_ audiovisual integration_
Getting Started with K210
Three-Minute Quick Start for K210

With the development of artificial intelligence, machine vision plays an increasingly important role in daily life and competitions. In visual recognition, compared to Raspberry Pi, Jeston Nano, OpenMV, and K210 have the characteristics of low cost and high performance, which can well meet our needs.
Introduction to K210

The K210, officially known as Kanjizhi K210, is a product independently developed by Jia’nan Technology that uses a RISC-V processor architecture. It features audiovisual integration, self-developed IP core and strong programmability, supporting multi-modal recognition of machine vision and machine hearing, and can be widely applied in scenarios such as smart homes, smart parks, smart energy consumption, and smart farms. The K210 uses TSMC’s ultra-low power 28nm advanced process, has a dual-core 64-bit processor, with a total computing power of up to 1 TOPS, built-in various hardware acceleration units (KPU, FPU, FFT, etc.), and possesses good power performance, stability, and reliability.
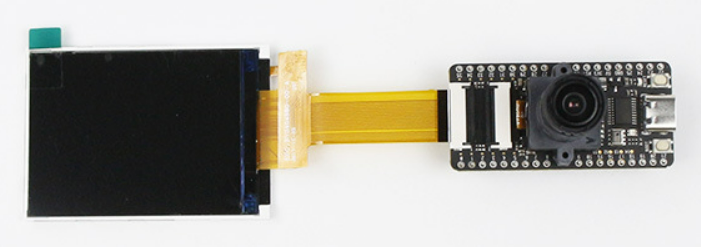
(K210 Device Diagram)
Additionally, this chip features a dual-core processor with an independent FPU, a 64-bit CPU width, 8M on-chip SRAM, and a 400M adjustable nominal frequency, supporting multiplication, division, and square root operations with double-precision FPU; it also has 128Mbit high-speed large-capacity Flash, high-speed USB-to-serial chip CH552, RGB LED, MEMS microphone, 24pin DVP camera interface, and 24pin 8bit MCU LCD interface, all designed on a 53.3mm by 25.4mm circuit board. Moreover, this product also supports MicroPython.
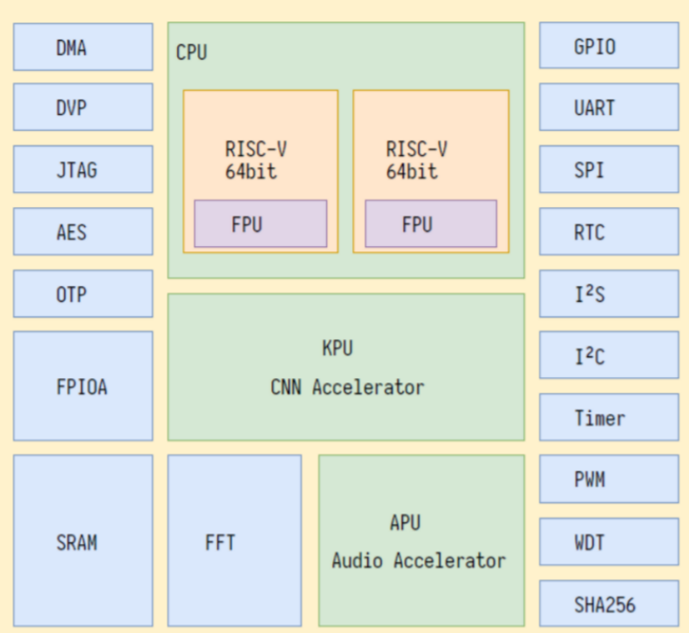
(K210 Principle Image)
For learning about K210, the most common project is the MaixPy project, which is a project that ports MicroPython to K210 (a 64-bit dual-core processor with hardware FPU, convolution accelerator, FT, Sha256 RISC-V CPU); MaixPy not only supports conventional MCU operations but also integrates hardware-accelerated AI machine vision and microphone array related algorithms.
Basic Learning of K210

1: Uses MicroPython script syntax, so some Python basics are required.
2: Compilation environment, download Maix IDE or set up a VSCode environment for compilation.
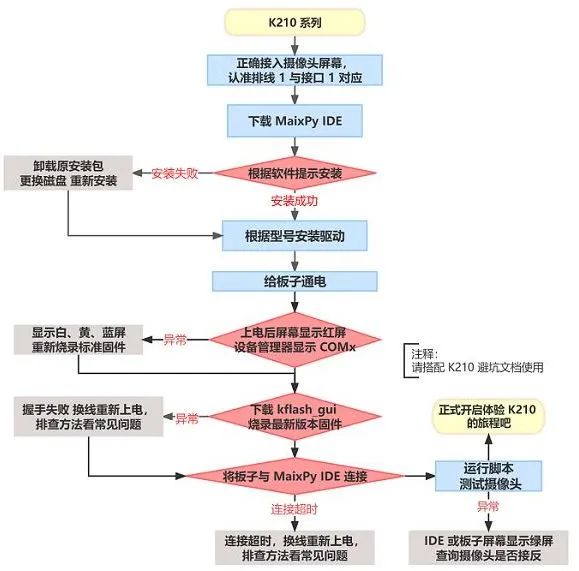
(Configuration Flowchart)
K210 Installation

Install Driver

Linux System
Linux does not require driver installation, as the system comes with it; use ls /dev/ttyUSB* to see the device number.

Windows System
2.1. Maix Bit (Old Version)
Windows download ch340 ch341 driver for installation, and then you can see the serial device in the device manager.
2.2. Maix Bit New Version with Microphone (Uses CH552)
The development board uses the CH552 chip to achieve USB-to-serial functionality, and there is no JTAG simulation function; Windows needs to install the FT2232 driver;
FT2232 driver download:
https://dl.sipeed.com/shareURL/MAIX/tools/ftdi_vcp_driver
GitHub Accelerator
When learning with K210, it is necessary to access GitHub for downloading some source code and software; a GitHub accelerator is essential for quick access to the GitHub website.
Download link for the accelerator:
steamcommunity302Ver.12.1.23–Dogfight360
1. First run as administrator.
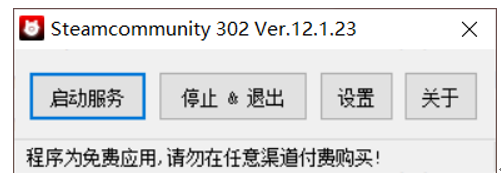
2. In the settings, select GitHub access and then save the settings.
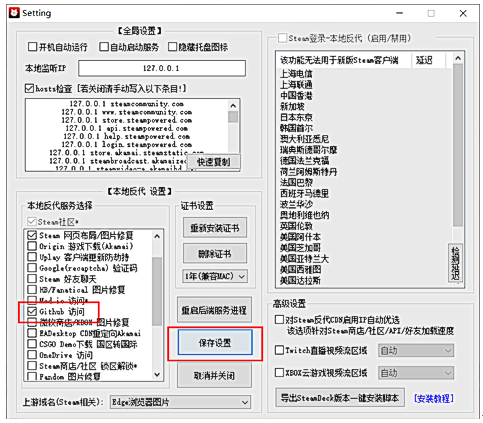
3. Finally, click to start the service to access the GitHub website.

Firmware Download

When you receive the board, it will come with the default firmware. However, different needs require different firmware.
1. Firmware
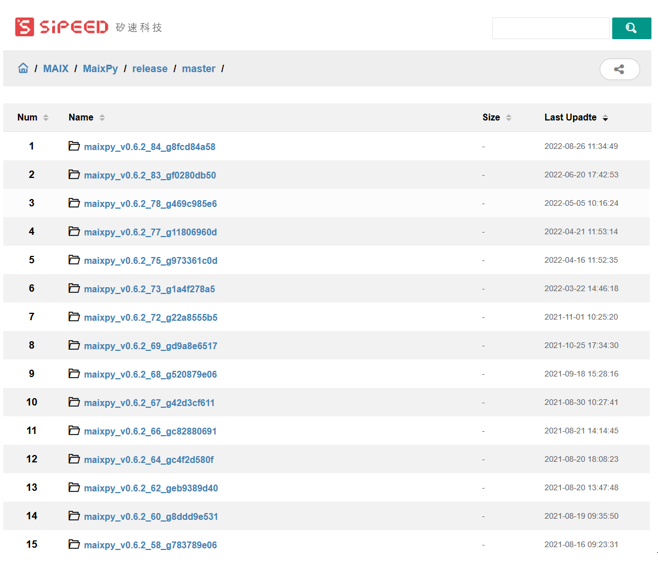
Firmware download website:
https://dl.sipeed.com/MAIX/MaixPy/release/master/
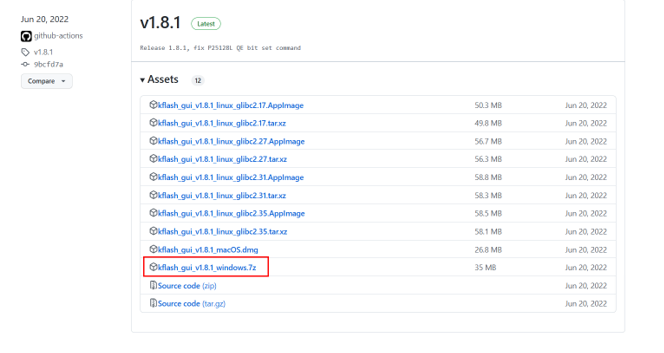
2. Install Firmware Software
For firmware installation, we need to use kflash_gui software, which requires accessing GitHub for download, and the previously mentioned accelerator can be used here.
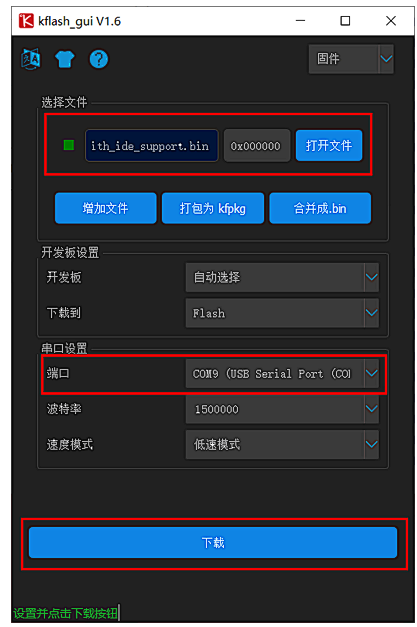
3. Install Firmware
At the beginning, the firmware selection should match the firmware number displayed on the screen.
Select the port with USB Serial Port, and other settings can remain default to download.
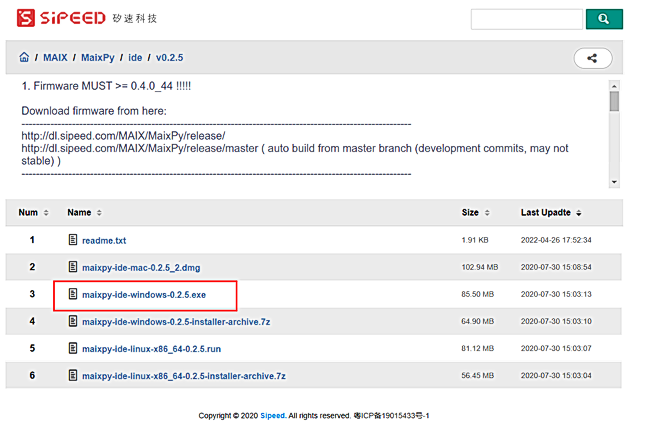
4. Download MaixPy IDE
Download link:
https://dl.sipeed.com/shareURL/MAIX/MaixPy/ide/v0.2.5
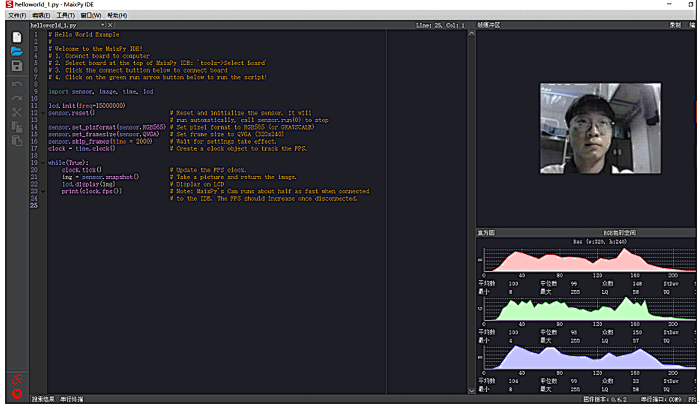
5. Test Run
Open MaixPy IDE, select the development board model Maixduino from the top toolbar. Then select the previously used serial port number and finally connect.

After a successful connection, the green button turns red. Test the board and camera with the provided code; if the image displays normally, the configuration is successful.
6. Knowledge of MicroPython

Introduction to MaixPy
MaixPy is developed and built on top of MicroPython, providing users with the final interface of MicroPython, requiring users to be familiar with the basic syntax of MicroPython.
MicroPython is a compact and efficient implementation of the Python 3 programming language, maintaining the syntax consistent with Python 3, but only implements a small part of the Python standard library and is optimized for use in resource-constrained environments such as MCUs and WIFI SOCs. Therefore, when using MicroPython, we need to understand its syntax.
If you have some programming experience in C/C++/Java (or any other language), it is recommended to refer to “Liao Xuefeng’s Python Tutorial”.
If you have no programming experience, it is recommended to refer to “Learn Python the Hard Way”.

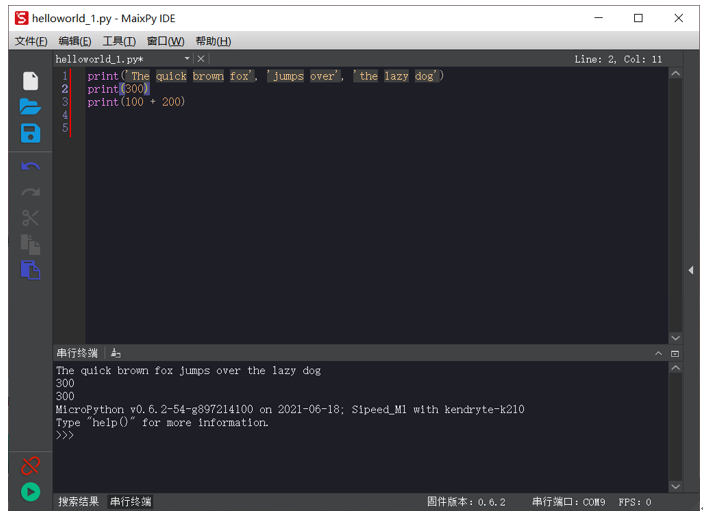
Learning MicroPython
You can learn MicroPython through the IDE and compile the code.

Basic Syntax to Master
1. Variables
2. List Variables
3. Tuple
4. Conditional Statements
5. Loops
6. Data Type Conversion
7. Functions
8. Slicing
9. Objects
10. Modules
7. MaixPy Storage System
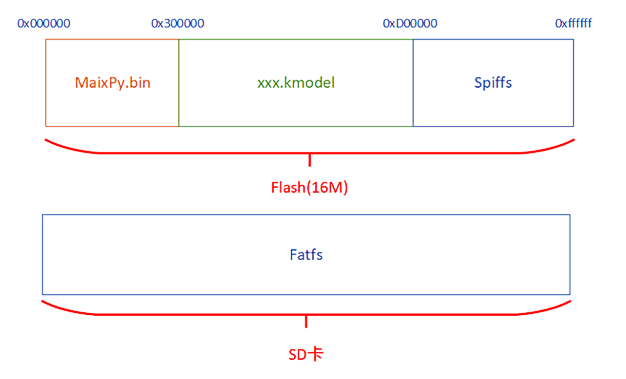
The storage media in MaixPy mainly consists of Flash and SD cards, divided into three areas: MaixPy.bin firmware area, xxx.kmodel model area, and file system area: The Flash uses spiffs (SPI Flash File System), and the SD card uses Fatfs (FAT file system).

MaixPy.bin Firmware Area
Used to store MaixPy.bin firmware, starting at 0x000000, because K210 will run the program starting from address 0x000000.

xxx.kmodel Model Area
Usually starts at 0x300000; the reason that model files are not burned into the Flash file system (which will be explained later) is as follows:
The memory available in the Flash file system is not large enough to hold large models, and larger models can be stored on the SD card.
Directly reading model files is faster than reading through the file system.
This area is not managed by a file system, and needs to operate files based on the burn starting address; for example, when the model is burned at 0x500000, the reading method is:


File System Area
Usually starts from 0xD00000; this area is managed by the file system, and we reserve the last 3MiB space of Flash for management by spiffs, and it also supports FAT32 (Fatfs) SD cards. These file systems provide interfaces that allow us to read and write files using file names without the need to operate using file starting addresses as in the model area. At the same time, they help us effectively manage the storage media, such as wear leveling (Flash has a wear lifespan, related knowledge can be searched independently), which can fully utilize the lifespan of Flash.

Using the MaixPy File System
Since the file systems of Flash and SD cards are different and the interfaces are inconsistent, operating different file systems requires calling different interfaces; at this time, the virtual file system (VFS) in MaixPy is used to solve this problem. The VFS can mount multiple different types of file systems and provide a unified interface for users to operate these file systems. When using these interfaces, users can ignore the differences between different file systems. These interfaces are implemented in the os module, and an example of usage is as follows:
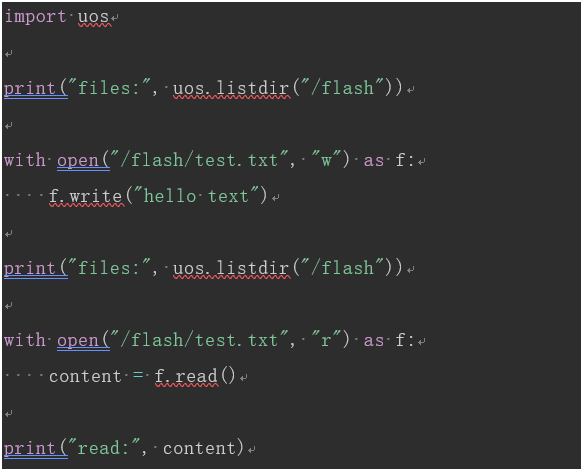
In the example above, the spiffs file system is automatically mounted to the /flash directory at startup; users only need to pass the “/flash” directory name as a parameter when using the os interface to access that file system.
8. Peripheral Modules
The peripherals on the board include: GPIO, I2C, PWM, SPI, Timer, UART, I2S, WDT, SP-MOD, Grove.
Other peripheral modules can also be expanded: Sipeed Microphone Array, Dual Module, MLX90640 Serial Infrared Lens, PWM Servos, ESP32ADC, OneWire.
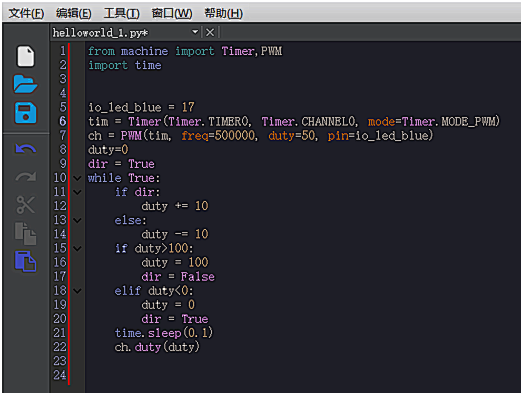
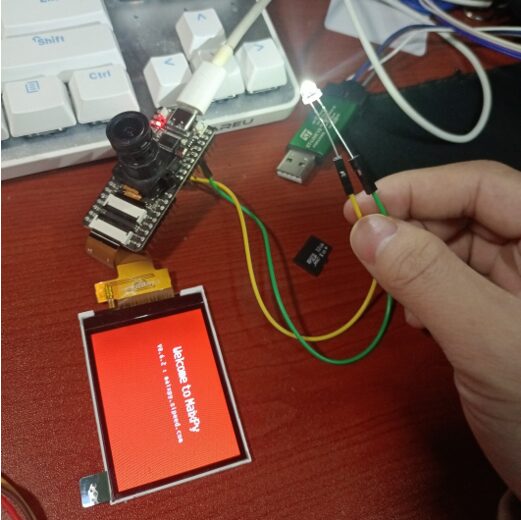
Example:
Using PWM to achieve a breathing light effect.
9. Other Functions
1. Traditional algorithm applications: image processing, audio processing, etc.
2. Neural network applications: deep neural networks, AI image processing, AI audio processing, model training, image recognition, etc.
Learning expansion, possible functions:


Basic Learning of K210

As a high-performance, low-cost machine vision processor, K210 has excellent applications in real competitions, enabling serial communication with microcontrollers to achieve good functional effects. For those who want to learn about vision, it is a good choice.
Scan to follow us

Text | Che Yangkai
Editor | Li Chenyang
Review | Zhao Yaqi, Wang Silin