In previous articles, we discussed the overall ecosystem of embedded Linux and provided a hands-on guide on how to compile firmware using Buildroot. This time, we will focus on how to use Buildroot to package custom software into the firmware. This article will first discuss the concept of the platform daemon and provide a simple example implemented in C/C++.
What is a Platform Daemon?
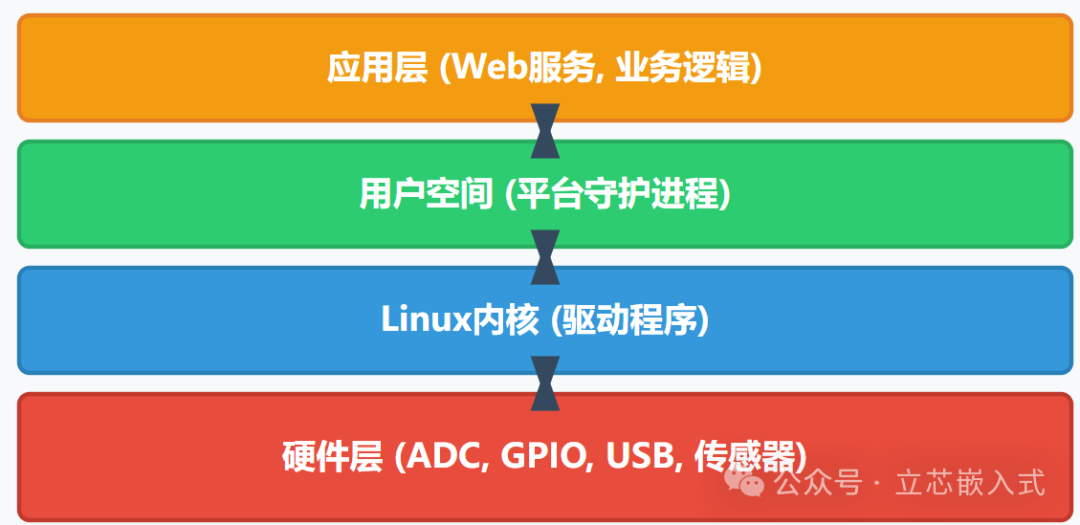
Previously, we mainly used the ready-made packages provided by Buildroot or some general open-source components. However, every embedded system has its own unique secrets, which are software tailored for specific hardware or platforms. This software typically takes over the tasks left by the kernel: the kernel provides drivers to interact with hardware peripherals, but the transfer of data between peripherals must be handled by user-space programs.
For example, suppose your system has an Analog-to-Digital Converter (ADC) that needs to send collected data via USB. The kernel allows user space to access the ADC and USB, but how to read data from the ADC and how to write data to USB must be coded by you. This type of software often relies heavily on specific hardware, and Buildroot cannot provide a universal solution.
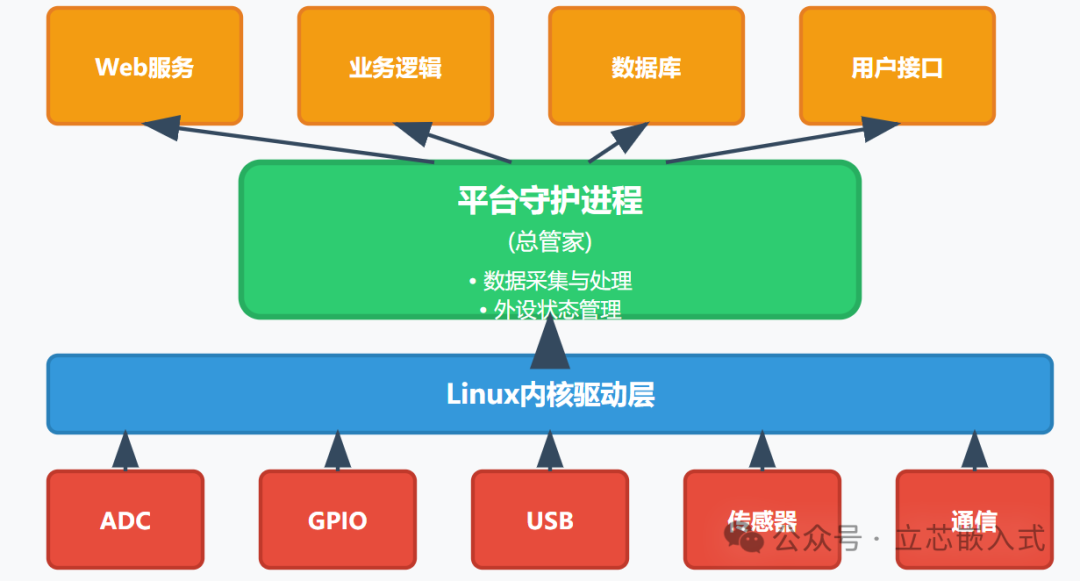
I refer to this type of software as a platform daemon. In simple terms, it is software specifically designed for a particular hardware platform (or a group of similar platforms) that manages the state of all peripherals, coordinating data flow like a general manager. For instance, it may need to know the sampling frequency of a certain ADC or the current state of a GPIO pin, and it may even include some driver code that should have been placed in the kernel. In short, the platform daemon is well-acquainted with the hardware and is responsible for managing the peripherals of the entire system.
In microcontroller development, this type of logic might be part of the firmware, running in a task of an RTOS. However, in Linux, we usually implement these functions in user space. The benefits are obvious: user-space code can be developed and debugged on a PC, making it easier to port to target hardware. Moreover, bugs in user space do not directly crash the entire system, leading to higher stability.
Implementing a GPIO Platform Daemon
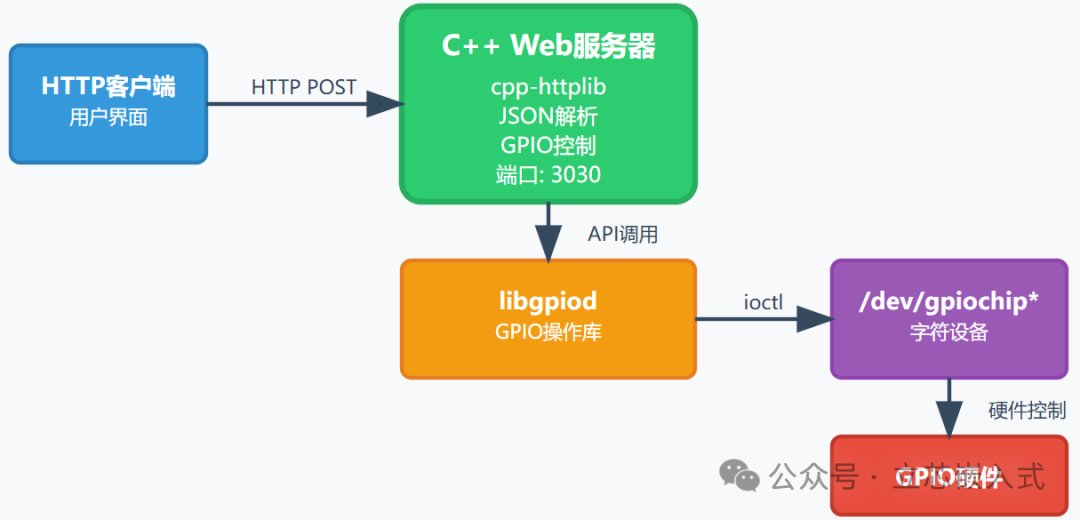
To help everyone understand more intuitively, I wrote a simple platform daemon in C/C++ that directly controls GPIO pins through an HTTP interface. In actual projects, there would typically be more abstractions, such as system modes or peripheral enable, but to simplify, we will first implement a basic version.
By the way, if you are not yet familiar with the application of C/C++ in embedded development, you might want to take a look at the documentation for libgpiod. C/C++ remains mainstream in the embedded field, with mature and stable code and extensive community support. Compared to some emerging languages, the toolchain for C/C++ is more universal in embedded development, and debugging tools are more complete.
GPIO Access in Linux
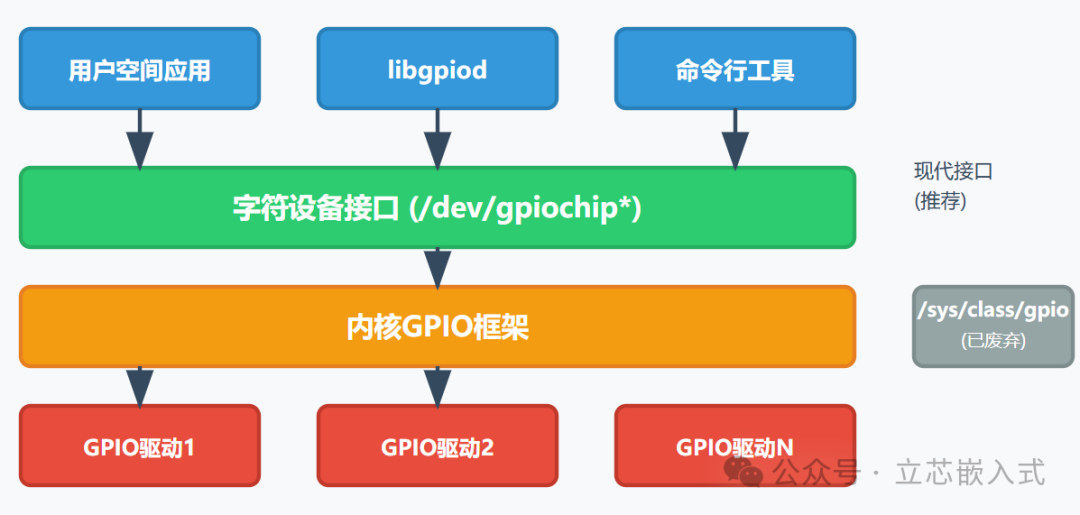
The Linux kernel provides a dedicated API for user-space programs to access GPIO directly. For those who want to delve deeper, you can refer to the kernel documentation, which details GPIO handling very thoroughly. Here’s a brief summary: Linux provides a character device for each GPIO controller in the /dev directory, with names depending on the device tree configuration. User space locates specific GPIO pins using the [controller name, pin number] format.
Through these character devices, user space can set the GPIO input/output mode, read high/low states, or control the high/low levels in output mode. The underlying implementation is done through ioctl commands, but we do not need to worry about these details. Buildroot has already integrated the libgpiod library, providing convenient command-line tools and C APIs for GPIO operations.
It is important to note that the previous /sys/class/gpio interface has been deprecated, and the kernel has gradually removed it since 2020. However, you may still see remnants of it in some older embedded systems. In this article, we are using the more modern character device API.
Operating GPIO
Here we have implemented a simple wrapper layer that maps GPIO operations to a REST API. Users can set GPIO to input or output mode through HTTP requests, and if in output mode, they can also set high/low levels. Below is the implementation of the core code:
#include <gpiod.h>
#include <string>
#include <map>
#include <stdexcept>
#include <iostream>

// Define GPIO command structure
struct GpioCmd {
    enum Mode { IN, OUT } mode;
    bool value; // Valid only in OUT mode
};

// Key-value pair for GPIO controller and pin
using GpioPath = std::pair<std::string, unsigned int>;

// Cache for GPIO controller and pin mappings
std::map<GpioPath, gpiod_chip*> active_pins;

// Modify GPIO state
int gpio_modify(const std::string& chip, unsigned int pin, const GpioCmd& cmd) {
    GpioPath key = {chip, pin};
    gpiod_chip* chipdev = nullptr;
    gpiod_line* line = nullptr;

    // Check if the GPIO controller is already cached
    auto it = active_pins.find(key);
    if (it != active_pins.end()) {
        chipdev = it->second;
    } else {
        // Open new GPIO controller
        chipdev = gpiod_chip_open(('/dev/' + chip).c_str());
        if (!chipdev) {
            throw std::runtime_error("Unable to open GPIO controller: " + chip);
        }
        active_pins[key] = chipdev;
    }

    // Get the specified pin
    line = gpiod_chip_get_line(chipdev, pin);
    if (!line) {
        throw std::runtime_error("Unable to get GPIO pin: " + std::to_string(pin));
    }

    // Set GPIO state based on command
    if (cmd.mode == GpioCmd::OUT) {
        if (gpiod_line_request_output(line, "http-gpio", cmd.value) < 0) {
            throw std::runtime_error("Failed to set output mode");
        }
    } else {
        if (gpiod_line_request_input(line, "http-gpio") < 0) {
            throw std::runtime_error("Failed to set input mode");
        }
    }

    return 0;
}
This code defines a GpioCmd structure to represent input/output commands and uses std::map to cache opened GPIO controller objects. The gpio_modify function sets the GPIO state based on the provided controller name, pin number, and command. libgpiod requires the file descriptor to remain open, so we cache the controller object in the map until the program exits.
Setting Up an Embedded Web Server
There are relatively few web framework options for C/C++, but for the lightweight needs of embedded scenarios, I chose cpp-httplib, a single-file C++ HTTP server library. It is simple to use, has few dependencies, and is very suitable for resource-constrained embedded systems.
Below is the core code for the web server:
#include <httplib.h>
#include <nlohmann/json.hpp>

using json = nlohmann::json;

void setup_server() {
    httplib::Server svr;

    // POST /gpio/<chip>/<pin>
    svr.Post("/gpio/([\w]+)/([\d]+)", [](const httplib::Request& req, httplib::Response& res) {
        try {
            auto chip = req.matches[1].str();
            auto pin = std::stoi(req.matches[2].str());
            auto body = json::parse(req.body);

            GpioCmd cmd;
            if (body.contains("In")) {
                cmd.mode = GpioCmd::IN;
            } else if (body.contains("Out")) {
                cmd.mode = GpioCmd::OUT;
                cmd.value = body["Out"]["value"].get<bool>();
            } else {
                res.status = 400;
                res.set_content("Invalid command", "text/plain");
                return;
            }

            gpio_modify(chip, pin, cmd);
            res.set_content("Success", "text/plain");
        } catch (const std::exception& e) {
            res.status = 500;
            res.set_content(e.what(), "text/plain");
        }
    });

    svr.listen("0.0.0.0", 3030);
}

int main() {
    setup_server();
    return 0;
}
This server listens for POST requests at /gpio/<controller name>/<pin number>, parses the JSON request body (using the nlohmann/json library), and then calls the gpio_modify function to handle GPIO operations. It returns “Success” on success and error messages on failure.
Testing Code
For convenience during development, I first tested on a PC using the gpio-mockup kernel module provided by Linux to simulate GPIO hardware. The command to load the module is as follows:
# modprobe gpio-mockup gpio_mockup_ranges=-1,32,-1,32
# ls -lh /dev/gpio*
crw------- 1 root root 254, 0 Apr  7 22:07 /dev/gpiochip0
crw------- 1 root root 254, 1 Apr  7 22:07 /dev/gpiochip1
Using httpie, I tested the daemon’s functionality as follows:
$ http POST localhost:3030/gpio/gpiochip0/2 Out:={value: true}
HTTP/1.1 200 OK
Content-Length: 7
Content-Type: text/plain

Success
This command sends JSON data to set pin 2 of gpiochip0 to output mode and high level. The framework automatically handles requests with format errors, and libgpiod ensures the correctness of GPIO operations.
Improvement Ideas
In actual projects, platform daemons typically require a configuration file, such as in INI or JSON format, placed in the /etc directory. The configuration file can specify the device name of the GPIO controller or define aliases for pins, allowing for more intuitive interfaces like POST /gpio/yellow-led.