From routers to smart speakers and industrial controllers, the flexibility of Linux and the prevalence of low-cost processors have made it a paradise for developers. Even more astonishing is that in China, you can currently buy a development board capable of running Linux for less than 100 yuan, which is practically a steal.
The goal of this series of articles is to take you from zero to mastering the essence of embedded Linux development step by step. We will start with selecting hardware, then cover how to compile system images from source code, delve into customizing the Linux kernel, designing a reliable firmware update mechanism, and even creating your own Linux development board. Whether you want to work on a DIY project or plan to use embedded Linux in your job, this series will make it easy for you to get started. However, it is best if you have some basic knowledge of Linux command line, understand the basic components of embedded systems (such as processors, flash memory, peripherals), and have enough time to tinker and experiment.
Next, we will start with high-level concepts to clarify the overall framework of embedded Linux, avoiding confusion when diving into the details.
The Essence of Embedded Linux
If you have worked with microcontrollers, such as STM32 or AVR, you may be accustomed to the all-in-one chips: buy a chip that comes with built-in flash memory, RAM, processor core, and a bunch of peripherals like UART, SPI, and possibly Bluetooth or USB interfaces. When writing code, you directly use the manufacturer’s development tools, and the code runs on bare metal without an operating system to complicate things. These chips are usually quite user-friendly, with packages suitable for hand soldering, such as SOIC or QFP.
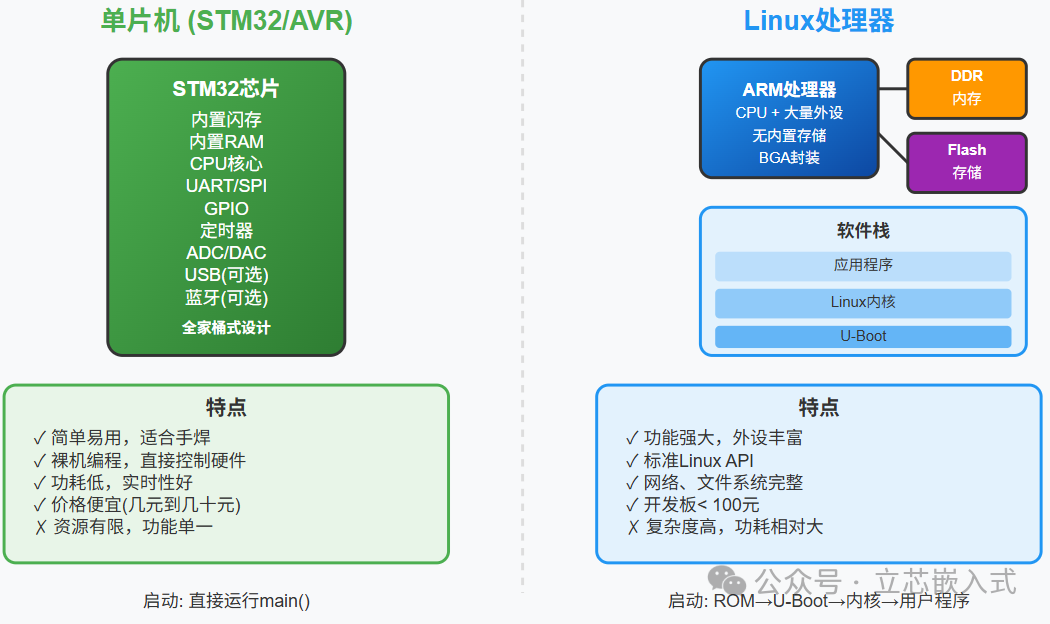
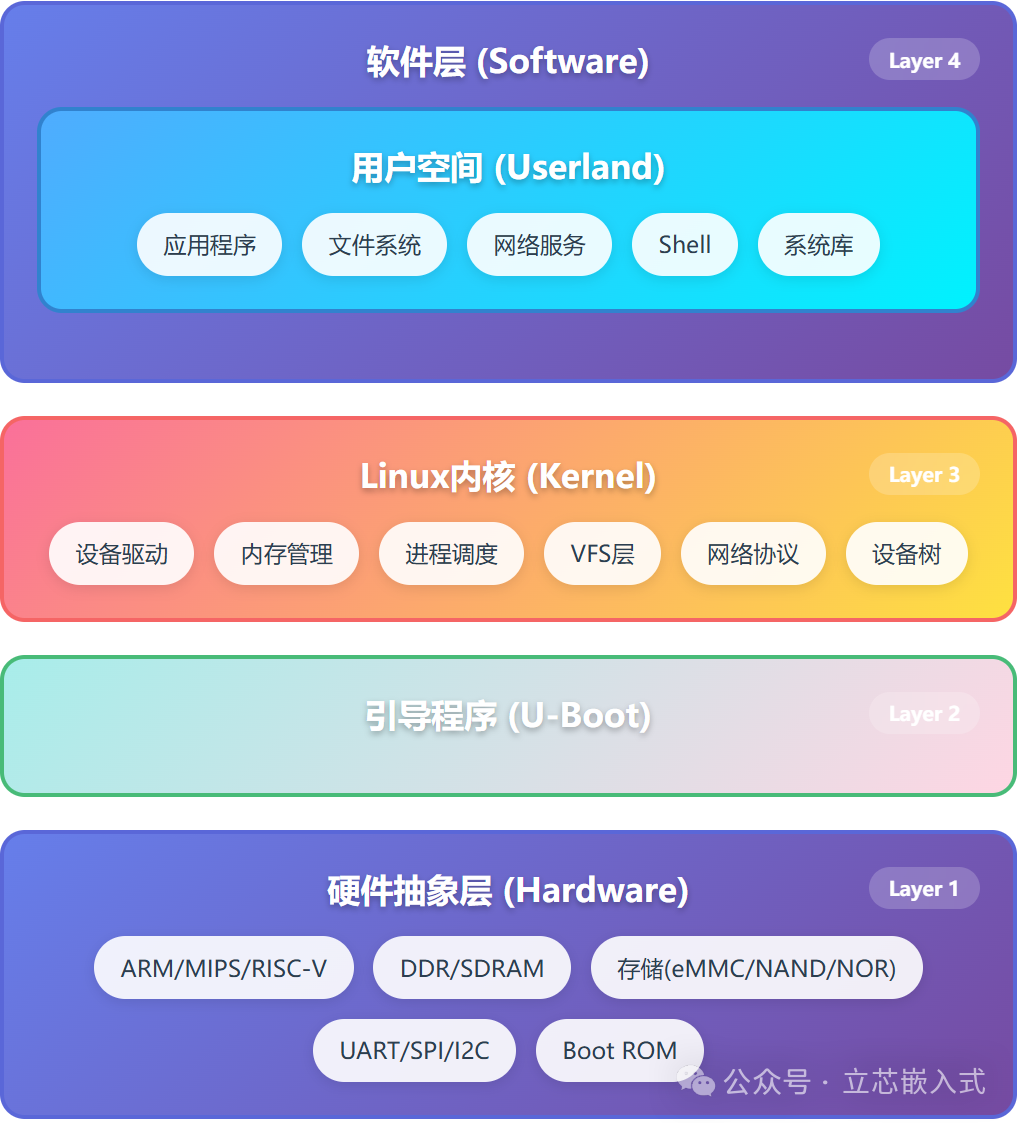
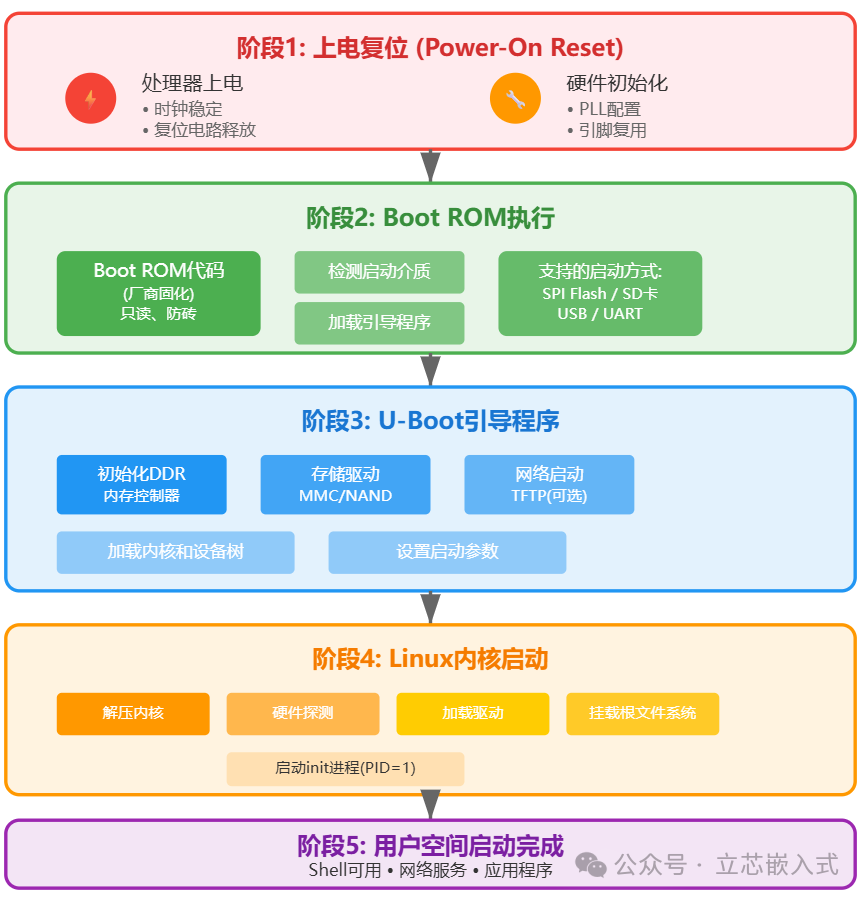
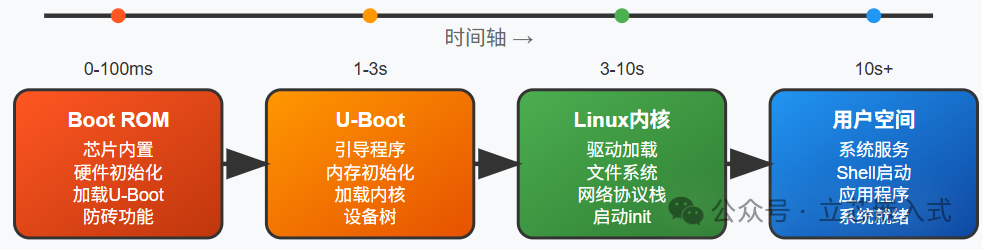
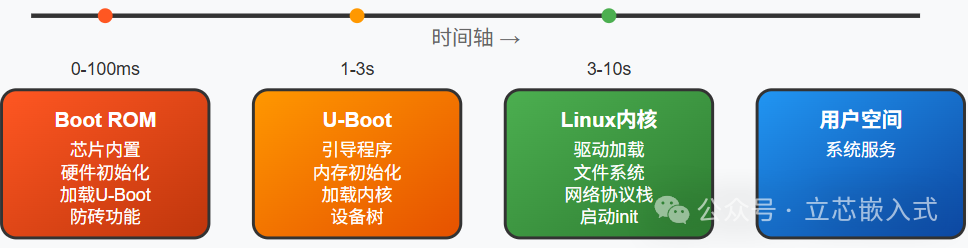
However, Linux processors (MPUs) are quite different. These processors typically integrate a large number of peripherals, many of which you may not have heard of, such as MIPI interfaces and CAN buses. But they usually do not come with built-in RAM and have no storage space. The boot process is also more complex: there is a Boot ROM inside the processor that is responsible for loading your bootloader. The bootloader then loads the Linux kernel, initializes the peripherals, and finally starts the user program. Once the entire environment is up and running, it is almost indistinguishable from desktop Linux: the same APIs, the same file systems, and the same network protocols. Your application code can almost be directly transferred from a PC to run on the embedded device.
The entire system image can be as small as 4MB, but the key point is that the software components of embedded Linux are almost identical to those of desktop Linux. The Linux kernel provides a powerful hardware abstraction layer, and your main task is to adapt the bootloader and kernel to your hardware.
Components of Embedded Linux
The embedded Linux system consists of several major modules, and the choice of each module will profoundly affect your design. Let’s break them down one by one.
Processor
The CPU is the core of the system, directly determining performance and functionality. Most inexpensive embedded Linux devices use ARM or MIPS cores, and ARM currently dominates the market. However, the dark horse RISC-V is also worth paying attention to; it is an open-source instruction set architecture that, although not fully mature yet, has already attracted the attention of many manufacturers.
Similar to microcontrollers, processor manufacturers will pack various peripherals into the chip, such as USB, SPI, and Ethernet interfaces. These peripherals are usually controlled through memory-mapped registers, and manufacturers often take shortcuts by copying peripheral IP from old chips to new ones or adding a few more of the same type of peripherals to enhance performance.
Memory
Linux processors generally do not come with built-in RAM; memory must be provided separately. Low-end devices commonly use SDRAM, while higher-end ones use DDR, DDR2, or even DDR3. DDR4 is still rare but will eventually become mainstream. The memory controller module is either initialized by the manufacturer’s boot code or handled by the first stage of the bootloader.
Some modular development boards (like the Raspberry Pi) have already integrated memory, saving you the trouble of designing the board. However, if you are a DIY enthusiast designing a circuit board from scratch, memory layout can be a significant pitfall. Memory signal lines have very high routing requirements, and a small mistake can lead to system instability. Therefore, in the next article, I will recommend some processors with built-in memory to help you avoid pitfalls.
Storage
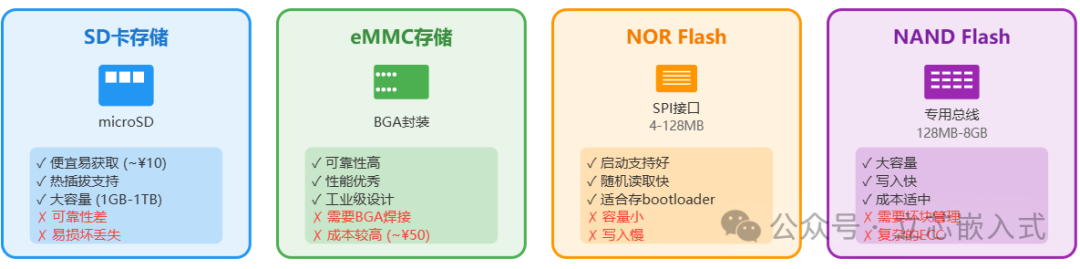 Storage is the non-volatile medium used to store code and data, and in embedded systems, it is almost always flash memory. Common types include SD cards, eMMC, and raw flash. Most people are familiar with SD cards, which come with a flash memory controller and are easy to operate, but their reliability is questionable; Raspberry Pi users have likely experienced SD card failures. eMMC is the embedded version of the SD card, integrating flash memory and controller, but is usually packaged in BGA, making manual soldering nearly impossible.
Raw flash comes in two types: NOR and NAND. NOR flash is slow to write, has a small capacity, and is inexpensive, making it suitable for storing boot programs; Boot ROM can usually read data directly from SPI NOR flash. NAND flash has a larger capacity, faster speeds, but is slightly more expensive, and some even support dedicated NAND buses. The downside of raw flash is that it is cumbersome to operate: you cannot write freely; you must first erase large areas, and the number of write cycles is limited (ranging from 1,000 to 100,000). Fortunately, the UBI subsystem in Linux can help you manage these issues, making raw flash easier to use.
Software
The software of embedded Linux includes the bootloader, kernel, and user space. The good news is that the Linux kernel has existing drivers for most peripherals, and the interfaces are quite uniform, unlike microcontrollers where you often have to write drivers yourself.
Bootloader
The bootloader is the first piece of code that engineers can control, tasked with loading and starting the kernel. Linux almost universally uses U-Boot, a versatile bootloader. It comes with simplified storage drivers and a few peripheral drivers, just enough to read the kernel into memory and run it.
Often, the bootloader that comes with the development board is sufficient; you just need to follow its rules. However, if you want to implement special functions, such as customizing the boot process, you will need to modify the bootloader. Don’t worry; U-Boot is essentially a program, and modifying it is not mysterious.
Boot ROM
The Boot ROM is a small piece of code built into the processor, provided by the manufacturer, with very simple functionality, usually only responsible for hospitality. The Boot ROM supports storage media such as SPI NOR flash or SD cards and can also communicate with a computer via USB. This means you can use USB to flash firmware onto a brand new device, making it a brick-proof tool. Different manufacturers have different names for it; for example, NXP calls it Download Mode, while Allwinner calls it FEL mode. When using it, specific PC-side tools are required, and the functionality varies by processor.
Kernel
The Linux kernel needs to be adapted to the specific processor and development board. The kernel source code contains a vast number of drivers, but only a small portion is typically used in embedded systems. The device tree is key to adaptation; it acts like a configuration file for drivers, informing the kernel how the hardware is connected. As long as the device tree is written correctly, the drivers can automatically recognize the hardware, saving a lot of trouble.
User Space
The user space software is almost identical to that of desktop Linux, including the file system, initialization system, and shell. The file system must be chosen based on the storage medium; for example, SD cards and eMMC support ext2/3/4 or f2fs, while raw flash requires JFFS2 or UBIFS. Personally, I prefer using squashfs with UBI partitions, which I will detail later.
The initialization system is responsible for managing user space programs; large systems may use systemd, while smaller systems typically use simple SysV scripts. The shell is your interactive window, usually accessed via UART serial port, and occasionally there may be display support. If you can see the shell prompt, it means your system has successfully booted!