
Author:Robert Lucian Chiriac, translated by Machine Heart
With nothing to do, we installed a Raspberry Pi in our beloved car, equipped it with a camera, designed a client, and completed a real-time license plate detection and recognition system.
How can we create a smart car system without changing the vehicle? For some time, the author Robert Lucian Chiriac has been thinking about giving cars the ability to detect and recognize objects. This idea is fascinating because we have seen the capabilities of Tesla, although we cannot buy one immediately (it must be mentioned that the Model 3 is becoming more attractive), but he had an idea to strive for this dream.
So, the author used a Raspberry Pi to achieve this, allowing real-time license plate detection in the car.

In the following content, we will introduce each step of the project and provide the GitHub project address, which only includes the client tool; other datasets and pre-trained models can be found at the end of the original blog.
https://github.com/RobertLucian/cortex-license-plate-reader-client
Now, let’s see how the author Robert Lucian Chiriac built a usable onboard detection and recognition system step by step.
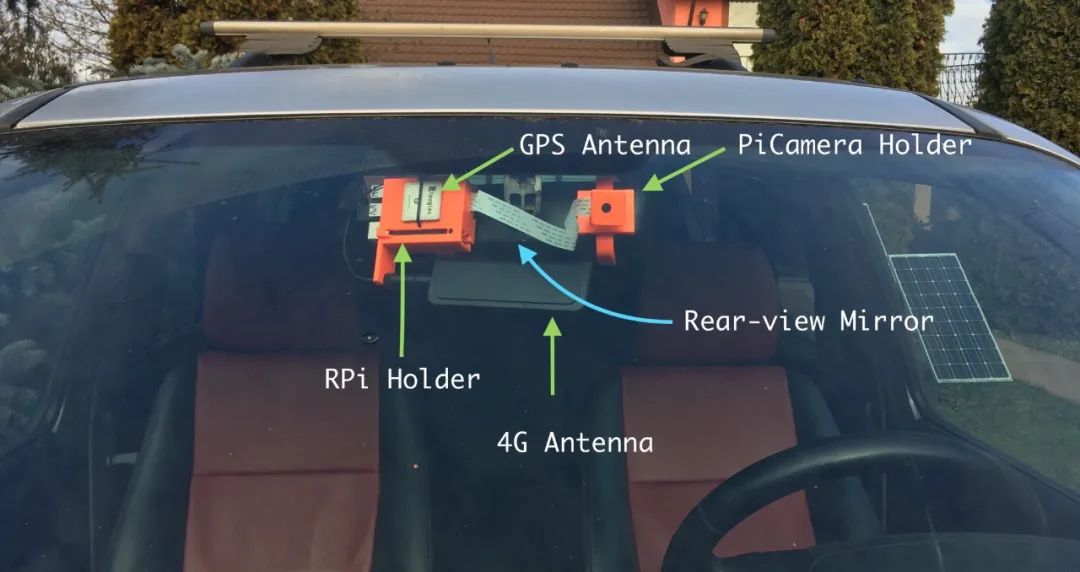
Here’s a picture of the finished product.
Step One:Define Project Scope
Before starting, the first question that came to my mind was what this system should be able to do. If I’ve learned anything in my life, it’s that taking things step by step is always the best strategy. Therefore, aside from basic visual tasks, I only need to clearly identify license plates while driving. This recognition process includes two steps:
-
Detect the license plate.
-
Recognize the text within each license plate bounding box.
I believe if I can accomplish these tasks, it will be much easier to handle other similar tasks (like determining collision risks, distances, etc.). I might even create a vector space to represent the surrounding environment—sounds cool, right?
Before determining these details, I knew I had to achieve:
-
A machine learning model that detects license plates using unlabeled images as input;
-
Some hardware. Simply put, I need a computer system connected to one or more cameras to call my model.
Let’s start with the first task—building the object detection model.
Step Two:Select the Right Model
After careful research, I decided to use these machine learning models:
-
YOLOv3 – This is one of the fastest models available, and its mAP is comparable to other SOTA models. We use this model to detect objects;
-
CRAFT text detector – We use it to detect text in images;
-
CRNN – Simply put, it is a recurrent convolutional neural network model. It must be sequential data to arrange the detected characters in the correct order;
How do these three models work together? The following describes the operational process:
-
First, the YOLOv3 model receives a frame from the camera and finds the license plate bounding boxes in each frame. It is not recommended to use very precise predicted bounding boxes—having the bounding boxes slightly larger than the actual detected objects is better. If they are too tight, it may affect the performance of subsequent processes;
-
The text detector receives the cropped license plates from YOLOv3. At this point, if the bounding box is too small, it is likely that part of the license plate text will be cropped, leading to poor prediction results. However, when the bounding box is enlarged, we can allow the CRAFT model to detect the positions of the letters, making the position of each letter very accurate;
-
Finally, we can pass the bounding boxes of each word from CRAFT to the CRNN model to predict the actual words.
With my basic model architecture sketch, I can start focusing on hardware.
Step Three:Design Hardware
When I realized I needed low-power hardware, I thought of my old love: Raspberry Pi. Because it has a dedicated camera, the Pi Camera, and enough computing power to preprocess each frame at a decent frame rate. The Pi Camera is the physical camera for the Raspberry Pi and has its mature and complete library.
To connect to the internet, I can use the EC25-E’s 4G access, which I used in a previous project with its GPS module; details can be found here:
Blog address: https://www.robertlucian.com/2018/08/29/mobile-network-access-rpi/
Then I will start designing the casing—I should be able to hang it on the rearview mirror of the car, so I ultimately designed a two-part support structure:
-
On the rearview mirror side, the Raspberry Pi + GPS module + 4G module will be retained. You can check my article about the EC25-E module for the GPS and 4G antennas I used;
-
On the other side, I used an arm with a ball joint to support the Pi Camera.
I will use my reliable Prusa i3 MK3S 3D printer to print these parts, and I also provide the 3D printing parameters at the end of the original article.

Figure 1: Shape of the Raspberry Pi + 4G/GPS casing

Figure 2:Arm supporting the Pi Camera with a ball joint
Figures 1 and 2 show what they look like when rendered. Note that the c-shaped bracket is detachable, so the accessories for the Raspberry Pi and the supports for the Pi Camera are not printed together with the bracket. They share a socket, and the bracket is plugged into it. If any reader wants to replicate this project, this is very useful. They only need to adjust the bracket on the rearview mirror. Currently, this base works very well on my car (Land Rover Freelander).

Figure 3:Side view of the Pi Camera support structure

Figure 4:Front view of the Pi Camera support structure and RPi base

Figure 5:Expected camera field of view

Figure 6:Close-up of the embedded system with built-in 4G/GPS module and Pi Camera
Clearly, these things take some time to model, and I need to do it several times to get a sturdy structure. The PETG material I used has a layer height of 200 microns. PETG works well at 80-90 degrees Celsius and has strong resistance to UV radiation—although not as good as ASA, it is still strong.
This was designed in SolidWorks, so all my SLDPRT/SLDASM files and all STLs and gcode can be found at the end of the original article. You can also use these to print your own version.
Step Four:Train the Model
Now that the hardware is sorted, it’s time to start training the model. Everyone should know that working while standing on the shoulders of giants is the best way. This is the essence of transfer learning—first learn with a very large dataset, then utilize the knowledge gained from it.
I found many pre-trained license plate models online, but not as many as I initially expected. However, I found one trained on 3600 license plate images. This training set is not large, but it is better than nothing. Moreover, it was trained based on the pre-trained model in Darknet, so I could use it directly.
Model address: https://github.com/ThorPham/License-plate-detection
Since I already had a recordable hardware system, I decided to drive around town for a few hours to collect new video frame data to fine-tune the previous model.
I used VOTT to annotate the frames containing license plates, eventually creating a small dataset of 534 images, all with labeled bounding boxes.
Dataset address: https://github.com/RobertLucian/license-plate-dataset
Then I found code that implements YOLOv3 with Keras and used it to train my dataset, then submitted my model to this repo so others could use it. I ultimately achieved an mAP of 90% on the test set, which is good considering my dataset is very small.
To find a suitable network for text recognition, I went through countless trials. Finally, I stumbled upon keras-ocr, which packages CRAFT and CRNN, is very flexible, and has pre-trained models, which is fantastic. I decided not to fine-tune the models and keep them as they are.
keras-ocr address: https://github.com/faustomorales/keras-ocr
Most importantly, predicting text with keras-ocr is very simple. It basically takes just a few lines of code. You can check the project homepage to see how it’s done.
Step Five:Deploy My License Plate Detection Model
There are mainly two methods for model deployment:
-
Perform all inference locally;
-
Perform inference in the cloud.
Both methods have their challenges. The first means having a central “brain” computer system, which is complex and expensive. The second faces challenges of latency and infrastructure, especially when using GPU for inference.
In my research, I stumbled upon an open-source project named cortex. It is a newcomer in the AI field, but as the next development direction for AI development tools, it undoubtedly makes sense.
Cortex project address: https://github.com/cortexlabs/cortex
Basically, cortex is a platform that deploys machine learning models as production web services. This means I can focus on my application while leaving the rest to cortex. It handles all the preparation on AWS, and all I need to do is write predictors using template models. Even better, I only need to write dozens of lines of code for each model.
Below is a terminal from the cortex runtime obtained from the GitHub repo. If this isn’t elegant and concise, I don’t know what to call it:

Since this computer vision system is not designed for autonomous driving, latency is less important to me, and I can solve this issue with cortex. If it were part of an autonomous driving system, then using services provided by cloud providers would not be a good idea, at least not right now.
Deploying ML models with cortex requires:
-
Defining a cortex.yaml file, which is our API configuration file. Each API will handle one type of task. I assigned the task of detecting license plate bounding boxes on a given frame to the yolov3 API, while the crnn API predicts license plate numbers with the help of the CRAFT text detector and CRNN;
-
Defining predictors for each API. Basically, what you need to do is define a specific class’s predict method in cortex to receive a payload (all the servy part has been resolved by the platform), which can predict results and return the predictions. It’s that simple!
Here is a classic predictor example for the iris dataset, but due to the length of the article, I won’t go into the specifics here. The project link contains methods to use these two APIs— all other resources for this project can be found at the end of this article.
# predictor.pyimport boto3
import pickle
labels = ["setosa", "versicolor", "virginica"]
class PythonPredictor:
    def __init__(self, config):
        s3 = boto3.client("s3")
        s3.download_file(config["bucket"], config["key"], "model.pkl")
        self.model = pickle.load(open("model.pkl", "rb"))    def predict(self, payload):
        measurements = [
            payload["sepal_length"],
            payload["sepal_width"],
            payload["petal_length"],
            payload["petal_width"],
        ]        label_id = self.model.predict([measurements])[0]
        return labels[label_id]
To make predictions, you just need to use curl like below:
curl http://***.amazonaws.com/iris-classifier \
    -X POST -H "Content-Type: application/json" \
    -d '{"sepal_length": 5.2, "sepal_width": 3.6, "petal_length": 1.4, "petal_width": 0.3}'
Then you will receive feedback like setosa, very simple!
Step Six:Develop the Client
With cortex helping me with deployment, I can start designing the client—this is the more challenging part.
I thought of the following architecture:
-
Collect frames from the Pi Camera at an acceptable resolution (800×450 or 480×270) at a frame rate of 30 FPS and push each frame into a public queue;
-
In a separate process, I will pull frames from the queue and distribute them to multiple workstations on different threads;
-
Each worker thread (or inference thread, as I call them) will make API requests to my cortex API. First, a request to my yolov3 API, and then, if any license plates are detected, another request will be sent with a batch of cropped license plates to my crnn API. The predicted license plate numbers will be returned in text format;
-
Each detected license plate (with or without recognized text) will be pushed to another queue, which will ultimately broadcast to the browser page. At the same time, the predicted license plate numbers will be pushed to another queue for later saving to disk in CSV format;
-
The broadcasting queue will receive a set of unordered frames. The consumer’s task is to put them into a very small buffer (the size of a few frames) and broadcast a new frame to the client every time to reorder. This consumer runs separately in another process, and it must try to keep the queue size fixed to a specified value to display frames at a consistent frame rate. Clearly, if the queue size decreases, the frame rate drops proportionally, and vice versa;
-
Meanwhile, another thread will run in the main process, pulling predictions and GPS data from another queue. When the client receives a termination signal, predictions, GPS data, and timestamps will also be saved to a CSV file.
The following diagram illustrates the relationship flow between the client and the cloud API provided by cortex.

Figure 7:Flowchart of the client based on the cloud API provided by cortex
In our case, the client is the Raspberry Pi, and the cloud API to which inference requests are sent is provided by cortex on AWS.
The source code for the client can also be found in its GitHub: https://github.com/robertlucian/cortex-licens-plate-reader-client
One challenge I had to overcome was the bandwidth of 4G. It’s best to minimize the bandwidth required for this application to reduce possible hang-ups or overuse of available data. I decided to have the Pi Camera use a very low resolution: 480×270 (we can use a small resolution here because the Pi Camera’s field of view is very narrow, so we can still easily recognize license plates).
However, even at this resolution, the JPEG size of each frame is about 100KB (0.8MBits). Multiply that by 30 frames per second gives 3000KB, or 24mb/s, which is still a lot without HTTP overhead.
Therefore, I used some tricks:
-
Reduce the width to 416 pixels, which is the size required by the YOLOv3 model, and the scale is obviously preserved;
-
Convert the image to grayscale;
-
Remove the top 45% of the image. The idea here is that license plates will not appear at the top of the frame because cars don’t fly, right? As far as I know, removing 45% of the image does not affect the predictor’s performance;
-
Convert the image back to JPEG, but at this time the quality is significantly lower.
The final frame size is about 7-10KB, which is excellent. This corresponds to 2.8Mb/s. However, considering all overhead like response times, it is about 3.5Mb/s. For the crnn API, cropped license plates do not require much space; even without compression, they are about 2-3KB each.
In summary, to run at 30FPS, the bandwidth required for the inference API is about 6Mb/s, a number I can accept.
The example above is real-time inference through cortex. I need about 20 GPU-equipped instances to run it smoothly. Depending on the latency of this group of GPUs, you may need more GPUs or fewer instances. The average latency from capturing frames to broadcasting them to the browser window is about 0.9 seconds, which is amazing considering the inference occurs very far away—I’m still amazed.
The text recognition part may not be the best, but it at least proves one point—it can be made more precise by increasing the video resolution, reducing the camera’s field of view, or fine-tuning.
As for the issue of needing too many GPUs, this can be solved through optimization. For example, using mixed precision/full half precision (FP16/BFP16) in the model. Generally, using mixed precision has a small impact on accuracy, so we didn’t make too many compromises.
In summary, if all optimizations are in place, reducing the number of GPUs from 20 to one is actually feasible. If properly optimized, even one GPU’s resources may not be fully utilized.
Original article address:https://towardsdatascience.com/i-built-a-diy-license-plate-reader-with-a-raspberry-pi-and-machine-learning-7e428d3c7401

Add Geek Assistant WeChat to join the Technical Exchange Group

Long press, scan, follow the public account

