Hardware design diagrams are available at the end for download.
STM32 is a series of 32-bit microcontrollers based on the ARM Cortex-M core, launched by STMicroelectronics. With high performance, low power consumption, and a rich set of peripherals, it is widely used in embedded system development.

Core Components
- STM32 Microcontroller (Main Control Board):
- Choose the cheapest option (like STM32F103, the blue pill), approximately 30~50 Yuan.
- Function: The “brain” that controls the drone’s flight, telling the motors how fast to spin and how to balance.
- Sensors (like the eyes and ears of a human):
- Gyroscope + Accelerometer (MPU6050, a small black block): about 10~20 Yuan, used to detect if the drone is tilted.
- Barometer (MS5611, optional): about 30~50 Yuan, measures altitude (like an altimeter).
- Compass (HMC5883L, optional): about 15 Yuan, determines direction (like a compass).
- Motors and Propellers:
- 4 brushless motors + 4 propellers, approximately 80~200 Yuan (like the blades and motors of a fan).
- Note: The larger the motor, the more expensive it is; use cheaper ones for small drones.
- Electronic Speed Controller (ESC):
- 4 ESCs (control motor speed), about 80~150 Yuan (like the remote control switch for the motors).
- Battery and Charger:
- Lithium battery (11.1V), about 50~100 Yuan, like a large power bank.
- Charger about 30~50 Yuan.
Other Small Parts
- Frame (made of carbon fiber rods + 3D printed plastic plates): about 20~50 Yuan (like a building block structure).
- Wires, Connectors, Screws: about 10~20 Yuan.
- Wireless Module (if you want remote control): about 50~100 Yuan (like the signal from a toy car remote).
Money-Saving Tips
- Parts that can be saved:
- Use existing flight control code (find open-source programs online, no need to write your own).
- Do not install a camera or GPS (these are expensive).
- DIY the frame using chopsticks and tape (but it can break easily).
- Parts that cannot be saved:
- Sensors and ESCs; too cheap ones may cause loss of control and crash (bang! to the ground).
Total Price Options
- Minimum Configuration: 200 Yuan (using second-hand parts, without high-end sensors).
- Stable Version: around 500 Yuan (new parts, capable of stable flight).
- Luxury Version: 800 Yuan+ (adding GPS, camera, like a DJI mini version).
PS: If you use STM32H743 for the drone’s flight control, you are a high-end player; this chip is much faster than the ordinary STM32F4/F7, suitable for more advanced flight control (like AI, visual obstacle avoidance, high-speed flight).
How Powerful is the STM32H743?
- Clock Speed 480MHz (several times faster than ordinary flight controls)
- Large Memory (1MB RAM), capable of running complex algorithms
- Supports Hardware Floating Point Operations (calculates math very quickly)
- Many Interfaces (can connect cameras, LiDAR, wireless video transmission)
Suitable for:
✅ High-speed racing drones
✅ Autonomous obstacle-avoiding drones
✅ AI drones with cameras
Imagine using STM32 as the “brain,” combined with motors and sensors, assembling it like building with LEGO.
Cheap version ≈ the price of 2 game cartridges, better version ≈ the price of 5 cartridges. If it crashes… save up some pocket money! 😉
Let’s get started
Imagine: your drone is like an “electronic bird”, and the flight control (STM32) is its “little brain”, responsible for telling it:
- “Don’t flip over!” (maintain balance)
- “Fly left! Fly right!” (follow remote control commands)
- “Don’t crash into walls!” (later can add obstacle avoidance)
1. What You Need (Like Building with LEGO) 🧩
| Part Function Analogy | ||
| STM32 Board (like F103 blue pill) | The brain of the drone | Like the “small computer” in a phone |
| Gyroscope (MPU6050) | Detects if the drone is tilted | Like knowing which way is up after spinning with your eyes closed |
| ESC | Controls motor speed | Like the throttle of an electric vehicle |
| Motor + Propeller | Makes the drone fly | Like the wings of a bird |
| Battery | Provides power | Like the drone’s “snack” |
| Remote Control + Receiver | Controls with a joystick | Like playing a game console |
(Cheaper than buying a toy drone, and you can brag that you made it yourself!)
2. How to Make It? (Like Assembling a Toy Car) 🔧
Step 1: “Glue” the Parts Together
- Connect the STM32, gyroscope, and ESC with wires (like building a small house with LEGO).
- Note: Don’t connect them the wrong way! Red to red, black to black, otherwise it will “set off fireworks” (smoke) 🎇.
Step 2: Install Software on the STM32
- Use a computer to “inject the soul” into the STM32 (actually just download the flight control program, like installing an app on a phone).
- Recommended to use Betaflight or ArduPilot (there are tutorials online, just follow along).
Step 3: Adjust Parameters (Like Balancing a Bicycle)
- Tell the flight control: “Motor 1 is here! Motor 2 is there!” (set motor layout).
- Adjust PID parameters (to keep the drone stable, like adjusting a bicycle to not fall).
Step 4: Test Flight! (Be Careful Not to Crash 💥)
- For the first flight, tie a string to it (or fly very low), otherwise it may directly “kiss the ground” (crash).
- If the drone is spinning wildly, the motor sequence may be wrong; just adjust it!
3. What to Do If It Fails? 🤔
- “My drone is flying around like it’s drunk!” → Check if the gyroscope is oriented correctly.
- “The motors won’t spin at all!” → Check if the ESC is connected correctly and if the battery is charged.
- “The flight control is smoking!” → Congratulations! You have unlocked the “electronic barbecue” achievement 🔥 (quickly cut the power and check).
To summarize:
- Flight Control = The brain of the drone (STM32 is this “brain”).
- Assembly is like building with LEGO, connecting wires, installing software, adjusting parameters.
- Be careful on the first flight, or you might become a “crash master” 😅.
Next, practical operation; first ensure you have a basic understanding of the following skills:
(1) Advanced Microcontroller Programming
- Familiar with HAL Library/CubeMX for configuring STM32H7
- Can debug DMA (high-speed data transfer)
- Can write multithreaded tasks (using FreeRTOS)
(2) Flight Control Algorithm Optimization
- Use hardware FPU to accelerate PID calculations
- Write faster sensor filtering (like second-order complementary filtering)
- Support higher frequency control loops (above 1kHz)
(3) Extended Features (Optional)
- Connect cameras for visual tracking (OpenMV/OAK-D)
- Use AI models for automatic obstacle avoidance (TensorFlow Lite)
- Add GPS/Optical Flow for position hold
Then, the step framework:
- Flash Bootloader: Use STM32CubeProgrammer to program
- Port Flight Control Firmware: For example, modify Betaflight/ArduPilot to support H743
- Optimize Sensor Drivers: SPI/DMA to accelerate IMU readings
- Adjust PID Parameters: Because the CPU is fast, it can run at higher frequencies
- Add Advanced Features: For example, use hardware acceleration for AI obstacle avoidance
Note:
If you are using STM32H743, it is quite powerful and more complex than F4, suitable for advanced users. It can create faster flight controls and smarter drones, requiring more knowledge of microcontrollers, but it will be very cool if you succeed!
 01
01
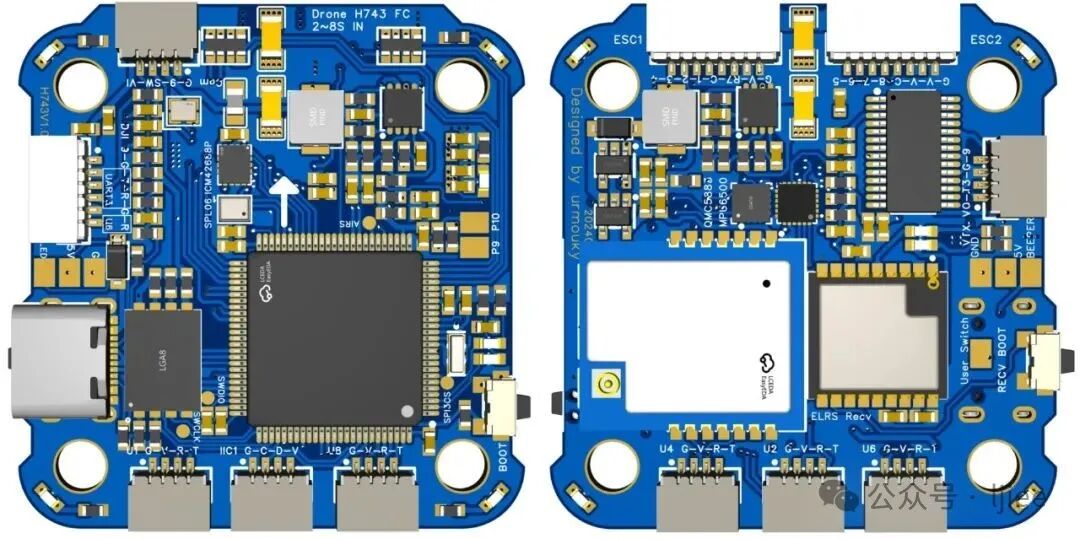
Main Features:
- Dual 3A Current BEC (@5V/9V)
- Integrated ELRS Receiver
- Dual Gyroscopes: ICM42688 + MPU6500
- Barometer: SPL-06
- Magnetometer: QMC5883L
- OSD Chip: AT7456E
- All resistors and capacitors are 0603
- Most wiring uses terminal blocks, with unified terminal block wiring sequence
- Up to 10 PWM outputs
- Supports direct plug-in for the sky end, pay attention to wiring sequence
 02
02
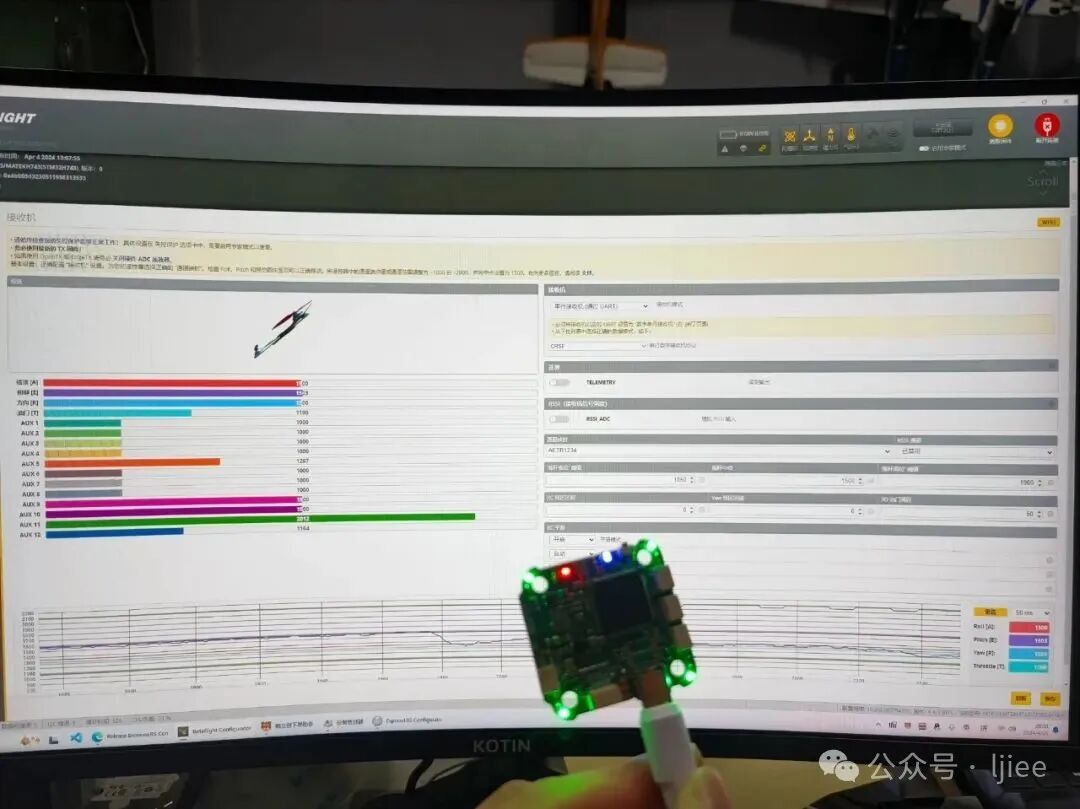
Testing:
- Betaflight works normally (bf firmware can be directly used with MatekH743; test items include MPU6500, ICM42688, OSD, ESC, BEC, QMC5883, SPL06, receiver)
- INAV works normally (INAV firmware is in the attachment, do not use MatekH743, testing is the same as above)
 03
03
Flight Control Firmware Flashing Method:
- Pre-install common drivers for tuning and flashing the racing drone flight control
- Download the firmware file for this flight control (INAV download the file in the attachment, BF download betaflight_urmoukyh743_20240616.config)
- After soldering the flight control, hold down the Boot button and connect to the computer via USB (note it is the flight control’s Boot, not the receiver’s)
- Open INAV or Betaflight to flash the corresponding firmware
- For BF firmware, after flashing, you need to open the CLI command and click to import from file, importing the betaflight_urmoukyh743_20240616.config below. If needed, enter save and press enter
- You can also use the SWD debugging interface to download your own flight control software.
Detailed Resource Description:
- UART1, UART2, UART4, UART8: directly exposed
- UART3: DJI sky end 6P connector
- UART6: Receiver serial port (when using other receivers, do not solder the ELRS module)
- UART7: ESC feedback
- IIC1: Connects to QMC5883L magnetometer, also exposes the interface
- IIC2: Connects to SPL06 barometer
- SPI1: MPU6500 (IMU1)
- SPI2: AT7456E (OSD chip)
- SPI3: Exposed debugging pads (convenient for introducing SPI magnetometer in future versions)
- SPI4: ICM42688P (IMU2)
- PWM1~8: 8 channels for ESC
- PWM9, PWM10: Two servo channels
- Reserved LED, Beeper pads
The conclusion: DIY flight control for personal drones is still somewhat complex for newcomers. Many bloggers on Bilibili have shared their experiences, and the purpose of writing this article is to inspire and demystify drone DIY. In fact, building a drone and flight control is not as difficult as imagined, just like playing with LEGO toys. The related knowledge and code involved can all be downloaded, as it is open source! Alright, let’s communicate here; feel free to message me with any questions.
 Scan to follow for more exciting content