1.1 VMProtect Software Company
VMProtect Software Company was founded in 2000 and is headquartered in Yekaterinburg, Russia. The company’s software protection software, VMProtect (currently updated to version 3.x, hereinafter referred to as VMP), can be considered the holy grail in the field of software cracking. Over the years, countless reverse engineers have tried to unveil the mystery of VMP.
VMP’s key features include virtualization, obfuscation, and anti-debugging. The main focus of this article is on VMP’s virtualization mechanism, which allows VMP to run protected code within a built-in virtual machine to prevent decompilation and cracking.
1.2 VMProtect Virtualization Principle
The VMP code virtual machine is a stack machine, meaning that the code virtual machine of VMP operates in the stack space of the protected program. The instruction set of a stack-based virtual machine primarily operates on the top elements of the stack. For example, the Java Virtual Machine (JVM) is a typical stack-based virtual machine. In contrast, there is also a register-based virtual machine, where the instruction operands are stored in virtual registers, and the instruction set operates directly on the registers. Lua’s virtual machine (called Lua Virtual Machine, LVM) is register-based.
The stack-based VMP virtual machine requires more instructions to maintain stack push and pop operations, which indirectly leads to poorer execution efficiency. VMP can cause the program to become bloated and slow down, but the inflation of the protected program’s code can also create many challenges for reverse engineers.
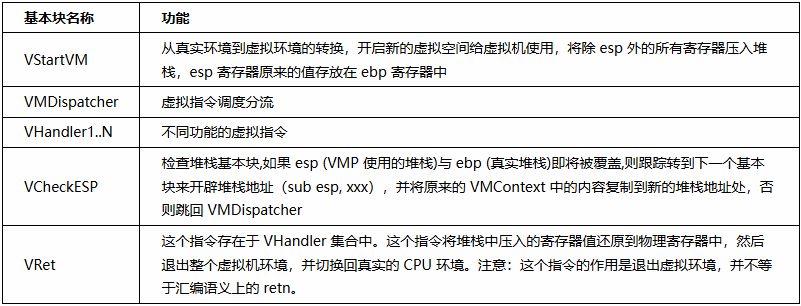
(Table from “Encryption and Decryption (4th Edition)”)
VMP virtualization process:
1. VMP converts the protected code into a virtual machine instruction set (bytecode) and corresponds each virtual instruction to a handler. Each handler is essentially a small interpreter. These handlers are not just simple addresses but contain specific processing logic code. During the code conversion process, VMP also obfuscates and encrypts the instructions to increase the difficulty of reverse engineering.
2. VMP also virtualizes some system objects like files and the registry, maintaining virtual system resources within the virtual machine, so that system interactions within the virtual machine do not affect the real system. VMP typically combines various anti-debugging techniques, such as self-modifying code, anti-tracing, and anti-simulation execution, to increase debugging difficulty.
3. When the protected program runs, it first executes the inserted VStartVM code. (VStartVM is typically inserted into the protected code as the program entry point.) VStartVM is responsible for transitioning the program from the real environment to the virtual environment and initializing the context of the virtual machine, saving the register states from the real environment, and preparing the stack space required by the virtual machine. Additionally, VStartVM hooks some critical system APIs to intercept system calls and simulate execution within the virtual environment. VMP allows specific instructions to be inserted in the protected code block to actively switch back to the real environment, such as calling system APIs that have not been hooked.
4. VMDispatcher is responsible for reading virtual instructions (bytecode) from the virtual instruction stream, then decoding to determine the corresponding handler. The decoded virtual instructions do not directly execute real instructions but call the corresponding handler to simulate execution. These handlers process virtual machine instructions rather than direct raw instructions.
5. VMP uses two stacks: a virtual stack for internal use by the virtual machine and a real stack which is the original stack of the thread. To avoid conflicts between the two, VMP monitors the stack pointer esp. When a virtual instruction needs to modify real registers, the values of the real registers are temporarily stored in the real stack, and the values of the virtual registers are applied to the real registers. If esp and ebp are about to conflict, VMP saves the current virtual machine context to the real stack and allocates new virtual stack space to ensure the virtual machine runs normally. For multi-threaded programs, VMP maintains an independent virtual machine context (VMContext) for each thread, isolating the virtual machines of different threads from each other.
6. After the virtual instruction execution is complete, the virtual machine does not immediately exit the virtual environment. It only exits the virtual environment and restores the state in the real environment when the entire protected code block has finished executing or an exception occurs. Upon exiting the virtual environment, the virtual machine restores the original register states and ensures that all context environments are correctly restored. However, before exiting, it also needs to write back the values of the virtual registers to the real registers and unhook the previously set system API hooks.
2.1 Test Environment
System Environment: Windows 7 Professional (32-bit) IDE: Dev-C++ 5.7.1 Packing Program: VMProtect 3.4
2.2 Test Program Source Code
#include<bits/stdc++.h>
#include<windows.h>
using namespace std;

int main()
{
    printf("Please enter your pwd >> ");
    string s;
    cin>>s;
    if(s=="123456")
        printf("successful!\n");
    else
        printf("failed!\n");
    system("pause");
    return 0;
}
Compiled to<span>CrackMe.exe.</span>
2.3 Test Target
In the case of entering an incorrect password, the program can still print “successful!” (The test demonstration is from Bilibili user Rairn, with a video link provided at the end of the article)
Three

VMP Compile Test Program
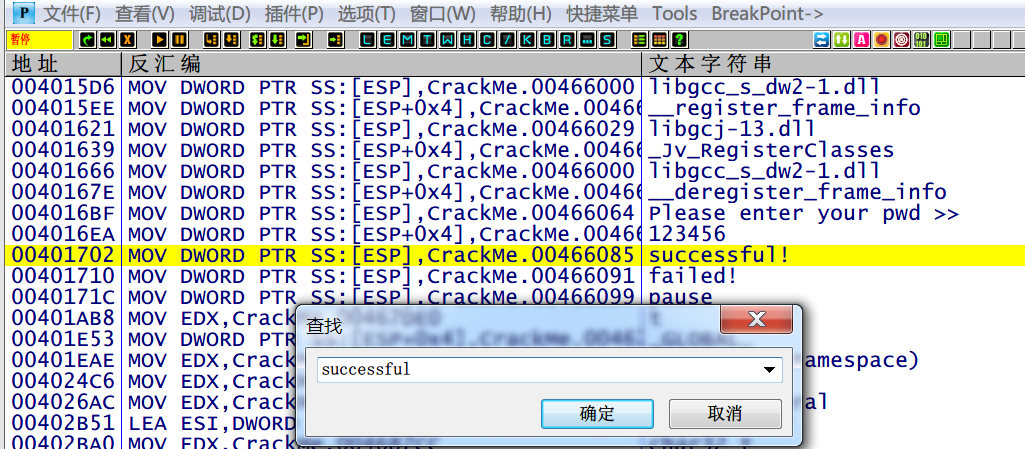
Use OD to load CrackMe.exe, find a key and easily identifiable location, and encrypt it with VMP; in the OD disassembly window, right-click and select<span>Chinese Search Engine -> Intelligent Search</span>, search for strings in the source code, such as<span>successful.</span>
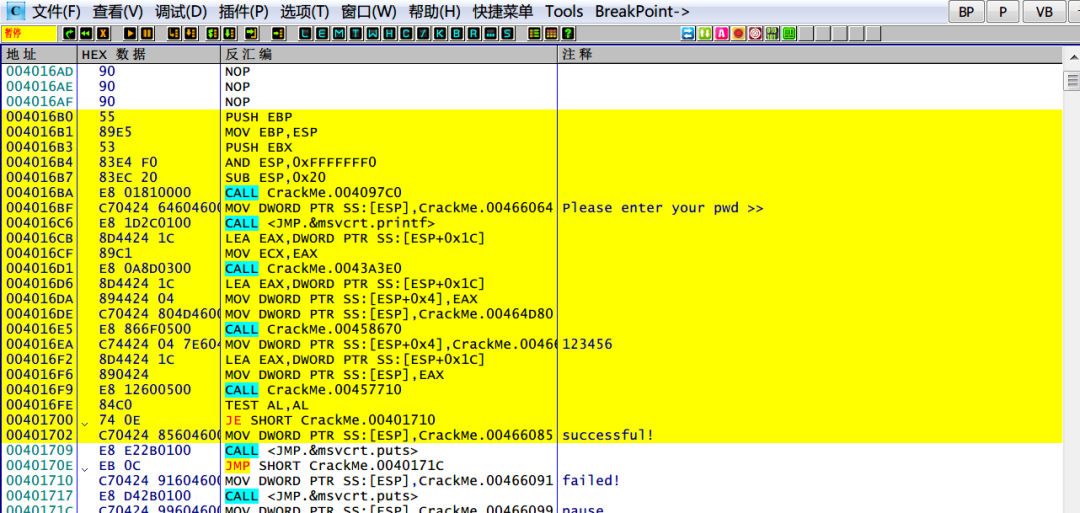
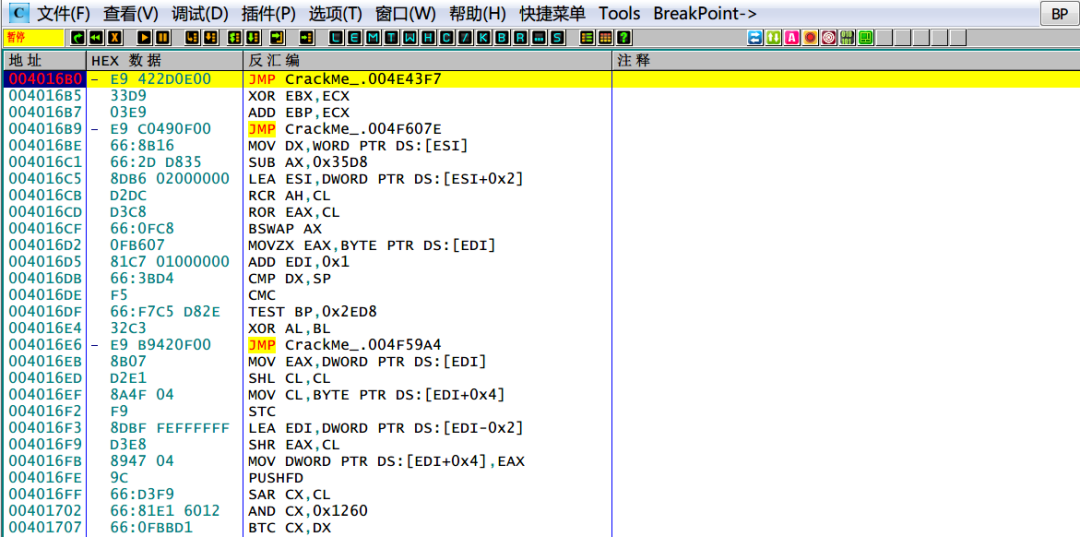
Click on the string<span>successful</span>corresponding address<span>0x00401702</span>, analyze the disassembly code, and set the packing location to<span>0x004016B0</span>, which appears to be the start of a function. Copy<span>004016B0 55 PUSH EBP</span>to the clipboard and note it down in Notepad or similar tool.
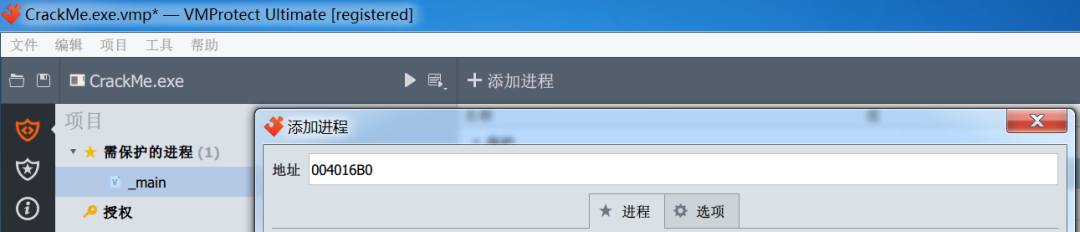
Open VMProtect 3.4, click<span>Process to Protect -> Add Process</span>, then copy the address<span>004016B0</span>into it, and select<span>Super (Compile + Virtual).</span>
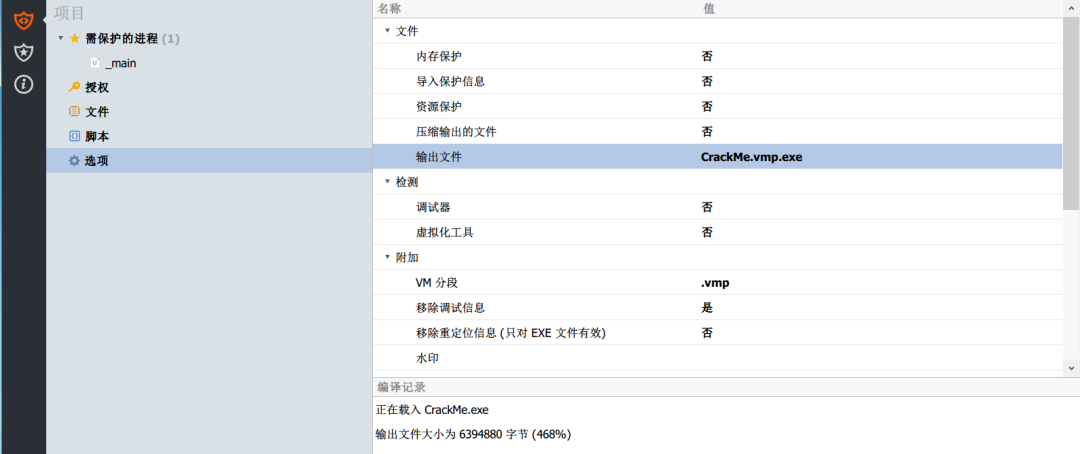
Click<span>Options</span>, select “Yes” to<span>Remove Debug Information</span>, and “No” for the rest, as this test focuses solely on virtual machine protection and does not study other content for now.
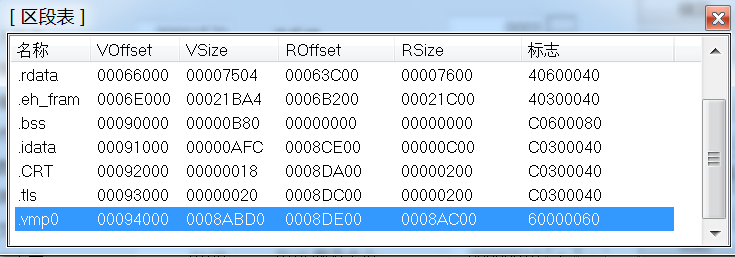
Then click<span>Compile</span>to obtain the packed file<span>CrackMe.vmp.exe.</span>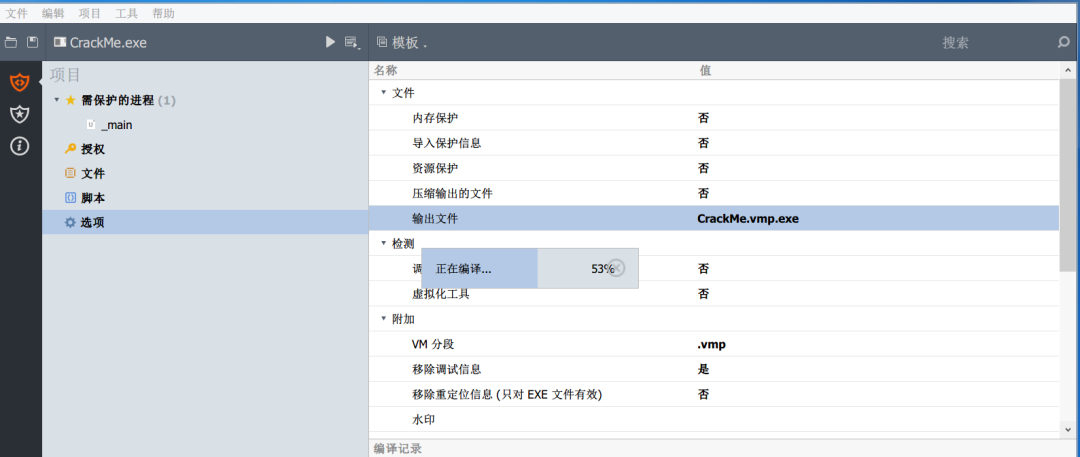 Use LordPE to view,
<span>CrackMe.vmp.exe</span>now has an additional section<span>.vmp0.</span>
Four

Debugging and Script Writing
4.1 Debugging Preparation
Load<span>CrackMe.vmp.exe</span>with OD and prepare the following:
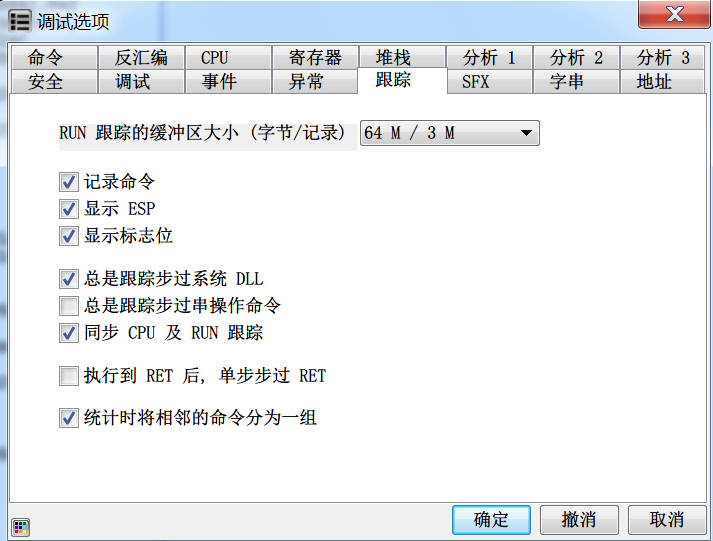
◆ Set in the debugging options, as the records need to track information.
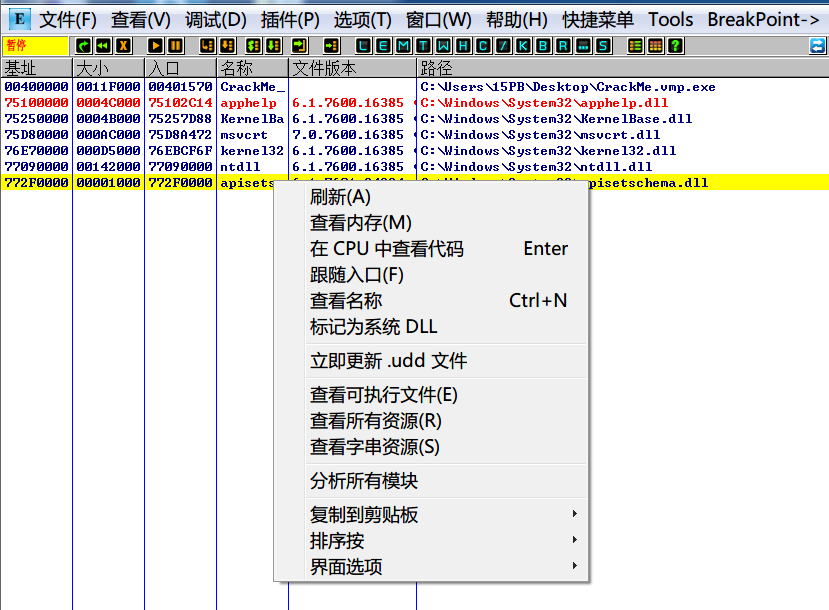
◆ Click the menu bar’s<span>E</span>, mark the displayed DLL as a system DLL to avoid being recorded during debugging tracing.
4.2 Debugging Process
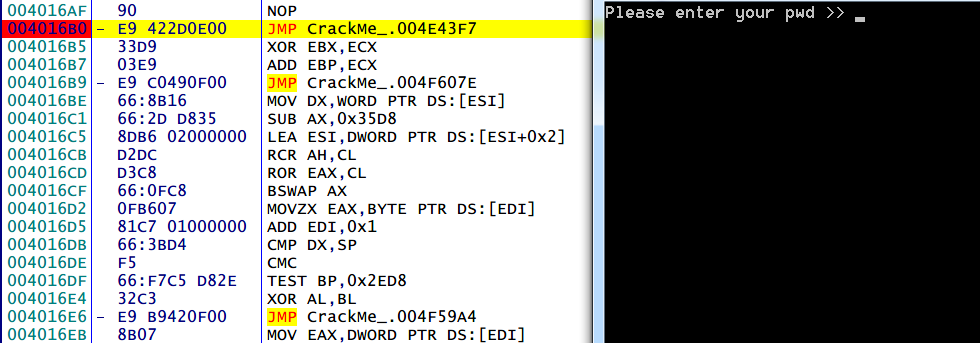
Press Ctrl + g to go to the previously noted address<span>004016B0</span>, set a breakpoint here with F2 and run. You can see that compared to the pre-packed situation, the disassembly code has changed significantly.
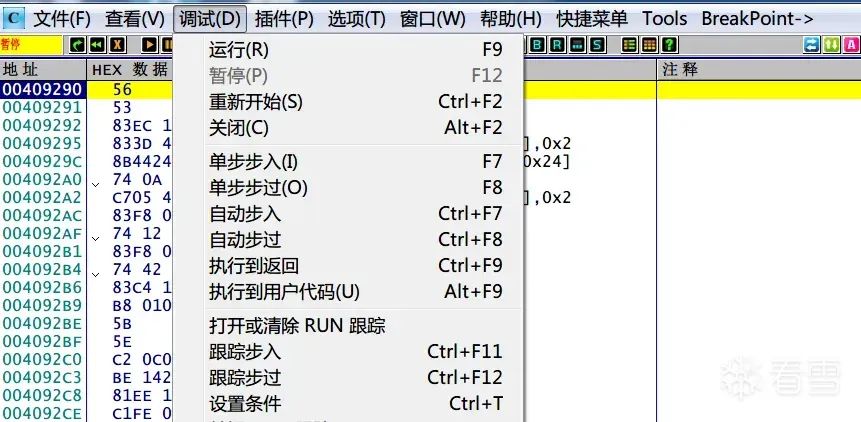
Press Ctrl + F11 to step over, and the program also prints out.
4.3 Trace Records
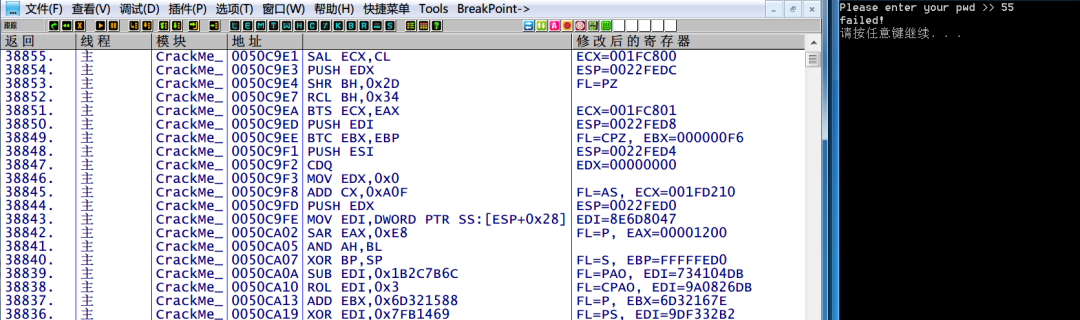
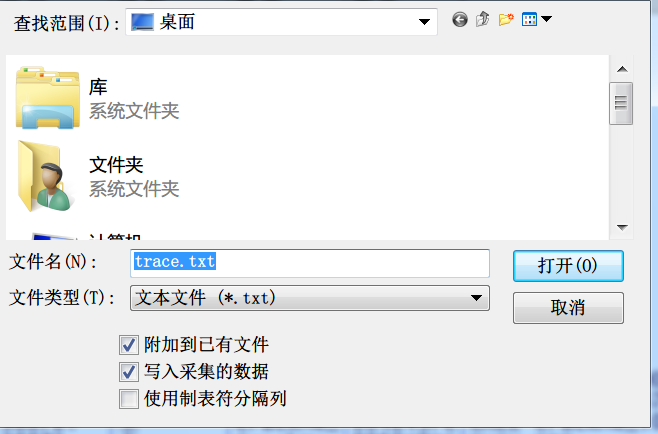
Enter any password in the program, for example<span>55</span>, then open the OD menu bar and select<span>......</span>, right-click to choose<span>Record to File</span>, save the debugging trace results as<span>trace.txt</span>, and remember to check “Append to existing file” and “Write collected data”.
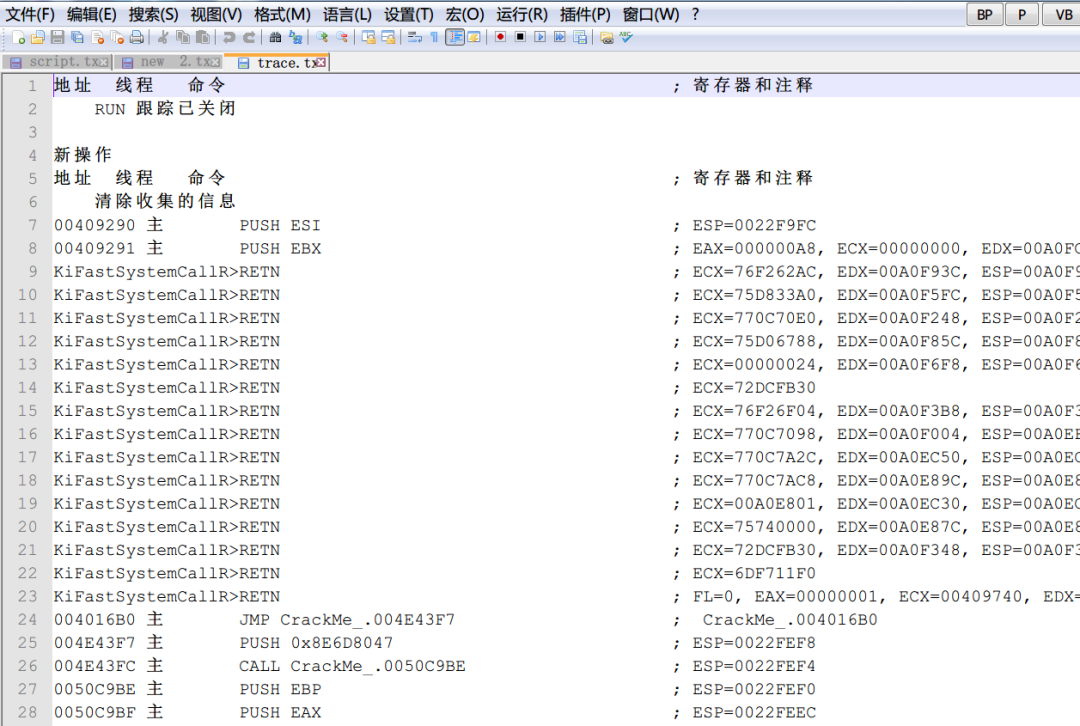
View<span>trace.txt.</span>
Search for<span>00000040</span>in<span>trace.txt</span>, because the hexadecimal<span>00000040</span>in binary is<span>0100 0000</span>, which can be used to represent the ZF flag. In x86 architecture, the position of the ZF flag corresponds exactly to the 6th bit of the EFLAGS register (counting from bit 0). That is, after executing certain instructions, if the result is zero, the ZF flag will be set to 1.
VMP uses the following formula to calculate the value of ZF:
Where 0x40 is the mask value for the ZF flag. When the 6th bit of the eflags register is 1, the result of the and operation will also be 1, indicating that the ZF flag is 1. Conversely, when the 6th bit is 0, the result of the and operation will be 0, indicating that the ZF flag is 0. This allows for very efficient determination of the state of the ZF flag without complex calculations.
This brute force test compares whether the input password is the correct one, so the code logic likely relies on CMP, JZ (jump if zero, ZF must be 1) or JE (jump if equal, ZF must be 1).
The instructions affected by this flag are exactly ZF, so you need to search for<span>00000040</span>.
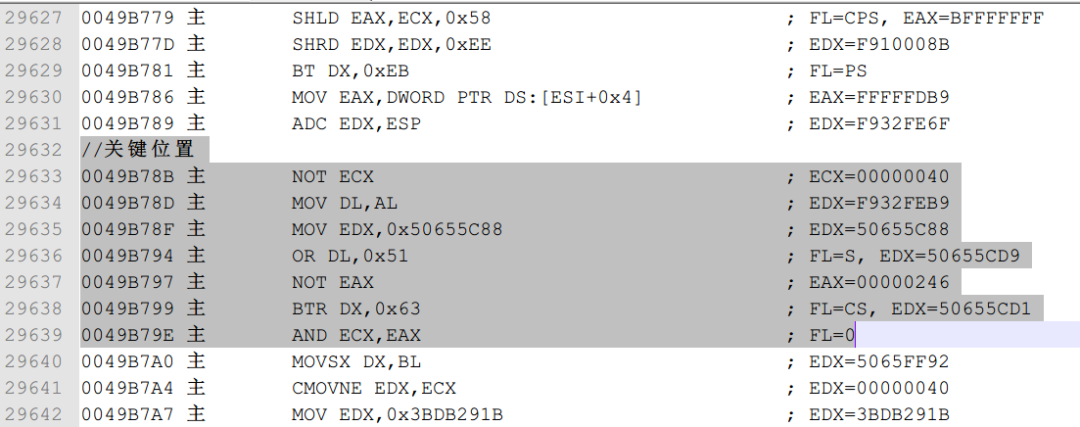
After finding<span>00000040</span>, look nearby for assembly instructions with characteristics similar to the following.
not a
not b
and a,b
// These three lines of code usually do not appear consecutively, with useless code in between
// a, b are general registers
Searching for assembly instructions with this kind of characteristic is due to the operation logic of NAND gates (commonly known as universal gates), represented as: Nand(a,b) = ~a & ~b, meaning to take the negation of both numbers and then perform an AND operation. The four basic logical operations in assembly can all be represented using NAND gates. Therefore, VMP version 3.x uses a large number of NAND operations to represent other logical operations, effectively hiding the original various logical operations and significantly increasing the difficulty of reverse engineering.
Not(a) = ~a = ~a & ~a = Nand(a,a)
Or(a,b) = a | b = ~(~a & ~b) = Nand(Nand(a,b),Nand(a,b))
And(a,b) = a & b = ~~a & ~~b = Nand(Nand(a,a),Nand(b,b))
Xor(a,b) = (~a & b) | (a & ~b) = (0 | (a & ~b)) | (0 | (b & ~a)) = (a & (~a | ~b)) | (b & (~a | ~b)) = (~a | ~b) & (a | b) = ~(a & b) | ~(~a & ~b) = Nand(And(a,b),Nand(a,b)) =Nand(Nand(Nand(a,a),Nand(b,b)),Nand(a,b))
The CMP instruction is essentially subtraction, but the result will not be written back to the operands, and NAND gates can also implement subtraction:
-a = ~a+1  => ~a = -a -1
~(~a+b) = ~(-a-1+b) = -(-a-1+b)-1 = a-b  => a-b = Not(Not(a)+b)
In summary, when you see assembly instructions with features like<span>not a, not b, and a,b</span>, you can reasonably suspect that this is where VMP processes the virtual machine instruction’s handler. VMP uses a large number of NAND operations at the handler entry to hide the original various logical operations. These “Nand” instructions often involve reading and writing operations to the EFLAGS register. By finely controlling the state of the EFLAGS flags, VMP can protect the program control flow.
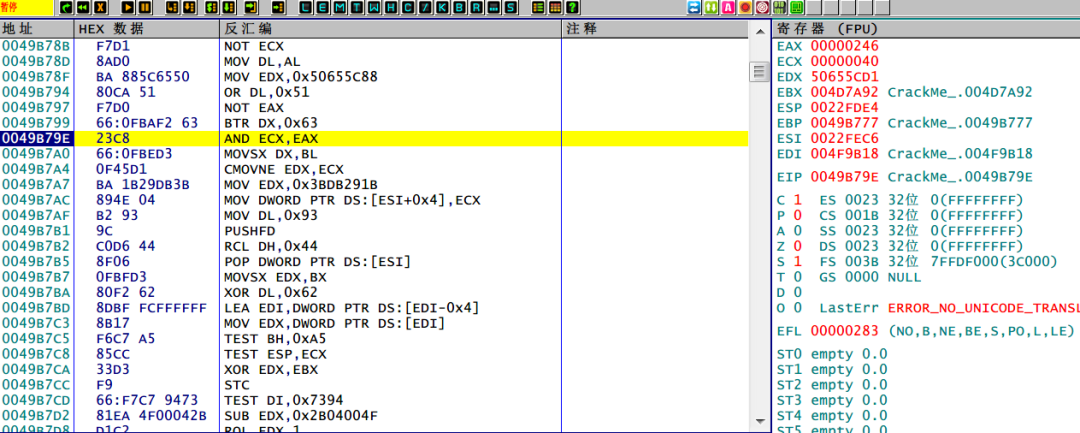
Having found the suspected instructions, note the address of the AND operation instruction<span>0049B79E</span>, as well as the values of the two registers<span>ECX=00000040</span>, and<span>EAX=00000246.</span>
and ecx, eax// The operation result is 0x40
(FL is the abbreviation for Flags register, FL=0 means that no flag was changed after executing the instruction<span>and ecx, eax</span> because the execution result is 0x40, meaning the original ZF flag is 1. In subsequent operations, we only need to modify ecx to change the ZF flag to 0, thus altering the program’s original jump logic. For example, when entering an incorrect password, instead of printing “failed,” it will jump to “successful!”.)
bp 0049B79E           // Set a breakpoint, pausing execution when the program reaches address 0049B79E.

start:                // Label to mark the starting position of subsequent instructions.
run                   // Continue executing the program until the set breakpoint is triggered.
cmp ecx, 00000040
jnz start
cmp eax, 00000246
jnz start

end:
bc 0049B79E           // Clear the breakpoint, so the program no longer pauses at address 0049B79E.
ret                   // Return instruction, ending the execution of the current script.
Save as<span>script.txt</span>.
Five

Re-debugging and Cracking
5.1 Run the Script
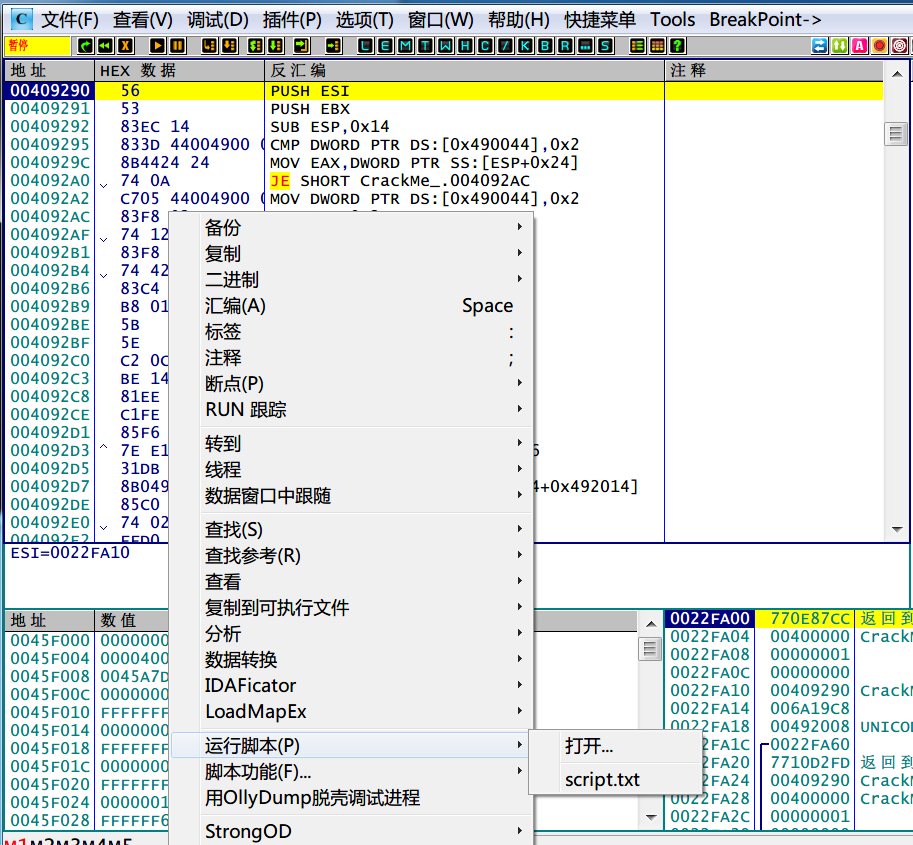
Reload<span>CrackMe.vmp.exe</span>with OD, right-click in the disassembly window, select<span>Run Script -> script.txt.</span>
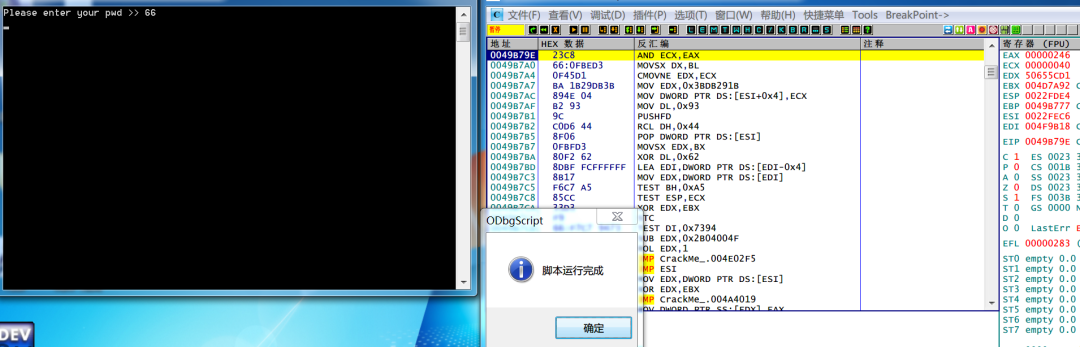
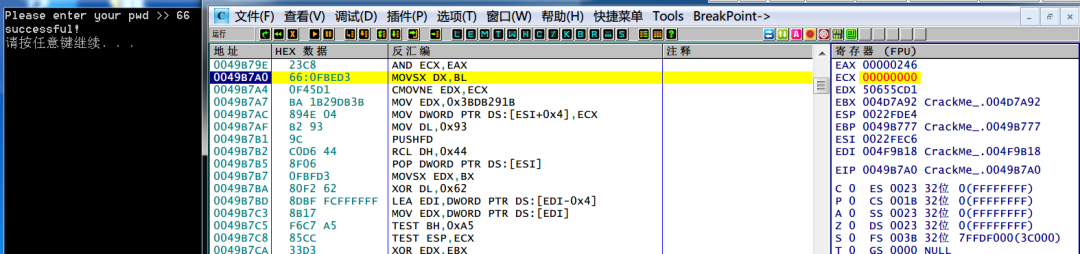
The program will run and print the string<span>Please enter your pwd >></span>. Enter 66 and press enter, a window will pop up showing “Script execution completed”.
5.2 Modify Register Values
After clicking “OK,” you will find that EIP is at<span>0049B79E</span>, because the previous script set a breakpoint at this address. Pay attention to the register window and the values of each register.
EAX 00000246
ECX 00000040
EDX 50655CD1
EBX 004D7A92 CrackMe_.004D7A92
ESP 0022FDE4
EBP 0049B777 CrackMe_.0049B777
ESI 0022FEC6
EDI 004F9B18 CrackMe_.004F9B18
EIP 0049B79E CrackMe_.0049B79E
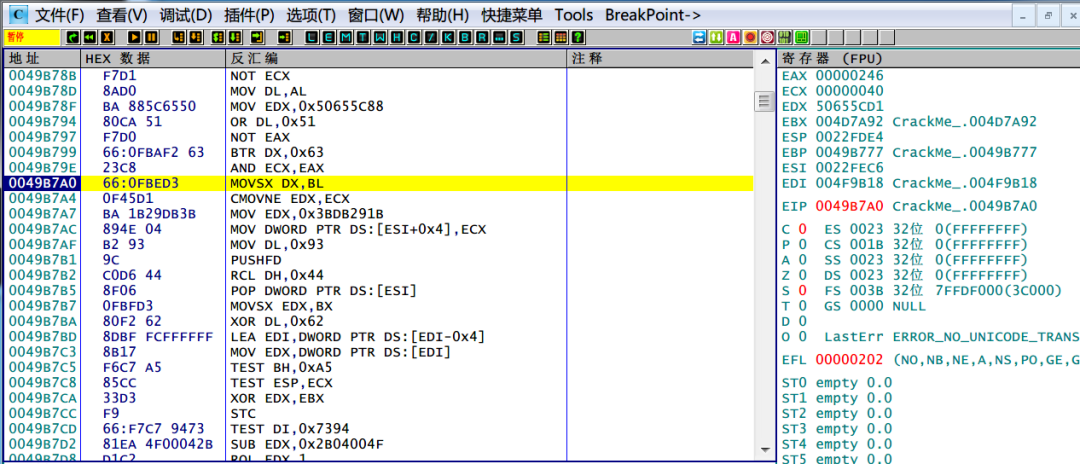
Press F7 to step over, and the register values do not change.
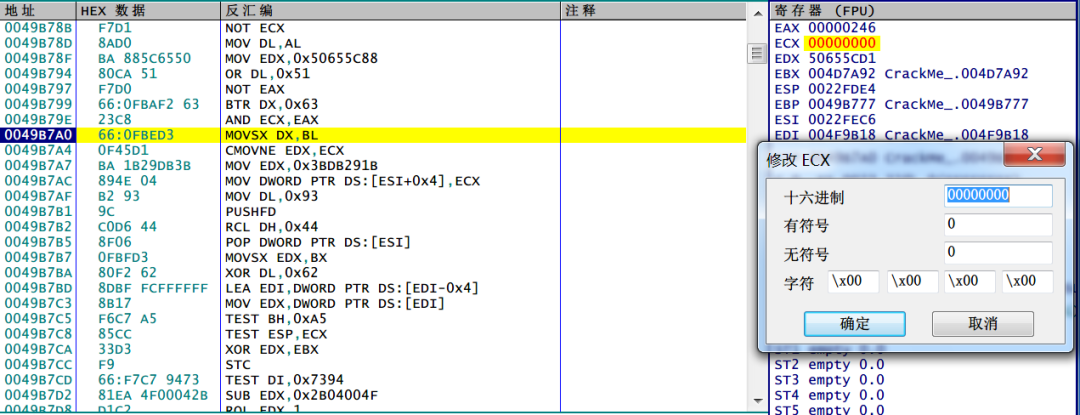
We will change the value of ECX from<span>00000040</span>to<span>00000000.</span>
Then click run again, cracking is successful, and note that the ZF flag is now 0;
eax = 0x246;
ecx = 0x0;
The operation result is 0;
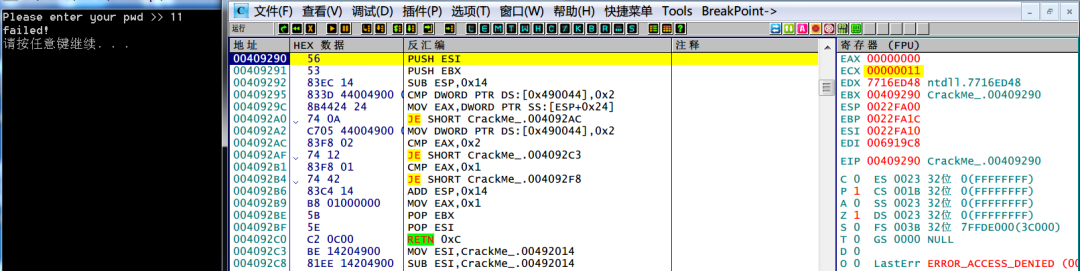
Comparing, when entering the wrong password and not modifying ecx, the ZF flag is 1.
Reference Links:
https://bbs.kanxue.com/thread-224732.htm
https://www.cnblogs.com/theseventhson/p/14274653.html
https://www.bilibili.com/video/BV1vK4y1Q7K7/?spm_id_from=333.337.search-card.all.click&vd_source=e5b65cf3bea873b0cfe83c6f3d30a710
“Encryption and Decryption (4th Edition)”
Kanxue ID: ZyOrca
https://bbs.kanxue.com/user-home-944427.htm
*This article is an excellent piece from the Kanxue forum, authored by ZyOrca. Please indicate the source when reprinting from the Kanxue community.

# Previous Recommendations
1、In-depth Analysis of Windows Host Intrusion Detection and Defense Kernel Technology
2、BFS Ekoparty 2022 Linux Kernel Exploitation Challenge
3、Silver Fox Sample Analysis
4、Using pysqlcipher3 to Operate Windows WeChat Database
5、XYCTF Two Unity IL2CPP Problem Solving Ideas and Solutions