Using the HTTP client plugin, you can create, edit, and execute HTTP requests directly in the GoLand code editor.
When you need to write and run HTTP requests, there are two main use cases:
-
When you are developing a RESTful web service and want to ensure it works as expected, is accessible according to the specifications, and responds correctly.
-
When you are developing an application that interacts with RESTful web services. In this case, investigating access to the service and the required input data before starting development can be helpful. During development, you can also call this web service from outside your application. This can help locate errors when your application produces unexpected output, and your code does not detect logical errors, leading you to suspect that the bottleneck is the interaction with the web service.
HTTP requests are stored in .http and .rest files and are marked with icon.
Support for HTTP files includes the following features:
icon.
Support for HTTP files includes the following features:
-
-
Code completion for hosts, method types, header fields, and endpoints defined by OpenAPI
-
Code folding for requests, their parts, and response handler scripts
-
Inline documentation for request header fields and documentation tags
-
View the structure of HTTP requests
-
Language injection in the message body of request messages in web languages
-
If necessary, configure the proxy settings on the HTTP Proxy page in the settings/preferences dialog (Ctrl+Alt+S) before starting.
Create HTTP Request Files
You can handle HTTP requests from temporary files or physical files of HTTP request types. Each file can contain multiple requests, and you can create as many files as needed.
Temporary files can be used to test HTTP requests during development. Temporary files are not stored in the project, so GoLand can modify them and add additional information about the requests. When executing HTTP requests from temporary files, links to the response output files will be added below the requests and at the top of the request history files.
👉 Click to receive
Go backend development large factory interview question manual
Create HTTP Request Temporary Files
Press Ctrl+Alt+Shift+Insert and select HTTP Request.
Physical files can be used to record, test, and validate HTTP requests. Physical files are stored in your project, and GoLand does not modify them. When executing HTTP requests from physical files, information about executed requests and links to response output files are added to the top of the request history files.
Create Physical HTTP Request Files
In the File menu, point to New, and then click HTTP Request.
Move HTTP Requests
You can use Refactor | Move (F6) to move HTTP requests from temporary files to physical files, as well as between physical files.
1. In the editor, place the cursor at the request you want to move, then do one of the following:
-
Select Refactor | Move from the main menu or context menu.
-
Press Alt+Enter and select Move HTTP Request intention action.
-
2. In the opened Move HTTP Request dialog, do the following:
-
In the path field, select one of the existing .http files from the list or click
 to find the file. You can also manually type the complete path of the file. If you specify a name for a file that does not exist, a new file with the provided name will be created automatically.
-
In the Requests list, check the checkbox next to the request you want to move.
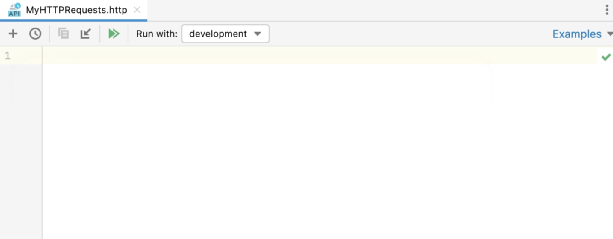
Write HTTP Requests
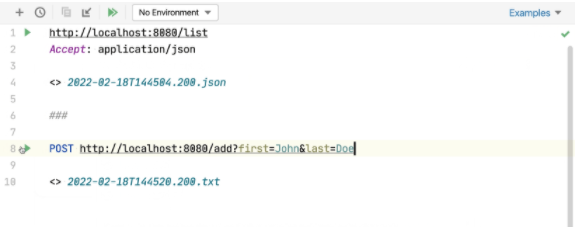
GoLand uses an editor format for HTTP requests, providing a simple way to create, execute, and store information about HTTP requests. You can directly type them in the created HTTP request file using the following generic syntax:
### Method Request-URI HTTP-Version
Header-field: Header-value
Request-Body
After the separator, you can enter any comments that start with # or ###. # “ //
To quickly find your requests in Run/Debug configurations, Search Everywhere, and Run Anything, you can name them.
You can customize the colors and styles to highlight request syntax (names, comments, parameters, headers, etc.) using Editor | Color Scheme | HTTP Request settings.
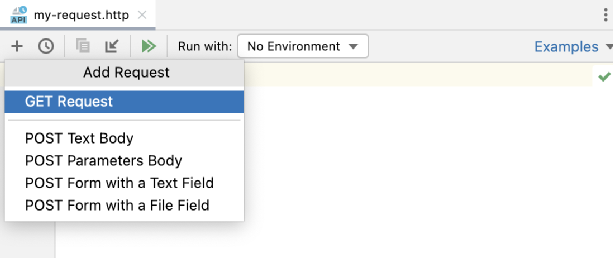
To speed up writing HTTP requests, you can:
-
Click Tools | HTTP Client | Create request in the HTTP client. If a request file is open in the editor, the request template will be added to the opened file. Otherwise, this will create a new .http temporary file.
-
Click
 at the top of the request editor panel. In the popup menu, select the type of request to add.
Alternatively, use live templates. In the editor, you can press Ctrl+J to view the available template list. For example, gtr expands to a simple GET request; mptr expands to a multipart/form-data POST request.
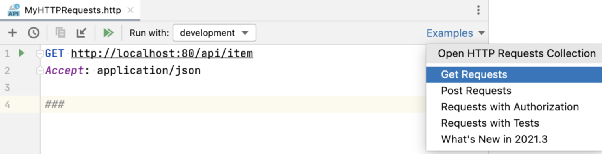
To get a rough idea of the possibilities of the HTTP client, you can explore the HTTP Request Collection, which is a selection of a few combined requests.
Open a Request from the HTTP Request Collection
1. Click the example shortcut link at the top of the request editor panel.
2. In the popup menu, select the HTTP request collection you want to open:
Convert cURL Requests
If you are working with cURL requests, you can convert between cURL requests and the HTTP request in editor format.
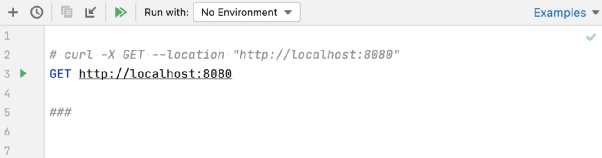
Convert cURL to HTTP Request
Paste the cURL request into the HTTP request file. GoLand will convert it to HTTP request format and comment out the original cURL request for future reference.
Or, click at the top of the HTTP request editor panel and select Convert cURL to HTTP Request. In the Convert cURL to HTTP Request dialog, type or paste the cURL request you want to convert.
Consider the following example cURL request:
at the top of the HTTP request editor panel and select Convert cURL to HTTP Request. In the Convert cURL to HTTP Request dialog, type or paste the cURL request you want to convert.
Consider the following example cURL request:
curl 'http://httpbin.org/' -H 'Connection: keep-alive' -H 'Accept: text/html' -H 'Accept-Encoding: gzip, deflate' -H 'Accept-Language: en-US,en;q=0.9,es;q=0.8'
GoLand will convert it to the following:
# curl 'http://httpbin.org/' -H 'Connection: keep-alive' -H 'Accept: text/html' -H 'Accept-Encoding: gzip, deflate' -H 'Accept-Language: en-US,en;q=0.9,es;q=0.8'
GET http://httpbin.org/
Connection: keep-alive
Accept: text/html
Accept-Encoding: gzip, deflate
Accept-Language: en-US,en;q=0.9,es;q=0.8
###
The converter supports the following cURL options:
|
|
|
|
|
The request method to use.
|
|
|
Request headers to include in the request.
|
|
|
User credentials to provide with the request and the authorization method to use.
|
|
|
Data to send in a POST request.
|
|
|
Multipart/form-data message sent in a POST request.
|
|
|
The URL to retrieve (usually used when specifying the URL in a configuration file).
|
|
|
Defines whether to include the HTTP response headers in the output.
|
|
|
|
|
|
Enables the re-sending of the request if the requested page has moved to a different location.
|
Convert HTTP Requests to cURL
1. Place the cursor on the HTTP request you want to convert to cURL format.
2. Click Alt+Enter and select Convert to cURL and copy to clipboard. Alternatively, you can click the conversion shortcut link at the top of the HTTP request editor panel and select Convert the HTTP request under the Caret to cURL and copy.
This will generate a cURL request based on the HTTP request and copy it to the clipboard.
Using Response Handler Scripts
With response handler scripts, you can programmatically react to received HTTP responses. By using these scripts, you can automatically process the received data and validate it based on the conditions you specify. Response handler scripts are provided as part of the request in the HTTP request file and are executed immediately after receiving the response. To view response examples, open the Requests with Authorization or Requests with Tests request collections.
You can insert response handler scripts into your requests inline or by referencing external files.
Insert Scripts into Requests
To insert a script inline, prefix it with > {% %}:
GET host/api/test
> {%// Response Handler Script...%}
To insert a script from an external file, prefix it with >:
GET host/api/test
> scripts/my-script.js
Response handler scripts are written in JavaScript ECMAScript 5.1, with coding assistance and documentation provided by the bundled HTTP Response Handler library. This feature is automatically enabled for inline scripts.
For external scripts, you need to enable it manually.
Enable JavaScript Coding Assistance for Response Handler Scripts
1. Open the script file in the editor.
2. In the context menu, select Use JavaScript Library | HTTP Response Handler.
The HTTP Response Handler library exposes two objects for writing response handler scripts:
-
The client object stores session metadata that can be modified within the script. The state of the client will persist until you close GoLand. Each variable stored in client.global as variable_name can be accessed in subsequent HTTP requests as {{variable_name}}.
-
The response object contains information about the received response: its content type, status, response body, etc.
To open the HTTP Response Handler library in the editor, place the cursor on the library object and press Ctrl+B.
Response handler scripts can include tests, allowing you to use the HTTP client as a testing framework. To create a test, call the client.test(testName, function) method. In the test, you can assert conditions by calling the client.assert(condition, message) method, for example:
GET https://httpbin.org/status/200
> {%    client.test("Request executed successfully", function() {        client.assert(response.status === 200, "Response status is not 200");    });%}
Execute HTTP Requests
1. If you want to test your web service, make sure it is deployed and running.
2. If you have defined environments, select one from the Run with list at the top of the request editor panel.
3. In the binding line, click next to the request.
If you have defined multiple HTTP requests in the .http file, you can run all of them in sequence. To do this, click
next to the request.
If you have defined multiple HTTP requests in the .http file, you can run all of them in sequence. To do this, click at the top of the request editor panel.
When executing requests, GoLand automatically creates a dedicated temporary HTTP request run/debug configuration for it. If necessary, you can save it as a permanent run/debug configuration.
at the top of the request editor panel.
When executing requests, GoLand automatically creates a dedicated temporary HTTP request run/debug configuration for it. If necessary, you can save it as a permanent run/debug configuration.
Open Requests in Browser
You can open HTTP requests in the browser specified in the Web Browsers and Preview page of the settings/preferences dialog (Ctrl+Alt+S).
-
Press Alt+Enter and select Open in Web Browser intention action.
Use HTTP Request Run/Debug Configuration
When you execute HTTP requests from the editor, GoLand automatically creates a temporary run/debug configuration using the request parameters. The temporary run/debug configuration works the same way as a permanent one. You can change its settings using the Run/Debug Configuration dialog and optionally save it as permanent.
Modify HTTP Request Run/Debug Configuration
1. Do one of the following:
-
Right-click a request in the editor and select Modify Run Configuration from the context menu.
-
Or, select Run | Edit Configurations from the main menu, and select the desired run/debug configuration from the HTTP Request list.
2. Change the necessary configuration parameters:
-
In the Environment list, select the environment that defines the set of environment variables used in the request.
-
In the File field, provide the path to the HTTP request file. You can manually type the path and use path completion Ctrl+Space while typing, or click
 and select the desired folder.
-
If your request file contains multiple requests, select the name of the request you want to execute from the Requests list.
Save Temporary HTTP Request Run/Debug Configuration
In the Run/Debug Configuration selector, select Save.
In the Run/Debug Configuration dialog, select the configuration and click .
.
Use Run/Debug Configuration to Execute Requests
In the Run/Debug Configuration selector, select the desired run configuration. Then click on the main toolbar or press Shift+F10.
Press Alt+Shift+F10, select the desired run configuration from the list, and press Enter.
on the main toolbar or press Shift+F10.
Press Alt+Shift+F10, select the desired run configuration from the list, and press Enter.
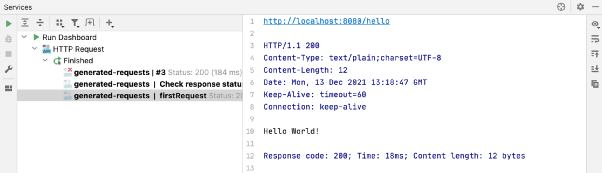
View Responses from Web Services
When you execute HTTP requests, GoLand automatically saves the responses to separate files in the .idea/httpRequests/ directory. You can view the last 50 stored responses and navigate to the corresponding files using request history. If the request is executed from a temporary file, the link to its response output will also be added below the original request:
View Received Replies
1. Switch to the Services tool window, which will automatically open once a response is received.
2. By default, the server response is displayed in the format specified by the content type field in the request header. To convert the response to another format, click and select Text, JSON, XML, or HTML.
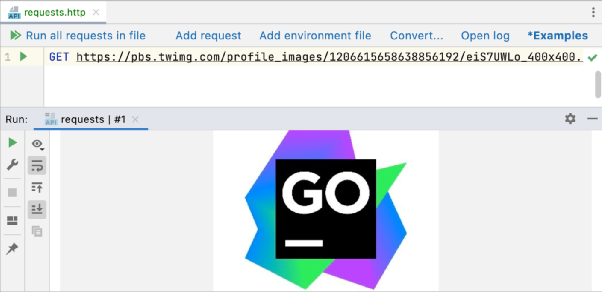
If the response contains a binary file, it is also saved in the .idea/httpRequests/ directory. If the response is an image, you can view its preview in the Services tool window.
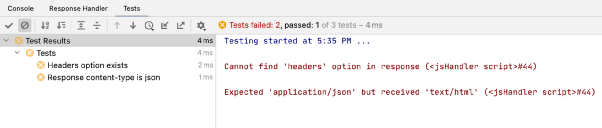
If you have response handler scripts, the test results executed as part of that script will be displayed in the “Tests” tab of the Services tool window.
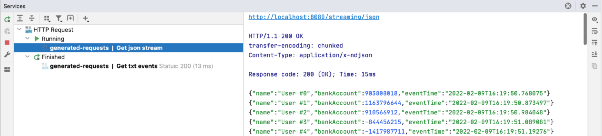
If you subscribe to event streams, GoLand will display events in the Services tool window. Here, you can also view the status of the client-server connection and click to terminate the connection
and select Text, JSON, XML, or HTML.
If the response contains a binary file, it is also saved in the .idea/httpRequests/ directory. If the response is an image, you can view its preview in the Services tool window.
If you have response handler scripts, the test results executed as part of that script will be displayed in the “Tests” tab of the Services tool window.
If you subscribe to event streams, GoLand will display events in the Services tool window. Here, you can also view the status of the client-server connection and click to terminate the connection . Depending on the content type (text/event-stream or application/x-ndjson), the response will be formatted as plain text or newline-separated JSON. You can write response handler scripts to handle each line of the event stream.
Currently, redirecting stream events to files is not supported.
. Depending on the content type (text/event-stream or application/x-ndjson), the response will be formatted as plain text or newline-separated JSON. You can write response handler scripts to handle each line of the event stream.
Currently, redirecting stream events to files is not supported.
Open Response Files in the Editor
1. Place the cursor on the link of the response you want to open.
2. Select View | Jump to Source from the main menu Ctrl+B, or press F4.
Alternatively, you can Ctrl+Click the response line:
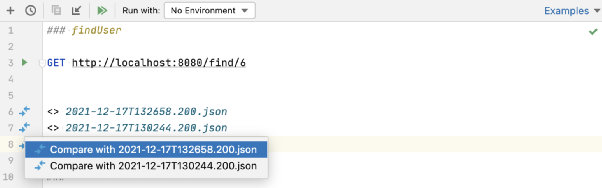
Compare Responses in Temporary Files
When executing requests from temporary files, links to the response output files will be added below the original request.
-
Place the cursor on the link of the response file. Press Alt+Enter and select Compare with intention action.
-
Click
 and select Compare with:
Compare Responses in Request History
When executing requests from physical files, links to the response outputs will be added to the request history.
1. Place the cursor on the link of the response file. Select View | Jump to Source from the main menu Ctrl+B, or press F4 to open this file in a new editor tab.
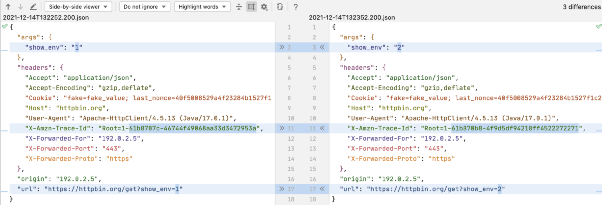
2. Select View | Compare from the main menu Ctrl+D, or press. GoLand will prompt you to open the response file from the httpRequests folder.
3. Select the response file you want to compare with the current file and click Open.
The two response files will open in the diff viewer, allowing you to compare their contents:
View Request History
GoLand automatically saves the last 50 executed requests to the http-requests-log.http file, which is stored at the project level in the .idea/httpRequests/ directory. With request history, you can quickly navigate to specific responses and reissue any requests. If a request is reissued from the request history, its execution information and links to the response outputs will be added to the top of the request history file.
To prevent requests from being saved to the request history, add a comment line with the @no-log tag before the request. This is helpful if the request contains sensitive data that you do not want to log.
Open Request History
Click at the top of the request editor panel.
Select Tools | HTTP Client | Show HTTP Request History from the main menu.
at the top of the request editor panel.
Select Tools | HTTP Client | Show HTTP Request History from the main menu.
Redirect Output to Custom Files or Directories
The HTTP client can redirect output to custom files or directories. It supports two operators for forced and soft redirects:
-
>> operator always creates a new file, -n adds a suffix to the filename if the request file already exists.
-
>>! operator overwrites the file if it already exists.
Manage Cookies
Cookies received through responses are automatically saved to a dedicated http-client.cookies file in the .idea/httpRequests/ directory. The number of cookies that can be saved is limited to 300. The names and *values of cookies will automatically be included in each subsequent request to URLs that match the domain and path specified for the cookie, provided that the expiration date has not been reached.
You can prevent received cookies from being saved to the cookie jar by adding a comment line with the @no-cookie-jar tag before the request.
If you want to set custom cookies in HTTP requests, you can use the Cookie header. Enter your cookies as a list of name=value pairs separated by semicolons, for example:
GET http://localhost:80/api
Cookie: theme=dark; country=France
gRPC Requests
To handle gRPC requests, you need to install and enable the following plugins: Protocol Buffers and gRPC.
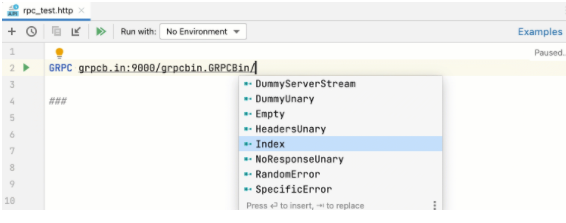
The HTTP client supports gRPC requests. To let the HTTP client treat your requests as gRPC requests, start with the GRPC keyword.
GoLand provides completion for gRPC based on .proto files: all known gRPC services, unary and server-streaming methods for specific servers, and message fields accepted in the request body. If there are no files in your project, code completion is still available if the server supports gRPC reflection .proto, providing information about accessible services for the HTTP client.
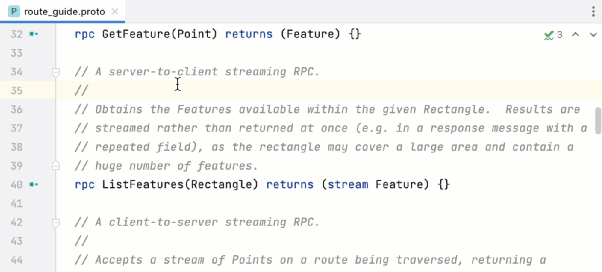
Generate gRPC Requests from PROTO Files
In the PROTO file, click the Generate icon near the RPC method.
Currently, the supported RPC types that can be executed in the HTTP Client are unary and server-streaming. Like regular HTTP requests, the request body and response are pure JSON files.
Configure Proxy Settings
1. In the Settings/Preferences dialog (Ctrl+Alt+S), select HTTP Proxy under Appearance & Behavior, then choose Manual proxy configuration and specify the following:
o Enter the proxy hostname and port number in the hostname and port number fields.
o To enable authorization, check the Proxy authentication checkbox and enter the username and password in the respective fields.
Programmer Technical Communication Group
Scan the code to join the group and remember to note: City, nickname, and technical direction.

[GoLand Tutorial] Creating Tests with GoLand

Go 1.20 arena can manually manage memory, how to use it?
[GoLand Tutorial] Running SSH Terminal in GoLand