Abstract: This experiment aims to build an IoT air quality monitoring device using Mind+ programming and an Arduino board. Through this experiment, students can enhance their practical application skills in IoT technology by using the Easy IoT platform and the OBLOQ module.
Keywords: Mind+ programming; Arduino board; Easy IoT platform
Classification Number: G434 Document Code: B
Paper Number: 1671-7384 (2024) 07-062-02
Experiment Background and Principles

With the rapid development of industrialization and urbanization in our country, air quality issues have become increasingly prominent, severely affecting people’s health and quality of life. Therefore, real-time monitoring and early warning of air quality have become particularly important. The rapid development of IoT technology provides new solutions for air quality monitoring. An IoT air quality monitoring device can collect air quality data in real-time and transmit it over the network to a remote platform for analysis and processing, providing strong support for environmental protection and public health.
This experiment aims to design an IoT air quality monitoring device based on Mind+ programming and Arduino boards to explore the application of IoT technology in the field of air quality monitoring. After measuring air quality data using air quality sensors, the experiment utilizes a network communication module and MQTT protocol to upload the data to the Easy IoT platform for recording, allowing users to view the data directly by logging into the platform. This IoT-based air quality monitoring solution features real-time, remote, and intelligent characteristics, which are significant for improving the efficiency and accuracy of air quality monitoring.
Required Resources for the Experiment

1. Hardware
(1) Arduino Uno board; (2) Arduino interface expansion board; (3) OBLOQ IoT module (serial); (4) ENS160 air quality sensor module (I2C interface); (5) Computer; (6) Connecting wires.
2. Software
(1) Computer with Mind+ programming software installed; (2) Easy IoT platform.
Experiment Procedure

1. Register and Set Up Easy IoT
The IoT platform is a software platform for managing and processing IoT devices and data. It can remotely manage and control devices and can transmit, collect, and analyze data in real-time, achieving interconnection between device and user ends.
The Easy IoT platform is designed to simplify and accelerate the connection and management of IoT devices. It provides user-friendly tools and interfaces that allow users to easily connect various devices and sensors to the cloud platform, and to monitor and control these devices in real-time.
The platform usage method is:
(1) Open the platform address: https://iot.dfrobot.com.cn
(2) Register on the Easy IoT platform using your mobile phone number, then enter the “workspace”, click the “+” sign, and create three devices named “CO2 Concentration”, “TVOC Concentration”, and “Air Quality Index” respectively. You will see that each device has a “Topic”, numbered from “Topic0” to “Topic2” from left to right, which will be used in programming. Additionally, a user can record a total of 10,000 data points, with each device defaulting to 1,000 data points, which can be adjusted. The lot_id (user) and lot_pwd (password) on the left side of the “workspace” are very important and will be used in programming.
2. Connect Hardware
The Arduino control board is a microcontroller board that includes a microprocessor, input/output pins, power supply, and other functional modules, which can be used to build related electronic projects and devices. The Arduino control board can enhance its functionality through various expansion boards, which can add sensors, actuators, displays, wireless modules, etc. Arduino control boards can be used in various related projects, from simple home automation to complex robotics and scientific instruments. They are also widely used in education, art, research, and industrial automation.
The connection process between the Arduino control board, OBLOQ IoT module, and ENS160 air quality sensor is: (1) Combine the Arduino board and the interface expansion board; (2) Connect the OBLOQ IoT module to the expansion board, with the red wire to V (power), black wire to G (ground), green wire to digital pin 2, and blue wire to digital pin 3; (3) Connect the ENS160 air quality sensor module to the expansion board. Note that the SCL and SDA pins of the ENS160 module must correspond to the SCL and SDA pins on the expansion board; the VCC and GND pins must correspond to the V and G pins on the main board.
3. Programming
Mind+ is a graphical programming software developed by DFRobot, designed to help users program by dragging and dropping graphical program blocks, allowing control of various open-source hardware such as Arduino, micro:bit, and other control boards without deep programming knowledge. The software is compatible with Scratch 3.0 and also supports programming in high-level programming languages such as Python, C, and C++, making it easy for users to enjoy the fun of creation.
Mind+ is a feature-rich programming software that is easy to use for users of different ages and programming levels, whether for educational learning or innovative project development, Mind+ provides strong support. The Mind+ programming for this experiment is as follows.
(1) Launch the Mind+ software and select upload mode.
(2) In the lower left corner, add the Arduino UNO control board, ENS160 air quality sensor, and OBLOQ IoT module to Mind+.
(3) Initialize the OBLOQ IoT module in the main program.
① Select “Obloq mqtt initialization” from the communication module, choose “soft serial” for the interface, Rx (green) to “2”, and Tx (blue) to “3”.
② Click to configure the network and IoT platform. In the Wi-Fi configuration, set up the wireless network (only supports 2.4G frequency, does not support 5G). Copy and paste the lot_id, lot_pwd, and the three corresponding Topic values into the corresponding positions on the IoT platform, selecting “China” as the server.
(4) Initialize the ENS160 module. In the left module area, select the “ENS160 I2C address” command to set the I2C address to “0x52” (refer to the ENS160 module manual for specific values; some modules may have the address “0x53”).
(5) Write the program to read and send data.
① In the left communication module, select “Oblog send message ‘hello’ to Topic_0”;
② In the sensor area, select “ENS160 read CO2 concentration” and combine this command with the OBLOQ send message command;
③ Copy the two combined commands, modifying the parameters to “TVOC concentration, Topic_1” and “Air Quality Index, Topic_2” respectively;
④ In the left “Control” section, select “wait 1 second” command, modify the wait value as needed, and combine it with the three send message commands;
⑤ In the left “Control” section, select “looping execution”, placing the send message and wait commands into the “looping execution” to continuously read and send data based on the wait time (Figure 1).
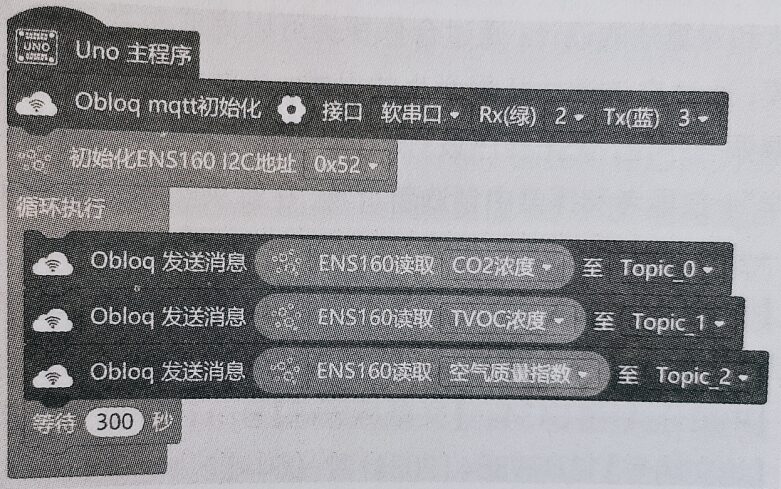
Figure 1: Graphical Program
(6) Connect the control board to the computer using a USB cable, then in the Mind+ menu, select “Connect Device > COM*-CH340”. After the device is connected, click “Upload to Device” on the right to upload the program to the control board.
(7) After the program is uploaded, the control board will automatically restart. Observe the OBLOQ module indicator light; if the network connection is successful, the indicator light will turn green.
(8) Once the device is successfully connected to the network, it will read the corresponding air quality data and send it to the Easy IoT platform, which will automatically record it. Relevant personnel can log into the Easy IoT platform to view the data.
Conclusion

This experiment is a typical IoT application experiment that helps students understand hardware connection protocols (serial communication, I2C protocol, etc.) and MQTT IoT communication protocols in IoT applications. The hardware involved in this experiment is available for sale on e-commerce platforms at low prices. The Easy IoT platform can also be used for free, with a data recording capacity of 10,000 points sufficient for learning needs. The circuit connections for this experiment are not complex, the operational difficulty is low, and the program structure is relatively simple, making it suitable for beginners in programming and IoT learners.

Source: “Information Technology Education for Primary and Secondary Schools” Magazine
Author: Wang Sheng
Author’s Institution: No. 12 Middle School, Shunyi District, Beijing
Disclaimer: The above images and text are shared for educational purposes, copyright belongs to the original author and source. If there are any infringements, please contact us promptly, and we will correct, delete, or handle it according to the law.
Editor: Wang Kunming
Technical Support: Zhang Jian
Reviewer: Zhang Chengguo
Release: Cao Guofeng
Editorial Team: Pingyin Information Technology Research
Yushan Primary School, Pingyin County, Jinan City