The C language is essential foundational knowledge in microcontroller development. This article lists some common basic knowledge of C language in STM32 learning.
01
Bit Manipulation
Bit manipulation is different from bit-banding operations. Bit manipulation refers to performing operations on each bit of a variable, while logical bit operations are performed on the variable as a whole.
Here are six commonly used operators:
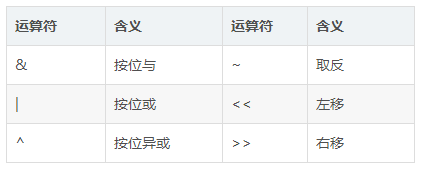
Bitwise NOT
void test01(){  int num = 7;  printf("~num = %d\n", ~num);//-8
// 0111  Bitwise NOT   1000   The machine stores in two's complement   // To convert two's complement to original code, it needs to be divided into signed and unsigned types}
Bitwise AND
void test02(){ int num = 128;//In eight bits, 1 is represented as 00000001, so if the last bit of the given number in binary is 1, it is odd; otherwise, it is even. if ( (num & 1) == 0) { printf("num is even\n"); } else { printf("num is odd\n"); }
Bitwise XOR
void test03(){  //Bitwise XOR means that two numbers are 0 if they are the same and 1 if they are different. We can use bitwise XOR to swap two numbers.  num01 = 1; // 0001  num02 = 4; // 0100  printf("num01 ^ num02 = %d", num01 ^ num02); // 5  The result of bitwise XOR in binary is: 0101
  printf("Before swap\n");  printf("num01 = %d\n", num01);  printf("num02 = %d\n", num02);
  num01 = num01 ^  num02;  num02 = num01 ^  num02;  num01 = num01 ^  num02;  // Swap two variables without a temporary variable  printf("After swap\n");  printf("num01 = %d\n", num01);  printf("num02 = %d\n", num02);}
Bitwise OR
Calculation method: For the two numbers participating in the operation, convert them to binary (0, 1) and perform the OR operation. A bit is set to 1 only when all corresponding bits are 1; if there is a 0, it is 0.
printf is a formatted output function that can directly print decimal, octal, and hexadecimal, with output control symbols being %d, %o, %x. However, it does not support binary output. To output binary, you can write it manually or call the itoa function in stdlib.h, which is not a standard library function but is available in most compilers.
#include <stdio.h>#include <stdlib.h>
int main(){  test04();    }
int test04(){    int a = 6;                  //Binary 0110    int b = 3;                  //Binary 0011    int c = a | b;              //a and b bitwise OR, result 8, binary 111, assigned to c    char s[10];    itoa(c, s, 2);    printf("Binary --> %s\n", s);//Output: Binary -->111}
Left Shift Operator
void test05(){ int num = 6; printf("%d\n", num << 3);//Left shift three bits, which is 0000}
Right Shift Operator
void test06(){ int num = 6; //0110 printf("%d\n", num >> 1); //Right shift one bit, which is 0011, output 3}
The above examples are written in standard C code. Now let’s look at some commonly used code in STM32:
(1) For example, to change the state of GPIOA->BSRRL, you can first clear the value of the register using & operation:
GPIOA->BSRRL &= 0xFF0F; //Clear bits 4 to 7 (note that numbering starts from 0)Then perform a | operation with the value to be set:
GPIOA->BSRRL |= 0x0040; //Set bits 4 to 7 to the desired number(2) Improve code readability through shift operations:
GPIOx->ODR = (((uint32_t)0x01) << pinpos);The above line of code means to first convert “0x01” from eight-bit hexadecimal to thirty-two-bit binary, then left shift by “pinpos” bits, where “pinpos” is a variable representing the number of bits to shift. This sets the pinpos bit of the ODR register to 1.
(3) Using NOT operation:
Each bit of the SR register represents a state. If at some point we want to set a bit to 0 while all other bits are 1, a simple way is to directly set a value to the register:
TIMx->SR=0xFFF7;This method sets bit 3 to 0, but it has poor readability. Let’s see how it’s used in library function code:
TIMx->SR = (uint16_t)~TIM_FLAG;Where TIM_FLAG is defined through a macro:
#define TIM_FLAG_Update ((uint16_t)0x0001) #define TIM_FLAG_CC1 ((uint16_t)0x0002)02
Define Macro
#define is a preprocessor command in C language used for macro definitions, which can improve the readability of source code and facilitate programming.
Common format:
#define identifier stringIdentifier refers to the name of the defined macro, and the string can be a constant, expression, or format string, etc. For example:
#define PLL_Q 7 //Note: No semicolon is needed at the end of this definition statement03
Conditional Compilation with #ifdef
During program development, this type of conditional compilation is often used:
#ifdef PLL_Q //Code segment 1#else //Code segment 2#endifThe above code means that if this identifier has been defined, then execute code segment 1; if not, execute code segment 2. Of course, just like in regular C code, “#else” can be omitted, which would reduce the code to just the part without “#else” and code segment 2.
#ifndef PLL_Q //Means if this identifier has not been defined04
Extern Variable Declaration
In C language, extern can be placed before a variable or function to indicate that the variable or function is defined in another file, prompting the compiler to look for its definition in other modules (a variable can only be defined once, while extern can be declared multiple times). Example:
extern u16 USART_RX_STA;The above example means that the variable “USART_RX_STA” is defined in another file, and “u16” means 16 bits.
05
Structures
The general form of defining a structure is:
struct struct_name{ member_list};The member list consists of several members, each of which is a component of the structure. Each member must also have a type specification, which is in the form:
type_specifier member_name; //For example: int num;Combining the above explanation, we can construct a simple structure example:
struct student{ int num; char name[20]; //20 bytes long character char sex; int age; float score; char addr[30]; //30 bytes long character}If we want to define structure variables, we can define them directly when defining the structure or define them separately after defining the structure, for example:
struct student{ int num; char name[20]; //20 bytes long character char sex; int age; float score; char addr[30]; //30 bytes long character} student01, student02; //List of variable names (if there are structure variable names, we can omit the structure name)Sometimes we may need to use nested structures, for example:
struct date{ int year, month, day;}; struct student{ int num; char name[20]; //20 bytes long character char sex; struct date birthday; //Here we use nested structures int age; float score; char addr[30]; //30 bytes long character} student01, student02; //List of variable names (if there are structure variable names, we can omit the structure name)To access the contents of a member within a structure, you can use the following method:
student01.name = "Xiao Li"; // Structure variable name.member name (note the dot is used here), this is assigning a value to this memberThe general form for declaring a structure pointer variable is:
struct struct_name *structure_pointer_variable_nameIf we want to define a pointer variable pointing to the structure “student”, we can use the following code:
struct student *pstu;If we want to assign an initial value to a structure pointer variable, we can use the following method:
struct student{  char name[66];  int num;  char sex;} stu;

pstu = &stu;
Note the assignment method above; if we want to assign a value, we must use a structure variable, not the structure name. For example, the following is incorrect:
struct student{  char name[66];  int num;  char sex;} stu;

pstu = &student;
This is because the structure name and structure variable are two different concepts. The structure name only represents a structure form, and the compiler does not allocate memory space for it (meaning it does not allocate an address), while the structure variable, as a variable, will have memory space allocated by the compiler to store it.
The general form for accessing members of a structure is:
(*pstu).name; //(1)(*structure_pointer_variable).member_name; pstu->name; //(2)structure_pointer_variable->member_nameThat’s a brief overview of structure knowledge.
06
typedef Type Alias
typedef is used to create a new name for an existing type, or a type alias, to simplify variable definitions (in the previous example of extern variable declaration, “u16” is a simplification of the “uint16_t” type name). In MDK, typedef is most commonly used to define type aliases for structures and enumerated types.
We define a structure GPIO:
struct _GPIO{ _IO uint32_t MODER; _IO uint32_t OTYPER; ...};After defining such a structure, if we want to define a structure variable like “GPIOA”, we need to use the following code:
struct _GPIO GPIOA;Although this achieves our goal, it is cumbersome. Since this will be used in many places in MDK, we can use “typedef” to define an alias for it, allowing us to define structure variables directly through this alias:
typedef struct{ _IO uint32_t MODER; _IO uint32_t OTYPER;} GPIO_typedef;Once this definition is complete, if we need to define structure variables, we only need to do this:
GPIO_typedef _GPIOA, _GPIOB;

Some screenshots of electronic books

【Complete Set of Hardware Learning Materials Collection】