Building a Smart Home Environment: A Step-by-Step Guide

Building a Smart Home Environment: A Step-by-Step Guide
Editor’s Commentary
A new week begins~
Last week, I almost got sick, with a terrible stomachache. I finally made up my mind to strengthen my exercise routine and improve my health.
So today, I tried walking to work and ended up walking for almost an hour…
Building a Smart Home Environment: A Step-by-Step Guide

Life is a journey, how far do we have to go!

Building a Smart Home Environment: A Step-by-Step Guide

This article provides a simple setup for a small smart home environment that can later be used for experiments or to reproduce certain issues. As a person from the south, my skin gets really dry in the capital, and since I haven’t published anything new in a year and a half, this is a good opportunity to resurrect my writing.

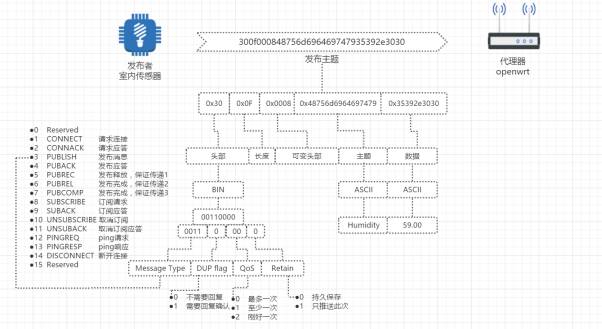
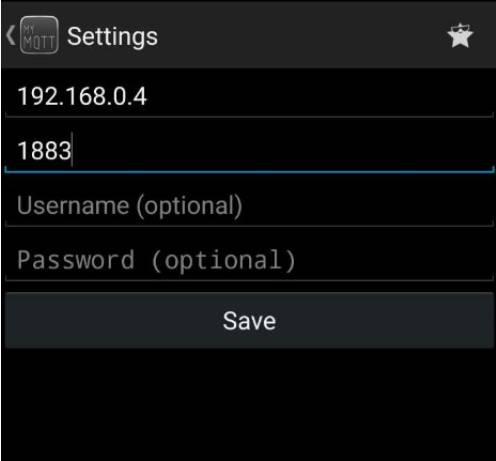
First, I will briefly introduce an IoT connection protocol that will be used:

MQTT
MQTT stands for Message Queuing Telemetry Transport. It is a lightweight messaging protocol developed by IBM, suitable for IoT devices due to its publish-subscribe message transmission mechanism. It simplifies short message communication between devices. MQTT uses TCP/IP for basic network services, while MQTT-SN is based on UDP or non-IP protocols. Since both are suitable for different environments, I will use the more common former as an example. In the MQTT protocol, there are three roles: Publisher, Broker (server), and Subscriber. By establishing topics, messages are transmitted from the publisher through the broker to every subscriber. The publisher sends the topic and its corresponding content to the broker, which then forwards the message to every subscriber that has subscribed to that topic. As shown in the diagram.
Building a Smart Home Environment: A Step-by-Step Guide
Publisher
The main role of the publisher is to send information, such as humidity, to the broker, which then sends it to every subscriber subscribed to the humidity topic. The publisher can also subscribe to other topics!
Broker
The primary role is to act as a server that receives application information published by the publisher and forwards it to the appropriate subscribers.
Subscriber

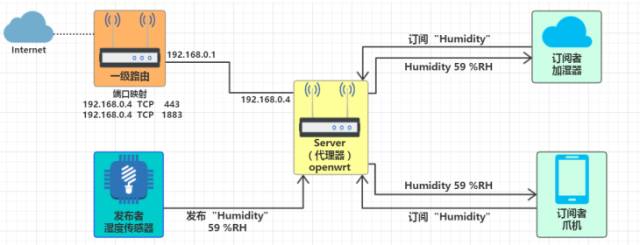
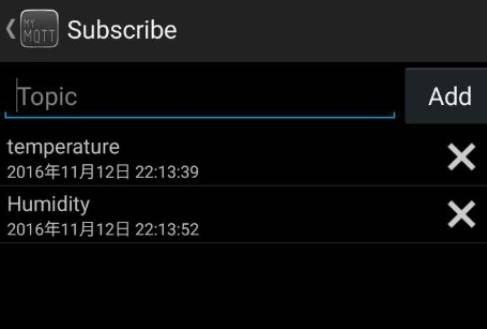
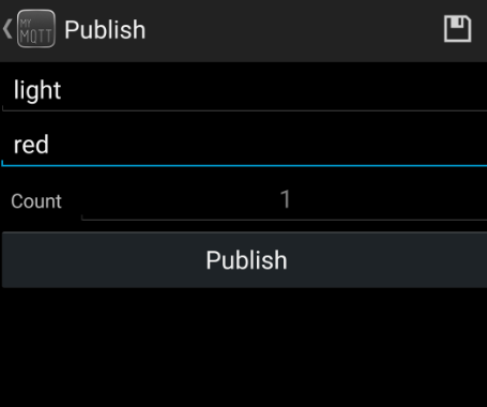
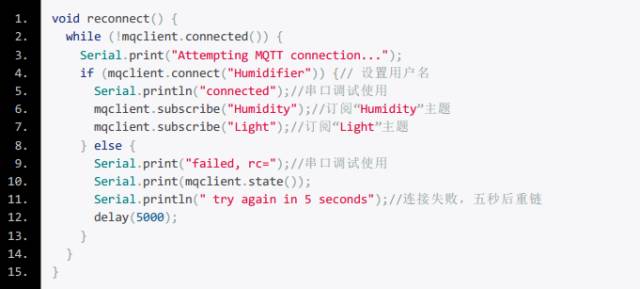
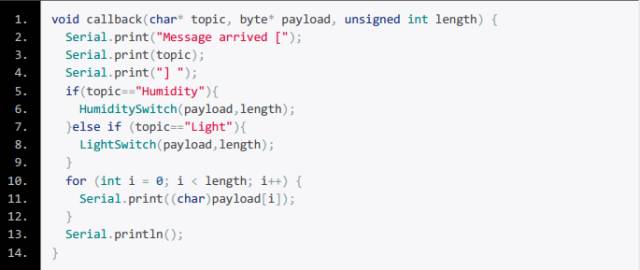
The subscriber first subscribes to the relevant topics from the server. For example, if the subscription is for a humidifier, this humidifier will first subscribe to the humidity topic from the broker. When the sensor (publisher) collects humidity data, the publisher sends this topic and its content to the broker, which then transmits the data to every subscriber that has subscribed to that topic, which is the humidifier.

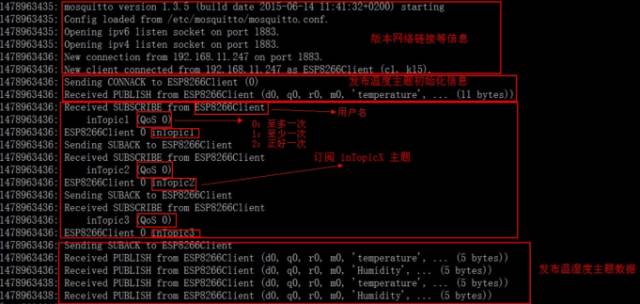
Let’s first discuss the QOS (Quality of Service) on this server, which provides three levels of service for different usage scenarios:

1: At most once, this service may result in packet loss, suitable for scenarios where real-time requirements are not high. For example, in the current environment, if the sensor sends humidity information to the broker and the data packet is lost, it can be retrieved in the next packet.
2: At least once, this service is designed to ensure that the data packet reaches its destination. For example, it is suitable for environments like access control alarms, where information may be duplicated. If the sender does not receive the PUBACK message within a specified time, the data content will be resent.

3: Exactly once, this service guarantees that the data packet is neither duplicated nor lost, suitable for billing systems. In such environments, when a message is sent, the broker will save the message’s ID and will persistently push the message to the subscriber. If the subscriber receives the message, it will send a PUBREL to the broker to clear the saved message’s ID.

Next, let’s talk about how to use wildcards to subscribe to multiple topics.

/: Represents hierarchy, e.g., a/b, a/b/c.

# : Matches >= 0 levels, e.g., a/# matches a/, a/b, a/b/c.

A standalone # matches all. a# and a/#/c are not allowed.

+: Matches one level, e.g., a/+ matches a/b, a/c, but not a/b/c. A standalone + is allowed, while a+ and a/+/b are not allowed.
Now let’s discuss the publisher, which is a temperature and humidity sensor that uses NodeMCU to connect to the Youku router via Wi-Fi and transmits temperature and humidity information to the Youku broker using the MQTT protocol. The original image used a standard temperature sensor, but later it was replaced with a DHT11. The display uses an SSD1306-driven OLED screen. The weather and PM2.5 data are obtained from an external weather API, which I won’t elaborate on here.
Building a Smart Home Environment: A Step-by-Step Guide
Then, using NodeMCU to read data from the DHT11 sensor, publish temperature and humidity data every two seconds using the MQTT protocol.
Building a Smart Home Environment: A Step-by-Step Guide
At this point, we capture the data packets to see the MQTT protocol headers sent by the sensor.
Building a Smart Home Environment: A Step-by-Step Guide
Once the publisher is working correctly, we start setting up the broker. You can directly set up a VPS, but due to the sensitive data involved, I chose to keep the data on the local network. However, we can control some settings through the external network. Therefore, we chose to set up these services on the router since both the broker and the sensor need to interact continuously for 24 hours. Setting up an additional server on the local network is clearly impractical for our small smart home environment, so we chose to use the router as the network manager and broker.
First, it reduces a lot of unnecessary links in data interaction.
Second, it has no additional costs.
Here, I used the Youku router, which is a cheap router with an 8GB SD card running OpenWRT. The Youku router acts as a secondary router responsible for the sensor’s data network. Initially, I planned to map ports 80 and 1883 (MQTT) from the primary router to the secondary router, so that we could connect to the internal modules via port 1883 to control some devices when we are outside. Port 80 was intended for integration with WeChat, making it much easier to control internal devices. However, I found that my Unicom broadband blocks port 80. But we can bypass this restriction using HTTPS (433), as WeChat only supports ports 80 and 433. After obtaining the router, I exploited a vulnerability to gain root shell access to the Youku router, and the first step was to modify the relevant configuration files to turn off the default mining program running on it, and then update the opkg source.
Building a Smart Home Environment: A Step-by-Step Guide
Then, modify the content to:
Building a Smart Home Environment: A Step-by-Step Guide
Then save and use:
Building a Smart Home Environment: A Step-by-Step Guide
Update the software source, and after updating, you can install the necessary environment, such as MySQL, PHP, Mosquitto, etc.
Building a Smart Home Environment: A Step-by-Step Guide
Mosquitto starts as a service by default. We can create this user or modify the configuration file.
Building a Smart Home Environment: A Step-by-Step Guide
First, let’s take a look at the help for this program.
Building a Smart Home Environment: A Step-by-Step Guide
Then we start the broker service.
Building a Smart Home Environment: A Step-by-Step Guide
Once familiar, write “mosquitto -c /etc/mosquitto/mosquitto.conf -d” into /etc/rc.local to ensure it runs on startup. Then we can see the following information.
Building a Smart Home Environment: A Step-by-Step Guide
Next, we subscribe to the “temperature” and “humidity” topics on the Youku router and check the data sent by the sensor.
Building a Smart Home Environment: A Step-by-Step Guide
Currently, the temperature is 19℃, and the humidity is 51%, all good.
Building a Smart Home Environment: A Step-by-Step Guide
Next, let’s test using a mobile phone to subscribe to topic data. I used the MYMQTT app for testing. Then the phone connects to the primary router’s Wi-Fi, enters the Youku router’s IP, and keeps the default port. If you want to access it externally, it’s best to set up dynamic domain name binding on the primary router and map the relevant ports to the Youku router.
Building a Smart Home Environment: A Step-by-Step Guide
Then, check the green bar in the upper right corner, which indicates that the connection to the Youku router is successful. Now we can subscribe to the relevant topics.
Building a Smart Home Environment: A Step-by-Step Guide
At this point, the phone can successfully receive data from the sensor. In the future, we will control the humidifier’s light and switch from the phone. We will send a message with the content “RED” to the “light” topic to control the color of the humidifier’s light.
Building a Smart Home Environment: A Step-by-Step Guide
Then we use the Youku router to simulate the module on the humidifier to receive data.
Building a Smart Home Environment: A Step-by-Step Guide
After setting up the broker, we need to set up the subscriber side, which is the humidifier in the topology. My humidifier looks like this, with humidification and multicolor light functions, and three buttons for color control, switch, and humidity intensity.
Building a Smart Home Environment: A Step-by-Step Guide
First, we open the humidifier and see that there is a lot of internal space. We find the button’s ribbon cable and use a multimeter to check the circuit of this button.
Building a Smart Home Environment: A Step-by-Step Guide
Then, we directly connect the relevant signal lines to the MCU’s IO with a common ground. I forgot to introduce this controller; we use NodeMCU, which is a wireless module equipped with the ESP8266 chip. It connects to the Youku router’s Wi-Fi for data transmission. The ESP8266 can operate in softAP mode, meaning two NodeMCUs can communicate without needing an additional router! Back to the main topic, the humidifier uses 24V power supply while our NodeMCU requires 5V, so we either need to step down the 24V to 5V or add a small battery inside.
Building a Smart Home Environment: A Step-by-Step Guide
Next, we write the relevant program for NodeMCU. Below is a part of the code. First, initialize the network (which I won’t go into detail about), then connect to the MQTT broker, and subscribe to the “Humidity” and “Light” topics. The humidity topic is published by another NodeMCU, and the humidifier module receives the humidity data. When the indoor humidity reaches a certain level, the humidifier will automatically turn on for humidification. The Light topic is published by the phone through the MYMQTT app to control the humidifier’s light!
Building a Smart Home Environment: A Step-by-Step Guide
Set the MQTT callback function to turn on the humidifier when the humidity reaches a certain level. Based on the incoming Light content, send a low-level signal to the humidifier button to simulate the button press. Some may ask why not place the sensor inside the humidifier to let it determine humidity and turn on the switch; the data measured would be inaccurate due to being enclosed!
Building a Smart Home Environment: A Step-by-Step Guide
After burning the program to NodeMCU, we can connect the IO pins to the button signal line and place the battery inside the humidifier, then screw it all together.
Building a Smart Home Environment: A Step-by-Step Guide
Next, we can decorate the humidifier with some silk or other decorative items to make it look like a cloud. I bought wedding decorations, which were quite nice and very affordable. In fact, Taobao also sells remote-controlled clouds, but they are a bit more expensive.
Building a Smart Home Environment: A Step-by-Step Guide
Moreover, we can use an external weather API to check the outdoor weather status and represent the air quality outside with light colors. However, if this is done in the capital, this cloud may remain deep red.
Building a Smart Home Environment: A Step-by-Step Guide
Finally, with the humidifier’s misting effect and fragrance effect, we can hang it up with a line. However, be careful not to block the mist outlet and the intake.
Building a Smart Home Environment: A Step-by-Step Guide
Thus, we have DIY-ed a smart humidifier that can intelligently humidify based on indoor humidity and can be remotely controlled while also indicating outdoor weather through light color. Initially, I just wanted to set up a smart home environment; I suggest writing the code yourself according to the examples. There are still parts of the code that need modification, and I will release it later. Once the environment is set up, if I have time, I will update the security section, as this environment lacks authentication, encryption, etc., and I will analyze some security issues and vulnerabilities that have occurred or may occur.
Building a Smart Home Environment: A Step-by-Step Guide
Look at the security of the snow · Look at the snow testing
Continuously focusing on security for 16 years, we are here to serve you!

Leave a Comment