Feng Se from Ao Fei Si Quantum Bit Report | Official Account QbitAI
Is it trouble to install Windows 11 on Raspberry Pi?
First, you need to download the ARM version of the system from the official website and then burn the image; after burning, you still need to configure some settings on the Raspberry Pi?
Now, there is a script that can automate all these operations, and it has a graphical interface—you just need to click a few times and you’re done!

And you don’t have to worry about Microsoft’s licensing issue; this script is completely legal!
(It can also be used to install Windows 10.)
6 Steps to Foolproof Installation
First, find the project called WoR-flasher on GitHub and clone it.

Note that this script is currently only available for Linux.
Then start the script in the terminal:
~/wor-flasher/install-wor-gui.sh
A graphical interface will appear, and you can start the foolproof installation.
Step 1, select whether you want to install Win11 or Win10 on Raspberry Pi;

Step 2, choose the language for the operating system;

Step 3, insert a writable memory card of at least 8GB (25GB or more is best), and select it;

Step 4, check the default configuration, and if there are other needs, you can add some yourself;

Step 5, click “Flash”, and the terminal will start running the install-wor.sh script officially.

This step may take a long time to download the installation package from Microsoft, compress it, and generate the image. (If you use a faster/non-official way to obtain the ISO file, you can skip this time-consuming image generation step.)
The author declares here: this script is completely legal, so there’s no need to worry about Microsoft only selling ARM version Windows licenses to OEM (Original Equipment Manufacturers).
Some people have communicated with several Microsoft employees about this, and they had no objections.

Because the script directly downloads files from Microsoft’s update servers (Windows Update servers) through UUPdump and generates the Windows image.

And Microsoft’s update servers are publicly accessible, which is as legal as downloading the x86 Windows ISO from the official website.
Moreover, Microsoft has always been aware of the existence of UUPdump but has never pursued its responsibility.
So there’s no need to worry about licensing issues with this installation.
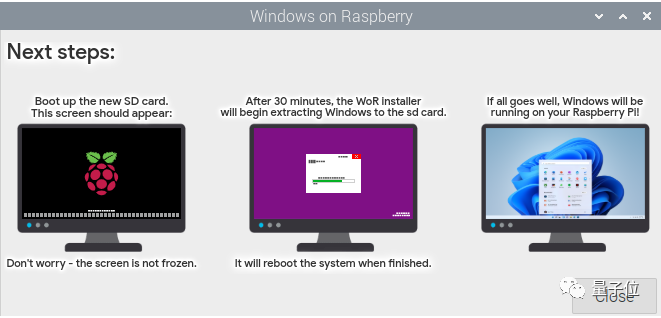
Alright, the last step, after the terminal completes running, the graphical interface will continue to pop up, prompting you to insert the burned memory card into the Raspberry Pi, and the script will continue to automatically install Windows and restart—everything is done (the installation takes about 30 minutes).
That’s all the operations; isn’t there no need for you to think at all?
The only thing needed is to spend some time patiently waiting.

In addition, there’s a good news that I don’t know if everyone has noticed, Windows 11 introduces an interface called “ARM64EC” for “emulation compatibility” (ABI), which is a new way to build applications on ARM devices with Windows 11.

In this case, you can run 64-bit exe programs on Raspberry Pi.
Script address: https://github.com/Botspot/wor-flasher
UUPdump: https://uupdump.net/
Reference link: [1]https://arstechnica.com/gadgets/2021/09/new-script-makes-it-easyish-to-put-windows-10-or-11-on-a-raspberry-pi/?comments=1
[2]https://www.raspberrypi.org/forums/viewtopic.php?f=29&t=318599#p1907313
— The End —
This article is part of the NetEase News•NetEase account feature content incentive plan signed account 【Quantum Bit】 original content, unauthorized reproduction is prohibited.
「Smart Car」 group recruitment is ongoing!
Welcome to join the community for friends interested in smart cars and autonomous driving, to communicate and discuss with industry experts, and to not miss the development and technological progress of the smart car industry. When adding friends, please be sure to note your name-company-position!

Click here👇 to follow me, remember to star it~
One-click triple connection “share”, “like” and “see”
Cutting-edge technology progress is seen every day~