Click on the "Xiaobai Learns Vision" above, select to add "Star" or "Top"

Important content delivered first
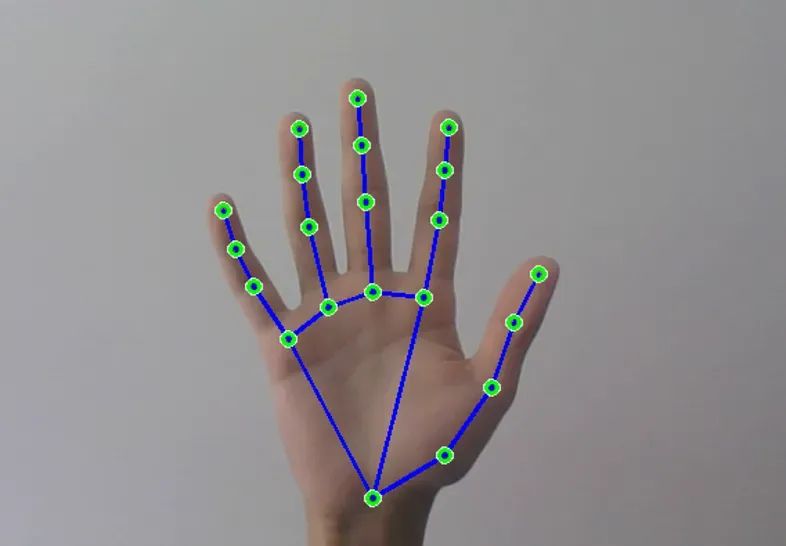
The hand detector is not just an ordinary tool that can detect and track hands; its significance goes far beyond that. You can build amazing projects across various fields from robotics to entertainment.
Without further ado, let’s start coding! 👨💻
import cv2
import mediapipe as mp
This will import the OpenCV and Mediapipe libraries.
mp_drawing = mp.solutions.drawing_utils
mp_hands = mp.solutions.hands
This initializes the Mediapipe drawing utilities and the Hands module for detecting hand landmarks.
cap = cv2.VideoCapture(0)
This initializes the video capture object.
if not cap.isOpened():
    print("Unable to open camera")
    exit()
This checks if the camera opens successfully. If not, it prints an error message and exits the program.
with mp_hands.Hands(static_image_mode=False, max_num_hands=2, min_detection_confidence=0.5) as hands:
This initializes the Mediapipe Hands object. It sets <span>static_image_mode</span> to <span>False</span>, enabling real-time video processing. <span>max_num_hands</span> sets the maximum number of hands to detect and <span>min_detection_confidence</span> sets the minimum confidence threshold for detection.
while True:
    ret, frame = cap.read()
    if not ret:
        print("Error reading frame from camera")
        break
This starts an infinite loop to continuously read frames from the video capture. It checks if the frame is read successfully; if not, it prints an error message and breaks the loop.
frame_rgb = cv2.cvtColor(frame, cv2.COLOR_BGR2RGB)
This converts the captured frame from BGR color space to RGB color space. Mediapipe processes frames in RGB format.
results = hands.process(frame_rgb)
This processes the frame with the Mediapipe Hands object, which detects hand landmarks in the frame. The processed results are stored in the <span>results</span> variable.
if results.multi_hand_landmarks:
    for hand_landmarks in results.multi_hand_landmarks:
        mp_drawing.draw_landmarks(frame, hand_landmarks, mp_hands.HAND_CONNECTIONS,
                                  mp_drawing.DrawingSpec(color=(0, 255, 0), thickness=2, circle_radius=4),
                                  mp_drawing.DrawingSpec(color=(255, 0, 0), thickness=2, circle_radius=2))
If hand landmarks are detected in the frame, this code block iterates through each hand and uses the <span>mp_drawing.draw_landmarks()</span> function to draw the landmarks on the frame.
It uses the <span>mp_hands.HAND_CONNECTIONS</span> parameter to connect the landmarks with lines. These <span>DrawingSpec</span> objects specify the color, thickness, and circle radius for drawing the landmarks.
cv2.imshow("Hand Detection", frame)
if cv2.waitKey(1) == ord("q"):
    break
<span>cv2.imshow()</span> displays the frame in a window titled “Hand Detection”. It waits for a key event with <span>cv2.waitKey(1)</span>; if the key pressed is “q”, it breaks the loop and exits the program.
cap.release()
cv2.destroyAllWindows()
Finally, this releases the video capture object and closes all windows created by OpenCV.
import cv2
import mediapipe as mp
# Initialize Mediapipe
mp_drawing = mp.solutions.drawing_utils
mp_hands = mp.solutions.hands
# Initialize video capture
cap = cv2.VideoCapture(0)
# Check if camera opened successfully
if not cap.isOpened():
    print("Unable to open camera")
    exit()
# Initialize Mediapipe Hands object
with mp_hands.Hands(static_image_mode=False, max_num_hands=2, min_detection_confidence=0.5) as hands:
    while True:
        # Read the frame from the video capture
        ret, frame = cap.read()
        if not ret:
            print("Error reading frame from camera")
            break
        # Convert the frame to RGB for Mediapipe
        frame_rgb = cv2.cvtColor(frame, cv2.COLOR_BGR2RGB)
        # Process the frame with Mediapipe
        results = hands.process(frame_rgb)
        # Draw hand landmarks on the frame
        if results.multi_hand_landmarks:
            for hand_landmarks in results.multi_hand_landmarks:
                mp_drawing.draw_landmarks(frame, hand_landmarks, mp_hands.HAND_CONNECTIONS,
                                          mp_drawing.DrawingSpec(color=(0, 255, 0), thickness=2, circle_radius=4),
                                          mp_drawing.DrawingSpec(color=(255, 0, 0), thickness=2, circle_radius=2))
        # Display the frame
        cv2.imshow("Hand Detection", frame)
        # Check for the 'q' key to exit
        if cv2.waitKey(1) == ord("q"):
            break
# Release the video capture and close all windows
cap.release()
cv2.destroyAllWindows()
Pick up the camera, start the code editor, and launch hand detection using OpenCV and Mediapipe to build impressive applications. Let your imagination run wild!
How to Use Code to Determine if the Hand is Open or Closed?
We will use a little trick here! But before that, we need to know the key point positioning of the 21 finger joint coordinates.
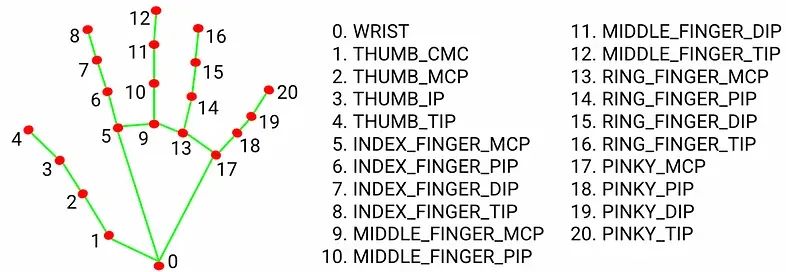
If we can obtain the coordinates (x, y) of the red circles at indices 12 and 9. We can compare the Y coordinates at each index so that if the Y coordinate at index 12 is less than that at index 9, we can consider the hand as closed; otherwise, it is open.
You can do it like this:
h, w, _ = frame.shape # h = frame height, w = frame width
x, y = int(hand_landmarks.landmark[12].x * w), int(hand_landmarks.landmark[12].y * h)
x1, y1 = int(hand_landmarks.landmark[9].x * w), int(hand_landmarks.landmark[9].y * h)
First, we determine the coordinates at indices 12 and 9, respectively as (x,y) and (x1,y1).
if y < y1:
    hand_status = "Open"
    cv2.rectangle(frame, (0, 0), (200, 60), (255, 0, 0), -1)
    cv2.putText(frame, "Open Hand", (0, 35), cv2.FONT_HERSHEY_SIMPLEX, 1, (255, 255, 255), 3)
else:
    hand_status = "Closed"
    cv2.rectangle(frame, (0, 0), (200, 60), (255, 0, 0), -1)
    cv2.putText(frame, "Closed Hand", (0, 35), cv2.FONT_HERSHEY_SIMPLEX, 1, (255, 255, 255), 3)
Finally, we compare the Y coordinate values and print the text “Closed Hand” or “Open Hand” in white on the blue rectangle.
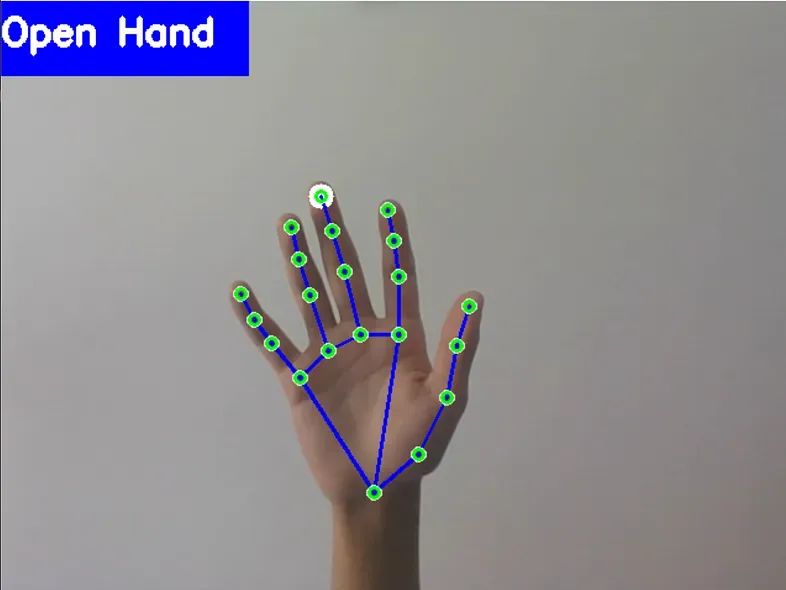
Detected hand marked as “Open Hand”
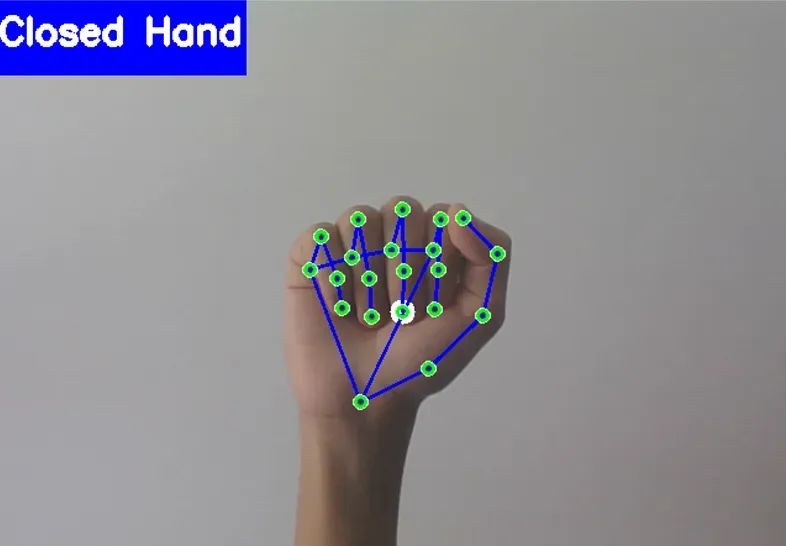
Detected hand marked as “Closed Hand”
Download 1: OpenCV-Contrib Extension Module Chinese Version Tutorial

Reply "Extension Module Chinese Tutorial" in the backend of "Xiaobai Learns Vision" public account to download the first OpenCV extension module tutorial in Chinese on the internet, covering installation of extension modules, SFM algorithms, stereo vision, object tracking, biological vision, super-resolution processing, and more than twenty chapters of content.

Download 2: Python Vision Practical Project 52 Lectures

Reply "Python Vision Practical Project" in the backend of "Xiaobai Learns Vision" public account to download 31 visual practical projects including image segmentation, mask detection, lane line detection, vehicle counting, eyeliner addition, license plate recognition, character recognition, emotion detection, text content extraction, and face recognition to help you quickly learn computer vision.

Download 3: OpenCV Practical Project 20 Lectures

Reply "OpenCV Practical Project 20 Lectures" in the backend of "Xiaobai Learns Vision" public account to download 20 practical projects based on OpenCV for advanced learning of OpenCV.

Group Chat

Welcome to join the public account reader group to exchange ideas with peers. Currently, there are WeChat groups for SLAM, 3D vision, sensors, autonomous driving, computational photography, detection, segmentation, recognition, medical imaging, GAN, algorithm competition, etc. (will gradually be subdivided in the future). Please scan the WeChat number below to join the group, with a note: "Nickname + School/Company + Research Direction", for example: "Zhang San + Shanghai Jiao Tong University + Visual SLAM". Please follow the format; otherwise, you will not be approved. After successful addition, you will be invited to relevant WeChat groups based on research direction. Please do not send advertisements in the group; otherwise, you will be removed. Thank you for your understanding~