Introduction to Building Your Own FM Radio Receiver with Arduino and Si4703
In this project, we will build a fully functional FM radio receiver using Arduino Nano and Si4703 FM tuner module.

Perfect for enthusiasts and electronics hobbyists looking to delve into RF and wireless communication.
The Si4703 module is a highly integrated FM receiver that simplifies the tuning and listening process for FM stations.
By the end of this tutorial, we will learn:
How to set up and program an FM radio receiver
How to connect the Si4703 FM receiver module to Arduino
How to tune frequencies using a rotary encoder
Display information on a 16×02 LCD screen
Build a compact and fully functional FM radio with a stereo amplifier
Required Materials

-
Arduino Nano (or any compatible Arduino board)
-
Si4703 FM tuner module
-
PAM8403 stereo amplifier module (for enhanced audio output)
-
16×02 LCD screen (for displaying frequency and other information)
-
Rotary encoder (for tuning frequency)
-
Speaker or headphones (for audio output)
-
Button (for power or station selection)
-
10k potentiometer (for adjusting display contrast)
-
Breadboard and jumper wires
-
5V power supply
-
Soldering tools
-
Enclosure or casing
-
Antenna
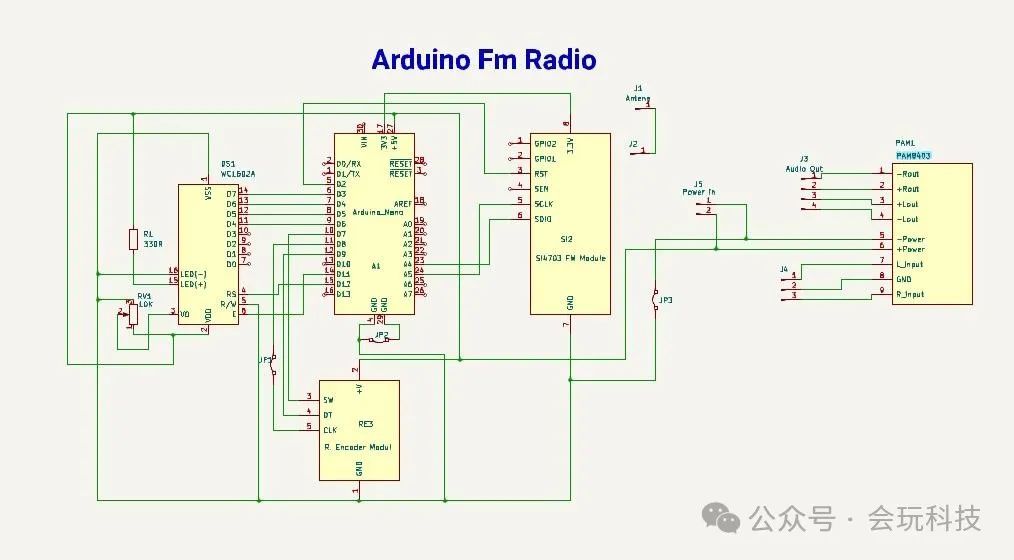
Step 1: Schematic Diagram
The schematic diagram for this FM radio receiver project is simple and easy to understand. It consists of the following key components:
-
Arduino Nano: The central microcontroller that connects to the Si4703 FM module and controls other components such as the rotary encoder and LCD screen.
-
Si4703 FM module: This FM tuner module connects to Arduino via I2C (SDA and SCL) lines. It receives FM signals and sends audio data to the amplifier module.
-
PAM8403 stereo amplifier module: The amplifier enhances the audio signal from the Si4703 and drives the speaker or headphones. It is powered by the same 5V power supply as the Arduino.
-
Rotary encoder: The rotary encoder connects to Arduino for tuning FM frequencies. Turning the encoder changes the frequency and displays it on the LCD screen.
-
16×02 LCD screen: The LCD screen displays the current FM frequency and other information. It connects to Arduino using the I2C protocol, sharing the same SDA and SCL lines as the Si4703 module.
-
Power supply: The entire circuit is powered by a 5V power supply. If a 5V power supply is not available, a 7805 voltage regulator can be used to step down from a 12V supply.
The connections between the components are clearly shown in the schematic. The I2C lines (SDA and SCL) are shared between the Si4703 and the LCD screen. The rotary encoder connects to the digital pins of the Arduino to detect rotation changes. The amplifier is powered by the same supply as the Arduino and receives audio signals from the Si4703 module.
Ensure all connections are secure and carefully follow the schematic to ensure proper functionality.
Step 2:Gather all components and set up the breadboard
First, gather all the components needed for the project:Arduino Nano, Si4703 FM module, LCD screen, rotary encoder, PAM8403 amplifier, and other parts.Once everything is ready, set up the breadboard by placing the components and connecting them according to the schematic.Make sure the wiring is neat to avoid confusion during assembly.
Step 3:Video Demonstration
In this section, you will find a video demonstration of the homemade FM radio project.The video will guide you through the assembly process, component connections, and final testing of the radio.You will also see how to tune into different FM stations using the rotary encoder and adjust the volume.Watch the video for a better understanding of each step and see the project in action!
Step 4:Arduino Code
https://github.com/TeknoTrek/Arduino-Nano-FM-Radio-Si4703
Step 5:Enjoy the Results
Power your FM radio with a 5V supply.If a 5V supply is not available, you can safely power the radio using a 7805 voltage regulator with a 12V input.
Congratulations on completing this project!I hope you enjoyed building this FM radio and learned something new in the process.Feel free to share your project versions, and don’t hesitate to ask any questions or provide feedback.