Are you tired of typing on your computer screen to chat with AI every day? Would you like to create something cooler, like an AI companion that can sit on your desk and converse with you verbally? Similar products on the market are priced too high and perform poorly in AI capabilities.
If you enjoy tinkering with hardware (especially small boards like the ESP32) and are particularly interested in AI, then you should take a good look at the ElatoAI open-source project!
Project Introduction
In simple terms, ElatoAI is not just ordinary software; it is a complete set of “blueprints” and “components” that teaches you how to use a small ESP32 development board (the kind commonly used for IoT projects, equipped with WiFi) along with OpenAI’s AI capabilities (speech-to-text, large model chat, text-to-speech), combined with a web control backend, to ultimately create a physical AI device capable of real-time voice conversations!
This project integrates Deno edge functions, Secure WebSocket, and Supabase database, supporting uninterrupted conversations globally for over 10 minutes. Users can create and customize AI characters (Agents) through the accompanying Next.js web application and interact with and manage the hardware device.
The core architecture of the project consists of three main parts:
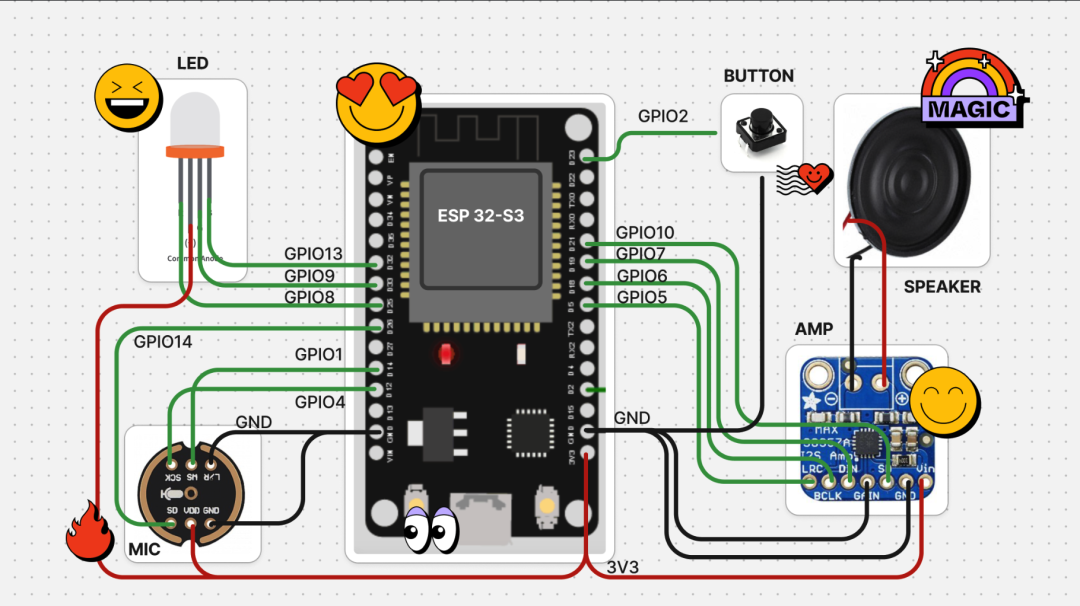
- IoT Client: Firmware running on the ESP32-S3 device (using the PlatformIO/Arduino framework), responsible for handling audio input/output, button/touch interactions, and communicating with the backend server via WebSocket.
- Edge Server: Written in Deno, running on Deno Deploy or Supabase Edge Functions. It handles WebSocket connections from the ESP32 and acts as a proxy for calling the OpenAI API (for speech recognition, LLM inference, and speech synthesis).
- Frontend Client: A Next.js web application (which can be hosted on platforms like Vercel) for user authentication, creating and managing AI characters, viewing conversation history, managing devices, and interacting with AI through voice via WebRTC.
The entire system is backed by a database and user authentication services provided by Supabase. ElatoAI aims to provide a low-latency, high-quality, customizable physical AI conversational experience.
DIY Hardware Design:
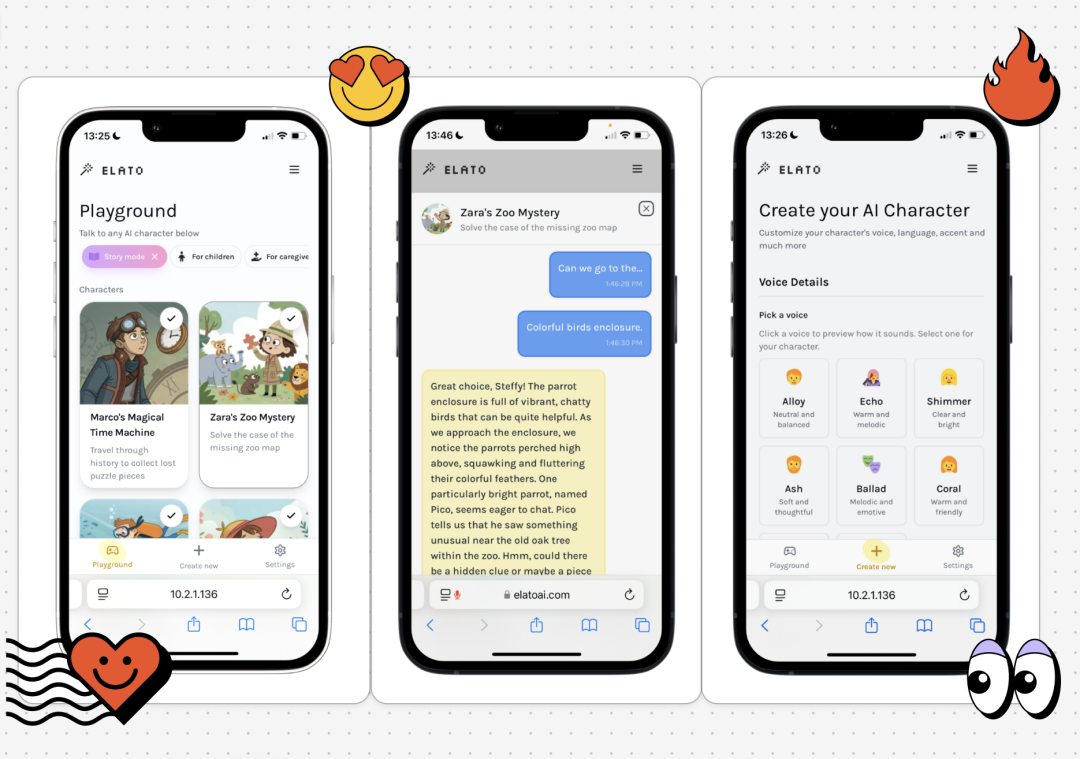
Application Design:
Recommended Use Cases
- Smart Companion for Kids: Upgrade your child’s plush dinosaur into a “little teacher” that not only tells dinosaur facts and historical stories but also sings nursery rhymes and chats, easily becoming a good friend and learning assistant for your child!
- Thoughtful Companion for the Elderly: Customize a plush cat or dog that can chat with the elderly, talk about the weather, tell jokes, and remind them to take their medicine, making their daily life no longer lonely.
- Language Learning Assistant: Use it to practice foreign languages like Japanese and Spanish, simulating real conversation scenarios anytime, which is more vivid than using language apps and can help improve your speaking fluency and pronunciation accuracy!
- Emotional Support Robot: For those who like to express their thoughts, it can be a companion to chat with around the clock, allowing them to share worries, vent, or discuss topics of interest, serving as a considerate listener without being intrusive.
- AI Teaching Assistant: Place it in a classroom model to become an interactive teaching tool, such as assisting children in learning math, memorizing vocabulary, or even solving classroom problems through voice communication.
Effect Demonstration
Below is a demonstration video provided by the project author:
Core Features
- Real-Time Voice-to-Voice Interaction: Utilizing OpenAI’s real-time API and optimized architecture to achieve global round-trip latency of less than 1 second, providing a smooth and natural conversation experience.
- Customizable AI Characters: Users can create AI agents with different personalities, voices, and backgrounds through the web application.
- Hardware Integration: Provides firmware code for the ESP32-S3, supporting button and touch sensor interactions, and includes WiFi management (network configuration via Captive Portal).
- High-Quality Audio: Uses the Opus audio codec for compression, achieving high-definition audio streaming at low bandwidth (24kbps).
- Edge Computing Optimization: Utilizes Deno Edge Functions for low-latency global deployment, ensuring a smooth conversation experience.
- Secure Communication: Uses secure WebSocket (WSS) for data transmission, combined with Supabase for user and device authentication.
- Complete Feature Set: Includes conversation history, device management, user authentication, OTA (Over-the-Air) firmware updates, volume control, real-time text record storage, factory reset, etc.
- No PSRAM Required: The ESP32 firmware is optimized to run even on ESP32-S3 without external PSRAM.
- Full-Stack Open Source: From frontend, edge functions to embedded firmware, the entire project is fully open source, making it easy to learn, customize, and contribute.
How to Install and Use
ElatoAI is not plug-and-play software. It requires a certain technical background (web development, some embedded concepts, cloud service configuration) to successfully deploy and run. Here is a simplified overview of the steps:
Prerequisites:
- Install Supabase CLI, Node.js (npm), Deno, and PlatformIO (usually installed as a VS Code extension).
- Have a Supabase account.
- Have an OpenAI API Key.
- Have an ESP32-S3 development board (e.g., ESP32-S3-DevKitC-1).
- Basic command line operation knowledge.
Setup Steps:
- Start the Local Supabase Backend:
- Clone the ElatoAI repository.
- Install Supabase
<span>brew install supabase/tap/supabase</span>and then run<span>supabase start</span>in the project root directory to initialize the local database and table structure.
- Navigate to the frontend-nextjs directory:
<span>cd frontend-nextjs</span>. - Run
<span>npm install</span>to install dependencies. - Copy
<span>.env.example</span>to<span>.env.local</span>:<span>cp .env.example .env.local</span>. - Fill in your Supabase URL/Anon Key and OpenAI API Key in
<span>.env.local</span>. - Run
<span>npm run dev</span>to start the local frontend development server.
- Navigate to the
<span>server-deno</span>directory. - Copy
<span>.env.example</span>to<span>.env</span>:<span>cp .env.example .env</span>. - Fill in your Supabase URL/Anon Key and OpenAI API Key in
<span>.env</span>. - Run
<span>deno run -A --env-file=.env main.ts</span>to start the local Deno server.
- Open the ESP32 firmware code using VS Code and PlatformIO (usually in a specific subdirectory of the repository, refer to the ESP32 Device README).
- Modify the
<span>Config.cpp</span>file to point the<span>ws_server</span>and<span>backend_server</span>to the local computer IP address running the Deno server and Next.js frontend. Ensure all devices are on the same WiFi network. - Build and upload the firmware to your ESP32-S3 development board.
- After uploading the firmware, the ESP32 should create a WiFi hotspot named ELATO-DEVICE (Captive Portal).
- Connect your phone or computer to this hotspot and visit http://192.168.4.1.
- Configure your home/work WiFi SSID and password on the page.
- After configuration, restart the ESP32 device. It should automatically connect to your WiFi network and the locally running server.
- Obtain the MAC address of the ESP32 device (can be done by flashing test code test/print_mac_address_test.cpp and checking in the serial monitor).
- Manually add the device’s MAC address and custom user code in the devices table of the Supabase database.
- In the settings page of the Next.js frontend, enter this user code to associate the device with your user account.
- If deploying to an online environment, set DEV_MODE to False in the frontend .env.local.
After completing the above steps, you should be able to have real-time voice conversations with your customized AI character by pressing the button on the ESP32 (or using the touch sensor)!
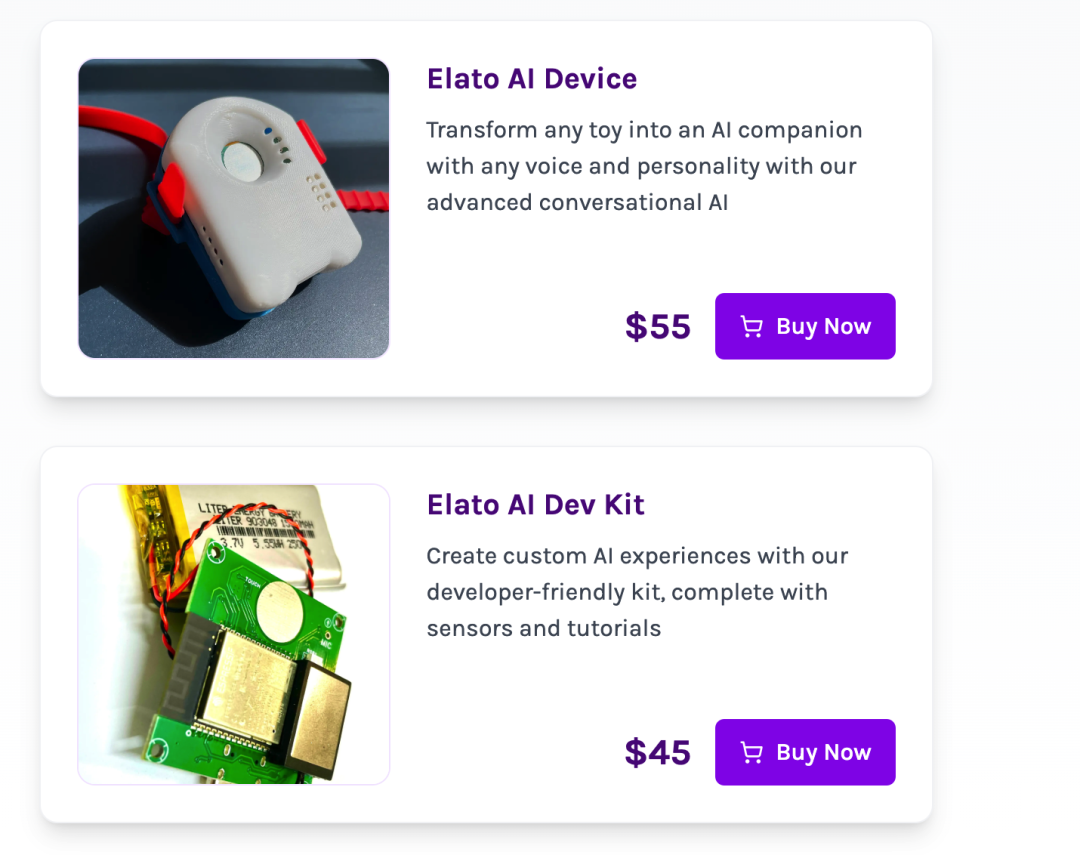
If you don’t want to do it yourself, you can also directly purchase ready-made products, which are linked on the project’s official website:
- Elato AI Device: $55, can be attached to any toy
- Elato AI Development Kit: $45, includes all necessary components, suitable for developers
Related Links
The project’s GitHub address and official website can be obtained by replying “0001” in the backend of this public account!