Do you want to set up a weather station at home to monitor temperature and humidity changes anytime, anywhere? Then try this mini weather station! We will use Arduino, the DHT11 temperature and humidity sensor, and an OLED display to build a super cool weather monitor. Don’t worry, despite the long name, the actual operation is simple enough to be unbelievable! With just a few connections and some code, you can master how to read temperature and humidity data in just a few minutes. Every time you see the data change on the display, you’ll feel like a professional meteorologist. More importantly, this project is not only fun but also practical, helping you understand the air environment in your home, and it can even be useful for gardening.
Next, we will humorously guide you step by step in building this mini weather station. You will learn how to connect the sensor, how to write programs on Arduino, and how to debug the display to show the correct data. The process is not complicated, but it is full of challenges and a sense of accomplishment. Each step comes with a little “surprise” that will bring you more rewards!
Overview
In this project, we will learn how to use Arduino and the DHT11 sensor to read temperature and humidity data and display it in real-time on an OLED screen. Most importantly, the DHT11 sensor is not only inexpensive but also quite accurate, making it an ideal choice for entry-level DIY projects. With just simple code and a few wires, you can have your own weather station to keep track of temperature and humidity changes in your home or office. Isn’t that cool?
The DHT11 sensor is particularly suitable for beginners as it operates stably and does not require complex configurations, providing accurate temperature and humidity data for your project. As the control core, Arduino allows you to flexibly write code to implement various functions, such as periodically updating the display and saving data. This project is not only fun but also deepens your understanding of Arduino programming and sensor operation. You don’t need to worry about complex hardware issues; the entire setup process is full of fun and challenges.
Connecting Components
If you want the source code, please contact me privately, and we can discuss purchasing options.

Installing the DHT Library
If you want the source code, please contact me privately, and we can discuss purchasing options.
Example Code
If you want the source code, please contact me privately, and we can discuss purchasing options.
Running Results
You will see the current temperature and humidity displayed on the OLED screen. For example, the display might look like this:
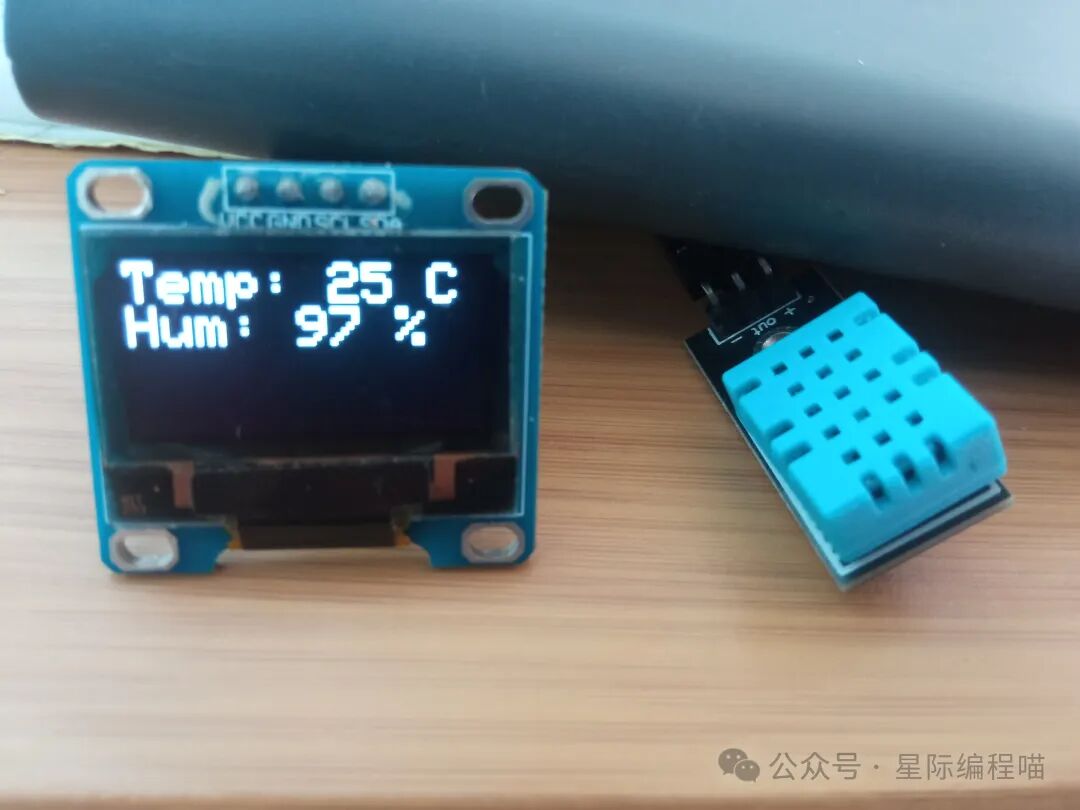
Moreover, this mini weather station updates the data every 2 seconds. Doesn’t it feel like a professional weather station?
Funny Story
Once, I was busy making a mini weather station project, preparing to showcase it to my friends, feeling like a high-tech genius, ready to have my own weather forecasting system. So, I carefully connected the DHT11 sensor and the OLED display, thinking everything would go smoothly. However, things did not go as I imagined.
It was like a dark comedy. After starting the code, I stared at the display, thinking, “The temperature and humidity data will pop up soon, and everyone will be amazed!” But—nothing appeared. The display flashed a chilling message: “Sensor read failed!” I was stunned, thinking, “Is my sensor broken?” Assuming it was a hardware issue, I took the DHT11 sensor off, checked it, and found that its pins were fine, and the wires were all connected tightly. So, I hurried to check the code, wondering if there was a mistake in the program.
I did various debugging, checked the power supply, signal lines, and even doubted if I had built a “weird” circuit. Eventually, overwhelmed, I decided to take a break, have a drink, and calm down. Suddenly, a thought flashed through my mind: “Could the wiring be wrong?”
So, I rechecked every wire and found that I had made a rookie mistake! I had mixed up the power line and the data line of the DHT11! When plugging the sensor into the breadboard, I had connected the signal line to the power position and the power line to the data line. It was a “disaster scene of the circuit.” I couldn’t help but laugh at myself: “Hey, the problem was that simple!”
At that moment, I thought if the sensor could talk, it would definitely look at me with a disdainful expression: “Is this how you want me to work? Let me endure and cooperate with you, and you can’t even get the power right?” However, looking back, this illustrates a profound truth—wiring must be correct, and the connections must be clear. If wrong, after all that effort, the device is just a decoration.
Since then, I have firmly believed in the principle of “wiring must be correct.” Every time I connect any component, I check each wire’s direction and each interface’s connection like a “circuit engineer,” even giving each wire a name: “This wire is power, no problem.” I also add a mantra of “check carefully” to every plug, fearing I might make a silly mistake again.
For me, starting a new electronics project feels like embarking on an adventure, even becoming a “detective mission.” Sometimes, the error lies in the most basic parts; a wire, a plug, if wrong, can affect the entire system’s operation. Because of this, I take “getting every step right” as a principle of an electronics project. Every time I connect a wire correctly, I feel like I have transformed from a “hardware novice” to a “hardware master.”
Now, whenever I see someone plug in the wrong wire or make a connection error, I can’t help but laugh: “Hey, just like I was back then!” Then, I always proudly say: “It’s okay, it’s just a technical detail.”
Common Questions
1. Why is the temperature and humidity data read inaccurately?
It may be due to poor contact with the sensor or a quality issue with the sensor. You can try re-plugging the sensor to ensure the wiring is correct.
2. Why does the OLED display not show any content?
It may be due to incorrect OLED connections or an incorrect I2C address setting. Check the connections and confirm if the address is correct.
3. The DHT11 sensor reads data slowly, what should I do?
The DHT11 sensor does read data relatively slowly; if you are not in a hurry for real-time updates, you can increase the reading interval (for example, read once every 10 seconds).
Applicable Scenarios
Home Use:Do you know what the temperature and humidity are like at home? For those who grow flowers, maintaining suitable humidity is key to plant growth; for pet owners, monitoring temperature and humidity can ensure the health of pets. For example, some cats and dogs are particularly sensitive to temperature changes, and a suitable environment can make them more active. With this mini weather station, you can easily monitor the temperature and humidity status at home, adjust the air conditioning or humidifier, and ensure that your home’s “biosphere” is always in optimal condition.
DIY Enthusiasts:If you are a DIY enthusiast looking to build a weather station by yourself, this project will be a great choice. Through this weather station, you can learn how to connect sensors, read data, and create your own “meteorological station.” More importantly, as one of the introductory projects for Arduino, it can help you quickly get started and understand the basic principles of electronic projects. Through this project, you will gradually master sensor usage skills and programming experience.
Office Environment:The comfort of an office is often closely related to temperature and humidity. Too high or too low temperatures can affect work efficiency, and excessive humidity can make the air feel stuffy, affecting mood. With this mini weather station, you can easily monitor temperature and humidity in the office or room, adjusting the air conditioning or humidifier according to the actual situation, creating a more pleasant working environment. After all, a good working environment plays a significant role in improving efficiency and maintaining a good mood; no matter how busy work is, one should care about their “working climate.”
Precautions
- The operating temperature range of the DHT11 sensor is 0-50°C, and the humidity range is 20-90%. If it exceeds this range, the sensor may fail.
- Power stability is very important. Try to use a stable 5V power supply to avoid device anomalies caused by unstable voltage.
- Avoid excessive use of the OLED display. The display lifespan of OLED is limited, and displaying the same content for a long time may lead to burn-in issues.
Best Practices
- Optimize Code:Want your mini weather station to be more efficient? Start with code optimization! For example, when reading sensor data, try to avoid unnecessary delays. While it is necessary to give the DHT11 sensor a “breather,” there is no need to “wait until the end of time” every time. By using reasonable time intervals and optimizing logic, you can make the system respond more quickly and avoid redundant operations. This not only improves efficiency but also reduces delays when Arduino processes other tasks, enhancing the overall system’s smoothness.
- Shell Protection:Although the DHT11 and OLED display are small hardware helpers, they do not like external “interference.” Making a simple shell for them can protect these sensitive components and prevent dust and moisture from affecting the sensor’s accuracy. If you want to add a bit of fun, you can use a transparent shell to showcase the project’s internal structure, protecting the components while making your mini weather station look like a high-tech gadget. Who doesn’t love a techy-looking project?
- Use Serial Output:Your mini weather station can not only display temperature and humidity data on the OLED screen but can also transmit this data to a computer via serial for deeper analysis. This way, you can record the data on your PC, use Excel or other tools to plot temperature and humidity change curves, or conduct data analysis to find potential patterns. This method not only enhances the project’s practicality but also provides more data support for understanding environmental changes, and it can even interact with other IoT devices to create more intelligent applications.
Conclusion
Through this mini weather station, you can learn how to use Arduino, the DHT11 sensor, and the OLED display, and establish your own weather monitoring system at home! The project is simple, fun, and very practical. With just a few steps, you can start monitoring the temperature and humidity in your home, office, or anywhere, keeping track of environmental changes in real-time. And who says technology has to be dull? Today, you can become the meteorologist of your own home and enjoy the wonderful journey of temperature and humidity “transformation”!
Moreover, this project will deepen your understanding of how sensors work and enhance your grasp of hardware control and programming. Every time you see the data updating in real-time on the OLED display, you will feel a sense of accomplishment, as if you have mastered the entire weather. Most importantly, you can adjust the environment in your home based on the data to ensure comfort and provide better growing conditions for plants. Now, let’s get started and bring “tech vibes” into your home!
Please open in the WeChat client