“Introduction: What happens between a line of C++ code and an executable binary file? Today, we press the slow-motion button and follow the steps of GCC to explore this process.”
Hello, C++ developers. When developing C++ in a Linux environment, GCC (GNU Compiler Collection) is almost an unavoidable king. Most of us have probably typed this command: <span>g++ main.cpp -o my_app</span>
After pressing Enter, an executable file <span>my_app</span> is magically born. But have you ever thought about how much complex work GCC, this “master of ceremonies”, does behind this simple command? It is like a hidden martial arts master, and we usually only use its simplest move.
Today, let us unveil the mystery of GCC, not just to be a “swapper”, but to become a developer who truly understands the principles of compilation. This article will take you through:
-
Deconstructing the four core steps of compilation: Preprocessing, Compilation, Assembly, Linking.
-
Learning to use the GCC command for “step-by-step execution”, witnessing the transformation of code firsthand.
-
Mastering advanced practical skills such as multi-file compilation and library linking through a complete project.
Are you ready? Let’s start this in-depth exploration of GCC!
1. Warm-up: Common “Three Moves” of GCC/G++
Before diving into the internals, let’s review the most commonly used commands and options to ensure a solid foundation.
-
<span>gcc</span>vs<span>g++</span>: -
<span>gcc</span>: GNU C Compiler. -
<span>g++</span>: GNU C++ Compiler. -
Key Difference:
<span>g++</span>automatically links the C++ standard library (like<span>libstdc++</span>) when compiling<span>.cpp</span>files, while<span>gcc</span>does not by default. Therefore, always use<span>g++</span>for compiling C++ programs. -
The Core Command:
# Compile main.cpp and generate an executable named my_app g++ main.cpp -o my_app -
<span>-o</span>: Specifies the name of the output file. If not specified, it defaults to generating a file named<span>a.out</span>. -
Recommended Compilation Options:
# Use C++17 standard and enable all recommended warning messages g++ -std=c++17 -Wall main.cpp -o my_app -
<span>-std=c++17</span>: Specifies the C++ standard. Essential for modern C++ development; you can also use<span>c++11</span>,<span>c++14</span>,<span>c++20</span>. -
<span>-Wall</span>: (Warning, all) Enables most useful warnings. It helps you discover many potential bugs and is a must-have option for professional programmers!
2. Delving Deeper: Detailed Explanation of the Four Steps of Compilation
The one-click compile command we usually use actually executes the following four steps in order automatically by GCC. Now, let’s break it down and go through it step by step.
Prepare a simple <span>hello.cpp</span> file:
// hello.cpp
#include <iostream>

#define GREETING "Hello, GCC!"

int main() {
    // This is a comment
    std::cout << GREETING << std::endl;
    return 0;
}
Step 1: Preprocessing
-
Task: The “textual makeup artist” of the code. It processes all directives starting with
<span>#</span>and performs pure text operations. -
Expanding
<span>#include</span>: Copies the content of<span><iostream></span>directly into<span>hello.cpp</span>. -
Replacing
<span>#define</span>: Replaces all instances of<span>GREETING</span>in the code with<span>"Hello, GCC!"</span>. -
Removing comments:
<span>//</span>and<span>/* */</span>will be cleaned up. -
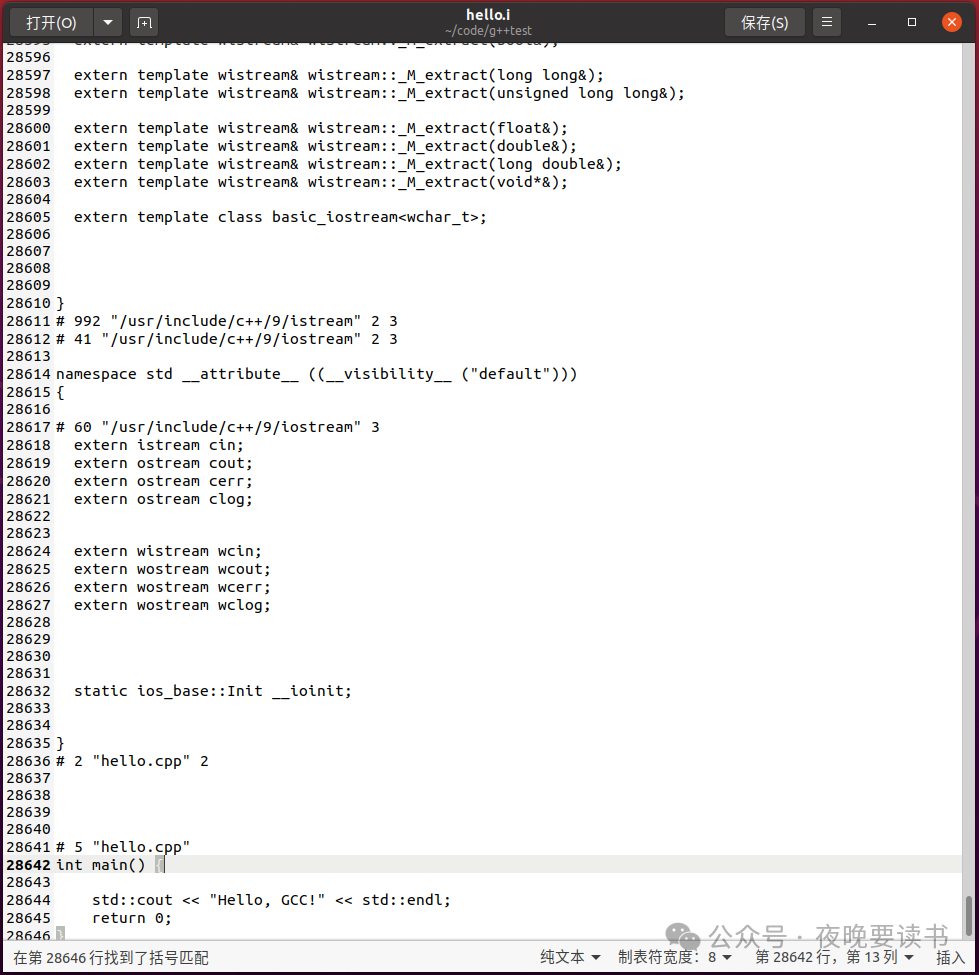
How to Execute: Use the
<span>-E</span>option to make GCC stop after preprocessing.g++ -E hello.cpp -o hello.i -
Output:
<span>hello.i</span>file. This is a large text file that is still C++ source code. You can open it with a text editor to see how extensive the expansion of<span><iostream></span>is and confirm that<span>GREETING</span>and comments have been processed.
Step 2: Compilation
-
Task: The “chief translator” of the code. It receives the preprocessed code, performs lexical, syntactic, and semantic analysis, checks if the code conforms to C++ standards, and then translates it into lower-level assembly code. Code optimization (
<span>-O2</span>,<span>-O3</span>, etc.) also mainly occurs at this step. -
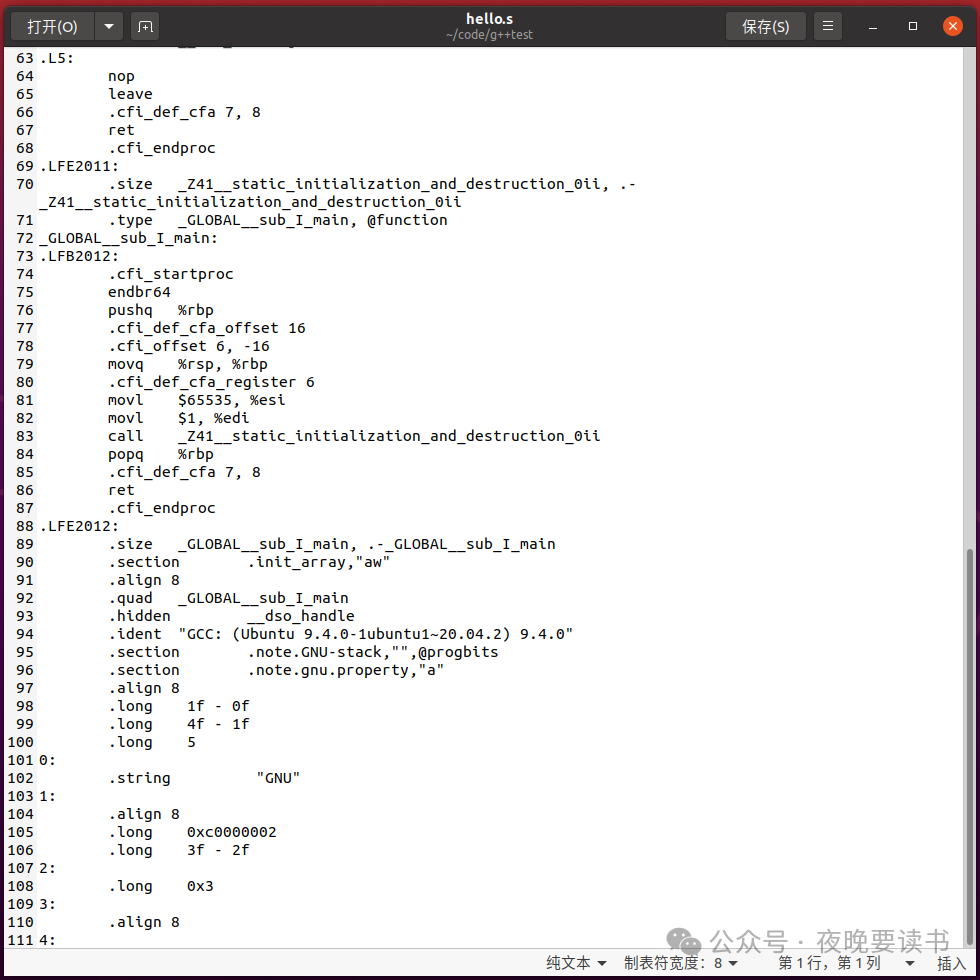
How to Execute: Use the
<span>-S</span>option to make GCC stop after generating assembly code.g++ -S hello.i -o hello.s # Or start directly from the source file g++ -S hello.cpp -o hello.s -
Output:
<span>hello.s</span>file. This is a text file containing assembly instructions in AT&T syntax that describe the logic of the program. Although it may seem like a foreign language to beginners, it is one step closer to machine code.
Step 3: Assembly
-
Task: The “binary coder” of the code. It receives the assembly code and translates it into binary machine code that the CPU can directly recognize.
-
How to Execute: Use the
<span>-c</span>option to make GCC stop after generating the object file. This is a very common option!g++ -c hello.s -o hello.o # Or start directly from the source file, this is the most common usage g++ -c hello.cpp -o hello.o -
Output:
<span>hello.o</span>file. This is an object file, which is in binary format. It contains the compiled code and data, but it is still incomplete— for example, it knows to call<span>std::cout</span>, but does not know the specific address of this function.
Step 4: Linking
-
Task: The “general contractor” of the project. It links your object file (
<span>hello.o</span>) with the library files that the program depends on (like the C++ standard library, which contains the implementation of<span>std::cout</span>), resolving all outstanding address references, and finally generates a complete executable file. -
How to Execute: Directly call GCC/G++ to process the object file.
g++ hello.o -o hello_app -
Output:
<span>hello_app</span>. This is the program we ultimately want, which can be run in the terminal!
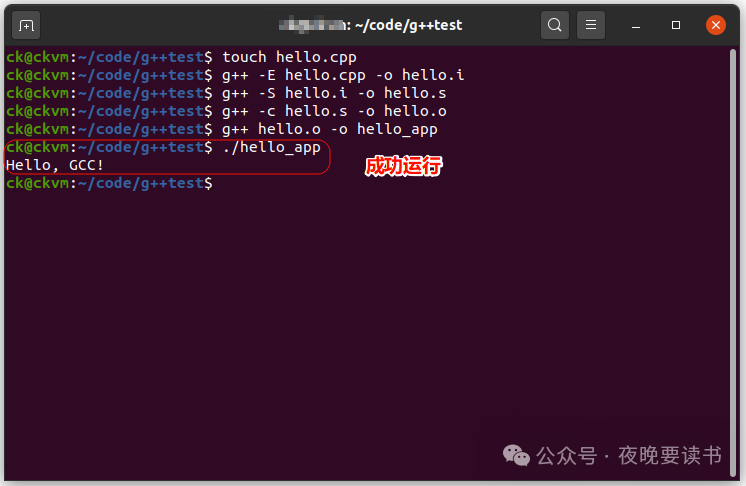
Process: <span>.cpp</span> –(-E)–> <span>.i</span> –(-S)–> <span>.s</span> –(-c)–> <span>.o</span> –(link)–> <span>executable</span>
3. Practical Advancement: From Multi-file Compilation to Creating Static Libraries
In real projects, we would never cram all the code into one file. Below, we will create a complete project to demonstrate a professional workflow.
Project Structure:
my_project/
├── main.cpp
├── math_utils.cpp
└── math_utils.h
Step 1: Write Code Files
First, create these three files.
<span>math_utils.h</span> (Header file, provides function declarations)
#ifndef MATH_UTILS_H
#define MATH_UTILS_H

// Addition
int add(int a, int b);

// Subtraction
int subtract(int a, int b);

#endif // MATH_UTILS_H
<span>math_utils.cpp</span> (Source file, provides function implementations)
#include "math_utils.h"

int add(int a, int b) {
    return a + b;
}

int subtract(int a, int b) {
    return a - b;
}
<span>main.cpp</span> (Main program, calls utility functions)
#include <iostream>
#include "math_utils.h"

int main() {
    int x = 20;
    int y = 8;

    std::cout << "Starting calculation..." << std::endl;
    std::cout << x << " + " << y << " = " << add(x, y) << std::endl;
    std::cout << x << " - " << y << " = " << subtract(x, y) << std::endl;
    std::cout << "Calculation finished." << std::endl;

    return 0;
}
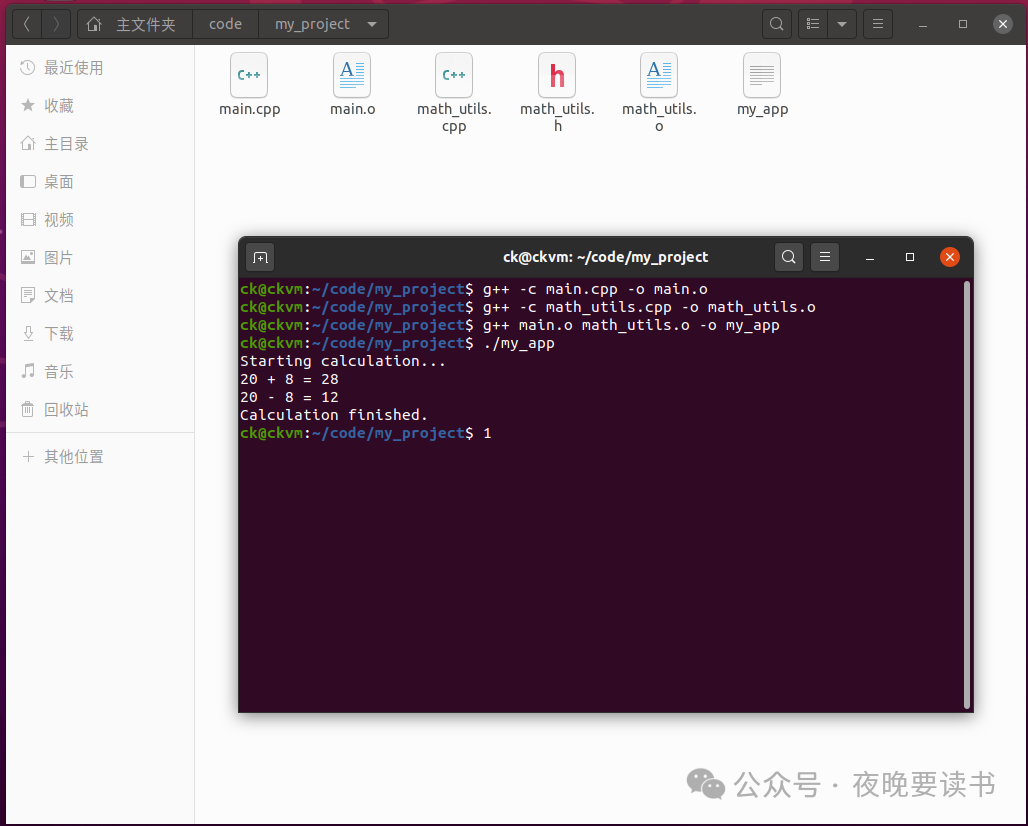
3.1 Professional Compilation Method: Compile First, Link Later
Incorrect Example (Inefficient): <span>g++ main.cpp math_utils.cpp -o my_app</span> This method works, but if any file is modified, all files must be recompiled. In large projects, compilation time can be very long.
Correct Approach (Efficient):
-
Compile into Object Files (.o) Separately: Use the
<span>-c</span>option.# Compile main.cpp, generating main.o g++ -c main.cpp -o main.o # Compile math_utils.cpp, generating math_utils.o g++ -c math_utils.cpp -o math_utils.oThus, if you only modify
<span>math_utils.cpp</span>, you only need to re-execute the second command, and<span>main.o</span>does not need to change. -
Link All Object Files:
g++ main.o math_utils.o -o my_appThis is the professional and efficient compilation method, and it is also the core working principle of build tools like
<span>Makefile</span>and<span>CMake</span>. -
Run the Program:
./my_app
3.2 Further: Creating and Using Static Libraries
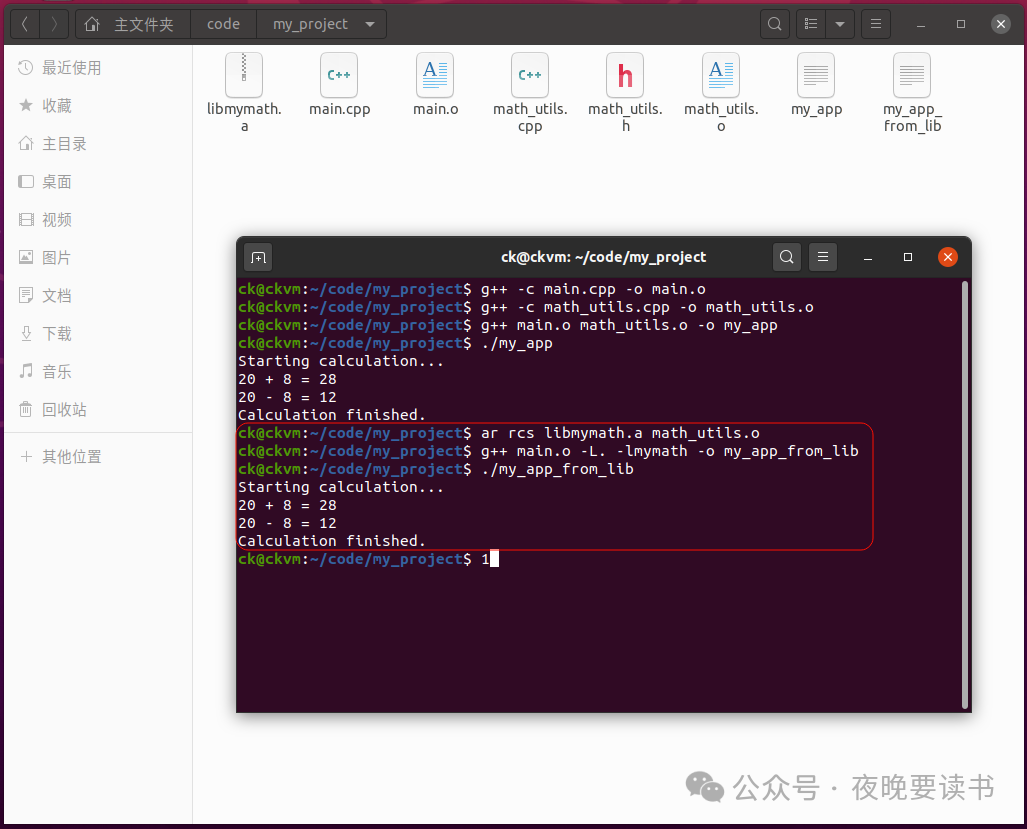
As your utility functions grow, and you want to package them into a library for others to use, you can create a static library (<span>.a</span> file).
-
Generate Object Files Needed for the Library: This step is the same as above.
g++ -c math_utils.cpp -o math_utils.o -
Package Object Files into a Static Library: Use the
<span>ar</span>(archiver) tool.# r: Insert files into the library (replace if already exists) # c: Create it if the library does not exist # s: Create an index for the library ar rcs libmymath.a math_utils.oNow, you have a
<span>libmymath.a</span>file, which is your math library! -
Link the Main Program with the Static Library:
# Compile the main program
g++ -c main.cpp -o main.o

# Link the main program's object file with our static library
# -L. indicates to look for libraries in the current directory
# -lmymath indicates to link libmymath.a
g++ main.o -L. -lmymath -o my_app_from_lib
-
<span>-L<dir></span>: Tells the linker to look for library files in the specified directory in addition to the default paths. -
<span>-l<name></span>: Tells the linker which library to link. Note that<span>name</span>is the name without the prefix (<span>lib</span>) and suffix (<span>.a</span>or<span>.so</span>).
Run the Program:
./my_app_from_libYou will see the same output as before, but this time, the implementations of <span>add</span> and <span>subtract</span> functions are linked from the <span>libmymath.a</span> static library.
Conclusion
Today, we started from a simple <span>g++</span> command and delved into the four core stages behind it, practiced a professional multi-file compilation process, and finally learned how to create and use static libraries.
Mastering these concepts will elevate your understanding of how C++ code transforms into an executable program, making you more confident in resolving compilation and linking errors. The Swiss Army knife that is GCC has functionalities far beyond this, but what we introduced today is its most core and commonly used parts, enough to make you adept in your daily development.