
Author: Mo & Tie Xiong
Blynk is a hardware-agnostic IoT platform that is simple and convenient to use. You can create beautiful app interfaces just by dragging and dropping components, and with a small amount of code, you can complete the development of an IoT project, making it one of the simplest IoT platforms.

With the popularity of graphical programming in the country, the threshold for IoT development has been further lowered. Teachers Qiu Jiongtao and Chen Zhongxian (Tie Xiong) have written a reference book titled “IoT, So Easy”, which specifically introduces programming with Blynk and IoT.
However, the book “IoT, So Easy” uses a development board centered around the ESP8266, and many teachers face a question after learning: Can I use my most familiar development board to connect to Blynk? On one hand, for most Arduino players, the Arduino Uno or Nano is one of their most commonly used development boards, and it would be even better if the Arduino Uno or Nano could also use Blynk. On the other hand, the ESP8266 has too few pins, especially with only one analog input pin, which is usually insufficient. If you can choose a suitable development board to connect to Blynk based on your actual situation, it would undoubtedly be a boon for Blynk enthusiasts.
Finally, connecting to Blynk IoT requires using the internet, and in some cases, there may not be a WiFi network available. So is there a way to make the development board use 4G network like a mobile phone? If you connect to Blynk using 4G network, combined with solar panels, wouldn’t that be the ideal IoT project?
With these questions, let’s start this tutorial. This tutorial mainly explores several ways to connect to Blynk IoT, allowing everyone to enjoy using Blynk and the fun of IoT programming.
Method 1: Connect Blynk via Computer Network
For Blynk, the simplest connection method is undoubtedly the USB serial connection method. This method only requires a computer connected to the internet, and by connecting the development board to the computer via USB serial, you can enjoy Blynk services.
First, let’s look at the demonstration video. The example uses the Arduino Nano development board for demonstration, and the connection method is USB serial.
The main code is as follows:
#include <BlynkSimpleStream.h>

char auth[] = "eacsmx5z2RvmYI4bKSLFkN6JgtjotL4k";

void setup() {
  Serial.begin(115200);
  Blynk.begin(Serial, auth);
}

void loop() {
  Blynk.run();
}
First, use the Blynk App to scan the QR code below to clone the example project:

Open the cloned example project, copy the project authorization code, replace the auth in the above program, and then upload the program. At the same time, we open the installation directory of the Arduino software (the link to download the Arduino software with the Blynk library will be provided at the end of the article), find the Blynk library files, look for the scripts folder, and edit the blynk-ser.bat file in that folder to replace the port number with your development board’s port number, modify the baud rate to 115200, and also modify the Blynk server’s IP and port number to be consistent with the Blynk server, as shown in the figure below:
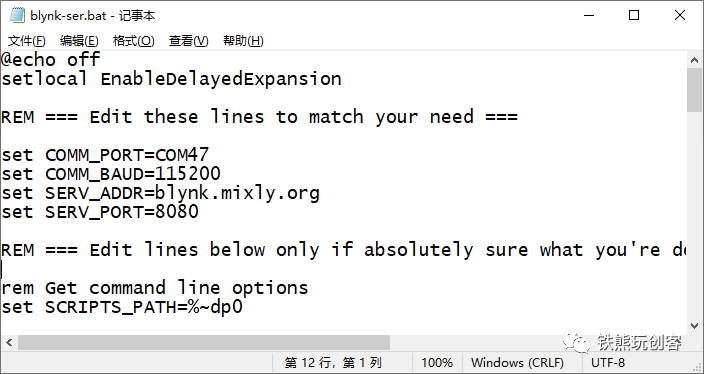
The figure shows a free server provided by the domestic third-party Mixly team. After modification, click save. Finally, double-click to open the blynk-ser.bat file. If you see the output shown in the figure below, it indicates that the connection to the Blynk server was successful. Finally, use the cloned Blynk project and click the button in the project to control the onboard D13 indicator light of Arduino Nano.
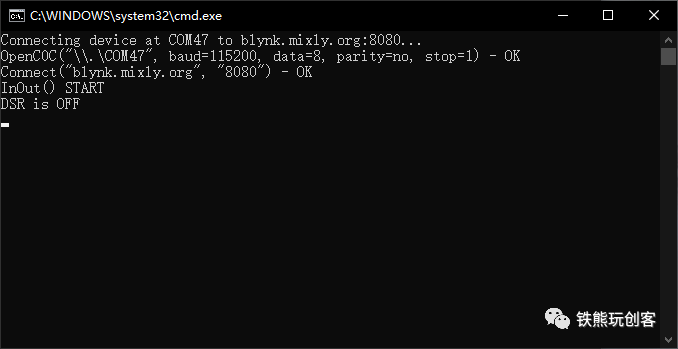
The USB serial connection method only requires a computer connected to the internet to connect to Blynk, quickly experiencing Blynk IoT. However, since its hardware serial is occupied, it causes the hardware serial’s print function to fail. Usually, we use hardware serial to debug programs, and without a serial port, debugging the program becomes difficult. Therefore, we have the second connection method, which connects to the Blynk server through a software serial while keeping the hardware serial for the original print function for program debugging.
The program is as follows:
#define BLYNK_PRINT Serial
#include <SoftwareSerial.h>
#include <BlynkSimpleStream.h>

SoftwareSerial DebugSerial(A4, A5); //RX TX

char auth[] = "eacsmx5z2RvmYI4bKSLFkN6JgtjotL4k";

void setup() {
  Serial.begin(115200);
  DebugSerial.begin(9600);
  Blynk.begin(DebugSerial, auth);
}

void loop() {
  Blynk.run();
}
In the above program, we define the software serial DebugSerial, defining its RX pin as A4 and TX pin as A5, using the software serial to connect to the Blynk server.
In practical use, we connect this software serial using a USB to TTL module and plug the USB end into the computer to obtain the serial number of the module. By modifying the blynk-ser.bat configuration file with the serial number, we can connect to Blynk without affecting the original hardware serial function. It is worth noting that the software serial is not as stable as the hardware serial, so we set a lower baud rate of 9600 as the communication speed. Of course, you can also use hardware serial to connect to Blynk and use software serial for debugging.
Method 2: Connect Blynk Using WiFi Module
On the internet, we often see the method of connecting Uno + ESP8266 to Blynk. It uses Uno’s hardware serial to connect to the ESP8266, and then uses the ESP8266 to connect to WiFi, thereby achieving the purpose of connecting to Blynk. When we use this connection method, we find that it is not stable, and there are often disconnection issues. Many teachers have consulted me about this, and my usual answer is to recommend them not to use this method.
The reasons for disconnection mainly have two: first, the ESP8266 used is a counterfeit or inferior product, which is a defect of the hardware itself; second, it is a problem with the program itself. The Uno connecting to the ESP8266 requires referencing the ESP8266_Lib.h library to set up the ESP8266. This library occupies a certain amount of program storage space and dynamic memory. In addition, the Uno has limited resources and performance. If programming experience is insufficient, there is a high probability of writing a lot of inefficient code. This inefficient code not only has low execution efficiency but also blocks other programs, for example, Blynk needs to keep the Blynk.run() function running in the main function. When there is blocking in the program, it can lead to disconnection. If we also use modules like OLED that occupy a lot of program storage space and dynamic memory, it can lead to instability.
The following figure shows the compilation situation of Uno connecting to ESP8266 and directly using USB connection. From the compilation results in the figure, we can see that the program storage space and dynamic memory usage of the USB connection method are lower than that of the ESP8266 connection method.
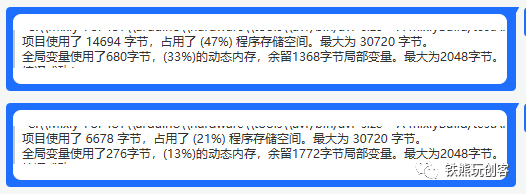
If we can separate the part of the Uno that connects to the internet just like the USB connection to the computer, using a third-party module to handle the networking, while the Uno only handles program interaction, then this can greatly improve the reliability and stability of the program.
The essence of Blynk IoT is the TCP connection between the main control board and the server. We only need to use other WiFi modules to connect to the Blynk server via TCP to use Blynk IoT. In scenarios with WiFi networks, based on the principle of simplicity and ease of use, I use the HC-25 WiFi module from Huicheng to connect to the Blynk server. The HC-25, as a serial WiFi module, supports AT command settings like the ESP8266, and compared to the ESP8266, it also supports web settings. By connecting to its AP hotspot with a phone or computer and entering its default IP address, you can open the web settings page for configuration. The HC-25 WiFi module is shown below:
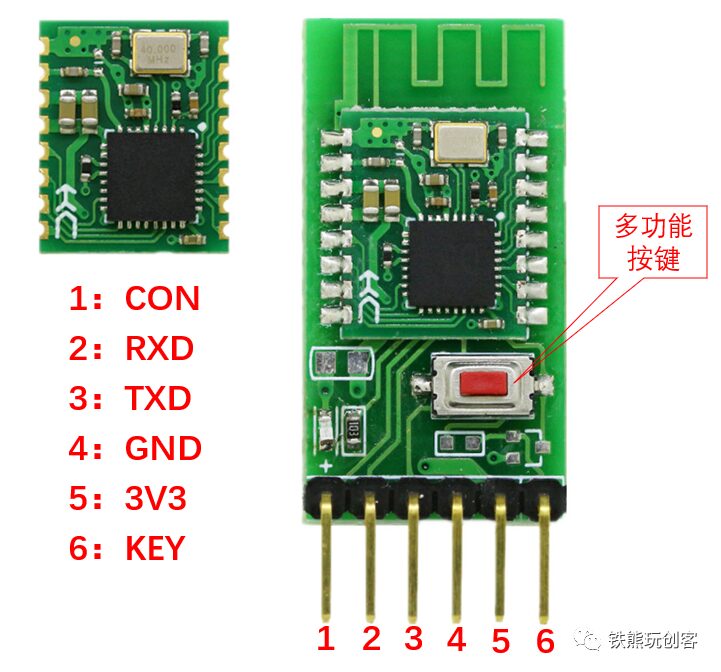
We upload the previous USB connection mode software serial program to the Arduino Nano development board. After the program is uploaded, we connect the HC-25 to the Nano with 4 Dupont wires, first connecting the power pins 3V3 and GND, then connecting RXD and TXD to the A5 and A4 pins of the Nano respectively. Finally, press the HC-25 multifunction button for 2 seconds, wait for the onboard indicator light to flash quickly, and then configure according to the order shown in the figure below:
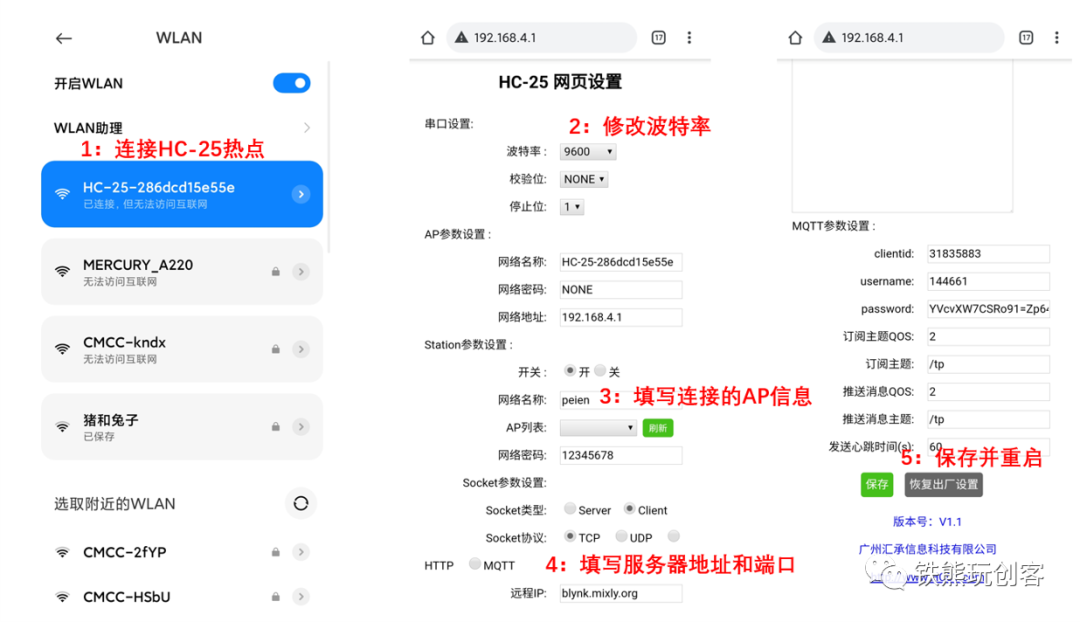
Configure and save the settings according to the order in the figure above, then restart the HC-25. During the process of connecting to the network after rebooting, the indicator light will flash slowly, and when it successfully connects to the network, the indicator light will stay on. Note: You cannot connect to a WiFi name in Chinese or a 5G frequency network. The socket must be selected as Client, and the protocol must be TCP. The remote IP address and port number must be consistent with the configuration of the USB connection mode. To facilitate future configurations, you can set the HC-25’s AP name and password. The AP name does not support Chinese characters, and pressing the multifunction button for 10 seconds will restore factory settings.
After successful networking, the demonstration is as follows:
Method 3: Connect Blynk Using 4G Network
When there is no WiFi, if you want to use IoT, you need to use cellular networks. The current mainstream network standard is 4G, so we use 4G modules to connect to Blynk. Here, I use the Air724UG core board of the Hezhou 4G Cat.1 transparent DTU module, which supports all-network communication and has a web setting interface similar to HC-25, making it easy to configure the module. The structure of the Air724UG core board is shown in the figure below:
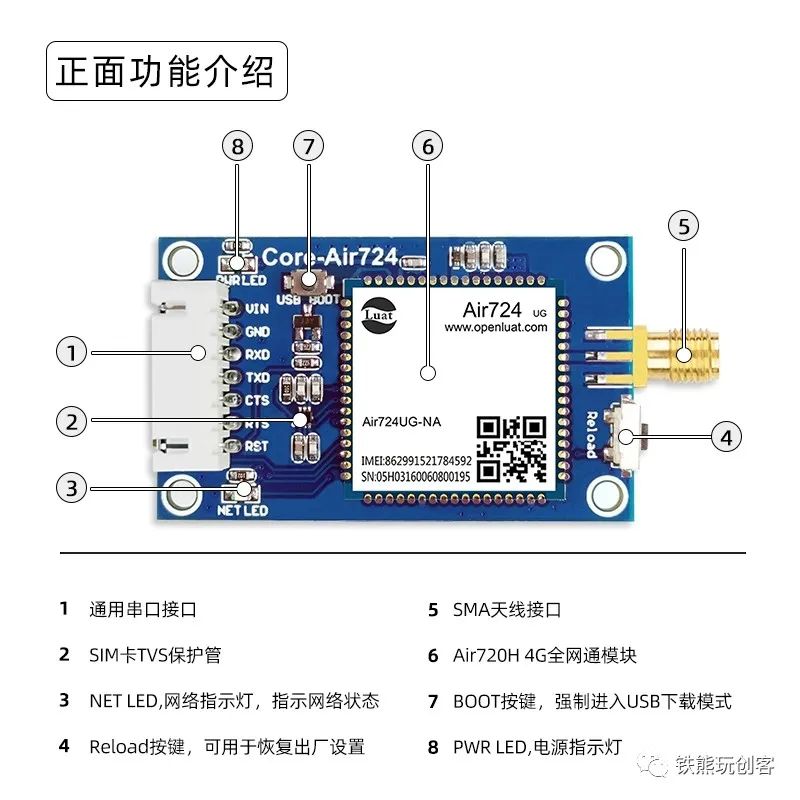
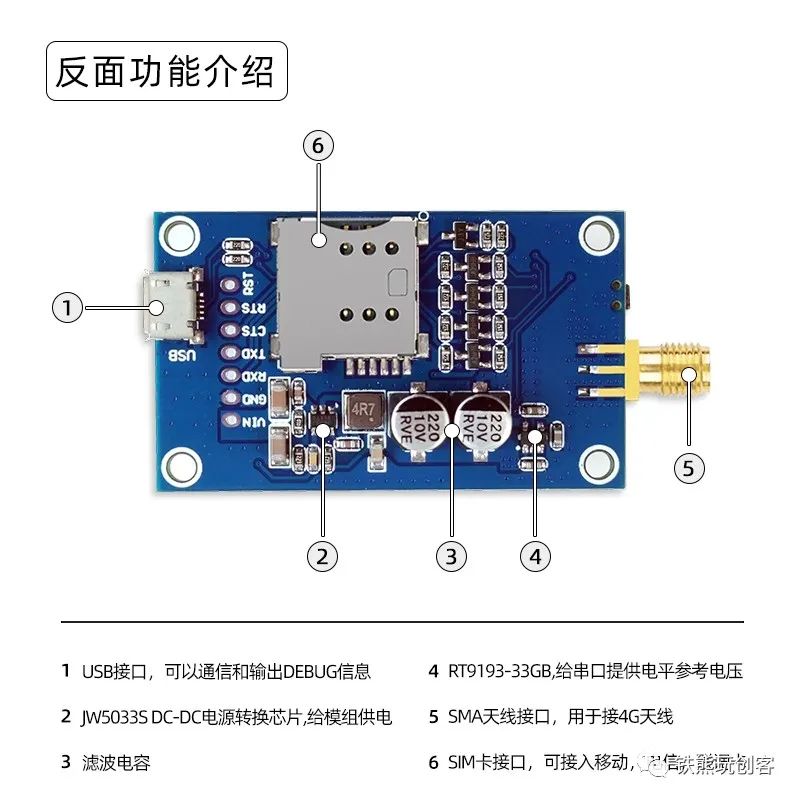
Next, we will introduce how to use the Air724UG core board to connect to the Blynk server. When purchasing the Air724UG core board, the seller will provide a 300M data flow IoT card that is activated upon powering on. The activated usage period is one year, and after one year, you need to contact customer service to purchase data. Here, for testing, we can use our own mobile phone card, and the flow card can be used when needed. The Air724UG core board has two types of firmware: one is AT firmware, which requires configuration through AT commands, which is relatively cumbersome. The other is DTU firmware, which requires contacting the seller to assign an account for the DTU management system http://dtu.openluat.com/login/. For specific situations, please consult customer service.
Here, we use the DTU firmware. First, log in to the account assigned by the seller to enter the management website, as shown in the figure below:
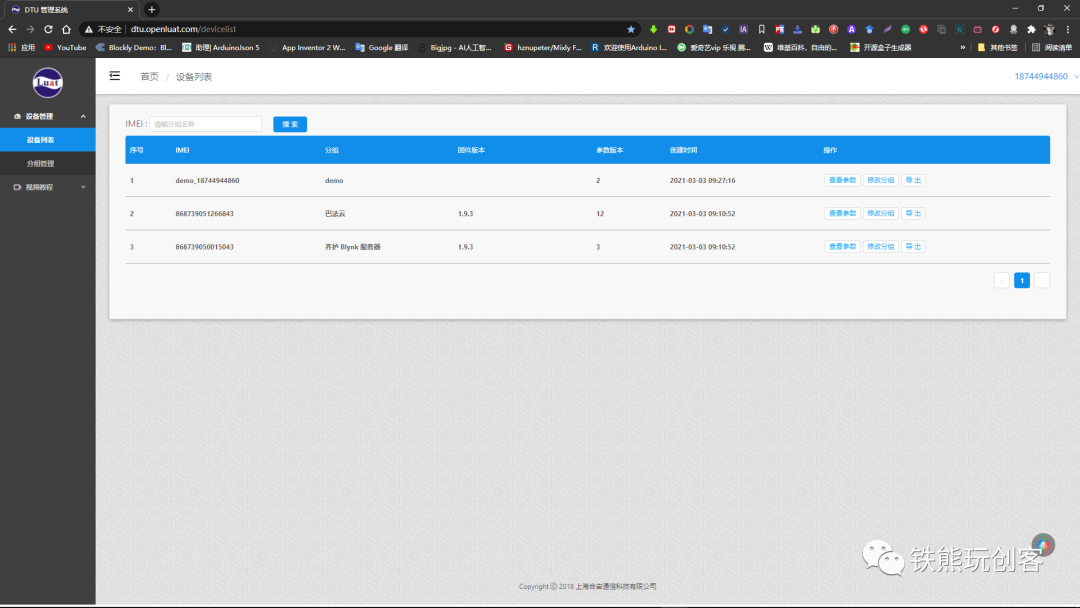
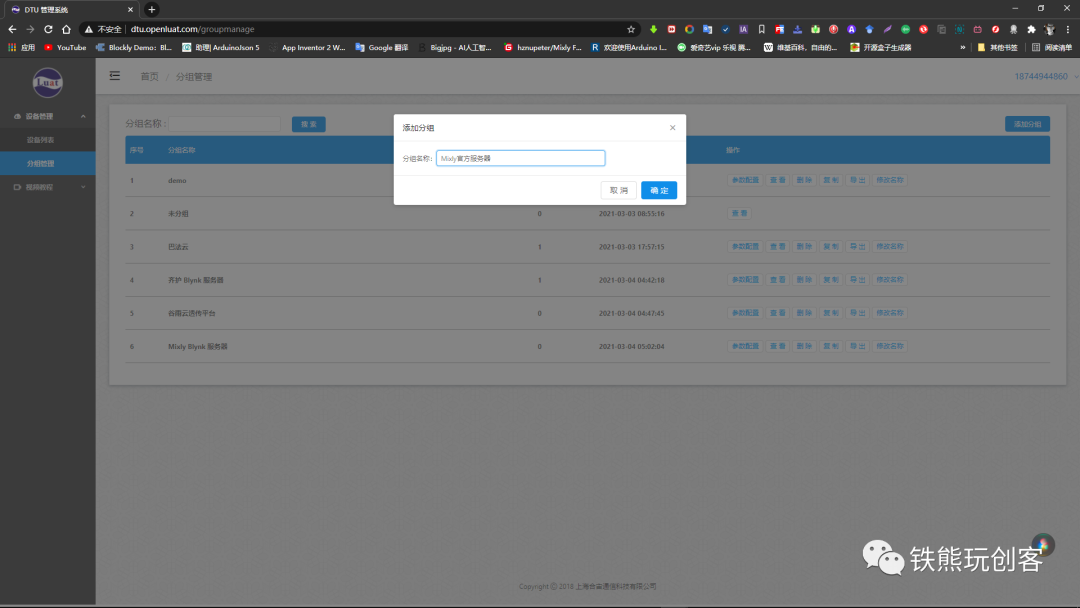
After logging into the system, you can see your devices and configuration groups (here I have two devices and have configured groups). Devices are distinguished by IMEI numbers. The first step is to create a new group, where we fill in the Blynk server provided by Mixly as the group name:
After creating the group, we click on parameter configuration and fill in the following configuration information:
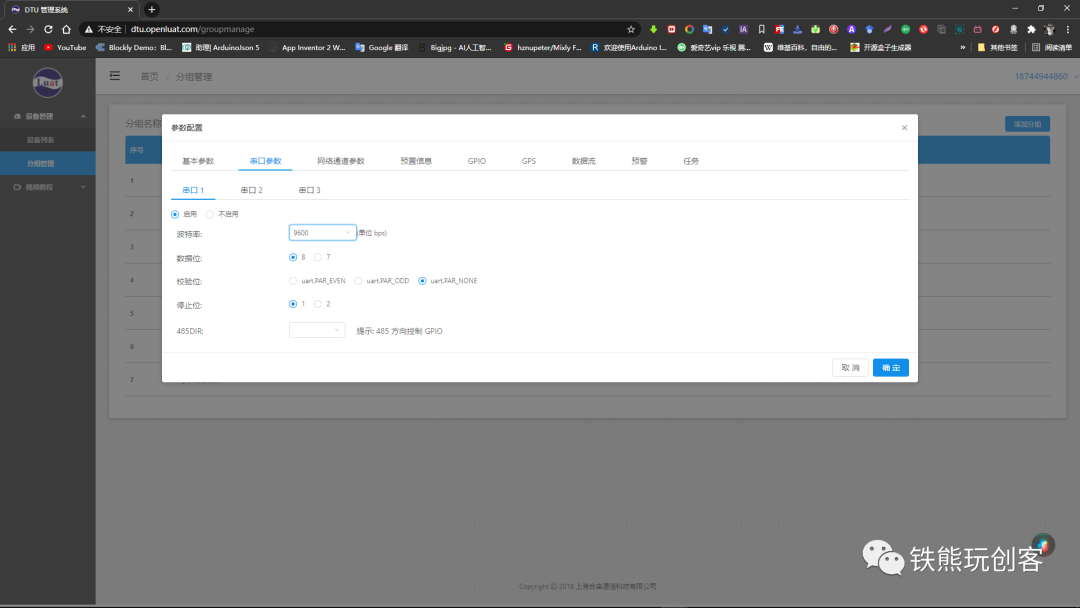
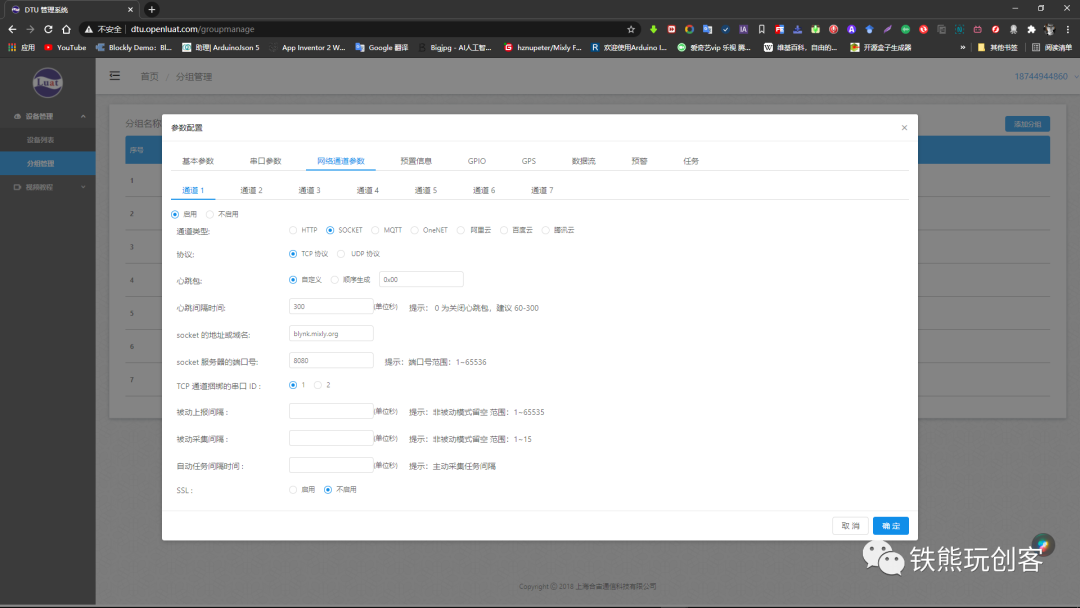
Finally, save the settings and modify the device group connecting to the Blynk server in the device list to the group we just set up. After setting, restart the Air724UG core board. When the onboard indicator light of the Air724UG core board flashes slowly, it indicates that it has connected to the Blynk server. At this time, you can control the Nano with your phone, and the demonstration effect is as follows:
Conclusion
In this tutorial, we introduced several methods for Blynk to connect to the network, where we all connected in the form of software serial. When we have written and debugged the program correctly, we should disable serial debugging and use hardware serial to connect to the Blynk server, modifying the communication baud rate to 115200, which can bring a faster and more stable connection.
Through the study of this tutorial, you can enjoy the convenience brought by Blynk IoT using your most familiar development board. The 4G connection also frees you from the troubles caused by the network environment, allowing us to focus on the realization of creativity. The module information mentioned in this article will be included in the tutorial appendix for everyone to learn and refer to, so that you can gain a deeper understanding of the usage of the modules mentioned in the article. The two networking modules we introduced only used the TCP transparent transmission function of the modules, and for other functions, everyone can learn according to the tutorial appendix. By now, I believe you have a new understanding of Blynk’s network connection.
Resource Download
Finally, feel free to follow the official account: Tie Xiong Plays Maker, which regularly updates content related to maker production, technical tutorials, maker education, and more.
Reply Blynk Networking Method to get the complete resource download link for this tutorial.
Reply Arduino to download the pre-configured Arduino green software.
