
Raspberry Pi is a computer the size of a credit card that can run an operating system (except for the new Raspberry Pi Pico released in January 2021, which is a microcontroller development board). The first Raspberry Pi was released in 2012, and it has been nine years since then. In these nine years, various Raspberry Pi projects have flourished: satellite manufacturers have installed Raspberry Pi into artificial satellites to provide imaging and image transmission functions; tech enthusiasts have used Raspberry Pi to build web servers, NAS, and smart home systems; gamers have used Raspberry Pi to enable online multiplayer for the 1989 GameBoy; tech bloggers have used Raspberry Pi to capture and recognize street views, creating a machine that praises passing dogs. Raspberry Pi is loved by many for its credit card-sized dimensions, comprehensive hardware and software features, and the rich playability brought by the combination of both, continuously attracting new friends to join the fun. This article is a beginner’s guide for those who are about to dive into or have just started using Raspberry Pi.
Is it still necessary to write a Raspberry Pi beginner’s guide in 2021? After some research, I believe the answer is yes. Although there are already many beginner-friendly Raspberry Pi tutorials online, on one hand, the hardware and software of Raspberry Pi are frequently updated, and some tutorials have become outdated and need to be revised and supplemented; on the other hand, some tutorials are scattered and not friendly enough for beginners. Therefore, I hope to compile a comprehensive, easy-to-understand Raspberry Pi beginner’s guide in 2021 based on the work of predecessors, avoiding obscure terminology and lengthy code, aiming to allow the most inexperienced new players to successfully complete the purchase, configuration, and use of Raspberry Pi by reading just this article.
Let’s get started.
Table of Contents:
-
Purchasing Raspberry Pi and Accessories
-
Flashing the Raspberry Pi Operating System
-
Setting up WiFi Connection and Remote Access
-
Accessing Raspberry Pi Desktop Remotely
-
Transferring Files Between PC and Raspberry Pi
-
Backing Up the Raspberry Pi System
Note: This article requires a computer running Windows or macOS (hereafter referred to as PC). The operations demonstrated in this article are performed on a Windows computer, but I will provide methods for macOS as well.
1
Purchasing Raspberry Pi and Accessories
As of June 2021, the Raspberry Pi Foundation’s official website has a total of 11 Raspberry Pi products for sale. Among these 11 products, one is the Raspberry Pi Pico released in January this year, which is a microcontroller development board; the other 10 products are computers that can run operating systems. Based on appearance, configuration, and performance, these 10 products can be divided into three series:
-
Model B Series: The flagship
-
Model A Series: Smaller in size, with slightly reduced configuration and interfaces
-
Zero Series: Extremely small
I have created a simplified product introduction chart that displays the models and appearance reference photos of each series. The darker the color of the product model, the later its release time and the higher its configuration and performance; except for the Raspberry Pi 400, the photo sizes of other products are the same, so everyone can intuitively compare their size differences. The Raspberry Pi 400 is a Raspberry Pi 4 Model B with a keyboard “skin,” and both have the same configuration.
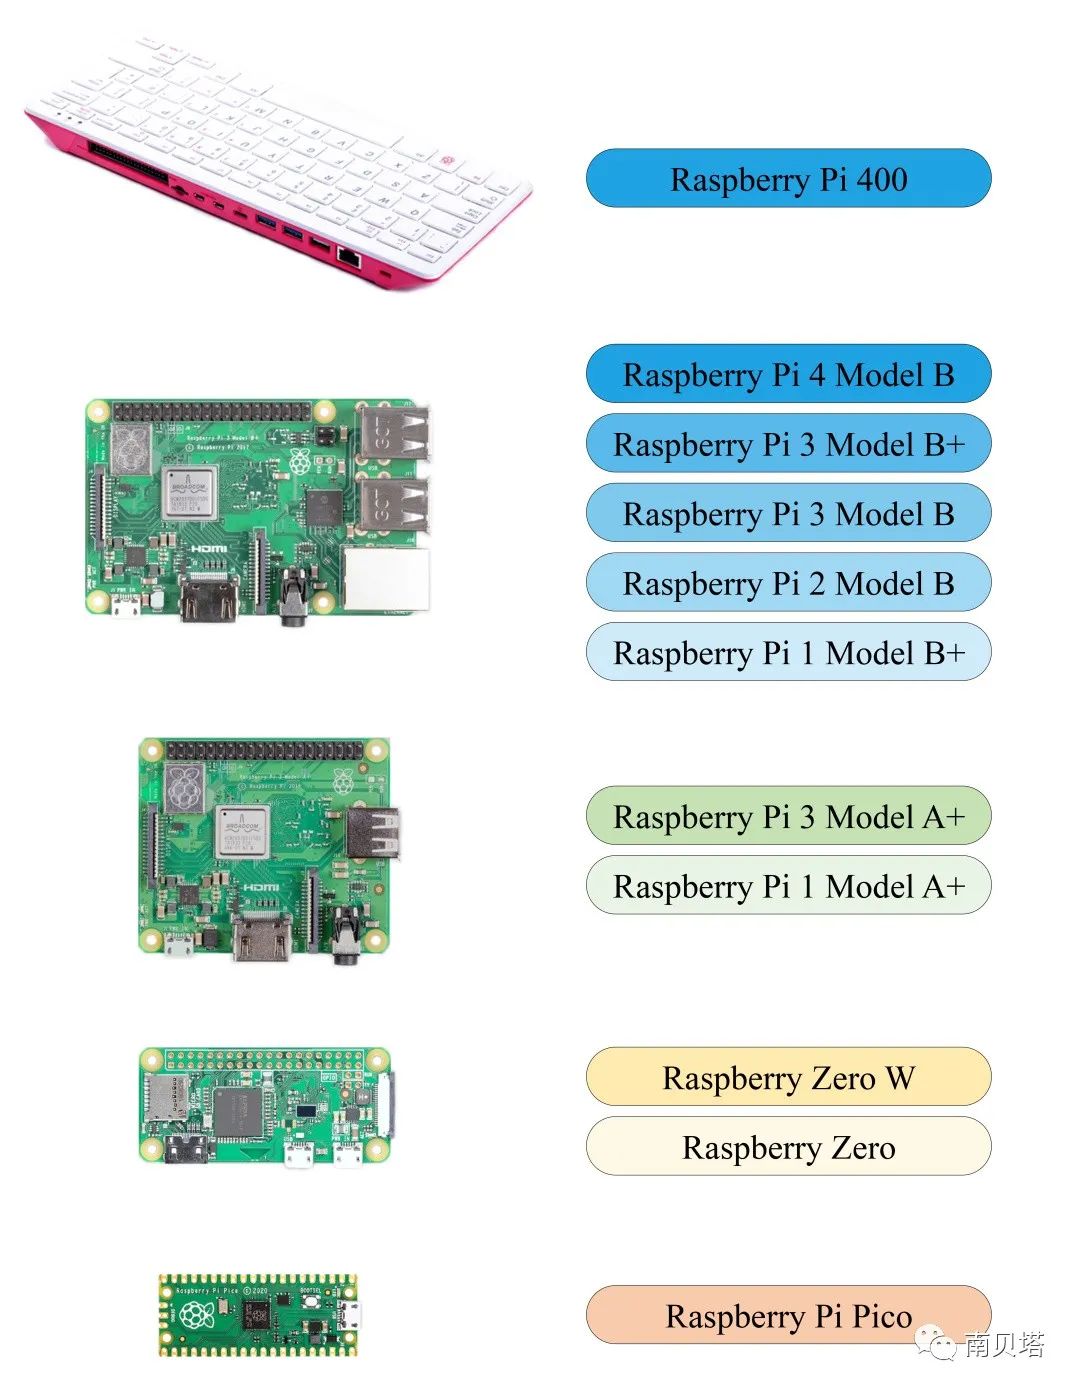
▲ The 11 Raspberry Pi products for sale,
Product appearance photos are from the Raspberry Pi Foundation.
Further Reading: The Raspberry Pi Lab has organized and created a detailed Raspberry Pi Product Parameter Comparison table. Follow Nan Beta and reply “Raspberry Pi Product Parameter Comparison“ to view it.
Based on the electronic product philosophy of “buying new, not old,” I recommend that new players who are still hesitating and preparing to dive in purchase the Raspberry Pi 4 Model B (also known as “Raspberry Pi 4B”) all at once, as it is the latest flagship product with the most complete features and interfaces, which can reduce the difficulty of getting started while providing various playability when we are still unsure what to do with the Raspberry Pi.
In addition to the Raspberry Pi itself, we also need to purchase some accessories:
|
Accessories |
Purpose |
|
TF card with a capacity of 8 GB or more |
Used to load the Raspberry Pi operating system |
|
TF card reader |
Used to connect the TF card to the computer and flash the Raspberry Pi system |
|
5V / 3A power supply or higher |
To power the Raspberry Pi |
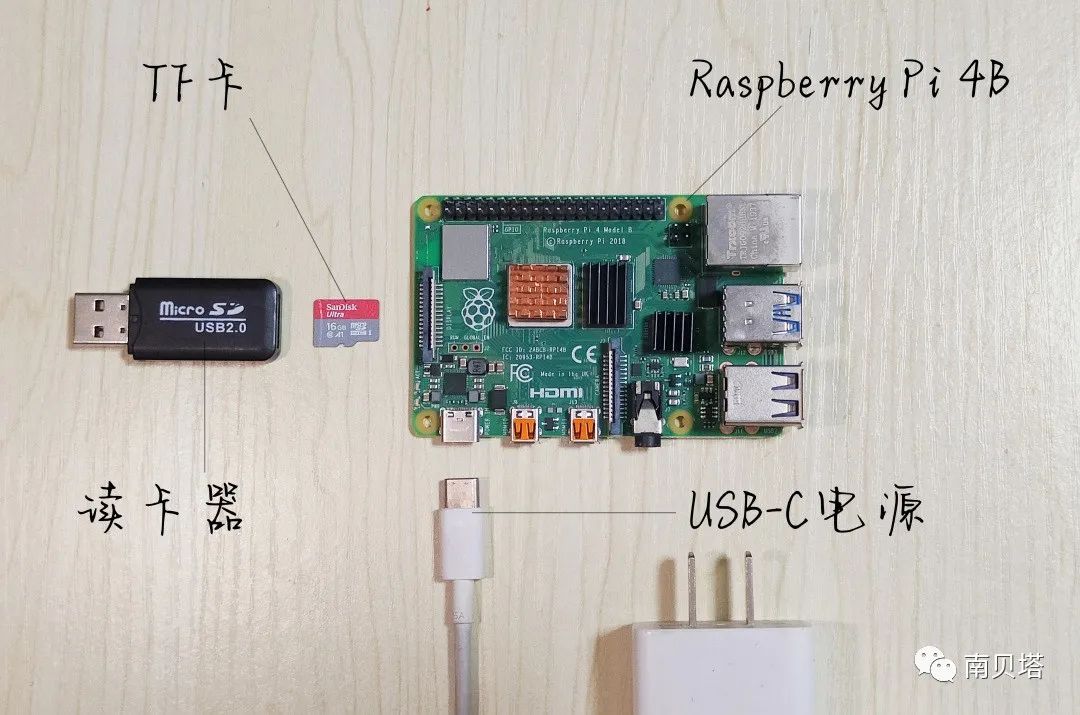
▲ Just buy these and you’re good to go.
As for where to buy Raspberry Pi, the official website of the Raspberry Pi Foundation has authorized distributors’ Taobao stores, and the Raspberry Pi Lab also has an official Taobao store, both of which are relatively reliable purchasing channels. As for the charger, if you have a charger that meets the requirements, you do not need to purchase one. It is important to note the type of power interface used by the Raspberry Pi model you purchase; the Raspberry Pi 4B uses a USB-C interface, while earlier products use a MicroUSB interface.
2
Flashing the Raspberry Pi Operating System
The Raspberry Pi is a computer, so we need to prepare an operating system for it. After we purchase the Raspberry Pi, the next thing we need to do is select and download the appropriate operating system and flash it onto the TF card.
Currently, the Raspberry Pi Foundation and third-party developers have developed multiple operating systems for Raspberry Pi. The official system developed is called Raspberry Pi OS, formerly known as Raspbian, and it is currently updated to version 5.10, compatible with all Raspberry Pi products (except Pico). As a beginner, we will use the officially recommended Raspberry Pi OS desktop version to get started, and after getting familiar, we can experiment with other fun systems later. If the TF card has ample storage space (≥ 16 GB), we can also use the version with “desktop + common software.”
|
Officially Provided Operating Systems |
Description |
|
Raspberry Pi OS Lite Version |
No graphical desktop, only command line interface. |
|
Raspberry Pi OS Desktop Version |
Has a graphical desktop. |
|
Raspberry Pi OS Desktop Version + Common Software |
Has a graphical desktop, pre-installed with common programming, office, and entertainment software. |
We will download the img file of the operating system to the PC (reply “Raspberry Pi System” in the background to get the link).
Now, we will connect the TF card to the PC via the card reader.
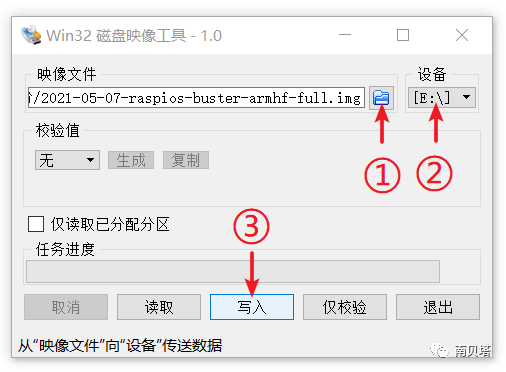
Next, we will download and install software called Win32DiskImager, which is used to flash the img file onto the TF card.
Open Win32DiskImager, select the downloaded img file in “Image File,” confirm that the “Device” is the corresponding drive letter of the TF card, and then click “Write.” At this point, the software will pop up a “Confirm Overwrite” warning; click “Yes” to start flashing.
After flashing is complete, the TF card will generate another partition that Windows cannot recognize, and the PC will pop up warnings such as “Cannot access volume” and “Needs formatting”; we can ignore all of them.
At this point, the TF card has the Raspberry Pi OS system installed, and we will insert the TF card into the slot on the back of the Raspberry Pi. The Raspberry Pi is now ready. If we connect a USB keyboard, mouse, a display via mini HDMI, and connect a network cable and power supply, we can operate the Raspberry Pi just like any other computer.
▲ Image Source: Raspberry Pi Foundation
However, we do not intend to use the Raspberry Pi as a primary computer, so there is no need to connect so many accessories. We only need the TF card and power cable to access and control the Raspberry Pi from the PC. How do we do that? It’s simple, just keep reading.
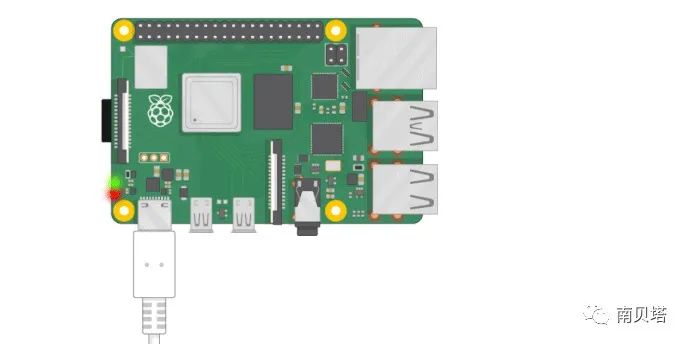
▲ We only need the TF card and power cable.
Note: To flash the system onto the TF card on a macOS computer, the same idea applies; you can use the flashing software Etcher.
3
Setting Up WiFi Connection and Remote Access
Raspberry Pi OS allows us to access and control the Raspberry Pi from the PC on the same WiFi, a feature called SSH service. To use this service to access the Raspberry Pi, after flashing the TF card on the PC, do not eject the TF card yet, but prepare two files to copy to the TF card:
File 1: Create a new txt file, name it “ssh” and delete the extension; note that it is not “ssh.txt.” This file is used to enable SSH functionality on the Raspberry Pi.
File 2: Similarly, create a new txt file and input the following content:
country=CNctrl_interface=DIR=/var/run/wpa_supplicant GROUP=netdevupdate_config=1 network={ssid="WiFi_Name"psk="WiFi_PassWord"key_mgmt=WPA-PSKpriority=1}Here, “ssid” is the name of our home WiFi, and “psk” is the WiFi password. After completing the content, save and exit, then rename the file along with the extension to “wpa_supplicant.conf.” This file is used to connect the Raspberry Pi to WiFi according to the content in our file.
Further Reading: For settings and more explanations regarding different WiFi encryption methods, please refer to this post.
Once both files are ready, copy them to the root directory of the boot partition of the TF card, and then you can eject the TF card.
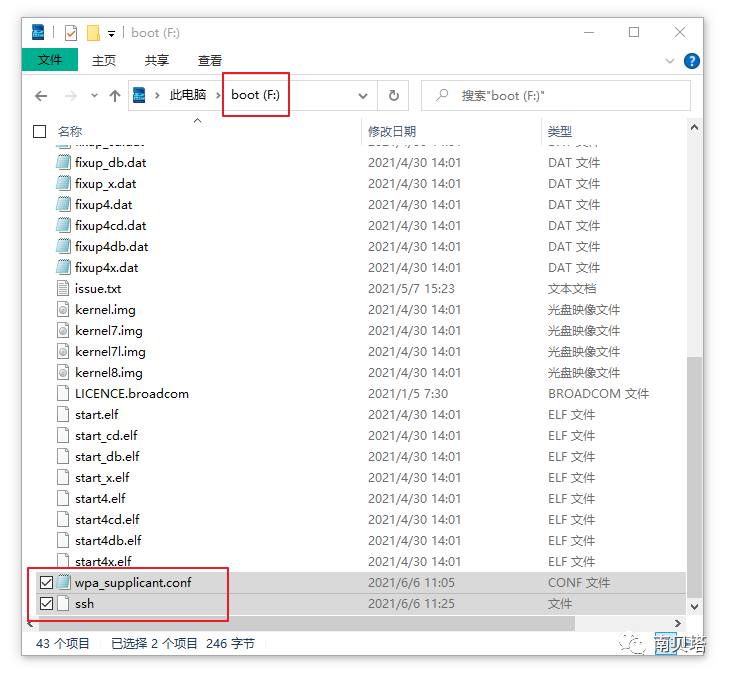
▲ Copy the two files to the root directory of the boot partition,
and pay attention to the naming and extensions of the two files.
Now insert the TF card into the slot on the back of the Raspberry Pi and power it on. When the Raspberry Pi starts for the first time, it will automatically read the “wpa_supplicant.conf” file, connect to WiFi according to the file content, and automatically enable the SSH service.
Next, we need to know the IP address of the Raspberry Pi connected to WiFi in the local area network so that we can access it from a PC connected to the same WiFi. We can access the management page of the wireless router to find the IP address assigned to the Raspberry Pi:
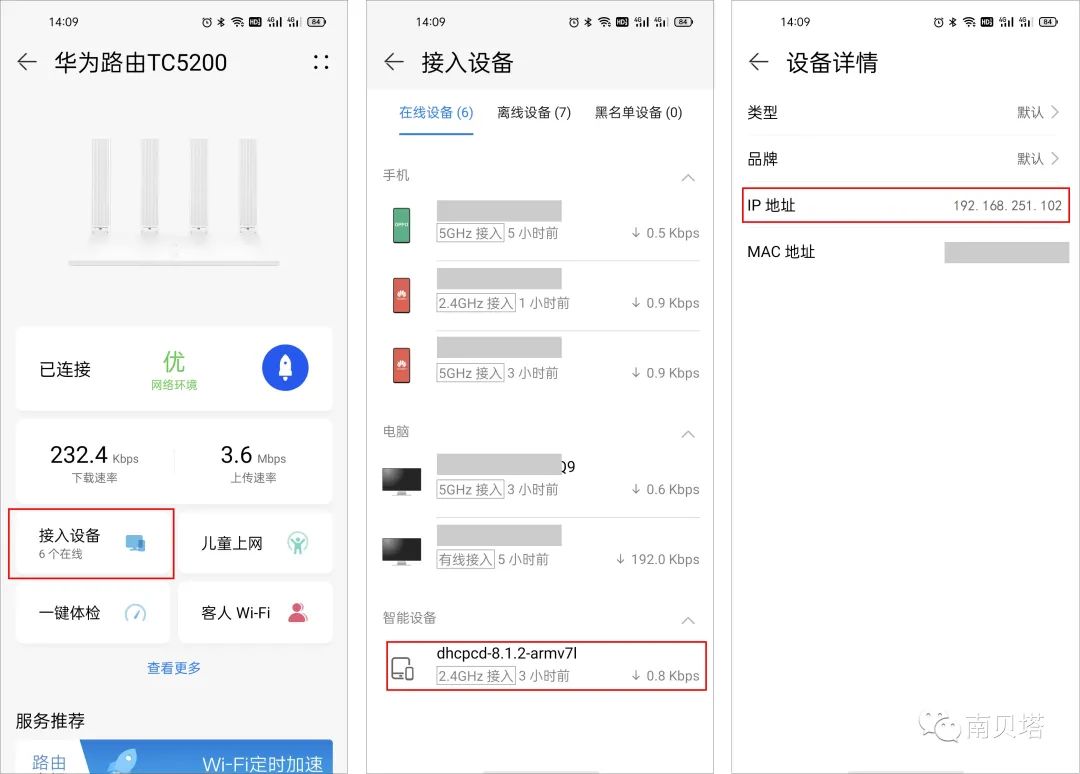
▲ On the wireless router management page, identify the Raspberry Pi and check its IP address through connection time, device name, and newly connected devices.
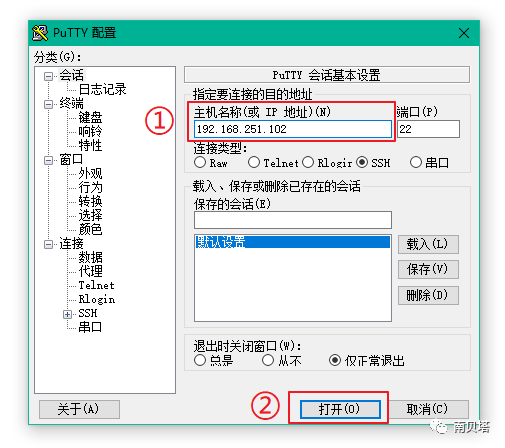
Now, we will download and install PuTTY, a tool for accessing the SSH service on the PC.
Open PuTTY, enter the IP address of the Raspberry Pi in the “Host Name” field, and leave the other options unchanged, then click “Open.” If this is the first time connecting to this IP address, the software will pop up a key confirmation warning; we click “Yes” to proceed.
At this point, the software will pop up a command line window:

In the “login as:” prompt, input the default username “pi” for Raspberry Pi OS and press enter; then input the password “raspberry” when prompted in “xxx password:” and press enter. Note that the password entered will not be displayed in the command line, so if you see no response while typing, do not doubt whether there is a problem; just type it boldly.
When you see the window display “pi@raspberrypi:~ $“, it means we have successfully logged into the Raspberry Pi. Now we can control the Raspberry Pi using various Linux commands.
Note: To log into the Raspberry Pi via SSH service on a macOS computer, you can use PuTTY on Mac.
4
Accessing Raspberry Pi Desktop Remotely
Although we have successfully logged into the Raspberry Pi from the PC, we have entered its command line interface. As beginners, we certainly hope to access a more familiar graphical desktop. This is possible; this time we will use the VNC service of Raspberry Pi OS.
First, we need to enable the VNC service. We log into the Raspberry Pi command line window through SSH from the PC and enter the following command to enter the configuration page of Raspberry Pi OS:
sudo raspi-config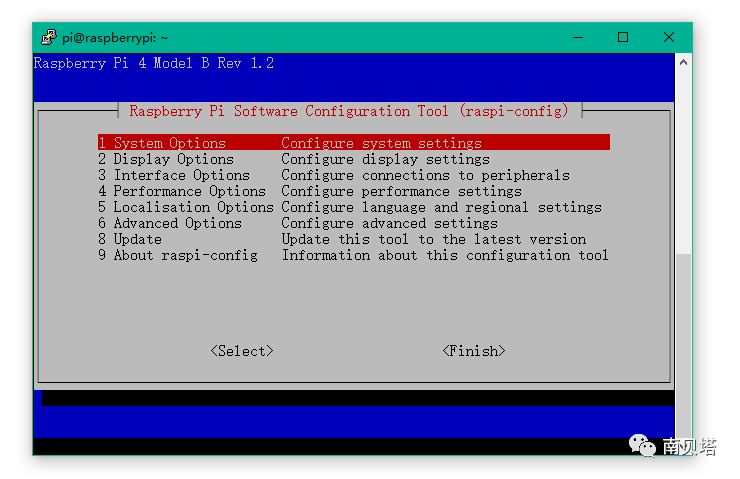
▲ Raspberry Pi OS Configuration Page
In the configuration page, select “3 Interface Options” > “P3 VNC” in sequence, press enter, and when prompted “Would you like the VNC server to be enabled?” select “Yes” to enable the VNC service. The system will automatically return to the configuration page; select “Finish” to exit the configuration page and return to the command line window.
Next, we will download and install a client called VNC Viewer for accessing VNC on the PC.
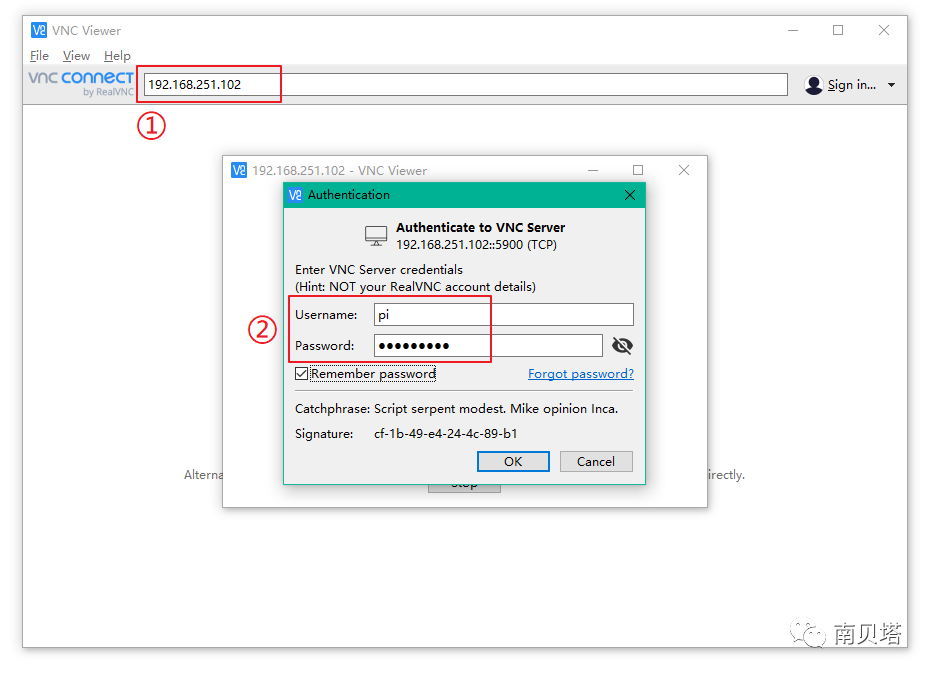
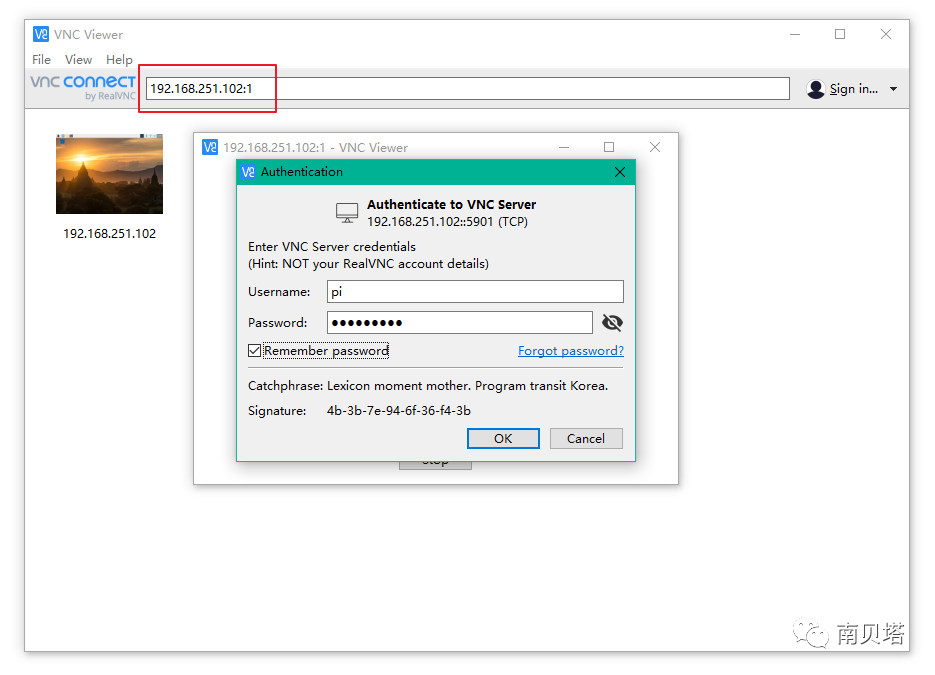
Open VNC Viewer, enter the IP address of the Raspberry Pi in the top IP address box, and press enter to connect. As with previous connections, a security warning will pop up, and we will agree to it. At this point, the software will pop up an authorization window; after entering the username and password, click “OK” to successfully log into the graphical desktop of the Raspberry Pi remotely.
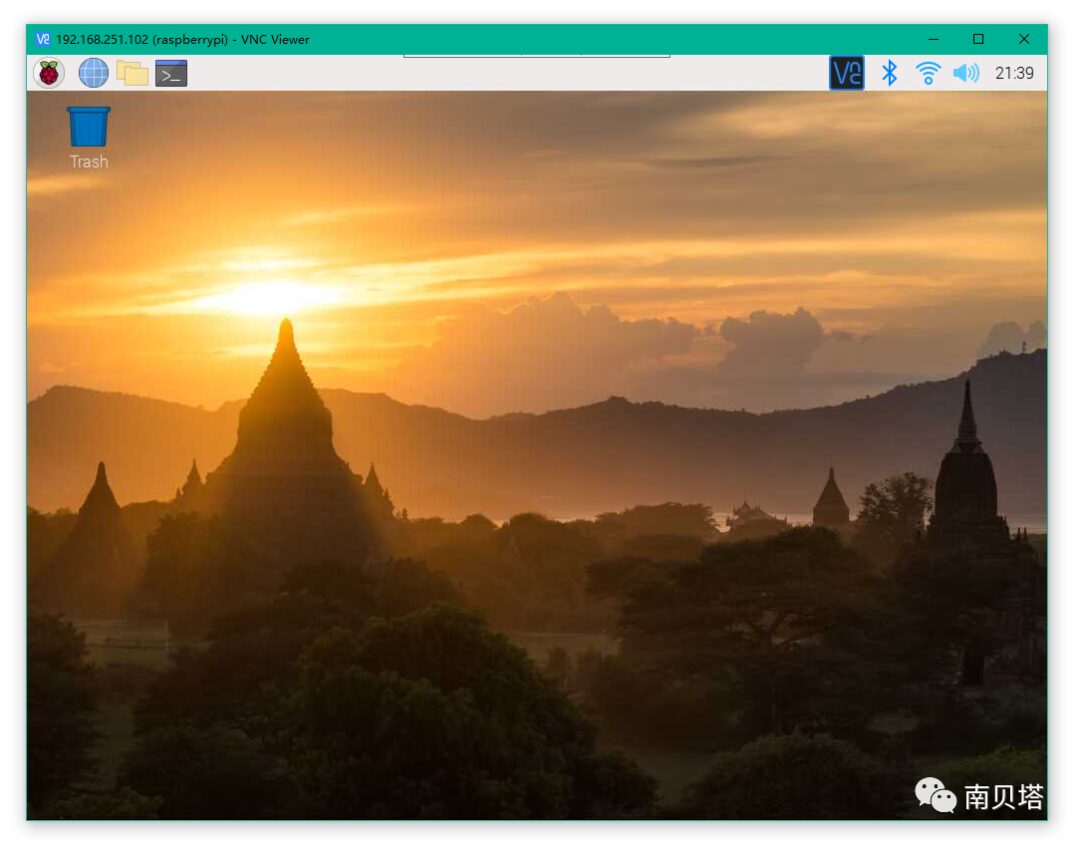
▲ Familiar graphical desktop
Note: To log into the Raspberry Pi desktop via VNC service on a macOS computer, you can use VNC Viewer for macOS.
Next, I will introduce two common problems encountered when accessing the Raspberry Pi desktop through VNC Viewer and their solutions.
Problem 1: How to Solve the “cannot currently show the desktop” Problem
Following the above steps, we may encounter the following issue: Successfully connecting to the Raspberry Pi in VNC Viewer, but the popped-up window is black and displays “cannot currently show the desktop.”
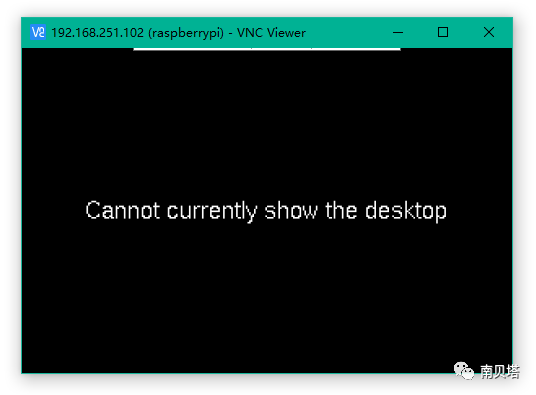
This is caused by an inappropriate desktop resolution for Raspberry Pi OS. The solution is simple:
Log into the Raspberry Pi command line window using PuTTY, and enter “sudo raspi-config“ to enter the configuration interface, then select “2 Display Options” > “D1 Resolution” and choose a resolution such as 1280×720 or 1920×1080, save and exit. Reconnect in VNC Viewer, and the desktop will display successfully.
Problem 2: How to Adjust VNC Viewer to Display the Raspberry Pi Desktop Resolution
Following the previous problem, even though we have set the Raspberry Pi OS desktop resolution to 1920×1080 in the configuration, why does the resolution still appear low when accessing the desktop via VNC Viewer on the PC:
▲ Accessing the Raspberry Pi desktop through VNC Viewer on the PC,
Even maximizing the window, the screen cannot fill the PC screen
This is because, although we modified the Raspberry Pi OS desktop resolution, we did not change the resolution of the VNC service. After research, there is a solution:
We execute the following command in the command line window (which can be done using PuTTY to log in or by opening the command line window on the desktop connected via VNC Viewer):
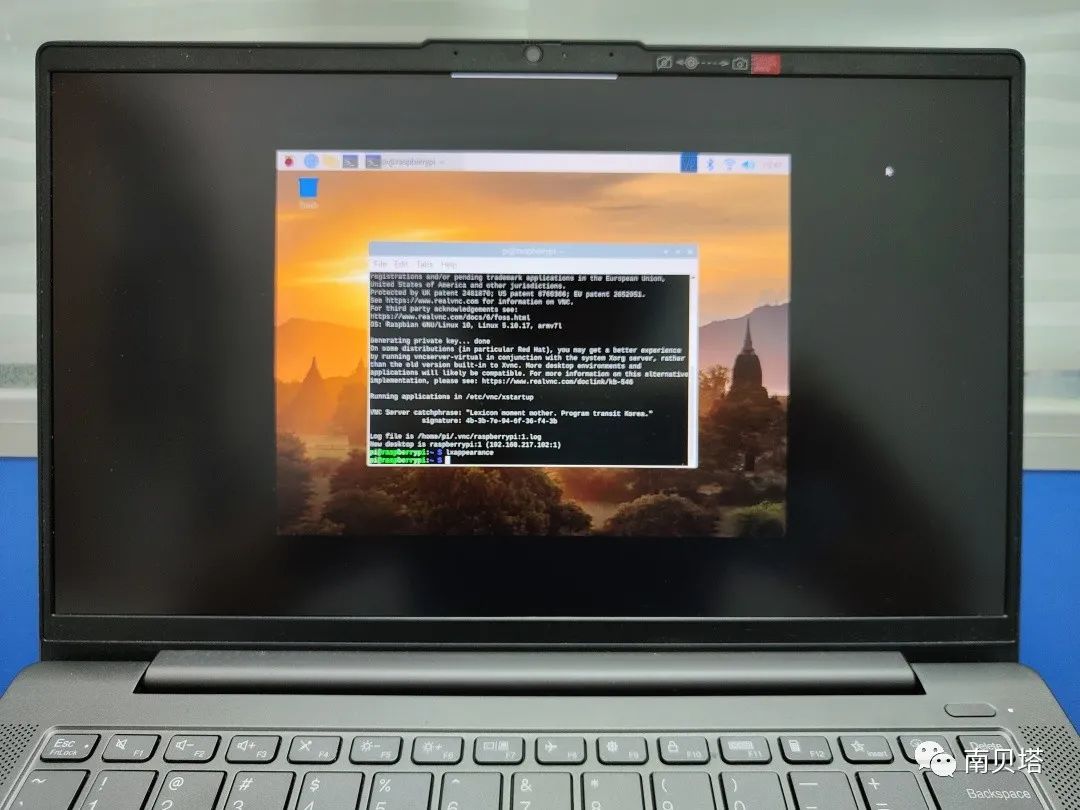
vncserver -geometry 1920x1080This command sets the display resolution of the VNC service to 1920×1080. After execution, the Raspberry Pi will prompt that another port “IP address:1” has been generated for VNC Viewer to connect.
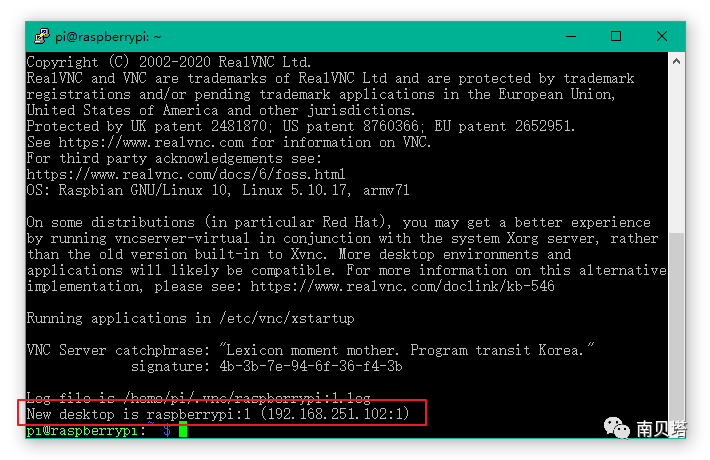
We enter the new port address “IP address:1” in VNC Viewer to connect, and after entering the username and password to log in, the resolution of this window will be 1920×1080.
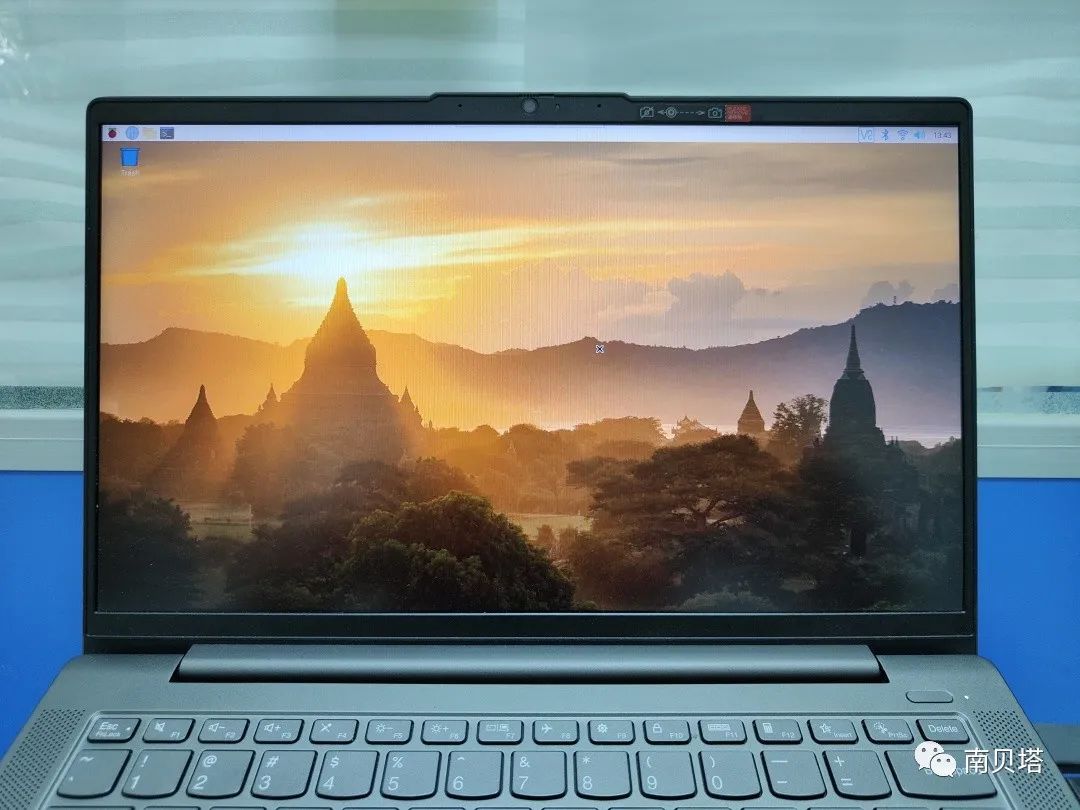
▲ Now the desktop resolution accessed by VNC Viewer is 1920×1080
However, the mouse pointer displayed in the new window has changed to a “×” sign. We execute the second command in the new window’s command line:
lxappearanceThis will switch the mouse pointer back to the familiar arrow.
5
Transferring Files Between PC and Raspberry Pi
We can now conveniently access the command line window and desktop of the Raspberry Pi from the PC. Next, we will set up the function of transferring files between the PC and the Raspberry Pi by building an FTP server on the Raspberry Pi using vsftpd, an FTP server that runs on UNIX-like systems.
We open the command line window on the Raspberry Pi (to review: we can use PuTTY to log in to the command line window, or log in to the desktop via VNC Viewer and then open the command line window) and enter the following command to install vsftpd:
sudo apt-get install -y vsftpdAfter installation, enter the command to open the vsftpd configuration file and make some necessary settings:
sudo nano /etc/vsftpd.confIn the opened configuration file, we will uncomment the following lines to enable them:
anonymous_enable=NOlocal_enable=YESwrite_enable=YESlocal_umask=022After completing this, press “ctrl+o” to save the file and then press “ctrl+x” to exit the file editor and return to the command line window.
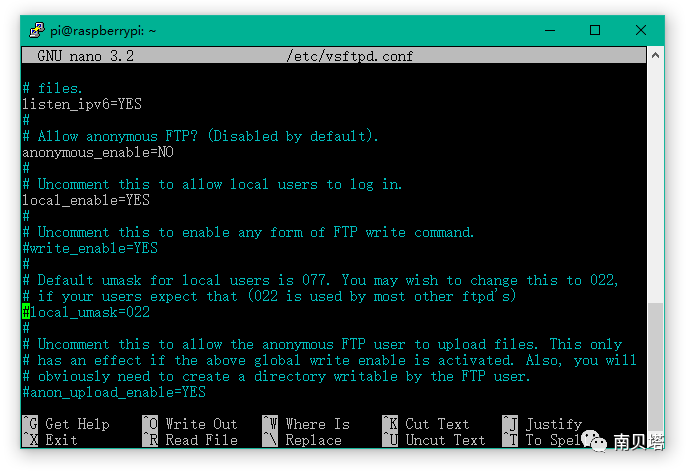
▲ Before modifying the “vsftpd.conf” file
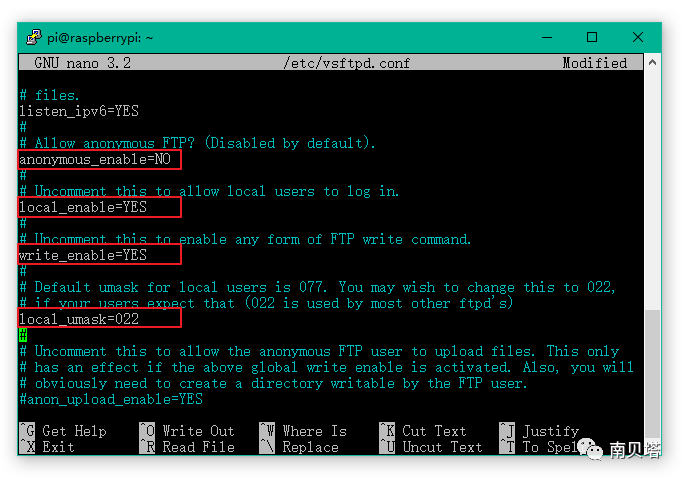
▲ After modifying the “vsftpd.conf” file
Further Reading: The functions of these settings are as follows:
|
anonymous_enable=NO |
Disallow anonymous users from accessing our FTP server |
|
local_enable=YES |
Allow local users to access the FTP server |
|
write_enable=YES |
Allow write operations to the FTP server |
|
local_umask=022 |
Set the upload file permission mask |
Next, enter the command in the command line window to start the vsftpd service:
sudo service vsftpd startThe operations on the Raspberry Pi are now complete, and an FTP server has been set up on the Raspberry Pi.
Now, we will download and install a client called FileZilla to access the FTP server on the PC.
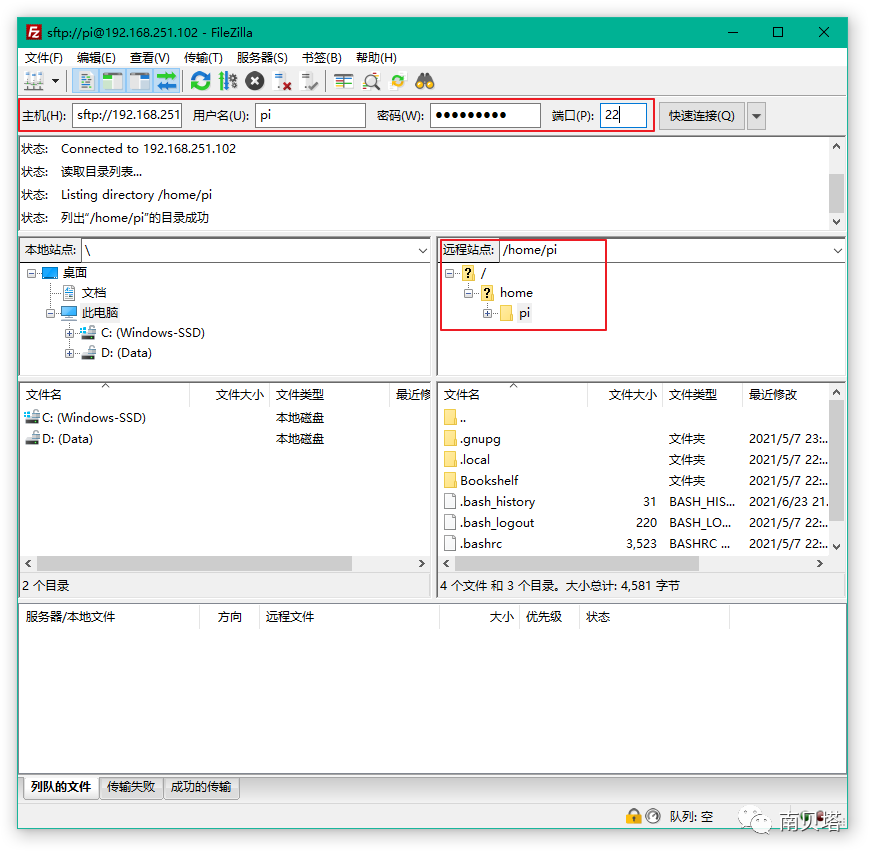
Open FileZilla, enter the IP address of the Raspberry Pi in the “Host” address box at the top, along with the username and password, and set the port to 22. Then click “Quickconnect.” Once connected successfully, we will see the file directory of the Raspberry Pi in the “Remote Site” section. Now we can conveniently transfer files back and forth between the PC and the Raspberry Pi by dragging and dropping, which is very convenient.
Note: To access the Raspberry Pi’s FTP server on a macOS computer, use FileZilla MACOSX X86.
6
Backing Up the Raspberry Pi System
Now that we can conveniently access and control the Raspberry Pi from the PC and transfer files, our Raspberry Pi adventure has officially begun. In the process of tinkering with the Raspberry Pi, we will inevitably install and configure various software, Python libraries, environment dependencies, etc. Tinkering comes with risks; to have a chance to revert when things go wrong, we can back up the system at appropriate times so that we can restore it when necessary. In this last part of the tutorial, let’s look at how to back up the Raspberry Pi system.
Based on research and practical tests, there are currently two methods for backing up the Raspberry Pi system, each with its own applicable scenarios. Below are the introductions to these two methods.
Complete Backup of the TF Card
The software we use on the PC to flash the system onto the TF card, Win32DiskImager, can also be used to back up the system on the TF card as a complete image file.
After shutting down the Raspberry Pi, we will remove the TF card and connect it to the PC via a card reader (again, ignore the system pop-ups that say “needs formatting”). Open Win32DiskImager on the PC, select the path to store the image file in “Image File,” and input the name of the image file with a “.img” suffix. Confirm that the “Device” corresponds to the drive letter of the TF card’s boot partition, then click “Read.” The software will transfer files from the “Device” to the “Image File,” and once completed, the Raspberry Pi system on the TF card will be backed up to the image file “D:/Raspberry Pi/systemBackUp.img.”
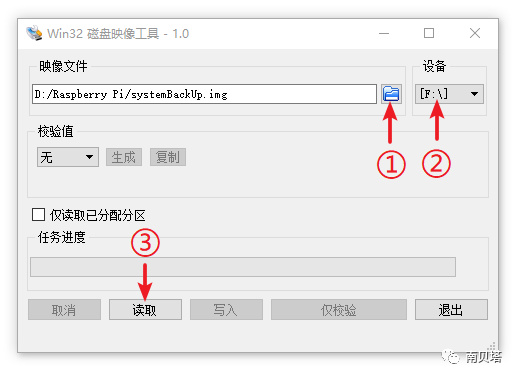
Now, we have completely backed up the Raspberry Pi system to this image file. To restore this system, we just need to format the TF card and follow the operations in the previous section “2. Flashing the Raspberry Pi Operating System” to flash this image file onto the TF card.
I recommend using SD Card Formatter to format the TF card, which has versions for both Windows and macOS. It can conveniently and cleanly format the TF card without mistakenly formatting other drives.
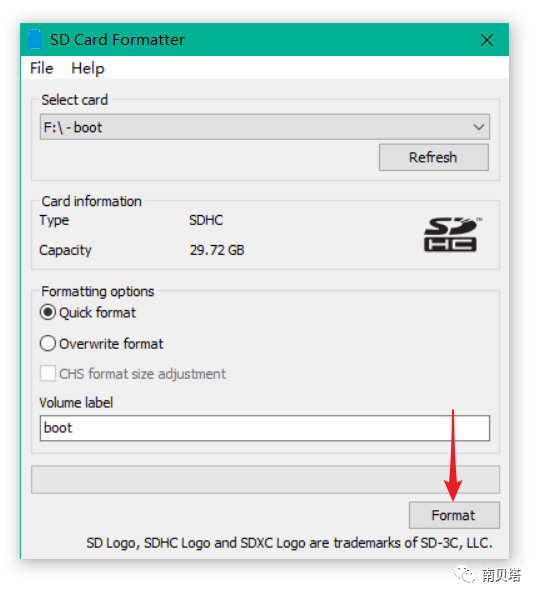
▲ No other settings are needed, just press “Format”
to complete the formatting.
This backup method is simple to operate, but its downside is that it requires a complete backup of the TF card, and the generated image file size is equal to the capacity of the TF card. Therefore, this method is more suitable for small-capacity TF cards (≤ 16 GB); for large-capacity TF cards (e.g., ≥ 128 GB), each backup will generate a 128 GB image file, which is obviously not practical. This brings us to our second backup method.
Using the rpi-backup Script for Backup
This method uses a script written by a developer to back up the Raspberry Pi system. The image file generated by this backup method is approximately 1.2 times the used space of the system, which can significantly reduce the size of the image file compared to the first backup method, saving disk space occupied by the image file.
This backup solution needs to be operated on the Raspberry Pi. We need to copy the rpi-backup script file to the Raspberry Pi. We log into the Raspberry Pi command line window and execute the following command to clone the script file from GitHub to the Raspberry Pi:
git clone https://github.com/nanhantianyi/rpi-backup.gitWe can also download the script from GitHub on the PC and transfer it to the Raspberry Pi via FTP.
Next, in the Raspberry Pi command line window, execute the cd command to navigate to the script’s location. For example, I placed the script file in “pi/Downloads/rpi-backup-master“:
cd Downloads/rpi-backup-master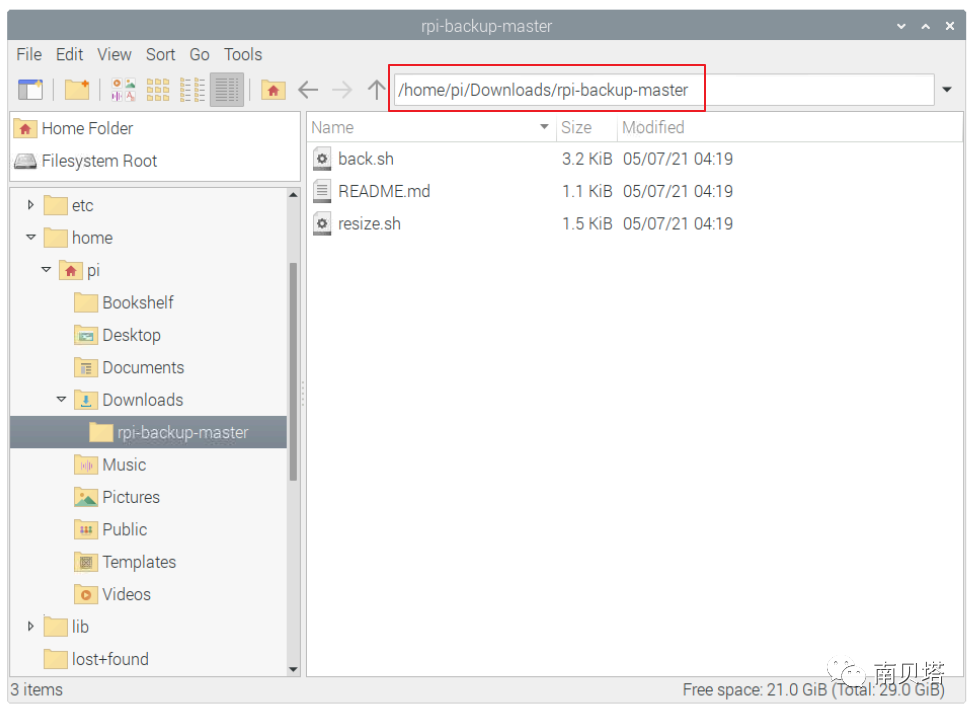
▲ Path where the script file is located
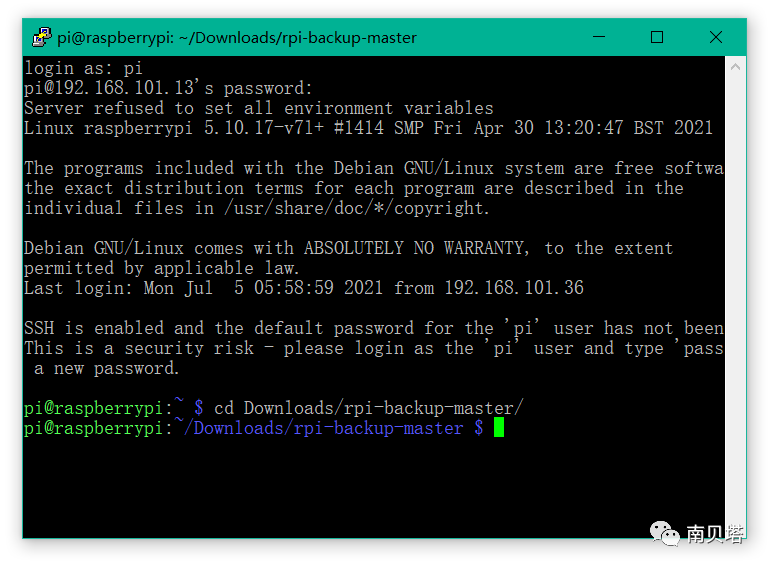
▲ Entering the script file’s path using the cd command
Now, in this path, execute the following command to run the “back.sh” script to back up the Raspberry Pi system as an image file:
sudo bash back.sh xxx.imgWhere “xxx” is the name of the image file. The generated image file will be stored in the same path as “back.sh.” We can modify the “xxx” content to specify the storage path and name of the image file, such as “Documents/systemBackUp.img” etc. To restore the system, we also just need to format the TF card and flash the backed-up image file onto the TF card.
I used this method to back up my Raspberry Pi system, and the results are as follows:
|
Item |
Size |
|
TF Card |
32 GB |
|
Used Space of the System |
6.7 GB |
|
Image File Generated After Backing Up the System |
8.3 GB |
As we can see, the size of the image file is approximately 1.24 times the used space of the system, which is much smaller than the capacity of the TF card.
However, this backup method is not without its drawbacks. The generated image file is saved on the TF card, so if the TF card does not have much space left, we need to mount a hard drive to an appropriate directory on the Raspberry Pi and save the image file there, which may be less friendly for beginners. Therefore, everyone should choose the backup method that suits their actual situation.
7
Conclusion
The Raspberry Pi beginner’s guide for 2021 is coming to an end. Let’s review and summarize the operations involved in this article in the following table:
|
Operation |
Implementation Method |
Tools/Software Used |
|
Flashing Raspberry Pi Operating System |
\ |