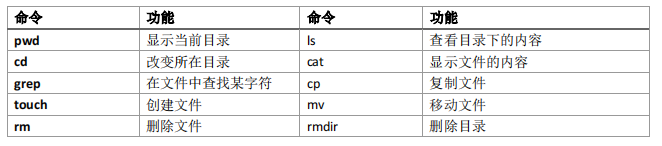
1.2 cd Command
-
The cd command is used to change the current directory.
-
cd / to switch to the root directory
-
cd ~ to switch to the /home/user directory
-
cd /usr to switch to the usr directory under the root directory – absolute path
-
cd test to switch to the test subdirectory under the current directory – relative path
1.3 ls Command
The ls command is used to view the contents of a directory.
1.4 cat Command
The cat command can be used to concatenate files and display the entire contents of a file on the screen.
cat snow.txt This command displays the contents of the file snow.txt, press ctrl+D to exit cat.
1.5 grep Command
The main function of the grep command is to search for a specific string in a bunch of files.
grep money test.txt
The above command searches for the string money in test.txt, grep search is case-sensitive.
1.6 touch Command
The touch command is used to create a new file, it can create a blank file where you can add text and data.
touch newfile This command creates a blank file named newfile.
1.7 cp Command
The cp command is used to copy files. To copy a file, enter the command:
cp <source filename> <target filename>
cp t.txt Document/t This command copies the file t.txt to the Document directory and names it t.

1.8 mv Command
The mv command is used to move files.

mv t.txt Document moves the file t.txt to the Document directory.
1.9 rm Command
The rm command is used to delete files.

rm t.txt This command deletes the file t.txt.
1.10 rmdir Command
The rmdir command is used to delete directories.
2. Commands Related to Disk Space
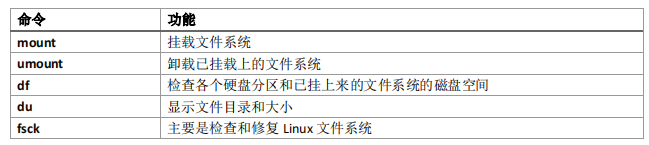
2.1 mount Command
The mount command is used to mount a file system, it can mount hard disks, CDs, floppy disks, and can also mount NFS network file systems. The standard usage of this command is as follows:
mount –t device_type mount_directory
mount IP_address:/provided_directory mount_directory
To mount an iso9660 file system in the /mnt directory, enter the command:
mount –t iso9660 /dev/hdb /cdrom
2.2 umount Command
The umount command is used to unmount mounted file systems. Before shutting down the system, all mounted file systems should be unmounted. This command is the opposite of the mount command.
Usage:
umount mounted_directory_or_device
To unmount the mounted /cdrom directory, enter the command: umount /cdrom
To unmount a specific partition, enter the command: umount /dev/hdb1
2.3 df Command
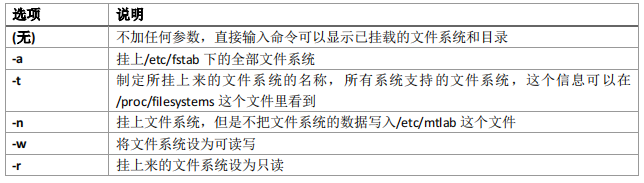
The df command is used to check the disk space of hard disk partitions and mounted file systems, that is, to check the usage of the hard disk. The standard usage is as follows:
df [-options]
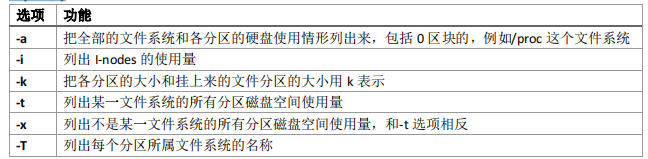
For example, to list all file systems and the disk usage of each partition, enter the command:
df –a
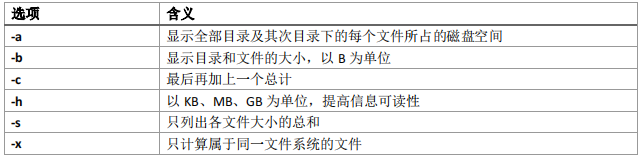
2.4 du Command
The du command is used to display the size of files and directories.
Standard usage:
du [-options]
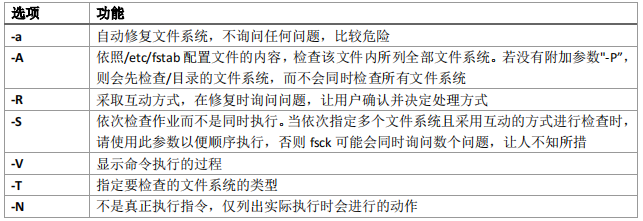
2.5 fsck Command
The fsck command is used to check and repair the Linux file system. This command is best used when no one is using the system or when no partitions are mounted. Actually, every time the system boots, it performs a check to see if there are any bad sectors or data loss.
Usage:
fsck (-options) partition_name
3. File Backup and Compression Commands
In Linux, commonly used file compression tools include gzip, bzip2, and zip. bzip2 is the ideal compression tool, providing maximum compression. zip has good compatibility and is also supported by Windows.

3.1 bzip2 Command
To use bzip2 to compress files, enter the command at the shell prompt: bzip2 filename
The file will be compressed and saved as filename.bz2.
To decompress the file, enter the command:
bunzip2 filename.bz2
filename.bz2 will be deleted, and filename will be retained.
bzip2 filename.bz2 file1 file2 file3 /usr/work/school
The above command compresses file1, file2, file3, and the contents of the /usr/work/school directory into filename.bz2.
3.2 gzip Command
To use gzip to compress files, enter the command: gzip filename
The file will be compressed and saved as filename.gz.
To decompress the file, enter the command: gunzip filename.gz
filename.gz will be deleted, and filename will be retained.
gzip -r filename.gz file1 file2 file3 /usr/work/school
The above command compresses file1, file2, file3, and the contents of the /usr/work/school directory into filename.gz.
3.3 zip Command
The zip command is used similarly to gzip.
3.4 tar Command
The tar command was originally used for tape backups, but as hard disk capacities have increased, it is now mainly used to back up all files.
The tar command packages a large number of files and directories into a single file.
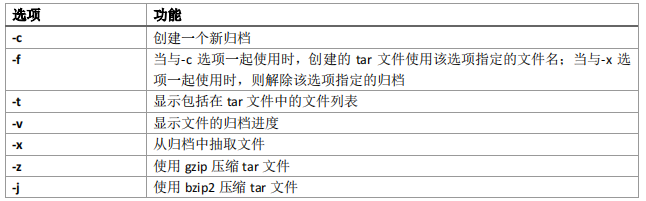
To create a tar file, enter the command: tar –cvf filename.tar directory/file /home/mine
The above command will package directory/file and /home/mine into an archive file.
To list the contents of the tar file, enter the command: tar –tvf filename.tar
To extract the tar file, enter the command: tar –xvf filename.tar
This command does not delete the tar file but will copy the extracted contents to the current working directory, preserving any directory structure used by the archive.
Note that tar does not compress files by default. To create a compressed archive using tar and bzip2, use the -j option:
tar –cjvf filename.tbz file
If you use the bunzip2 command to decompress the filename.tbz file, then filename.tbz will be deleted and replaced with filename.tar. To expand and extract the bzip tar file, enter the command:
tar –xjvf filename.tbz
To create a tar file that is archived and compressed with gzip, use the -z option: tar –czvf filename.tgz file
If you use the gunzip command to decompress the filename.tgz file, then filename.tgz will be deleted and replaced with filename.tar.
4. Commands for Shutting Down and Viewing System Information

4.1 shutdown Command
To use this command, you must be the root user; otherwise, use the su command to switch to the root user. The command format is as follows:
shutdown –(options)

To shut down in 2 minutes, enter the command: shutdown –t 2
If you want to shut down and reboot, enter the command: shutdown –r
4.2 reboot Command
This command is also a shutdown command; just enter it without any parameters, and the system will shut down as quickly as possible without writing back anything from memory or buffers to the hard disk.
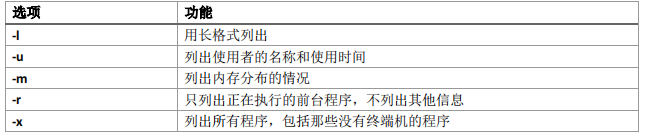
4.3 ps Command
The ps command is used to view which programs are currently executing on the computer system and their status. This is a powerful command that can be used to find all process IDs and names. Additionally, the ps command can also be used to list all programs that are using memory.
Usage is as follows:
ps –(options)

5. Commands for Managing Users and Setting Permissions

5.1 chmod Command
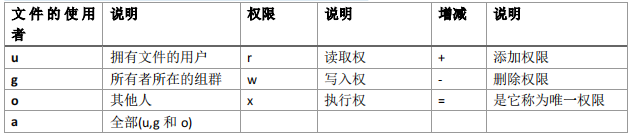
The chmod command is used to change permission settings. Read, write, and execute are the three main settings in permission. Because users are assigned to a group when their accounts are created, you can also specify which groups can read, write, or execute a file.
Where:
r—file can be read
w—file can be written
x—file can be executed if it is a program
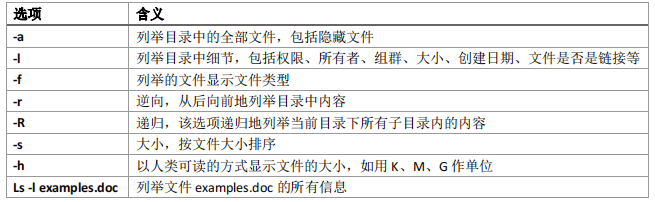
You can use the ls command with -l to carefully check many details of a file.
The chmod command is used to set file permissions.
Standard usage:
chmod user(u,g,o,a) add or remove (+,-,=) permission name (r,w,x) file
To remove all permissions from a file, enter the command: chmod a-rwx test.txt
To add permissions for the file owner, enter the command: chmod u+rwx test
You can also use numbers to represent permissions: 4—read, 2—write, 1—execute.
The following two commands are equivalent:
chmod 751 filename
chmod u+rwx,g=rx,0=x filename
5.2 su Command
The su command is used to change users. This command is very important as it allows a regular user to have superuser or other user permissions. However, this command requires the superuser or other user’s password to become a superuser or another user. To exit, you can enter exit.
Standard usage:
su username (if no username is entered, defaults to root)
For example, if the current user is user01 and wants to switch to user02, enter the command: su user02
The system will return: password:
At this point, entering commands for user02 will change to user02.
5.3 useradd Command
The useradd command is used to add users, only the root user can add users. If you are not logged in as the root user, enter su and then enter the root password.
To add a user, enter the command:
useradd username
Then, follow the prompts to enter a password for the new user.
6. Online Query Commands

6.1 man Command
The man command is used to query and explain the usage and precautions of a command. This query is available on every Linux system.
Typically, users just need to enter the command man and the name of the command to get a complete description.
Standard usage:
man command_name
To query the manual page for the ls command, enter the command: man ls
To browse the manual page, you can use the Page Up and Page Down keys, or use the space bar to scroll down a page, and use b to scroll up.
To exit the manual page, enter the command q. To search for keywords in the manual page, enter the command / followed by the keyword or phrase you want to search, and then press Enter.
All keywords that appear in the manual page will be highlighted, allowing for quick reading of the context of the keywords.
6.2 locate Command
The locate command’s main function is to locate files and directories. Sometimes, you may know that a certain file or directory exists, but you don’t know where it is, so you can use locate to find files and directories.
Using the locate command will show every file and directory that includes the search term. For example, if you want to search for files containing the word test, enter the command: locate test. The locate command uses a database to locate files or directories containing the word test.
6.3 whatis Command
The whatis command is used to query the meaning of a command. It is simple to use and does not require any parameters, just add the command you want to query after the whatis command, but it is very practical.
To query the meaning of the mv command, enter the command: whatis mv
7. File Reading Commands

7.1 head Command
The head command can be used to view the beginning part of a file. The format of this command is:
head filename
By default, it only views the first 10 lines of the file. However, you can change the number of lines displayed by specifying a numeric option, as follows:
head –20 filename
This command will view the first 20 lines of the file.
7.2 tail Command
The tail command is the opposite of the head command. Using the tail command, you can view the last 10 lines of a file.
This is helpful for viewing the last 10 lines of log files to read important system information. You can also use tail to observe updates to log files.
Using the -f option, tail will automatically display new information from the opened file to the screen in real-time.
For example, to actively observe /var/log/messages, enter the following command as the root user in the shell: tail –f /var/log/messages
7.3 less Command
The less command is similar to the more command.
7.4 more Command
The main difference between more and less is that less allows you to use arrow keys to navigate back and forth, while more uses the space bar and b key to navigate back and forth.
Using ls and more to list the contents of the /etc directory:
ls –al /etc | more
To search for keywords in a text file using more, press / and enter the search term: /foo
Use the space bar to scroll through the pages. Press q to exit.
8. Network Operation Commands

8.1 ftp Command
The ftp command is used to transfer files, which is very important. If you see a very important file on the network, you can use this command to transfer that file to your machine.
Standard usage: ftp (-options) hostname or IP address
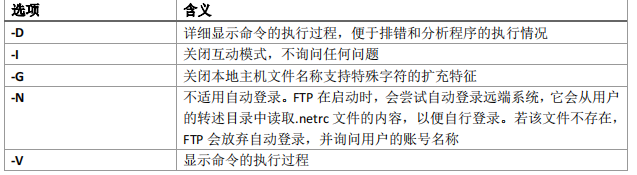
For example, to log in to the ftp.dark.com host, enter the command: ftp ftp.dark.com
Note: Users must have the appropriate access permissions; otherwise, they cannot obtain files from or transfer files to the remote system.
To use ftp to transfer files, users must know the legitimate username and password on the remote computer.
8.2 bye Command
In ftp mode, entering bye will interrupt the current connection and end the execution of ftp, without options.
8.3 ping Command
Executing the ping command will use the ICMP transport protocol to send a request for a response. If there are no issues with the network of the remote host, it will respond, allowing you to know that the host is functioning normally.
Standard usage: ping (-options) hostname or IP address
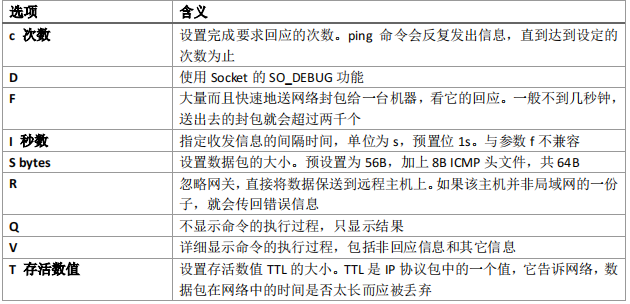
For example, to check if the des.bllod.net host’s network function is normal, send out 5 requests for response, with a 10s interval each time, and a packet size of 512B, enter the command: ping –c 5 –i 10 –s 504 –t 64 des.blood.net
9. Commands for Locating and Finding Files
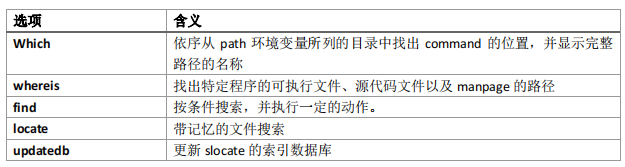
9.1 which
Syntax: which command
Description:
Sequentially finds the position of command from the directories listed in the path environment variable and displays the full path name. It stops searching as soon as it finds the first matching program file, omitting the remaining unsearched directories.
Example, find the program file’s location for the ls command: which ls, the system outputs: /usr/bin/ls
9.2 whereis
Syntax: whereis [option] name
Description:
Find the executable file, source code file, and manpage path of a specific program. The provided name will have its leading path and any .ext extensions removed.
whereis only searches in standard Linux directories.
9.3 find
Syntax: find paths expression [action] Description: Starting from paths, find each file that matches the expression condition layer by layer and execute the action represented by that file.
Expression is the search condition, which consists of an option representing matching items and a parameter representing matching patterns.
Action is the processing action, which consists of an option representing the “processing method” and an operation parameter. If action is not specified, the default action is to display the file name.
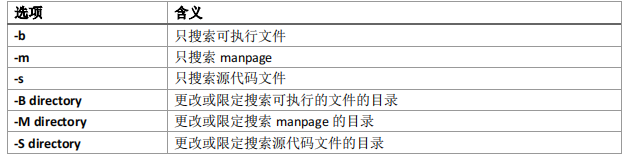
Common search conditions:
-name pattern
-path pattern
-lname pattern
Find files that match the pattern for name, path name, or symbolic link target. The pattern can include shell filename wildcards, and the path is relative to the search starting point.
Common processing actions:
Display the relative path of the file (relative to the search starting point).
-exec cmd /;
Execute the specified shell command. If cmd contains any shell special characters, they must be preceded by a backslash to prevent the shell from executing them immediately.
In cmd, you can use the “{}” symbol (including double quotes) to represent the file found by find.
9.4 locate
Syntax: locate patterns
Description: The first time you execute locate, it will create an index database. When you execute it again later, it will quickly find the file’s location from the index database. locate is suitable for repeatedly searching directories that change little, but for newly renamed old files and newly created files, locate cannot find them unless the database is rebuilt.
9.5 updatedb
Syntax: updatedb [option]
Description: Update the slocate index database.
Options:
-e directories
Skip the directories listed.
10. Other Commands

10.1 echo Command
The echo command is used to output a string of text on the display. This command is often used to output some prompt information, so the significance of this command is to output some text.
Its usage is also simple:
echo –(parameter) string (can use “”, or not, display is slightly different)
Parameter n means to output text without a newline. If no parameter is added, it will automatically add a newline.
Enter the command: echo “welcome to use Linux”
The output result is: welcome to use Linux
If you do not add “”, the output result will be: welcome to use Linux
The difference is that in the latter output, there is only one space between each output, because echo treats these outputs as a string.
10.2 clear Command
The clear command’s main function is to clear the display. This command is very simple; just enter clear.
10.3 passwd Command
The passwd command is used to change the user’s password.
Enter passwd in the shell
Then, follow the prompts to enter the old password and new password.
10.4 lpr Command
The lpr command’s function is to send the specified file to the print queue. For example, lpr foo.txt will print the foo.txt file.
Standard usage: lpr filename
To view the jobs waiting in the print queue, enter the command lpq in the command line. The system returns the following information:
active root 389 foo.txt
In this example, 389 is the job number. You can also cancel a job in the print queue using the format:
lprm job_number
Enter the command: lprm 389
This will cancel the printing job for foo.txt.
Note: The above commands are sourced from the internet, please delete if infringing.
☆ Limited Time Offer ☆
A total of 1349 pages of Linux command quick reference manual, over 570 commands. The content is comprehensive and rich, with clear and copyable code. All commands are arranged from A to Z for easy searching. Ctrl+F for one-click positioning, quickly check the required commands, especially convenient.


Click below“Read the Original Text”to get more valuable resources
👇