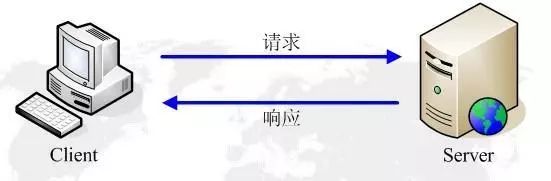
IoT (Internet of Things) devices must connect to the internet. By connecting to the internet, devices can collaborate with each other and work with backend services. The foundational network protocol of the internet is TCP/IP. MQTT (Message Queuing Telemetry Transport) is built on the TCP/IP protocol stack and has become the standard for IoT communication.
MQTT was originally invented and developed by IBM in the late 1990s. Its initial use was to connect sensors on oil pipelines to satellites. As the name suggests, it is a messaging protocol that supports asynchronous communication between parties. Asynchronous messaging protocols decouple the message sender from the receiver in space and time, allowing for scalability in unreliable network environments. Despite being called Message Queuing Telemetry Transport, it has nothing to do with message queues but uses a publish and subscribe model. At the end of 2014, it officially became an OASIS open standard and is supported in several popular programming languages through various open-source implementations.
Why Choose MQTT
MQTT is a lightweight and flexible network protocol aimed at achieving an appropriate balance for IoT developers:
-
This lightweight protocol can be implemented on severely constrained device hardware and high-latency/bandwidth-limited networks.
-
Its flexibility makes it possible to support diverse application scenarios for IoT devices and services.
To understand why MQTT is so suitable for IoT developers, we first analyze why other popular network protocols have not been successfully applied in IoT.
Why Not Choose HTTP
Most developers are familiar with HTTP web services. So why not connect IoT devices to web services? Devices can send their data in the form of HTTP requests and receive updates from the system in the form of HTTP responses. This request and response model has some serious limitations:
-
HTTP is a synchronous protocol. Clients must wait for the server’s response. Web browsers have this requirement, but at the cost of sacrificing scalability. In the IoT domain, a large number of devices and likely unreliable or high-latency networks make synchronous communication problematic. Asynchronous messaging protocols are more suitable for IoT applications. Sensors send readings, allowing the network to determine the best route and timing to deliver them to target devices and services.
-
HTTP is one-way. The client must initiate the connection. In IoT applications, devices or sensors are usually clients, meaning they cannot passively receive commands from the network.
-
HTTP is a 1-1 protocol. The client makes a request, and the server responds. Delivering messages to all devices on the network is not only difficult but also costly, which is a common use case in IoT applications.
-
HTTP is a heavyweight protocol with many headers and rules. It is not suitable for constrained networks.
The two processes of the HTTP protocol, Request and Response, both have their respective language formats. Let’s take a look at what they are.
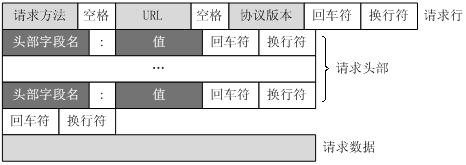
Request message format: (Note there is a line break here)
<method> <request-URL> <version>
<headers>
<entity-body>
Response message format: (Note there is a line break here)
<version> <status> <reason-phrase>
<headers>
<entity-body>
Method method:
This is very important, for example, GET and POST methods, these two are very common, GET is to retrieve content, while POST is to send data to the server. Of course, there are others, such as DELETE, PUT, CONNECT, HEAD, OPTIONS, TRACE, etc., a total of 8 methods (HTTP Method history: HTTP 0.9 only had the GET method; HTTP 1.0 had GET, POST, HEAD three methods).
Request URL:
The URL filled in here does not contain the IP address or domain name, but is the directory address corresponding to the local file of the host, so we generally see it as “/”.
Version version:
The format is HTTP/<major>.<minor>, for example, HTTP/1.1. This version represents the version of the HTTP protocol we are using, and the one in general use is HTTP/1.1.
Status code status:
The status code is a three-digit number that represents what happened during the request process, for example, 200 means success, 404 means file not found.
Reason phrase reason-phrase:
This is the readable version of the status code; the status code is just a number. If you don’t know what this number means beforehand, you can first check the reason phrase.
Header header:
Note that here we do not call the header as head, but as header. There may be zero headers or multiple headers, each header contains a name followed by a colon, then an optional space, followed by a value, and then a line break.
Entity body entity-body:
The entity body contains a data block composed of arbitrary data; not all messages contain the entity body; sometimes it just ends with an empty line and a line break.
Here is a simple example:
Request message:
GET /index.html HTTP/1.1
Accept: text/*
Host: www.myweb.com
Response message:
HTTP/1.1 200 OK
Content-type: text/plain
Content-length: 3
For the above reasons, most high-performance, scalable systems use asynchronous message buses for internal data exchange rather than web services. In fact, the most popular messaging protocol used in enterprise middleware systems is called AMQP (Advanced Message Queuing Protocol). However, in high-performance environments, computing power and network latency are usually not issues. AMQP is dedicated to achieving reliability and interoperability in enterprise applications. It has a large feature set but is not suitable for resource-constrained IoT applications.
Besides AMQP, there are other popular messaging protocols. For example, XMPP (Extensible Messaging and Presence Protocol) is a peer-to-peer instant messaging (IM) protocol. It heavily relies on features that support IM use cases, such as presence and media connections. Compared to MQTT, it requires much more resources on devices and networks.
So, why is MQTT so lightweight and flexible? One key feature of the MQTT protocol is the publish and subscribe model. Like all messaging protocols, it decouples the data publisher from the users.
It has the following main features:
1. Uses a publish/subscribe messaging pattern, providing one-to-many message publishing and decoupling between applications;
2. Message transmission does not need to know the content of the payload;
3. Uses TCP/IP for network connection;
4. Has three levels of message publishing quality of service:
QoS 0: “At most once,” message publishing completely relies on the underlying TCP/IP network. Delivered messages may be lost or duplicated. For example, this level can be used for environmental sensor data, where a single data loss is not an issue because a second sending will occur shortly afterward.
QoS 1: “At least once,” ensures that messages can arrive, but messages may be duplicated.
QoS 2: “Exactly once,” ensures that messages arrive exactly once. For example, this level can be used in a billing system, where message duplication or loss could lead to incorrect billing.
5. Small transmissions, minimal overhead (fixed-length header is 2 bytes), and minimized protocol exchanges to reduce network traffic;
6. Uses Last Will and Testament features to notify relevant parties of client abnormal disconnections;
In the MQTT protocol, an MQTT packet consists of three parts: a fixed header, a variable header, and a payload. The transmission format of MQTT is very compact, with the smallest packet being only 2 bits and no application message header.
Publish and Subscribe Model
The MQTT protocol defines two types of entities in the network: a message broker and some clients. A broker is a server that receives all messages from clients and then routes those messages to the relevant target clients. A client is anything that can interact with the broker to send and receive messages. Clients can be IoT sensors in the field or applications that process IoT data in a data center.
-
The client connects to the broker. It can subscribe to any message “topic” in the broker. This connection can be a simple TCP/IP connection or an encrypted TLS connection for sending sensitive messages.
-
The client publishes messages within a certain topic range by sending messages and topics to the broker.
-
The broker then forwards the messages to all clients subscribed to that topic.
Because MQTT messages are organized by topic, application developers can flexibly specify that certain clients can only interact with certain messages. For example, a sensor will publish readings within the “sensor_data” topic range and subscribe to the “config_change” topic. A data processing application that saves sensor data to a backend database will subscribe to the “sensor_data” topic. A management console application can receive commands from system administrators to adjust sensor configurations, such as sensitivity and sampling frequency, and publish those changes to the “config_change” topic.

MQTT Publish and Subscribe Model for IoT Sensors
At the same time, MQTT is lightweight. It has a simple header for specifying message types, a text-based topic, and an arbitrary binary payload. Applications can use any data format for the payload, such as JSON, XML, encrypted binary, or Base64, as long as the target client can parse that payload.
Getting Started with MQTT Development
-
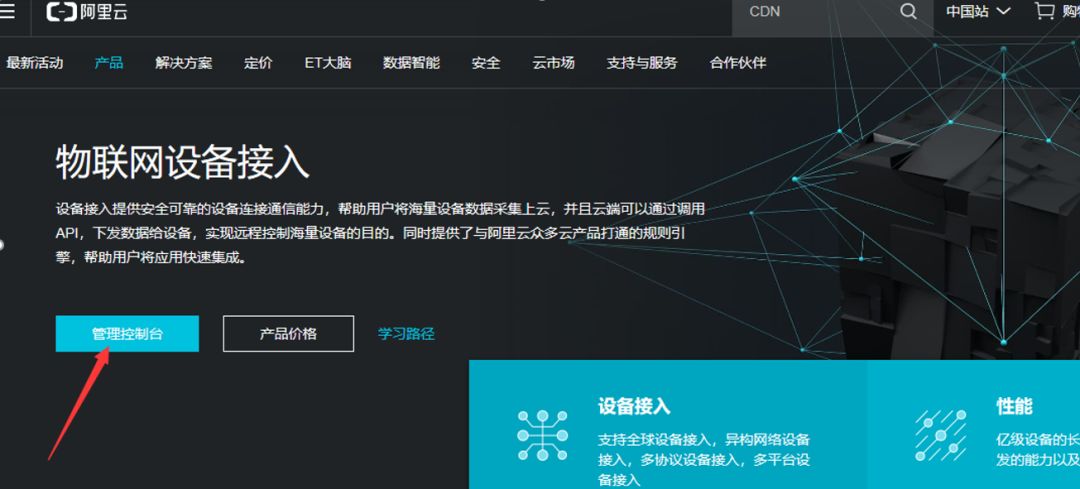
Add product devices on the Alibaba IoT platform—Below we introduce how to use an MQTT tool to access the Alibaba IoT platform:
Creating Product Devices on the IoT Platform:
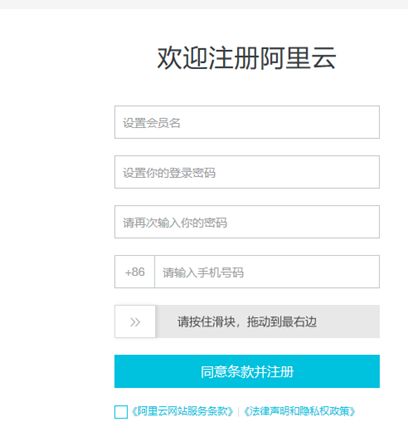
1. First, register and log in to Alibaba Cloud, then activate the Alibaba Cloud IoT platform
https://dev.iot.aliyun.com/sale?source=deveco_partner_chenlin
Copy the link into the browser (if you do not have an Alibaba Cloud account, register and then copy it again to enter, click “Activate”)
Scanning the QR code can also activate

Registration: Click on free registration or use third-party Taobao, Alipay, DingTalk, 1688, Weibo authorization login, but third-party login also requires re-registration and real-name verification.
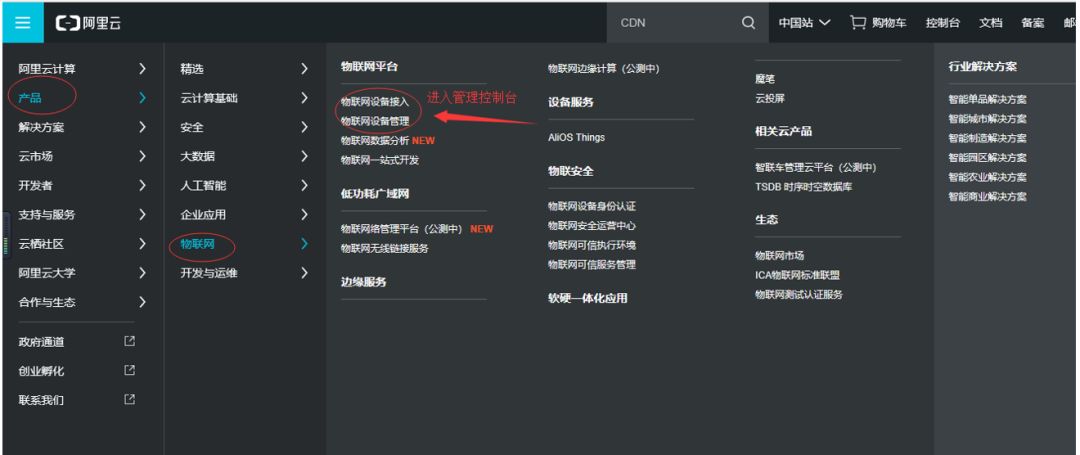
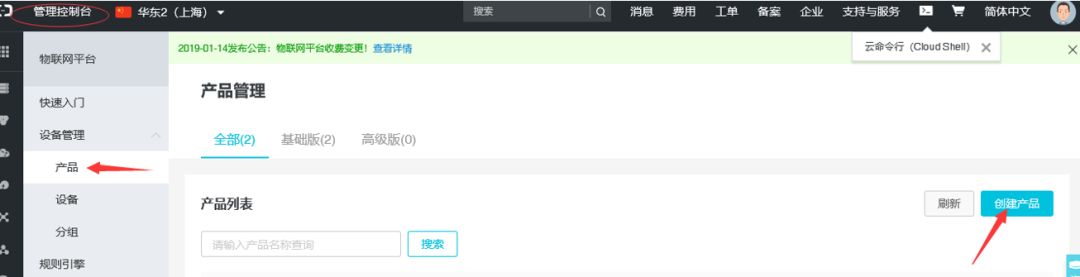
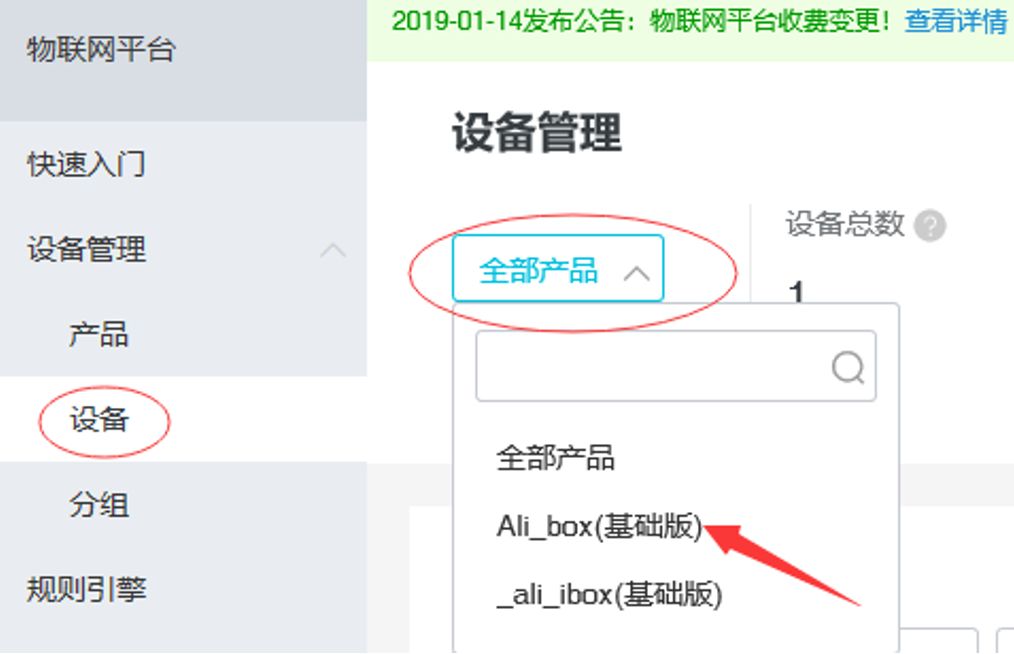
2. After activation, enter the management console. If you return to the homepage, you can re-copy the platform link or enter the management console from the sidebar menu on the top right of the homepage—Product—IoT—IoT Device Access/IoT Device Management
Select Device Management—Product on the left navigation bar, and click Create Product
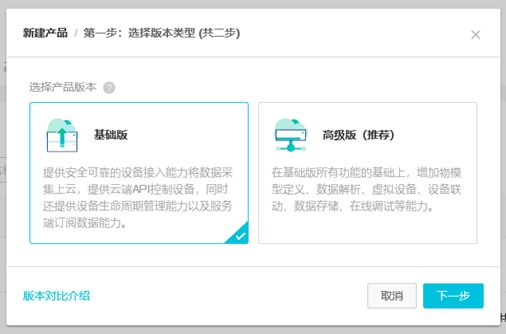
3. Create a new product, Step 1: Select version type, here we choose the basic version for demonstration, click next.
4. Create a new product, Step 2: Fill in product information, complete the parameter settings for the product to be created, and click finish.
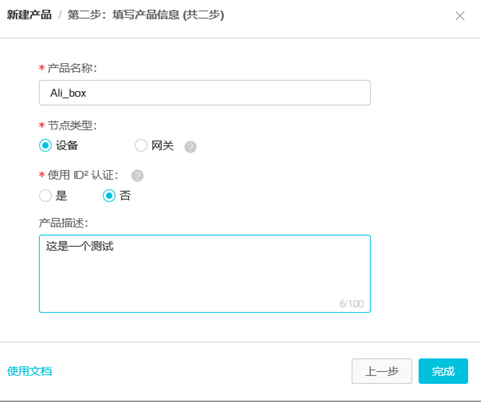
The page parameter settings are as follows:
|
Parameter |
Description |
|
Product Name |
Name the product. The product name must be unique within the account. For example, it can be filled as the product model. Supports Chinese, English letters, numbers, and underscores, length limit 4~30, one Chinese character counts as 2. |
|
Node Type |
Device or Gateway. o Device: Refers to devices that cannot mount sub-devices. This type of device can connect directly to the IoT platform or connect to the IoT platform as a sub-device of a gateway. o Gateway: Refers to directly connected devices that can mount sub-devices. Gateways have sub-device management modules, maintain the topological relationship of sub-devices, and can synchronize the topological relationship to the cloud. |
|
Product Description |
Enter text to describe the product. Word limit is 100. |
After successful creation, as shown:

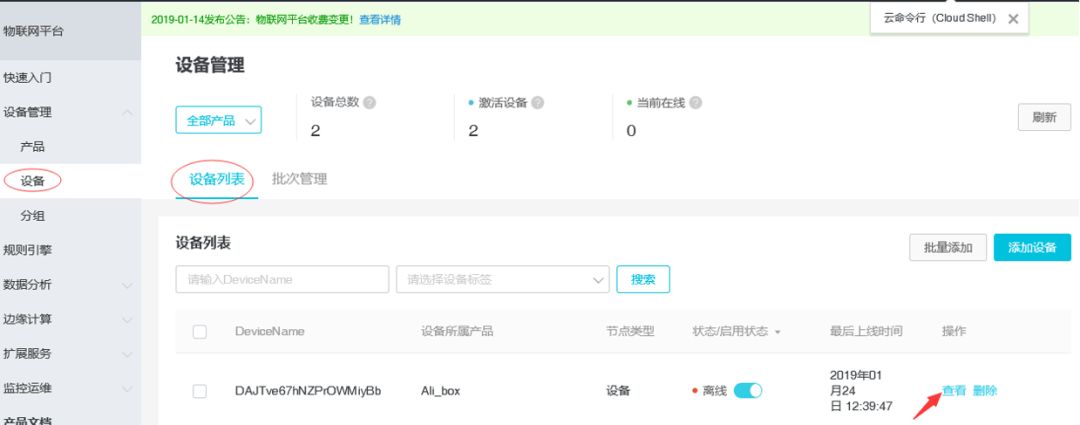
5. In the left navigation bar, select Device Management—Devices and choose the newly created product. Then, click Add Device to select, the newly created device will inherit the features and functions defined by that product. (Optional) Fill in DeviceName; if not filled, the system will automatically generate a DeviceName to identify the device.
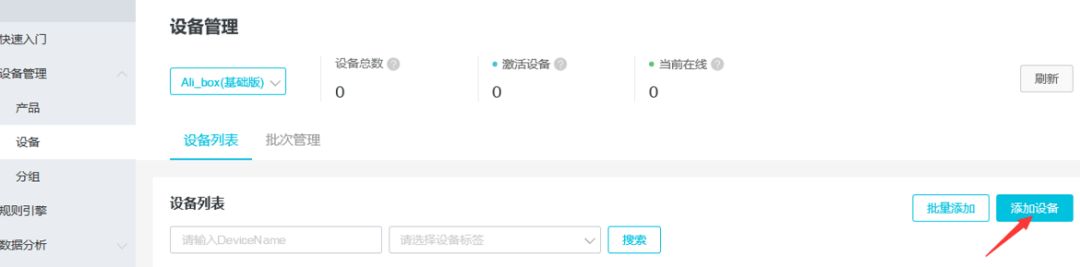
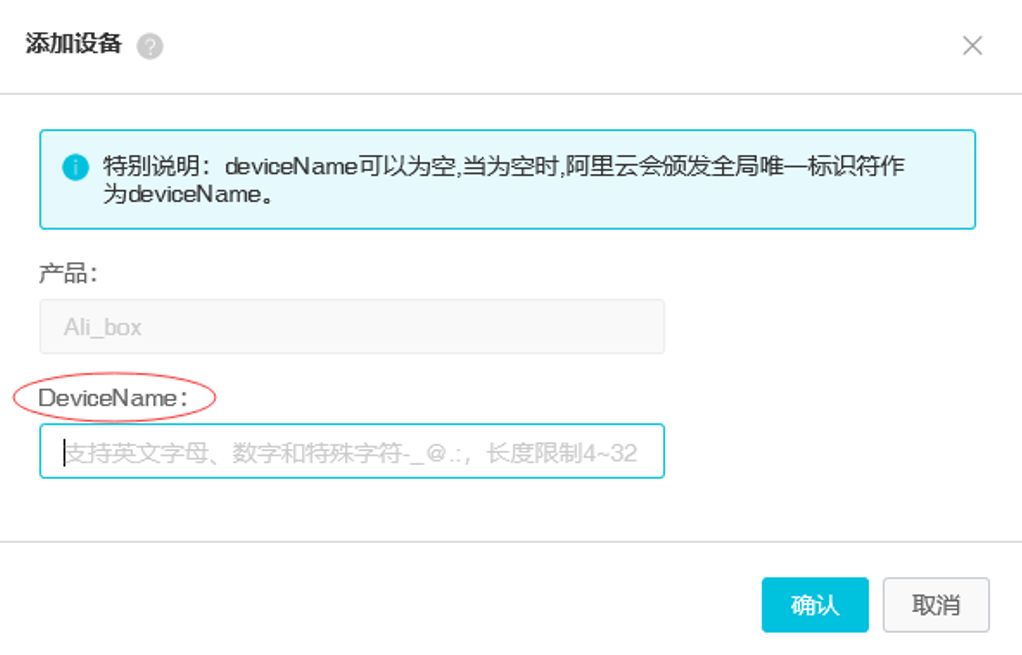
6. Click Confirm to complete device creation.
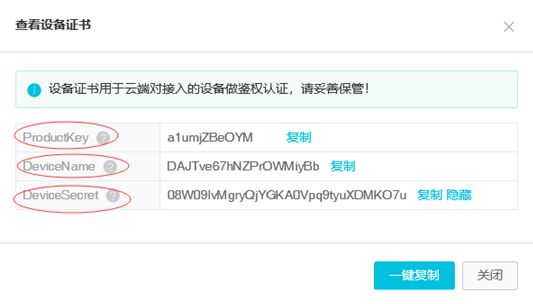
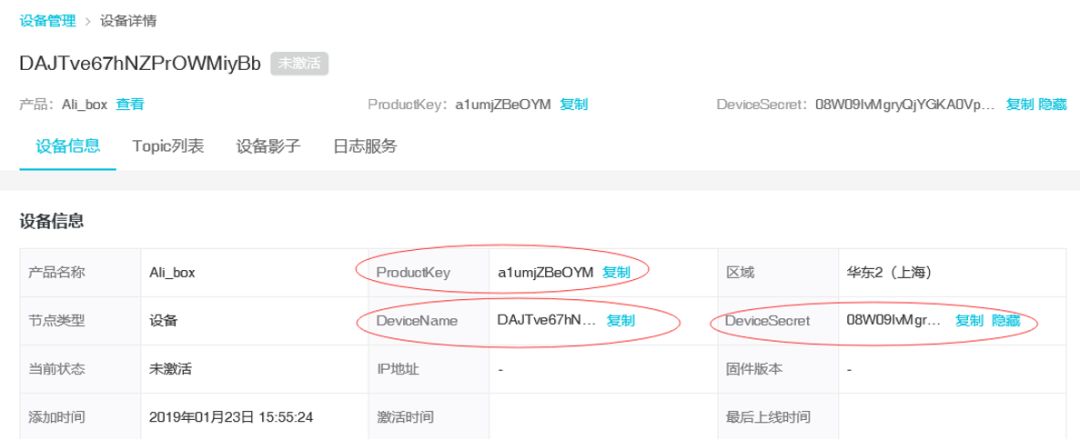
After the device is created, a pop-up will automatically appear to view the device certificate. You can view and copy the device certificate information. The device certificate, also known as the device trio, consists of the Device ProductKey, DeviceName, and DeviceSecret, which are important identity authentications for communication between the device and the IoT platform. It is recommended that you keep it safe.
ProductKey: A globally unique identifier issued by the IoT platform for the product you created.
DeviceName: A unique identifier for the device within the product, used for device authentication and communication. (User-defined or system-generated)
DeviceSecret: A device key issued by the IoT platform for the device, used for authentication encryption, and must be used in conjunction with DeviceName.

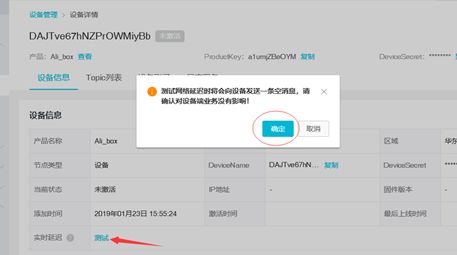
7. Click View in the operation bar corresponding to the created device to enter the device details page and view the device details. On the Device Information tab, click Test after Real-time Delay to check the network delay of your device.
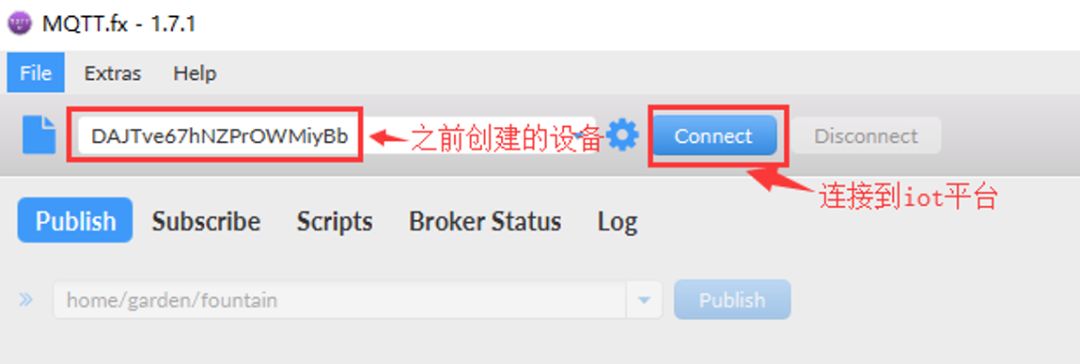
Using MQTTfx tool to connect
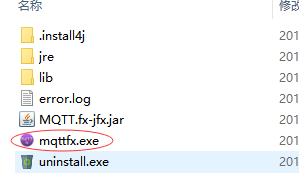
Download the mqttfx tool
-
Double-click to open mqttfx.exe
2. Click Extras, select Edit Connection Profiles

3. After opening, set detailed parameters
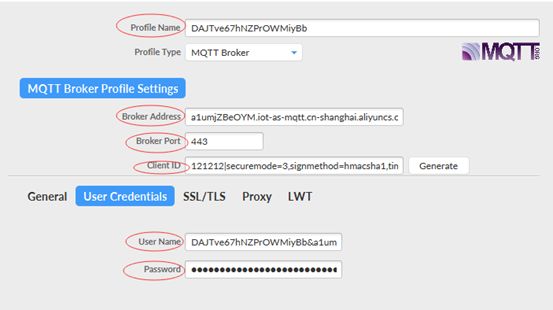
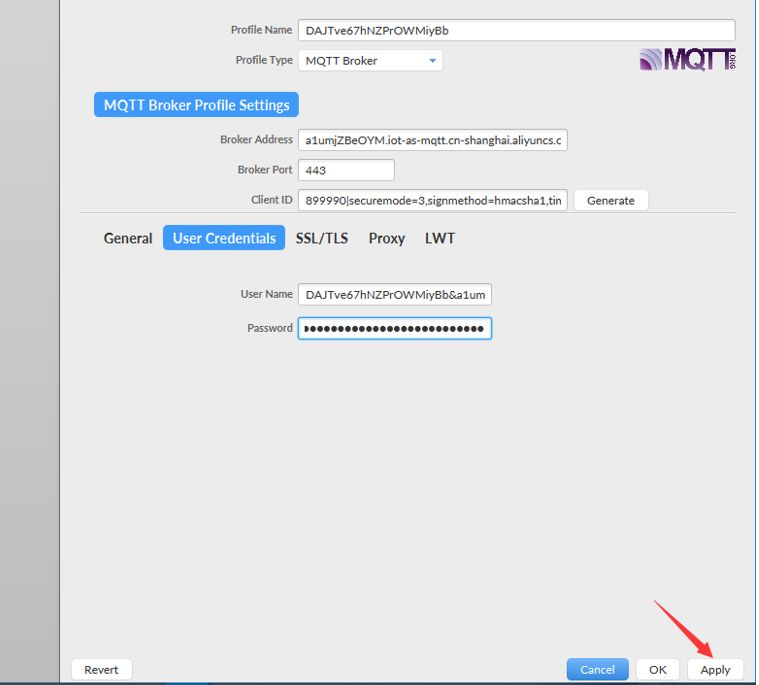
(1) Profile Name: the DeviceName of the created product (copy directly)
(2) Broker Address:
YourProductKey.iot-as-mqtt.cn-shanghai.aliyuncs.com,
“YourProductKey” please replace with your ProductKey (copy directly)
(3) Broker Port: set to 1883
(4) Client ID (mqtt):
ClientID(mqtt)=clientId(sn)+”|securemode=3,signmethod=hmacsha1,timestamp=12345|”
clientId: represents the client ID, suggested to be mac or sn, within 64 characters. (User-defined, needs to be unique)
timestamp: represents the current time in milliseconds, optional.
mqttClientId: The format within||is for extended parameters.
signmethod: represents the signature algorithm type. (The signature method of Alibaba Cloud platform ishmacsha1)
securemode: represents the current security mode, optional values are 2 (wss protocol) and 3 (ws protocol).
Example:
ClientID(mqtt) is
121212|securemode=3,signmethod=hmacsha1,timestamp=12345|
(5) User Name: User Name =DeviceName+“&”+ProductKey
Example: DAJTve67hNZPrOWMiyBb&a1umjZBeOYM
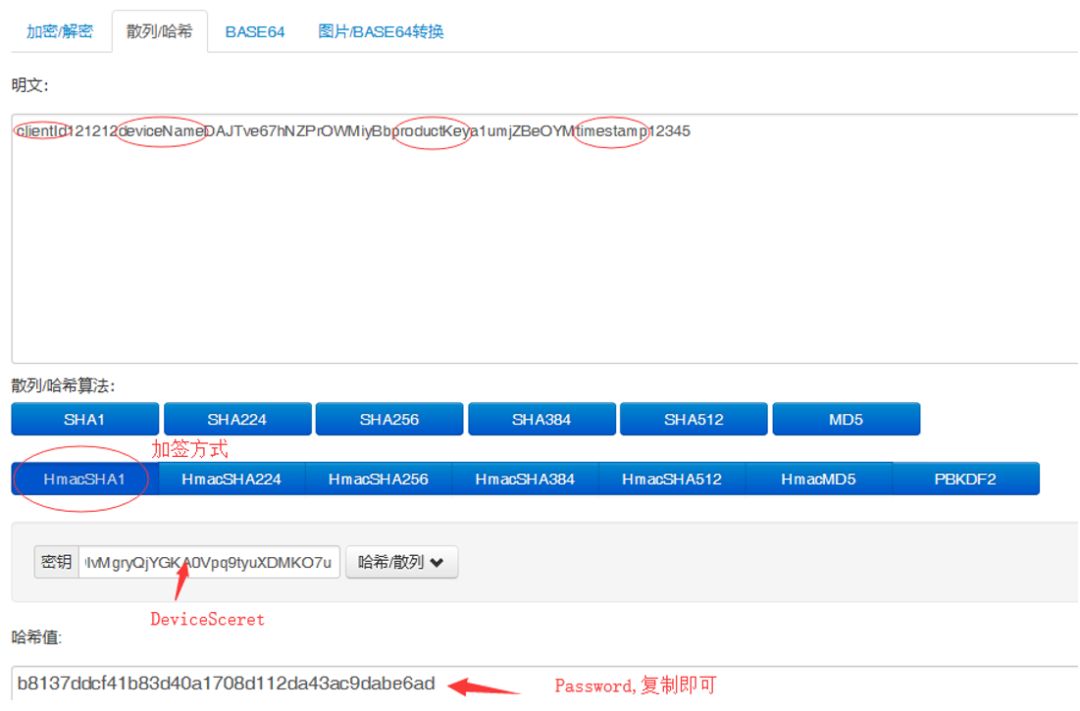
(6) Password:http://tool.oschina.net/encrypt?type=2
Open the link, the password signing process is shown in the following figure, and finally fill in the signed password in the mqttfx password
Plain text: clientId + Id value + deviceName + Name + productKey + Key value + timestamp + time value;
Select HmacSHA1 as the signing method, input the value of DeviceSecret in the key, and click Hash/Hash to get the hash value as the user password.
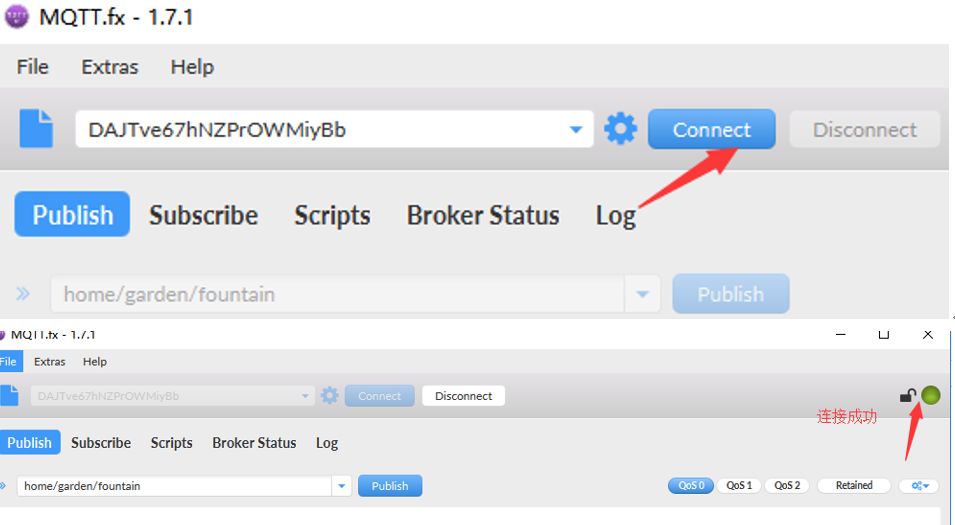
4. After setting, click Apply
5. Click Connect, the green circle indicates a successful connection, the red circle indicates a failed connection, indicating that the username or password is incorrect
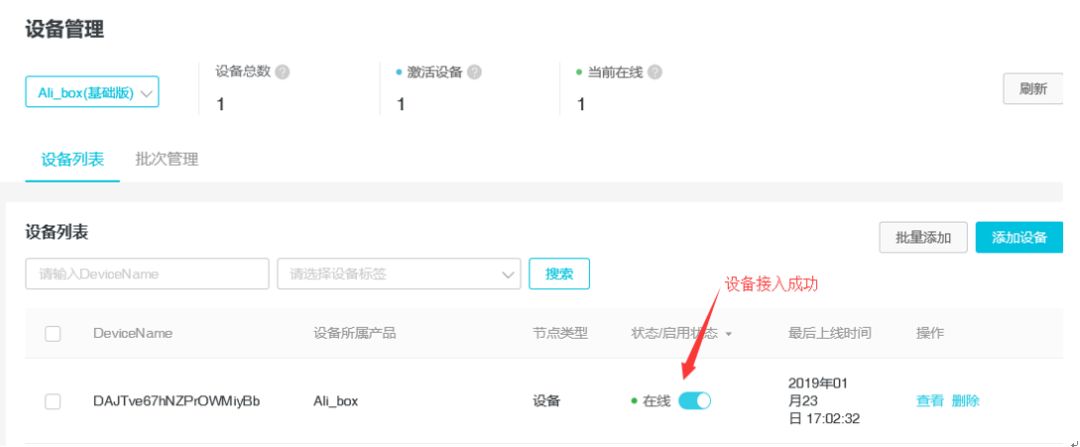
6. Return to the management console to view Device Management—Device List—Current Device Status (whether online), online indicates that the device has successfully accessed, unactivated indicates that the device has not yet successfully accessed
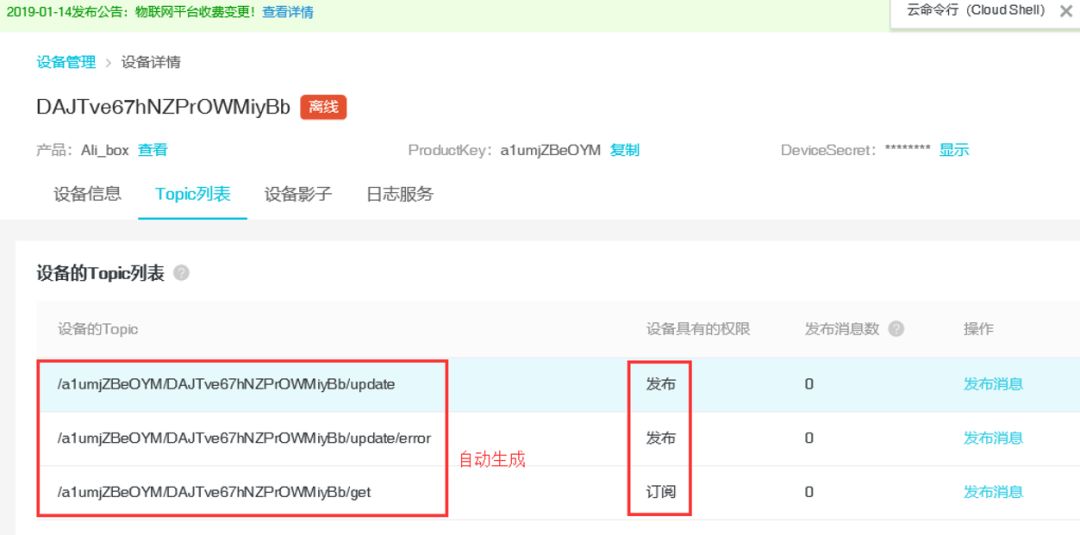
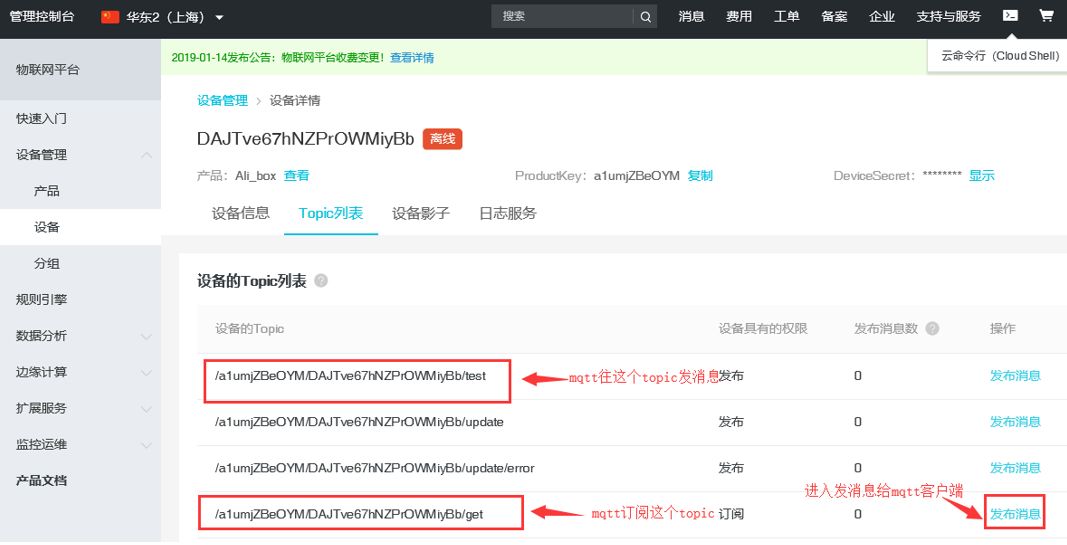
Three, Subscription
1. Select Device Management—Device—Device List—View, enter the device details page
2. Enter the Topic list interface, and several Topics will be automatically generated
Publishing refers to the device sending to the platform;
Subscription is the platform sending to the device.
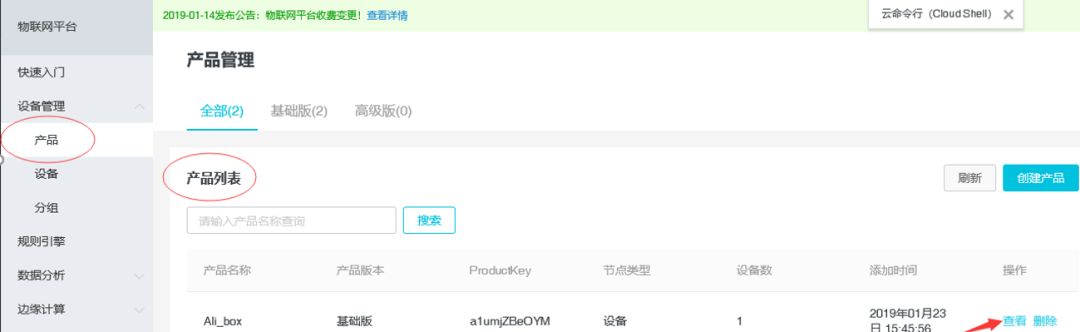
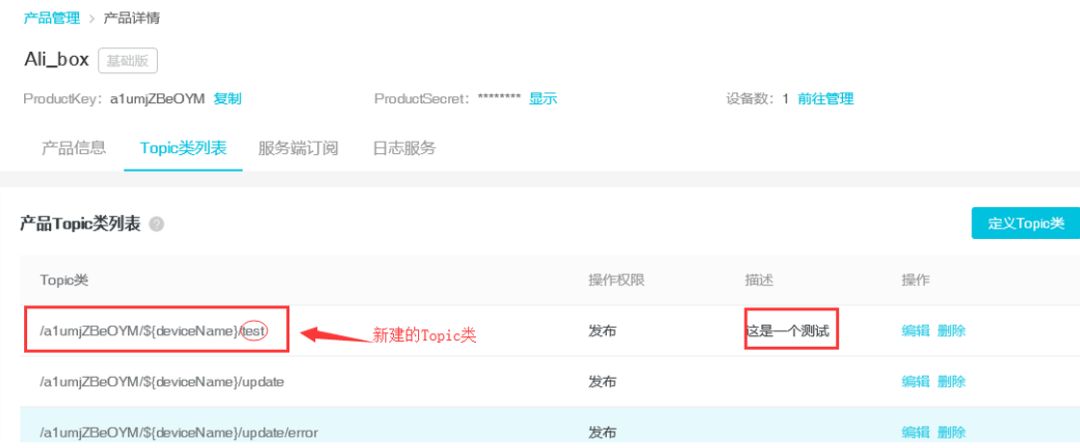
Four, Create or Edit Topic
1. Select Device Management—Product—Product List—View, enter the product details page
2. In the product details page, enter the Topic category list interface
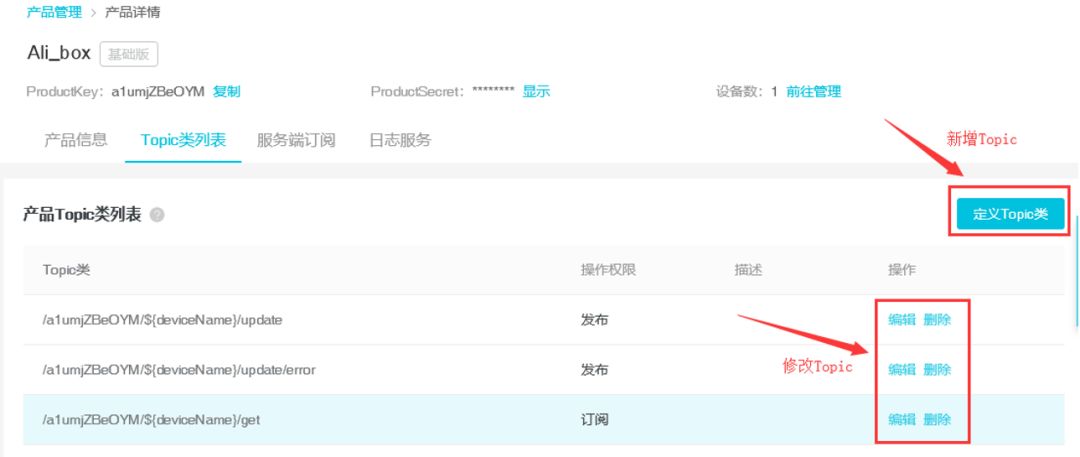
3. Click Define Topic Class, create a new Topic class, and customize the name
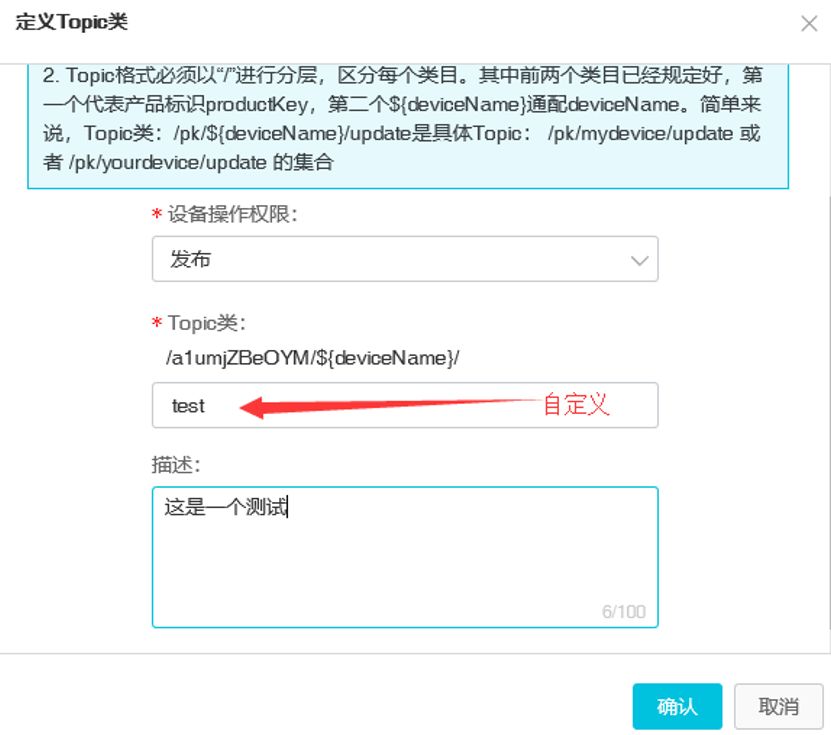
4. Click Confirm, then enter the product Topic class list, and see the newly created Topic class (test)
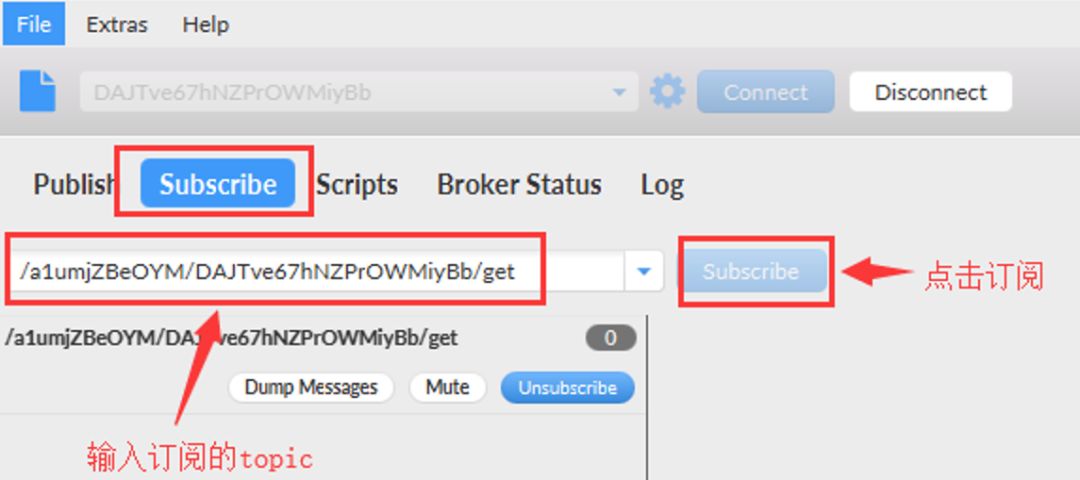
5. Select Device Management—Device—Device List—View—Topic List, and subscribe to the Topic in the mqtt client
Five, mqtt client subscribes to the IoT platform Topic
1. Double-click to open the mqtt client, click Connect to connect to the platform
2. After successful connection, enter the subscribed topic in Subscribe, click Subscribe, and confirm the subscription
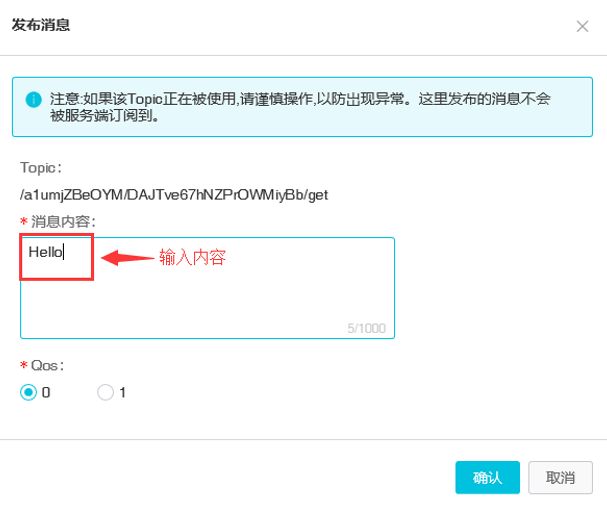
3. Return to the device’s Topic list, select publish message

4. Select publish message, enter message content (custom)
* Quality of Service level is a protocol about guaranteeing delivery of information between sending and receiving ends. There are a total of 3 QoS levels:
1. At most once (0)
2. At least once (1)
3. Exactly once (2)
Here, either 0 or 1 can be used
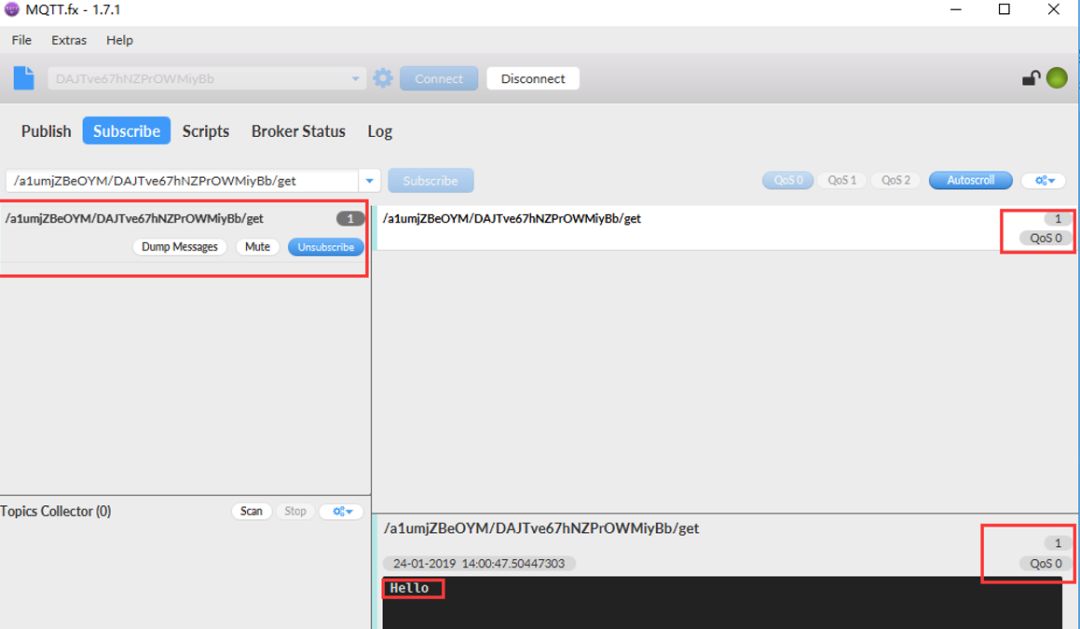
5. After clicking confirm, the mqtt client receives the message sent by the platform
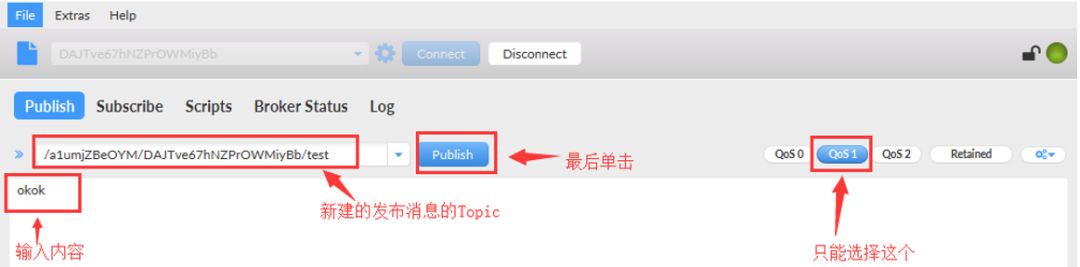
Six, mqtt client sends information to the IoT platform
Select Publish, input the topic of the newly created publish message on the IoT platform, because the platform currently only supports viewing data with QoS of 1, choose 1 here, then enter the information to be sent to the IoT platform and click Publish to send
MQTT Protocol
MQTT is a connection protocol that specifies how to organize data bytes and transmit them over TCP/IP networks. However, in practice, developers do not need to understand this connection protocol. We only need to know that each message has a command and a data payload. The command defines the message type (e.g., CONNECT message or SUBSCRIBE message). All MQTT libraries and tools provide simple methods to directly handle these messages and can automatically populate some required fields, such as message and client ID.
First, the client sends a CONNECT message to connect to the broker. The CONNECT message requests the establishment of a connection from the client to the broker. The CONNECT message contains the following content parameters.
Table 1. CONNECT Message Parameters
|
Parameter |
Description |
|
cleanSession |
This flag specifies whether the connection is persistent. Persistent sessions will store all subscriptions and possibly lost messages (depending on QoS) in the broker. (See Table 3 for descriptions of QoS.) |
|
username |
Authentication and authorization credentials for the broker. |
|
password |
Authentication and authorization credentials for the broker. |
|
lastWillTopic |
When the connection is unexpectedly interrupted, the broker will automatically send a “last will” message to a certain topic. |
|
lastWillQos |
QoS of the “last will” message. (See Table 3 for descriptions of QoS.) |
|
lastWillMessage |
The “last will” message itself. |
|
keepAlive |
This is the time interval required for the client to ping the broker to keep the connection alive. |
After establishing the connection, the client then sends one or more SUBSCRIBE messages to the broker, indicating that it will receive messages for certain topics from the broker. The message may contain one or more duplicate parameters, as shown in Table 3.
Table 3. SUBSCRIBE Message Parameters
|
Parameter |
Description |
|
qos |
The qos (Quality of Service or QoS) flag indicates the level of assurance required for the delivery of messages within this topic range to the client.
|
|
topic |
The topic to subscribe to. A topic can have multiple levels, separated by slash characters. For example, “dw/demo” and “ibm/bluemix/mqtt” are valid topics. |
After successfully subscribing to a topic, the broker will return a SUBACK message to the client, which contains one or more returnCode parameters.
Table 4. SUBACK Message Parameters
|
Parameter |
Description |
|
returnCode |
Each topic in the SUBSCRIBE command has a return code. The return values are as follows.
|
Corresponding to the SUBSCRIBE message, the client can also unsubscribe from one or more topics using the UNSUBSCRIBE message.
Table 5. UNSUBSCRIBE Message Parameters
|
Parameter |
Description |
|
topic |
This parameter can be repeated for multiple topics. |
The client can send a PUBLISH message to the broker. This message contains a topic and a data payload. The broker then forwards the message to all clients subscribed to that topic.
Table 6. PUBLISH Message Parameters
|
Parameter |
Description |
|
topicName |
The relevant topic of the published message. |
|
qos |
The level of service quality for message delivery. (See Table 3 for descriptions of QoS.) |
|
retainFlag |
This flag indicates whether the broker should retain this message as the last known message for this topic. |
|
payload |
The actual data in the message. It can be a text string or binary large object data. |
Tips and Workarounds
The advantage of MQTT lies in its simplicity. There are no restrictions on the types of topics or message payloads that can be used. This supports some interesting use cases. For example, consider the following questions:
How to use MQTT to send 1-1 messages? Both parties can negotiate to use a topic specific to them. For example, the topic name can include the IDs of the two clients to ensure its uniqueness.
How can a client transmit its presence status? The system can negotiate a naming convention for the “presence” topic. For example, the “presence/client-id” topic can have the presence status information of the client. When the client establishes a connection, this message is set to true, and when it disconnects, this message is set to false. The client can also set a last will message to false to set this message when the connection is lost. The broker can retain this message, allowing new clients to read this topic and find the presence status.
How to protect communication? The connection between the client and broker can use an encrypted TLS connection to protect data in transit. Additionally, because the MQTT protocol imposes no restrictions on the format of payload data, the system can negotiate an encryption method and key update mechanism. After that, everything in the payload can be encrypted binary data of actual JSON or XML messages.
MQTT protocol explanation
MQTT VS CoAP
[Video Tutorial] Step-by-step guide to building an IoT server (based on MQTT)
My view of the “Internet of Things”
Click to read the original text, activate the Alibaba Cloud IoT platform, and use 1 million messages for free every month