
[Continuing from Last Time]
Last time we discussed: Arm-2D is a GUI toolkit for microcontrollers with limited resources, and we systematically introduced how to deploy the Arm-2D library in an MDK project, further explaining how to use the PFB Helper to achieve “infinitely variable speed” between “frame rate and RAM usage”. Today, we will continue to talk aboutthe second romance of embedded engineers— “bare-metal GUI programming“. Previously, we mentioned that although Arm-2D is intended to silently accelerate various commercial and open-source GUI software protocol stacks at the lower level, considering the resource-constrained deep embedded system environment, there is still a large group of hardworking developers trying to create “gorgeous” graphical interfaces that are typically only accessible to high-end processors within microcontrollers with 32~64K Flash, 4~32K SRAM. Arm-2D also provides a series of opportunities for these resource-limited developers who cannot even afford the basic benefits of LVGL. Since it is the “romance of embedded engineers”, how can we not get creative? Today, we will “seriously” introduce the usage and techniques of “some” commonly used APIs on the platform we migrated in the previous article.

[Starting with the “Main Business”] Speaking of the main business of Arm-2D, it is naturally tiling. In fact, everything seems to be a tile in the eyes of Arm-2D:
-
Images stored in ROM are tiles;
-
Frame buffers in RAM are also tiles;
-
It is even possible to derive countless child tiles from an existing tile.
To this end, Arm-2D specifically introduces a data structure arm_2d_tile_t, defined in arm_2d_tile_types.h, with the following content:
typedef struct arm_2d_tile_t arm_2d_tile_t;struct arm_2d_tile_t {    implement_ex(struct {        uint8_t    bIsRoot              : 1;         uint8_t    bHasEnforcedColour   : 1;        uint8_t                         : 6;        uint8_t                         : 8;        uint8_t                         : 8;        arm_2d_color_info_t    tColourInfo;    }, tInfo);
    implement_ex(arm_2d_region_t, tRegion);
    union {        /*! when bIsRoot is true, phwBuffer is available,         *! otherwise ptParent is available         */        arm_2d_tile_t       *ptParent;        uint16_t            *phwBuffer;        uint32_t            *pwBuffer;        uint8_t             *pchBuffer;    };};
If it looks a bit confusing, don’t worry, it actually consists of three main parts:
-
Various attribute descriptions of the tile: tInfo
-
Size and position information of the tile: tRegion
-
Pointer or reference to the tile
To help everyone understand, let’s take an example.

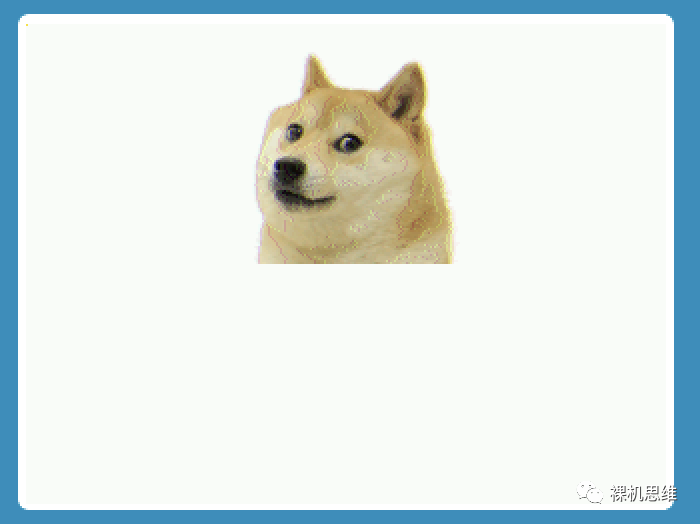
Suppose we want to display an “impressive” image on the screen, like this one:
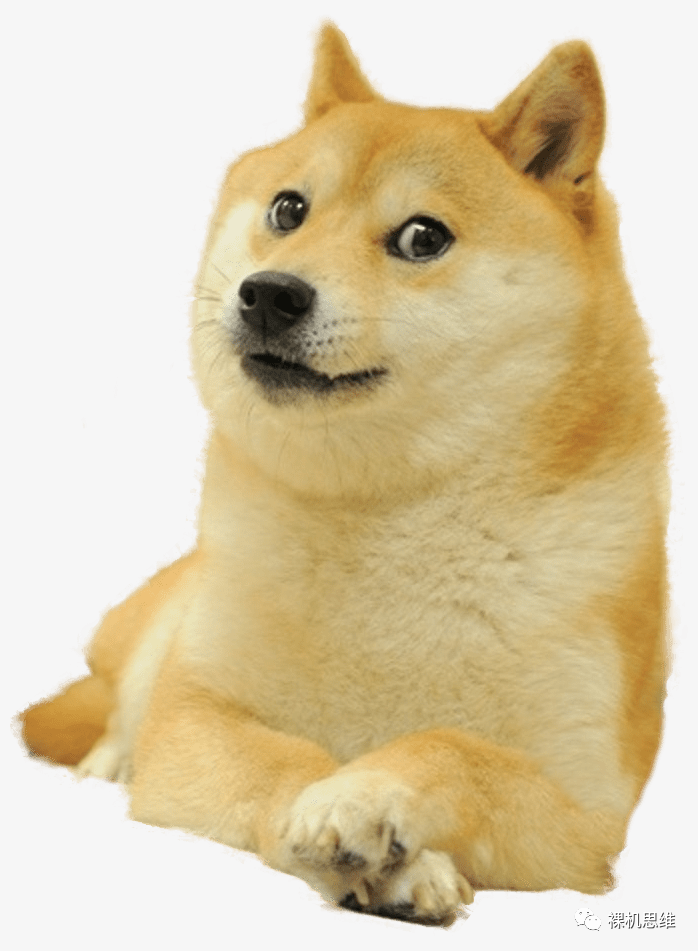
Since I have almost forgotten the Photoshop skills I learned during the summer of sixth grade, I can only resort to the tool that everyone claims to be proficient in on their resumes—PowerPoint—to insert the above image on a blank page, crop the “soul”, and scale it to a size that looks appropriate on a regular LCD:

Using a tool to convert it into a C language array:
#include <stdint.h>
//! Without this, some compilers will generate warnings, which is annoying!__attribute__((aligned(2)))extern const uint8_t c_bmpDodgy[];
__attribute__((aligned(2)))const uint8_t c_bmpDoge[] = {    ...};
Since my screen uses RGB565 color format, the pixels stored in the array c_bmpDoge[] are 16 bits, requiring 2-byte alignment; similarly, if you are using a 32-bit color format, you need to use __attribute__((aligned(4))) to ensure at least 4-byte alignment.
Regarding conversion tools, I recommend LVGL’s online tool: https://lvgl.io/tools/imageconverter, which is very useful.
Next, we can use arm_2d_tile_t to describe this image resource:
extern const uint8_t c_bmpDoge[];
const arm_2d_tile_t c_tileDoge = {    .tRegion = {        .tSize = {            .iWidth = 112,  //!< Width of the material            .iHeight = 108  //!< Height of the material        },    },    .tInfo.bIsRoot = true,  //!< Indicates that this tile owns the resource    .phwBuffer = (uint16_t *)c_bmpDoge,  //!< Pointer to the resource};
Here, we used the structure initialization method introduced by the C99 standard (unfortunately, this method is not recognized by C++), and provided the following information:
-
Dimensions of the material;
-
The current tile is a “root” tile (bIsRoot = true), meaning that this tile truly owns its pixel array; in contrast, some tiles are derived from other tiles and therefore do not own their pixel arrays;
-
Since the current tile is a root tile, the “pointer reference area” phwBuffer is assigned—pointing to the constant array c_bmpDoge[] we established earlier.
It is worth noting that since both c_bmpDoge[] and the newly created tile object c_tileDoge are marked as const, they are considered RO data (Read Only Data) at compile time, which generally will be placed in Flash, thus not occupying valuable RAM resources, and of course, their contents cannot be modified at runtime—otherwise, it will immediately lead to a Busfault (or Hardfault).
For most Arm-2D APIs, the most basic unit of operation is the tile, and now we already have a dedicated tile object c_tileDoge, so the remaining tasks become very simple. For example, we can use the arm_2d_rgb16_tile_copy() function to copy it to the display buffer (the display buffer is naturally also represented by the arm_2d_tile_t data structure):
#include "arm_2d.h"
#include "arm_2d_helper.h"...
static arm_fsm_rt_t __pfb_draw_background_handler( void *pTarget,                                          const arm_2d_tile_t *ptTile){    ARM_2D_UNUSED(pTarget);        arm_2d_rgb16_fill_colour(        ptTile,      //!< Target buffer        NULL,        //!< Which area of the target buffer to fill        GLCD_COLOR_WHITE); //!< White        arm_2d_rgb16_tile_copy(        &c_tileDoge,  //!< Our material        ptTile,       //!< Target buffer        NULL,         //!< Which area to copy to in the target buffer        ARM_2D_CP_MODE_COPY); //!< Just a simple copy, no tricks
}...static ARM_NOINIT arm_2d_helper_pfb_t s_tExamplePFB;...void main(void){    lcd_init();    arm_2d_init();
    //! initialise FPB helper    if (ARM_2D_HELPER_PFB_INIT(             &s_tExamplePFB,                 //!< FPB Helper object            ...            {            ...                .evtOnDrawing = {                    //! callback for drawing GUI                     .fnHandler = &__pfb_draw_background_handler,                 },            }        ) < 0) {        //! error detected        assert(false);    }        //! call partial framebuffer helper service to draw background    while(arm_fsm_rt_cpl != arm_2d_helper_pfb_task(&s_tExamplePFB,NULL));  }
Here __pfb_draw_background_handler() is our interface drawing function, where we performed the following operations:
-
Filled the entire target buffer with white using arm_2d_rgb16_fill_colour();
-
Copied the tile into the target buffer using arm_2d_rgb16_tile_copy().
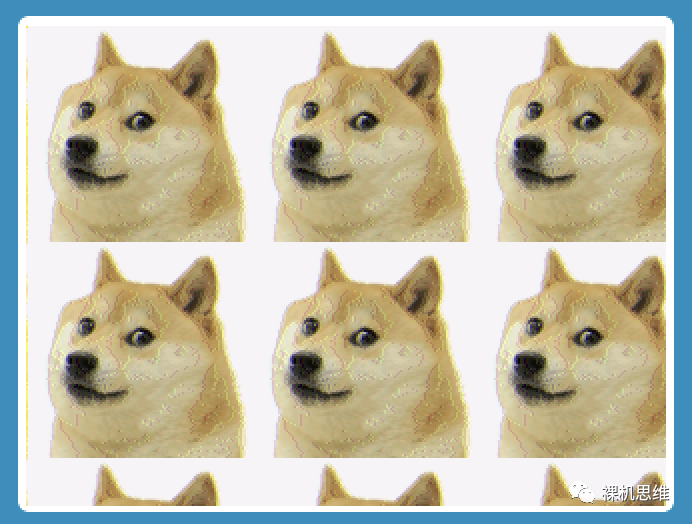
The effect is as follows:

It is worth noting that both functions provided NULL where it involves “which specific position in the target buffer”, meaning: “I do not specify where in the target buffer, you can just assume it is the entire area of the target buffer“. The effect looks good—this little gaze seems to have a certain “spirit”—however, to enhance the effect, we can do it like this:
How about that? Doesn’t it raise your blood pressure instantly? Here we simply used the tile fill function (which is the familiar texture fill), with the following code:
static arm_fsm_rt_t __pfb_draw_background_handler( void *pTarget,                                          const arm_2d_tile_t *ptTile){    ARM_2D_UNUSED(pTarget);        arm_2d_rgb16_tile_copy(        &c_tileDoge,  //!< Our material        ptTile,       //!< Target buffer        NULL,         //!< Which area to copy to in the target buffer        ARM_2D_CP_MODE_FILL); //!< Just a simple copy, no tricks
}
It is easy to notice two points:
-
Since it is already a full-screen seamless fill, there is naturally no need for a background color;
-
Changing ARM_2D_CP_MODE_COPY to ARM_2D_CP_MODE_FILL can achieve the fill function—very simple.
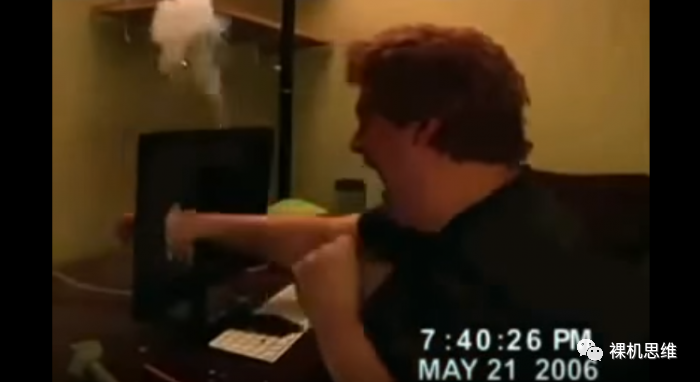
Considering that if you really present such an effect as a background interface to your users, I estimate the screen damage rate might be surprisingly high:
To calm the audience’s emotions, we might as well use a universal background beautification effect—adding a semi-transparent mask:
static arm_fsm_rt_t __pfb_draw_background_handler( void *pTarget,                                          const arm_2d_tile_t *ptTile){    ARM_2D_UNUSED(pTarget);        arm_2d_rgb16_tile_copy(        &c_tileDoge,  //!< Our material        ptTile,       //!< Target buffer        NULL,         //!< Which area to copy to in the target buffer        ARM_2D_CP_MODE_FILL); //!< Just a simple copy, no tricks
    arm_2d_rgb565_fill_colour_with_alpha(        ptTile,       //!< Target buffer        NULL,         //!< Which area of the target buffer to fill        //! Specifically indicating rgb565 white        (arm_2d_color_rgb565_t){GLCD_COLOR_WHITE},         200);         //!< Opacity (200/255) * 100%
}
The actual effect is as follows:
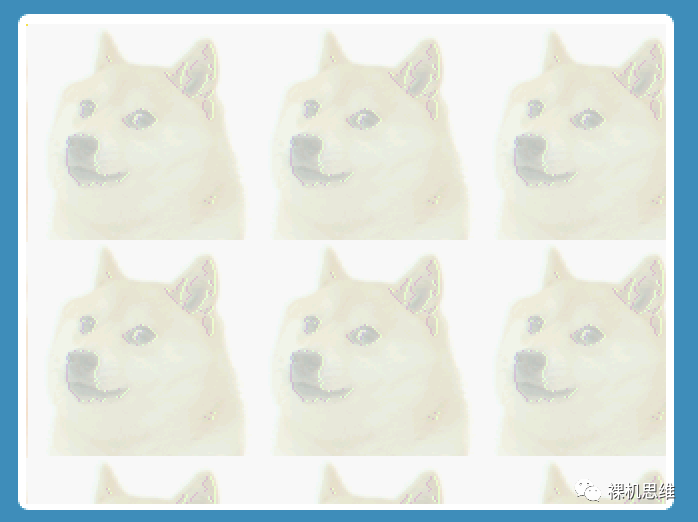
Doesn’t it suddenly look quite nice?
To be serious, the same method can also be used to watermark the interface—using the company logo to fill the background, then adding a white mask—perfect.

[“Getting Creative Requires Technical Skills”]
The previous creative tiling, although the effect is good, still feels too lacking in technical content. For example, the simplest question, if I want to create a “dog by the water’s edge”, how should I implement it? Speaking of the water’s edge, the key lies in a kind of artistic conception, specifically, a kind of almost imperceptible reflection. Achieving this is actually not difficult. First, we need to center the dog’s head and leave space for the reflection:
The code is as follows:
static arm_fsm_rt_t __pfb_draw_background_handler( void *pTarget,                                          const arm_2d_tile_t *ptTile){    arm_2d_rgb16_fill_colour(ptTile, NULL, GLCD_COLOR_WHITE);        arm_2d_region_t tDogRegion = {        .tLocation = {            .iX = (APP_SCREEN_WIDTH - c_tileDoge.tRegion.tSize.iWidth) >> 1,            .iY = (APP_SCREEN_HEIGHT - c_tileDoge.tRegion.tSize.iHeight * 2) >> 1,        },        .tSize = c_tileDoge.tRegion.tSize,    };        arm_2d_rgb16_tile_copy(        &c_tileDoge,      //!< Our material        ptTile,           //!< Target buffer        &tDogRegion,      //!< Which area to copy to in the target buffer        ARM_2D_CP_MODE_COPY);
}
Unlike before, this time we performed necessary calculations to 1) center the dog’s head; 2) and reserve space for the reflection. The results of the calculations are stored in the arm_2d_region_t structure tDogRegion. It is easy to notice that the type arm_2d_region_t consists of size and position information, defined as follows:
typedef struct arm_2d_location_t {    int16_t iX;    int16_t iY;} arm_2d_location_t;
typedef struct arm_2d_point_float_t {    float fX;    float fY;} arm_2d_point_float_t;
typedef struct arm_2d_size_t {    int16_t iWidth;    int16_t iHeight;} arm_2d_size_t;
typedef struct arm_2d_region_t {    implement_ex(arm_2d_location_t, tLocation);    implement_ex(arm_2d_size_t, tSize);} arm_2d_region_t;
The OOPC auxiliary macro implement_ex() means that arm_2d_region_t inherits arm_2d_location_t and arm_2d_size_t, assigning them corresponding names tLocation and tSize. Next is the main event, flipping the dog’s head—this time we must call the special mode of arm_2d_rgb16_tile_copy(): Y-axis mirroring (ARM_2D_CP_MODE_Y_MIRROR)—the code is as follows:
static arm_fsm_rt_t __pfb_draw_background_handler( void *pTarget,                                          const arm_2d_tile_t *ptTile){    //! Fill white background    arm_2d_rgb16_fill_colour(ptTile, NULL, GLCD_COLOR_WHITE);    //! Calculate the dog's position (centered, and reserve space for reflection)    arm_2d_region_t tDogRegion = {        .tLocation = {            .iX = (APP_SCREEN_WIDTH - c_tileDoge.tRegion.tSize.iWidth) >> 1,            .iY = (APP_SCREEN_HEIGHT - c_tileDoge.tRegion.tSize.iHeight * 2) >> 1,        },        .tSize = c_tileDoge.tRegion.tSize,    };    //! Draw the dog's head    arm_2d_rgb16_tile_copy(        &c_tileDoge,      //!< Our material        ptTile,           //!< Target buffer        &tDogRegion,      //!< Which area to copy to in the target buffer        ARM_2D_CP_MODE_COPY);            //! Update the position to copy the dog's head    tDogRegion.tLocation.iY += c_tileDoge.tRegion.tSize.iHeight;        //! Copy the dog's head in a mirrored way    arm_2d_rgb16_tile_copy(        &c_tileDoge,      //!< Our material        ptTile,           //!< Target buffer        &tDogRegion,      //!< Which area to copy to in the target buffer        ARM_2D_CP_MODE_Y_MIRROR);
}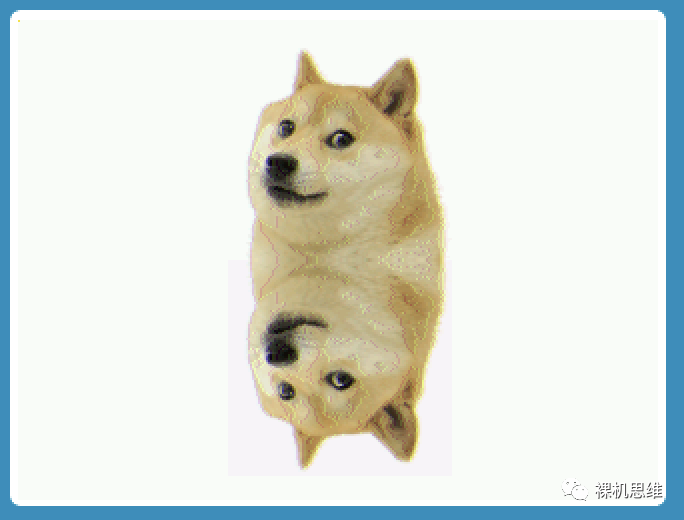
Hmm! Hmm!
I know!
Yes… yes…
I know it’s quite amusing…

“We have received professional training, no matter how funny it is, we will not laugh… unless we can’t help it…”

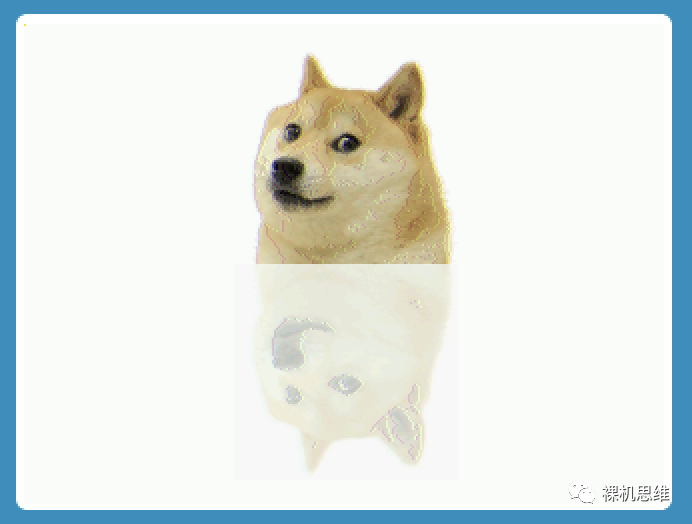
Next, we continue to seriously address the issue of “the reflection lacking artistic conception”—adding a semi-transparent mask:
static arm_fsm_rt_t __pfb_draw_background_handler( void *pTarget,                                          const arm_2d_tile_t *ptTile){    //! Fill white background    arm_2d_rgb16_fill_colour(ptTile, NULL, GLCD_COLOR_WHITE);    //! Calculate the dog's position (centered, and reserve space for reflection)    arm_2d_region_t tDogRegion = {        .tLocation = {            .iX = (APP_SCREEN_WIDTH - c_tileDoge.tRegion.tSize.iWidth) >> 1,            .iY = (APP_SCREEN_HEIGHT - c_tileDoge.tRegion.tSize.iHeight * 2) >> 1,        },        .tSize = c_tileDoge.tRegion.tSize,    };    //! Draw the dog's head    arm_2d_rgb16_tile_copy(        &c_tileDoge,      //!< Our material        ptTile,           //!< Target buffer        &tDogRegion,      //!< Which area to copy to in the target buffer        ARM_2D_CP_MODE_COPY);            //! Update the position to copy the dog's head    tDogRegion.tLocation.iY += c_tileDoge.tRegion.tSize.iHeight;        //! Copy the dog's head in a mirrored way    arm_2d_rgb16_tile_copy(        &c_tileDoge,      //!< Our material        ptTile,           //!< Target buffer        &tDogRegion,      //!< Which area to copy to in the target buffer        ARM_2D_CP_MODE_Y_MIRROR);            //! Add a semi-transparent mask to the reflection    arm_2d_rgb565_fill_colour_with_alpha(        ptTile,       //!< Target buffer        &tDogRegion,      //!< Which area to copy to in the target buffer        //! Specifically indicating rgb565 white        (arm_2d_color_rgb565_t){GLCD_COLOR_WHITE},         200);         //!< Opacity (200/255) * 100%
}
The final effect is as follows:

[It’s Only the Beginning!]
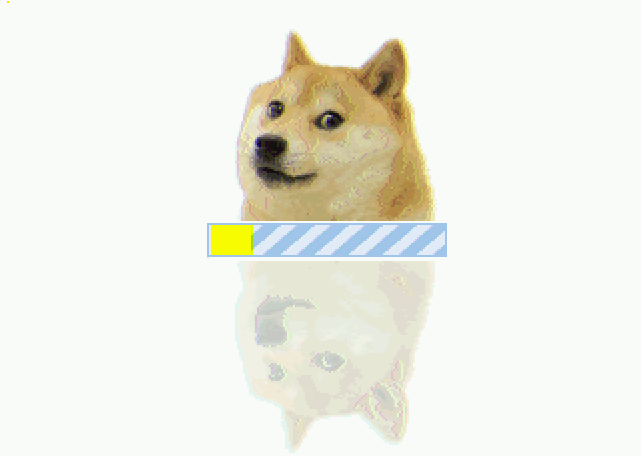
In this article, we introduced the usage of some commonly used APIs in Arm-2D through the “angry dog head” method, and provided suggestions on how these methods can “save the dog’s head” in daily applications—for example, how to achieve a water reflection background. However, how can the pace of creativity stop? In the next article, we will detail a method to implement “a dog reflecting the moon progress bar”:
For those interested, and for those who haven’t set up the platform yet, hurry up and join us in following Arm-2D! Original content is not easy,
If you like my thoughts,and find my article inspiring,
Please be sure to “like, bookmark, and share”—this is very important to me! Thank you!
Welcome to subscribe to Bare-Metal Thinking