Click the image above  “Chuangxue Electronics” to follow and easily learn electronic knowledge.
During mass production of products, many people have the need to program a unique ID number (Serial Number) into each chip for tracking and management purposes or to meet the requirements for binding ID number encryption. To improve the efficiency of the entire mass production process, choosing a good programming tool is crucial. For NXP’s Kinetis series, available programming solutions include the official P&E Cyclone MAX (which supports both online and offline programming, but is quite expensive) and J-Link (which only supports online programming and requires a debugger and host computer). This article will detail the J-Link + J-Flash batch programming solution for serial numbers using the popular Freescale M0+ Kinetis L series as an example (Speaking of this, one cannot help but admire the power of J-Link, with its high-speed downloads and debugging, rich IDE support, and strong debugging capabilities, plus… cough cough (everyone understands), it’s not just a wealthy tool, it’s gold, truly impressive):
Development Platform: Kinetis L Series KL15Z128
Programming Tool: J-Link + J-Flash (v4.76f)
(1) I won’t go into detail about J-Flash here; you can refer to my previous article “How to Use J-Flash ARM Tool to Program Kinetis”. The software package, including J-Flash, can be downloaded directly from SEGGER’s official website at http://www.segger.com/jlink-software.html. It is recommended to download the latest version, which supports a wider range of chip series and has more powerful component functions.
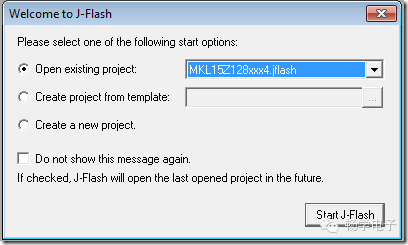
(2) Open J-Flash (path: Start->All Programs->SEGGER->J-Link ARM V4.76f->J-Flash). In the latest version, a tab will pop up to select an existing project. Based on your needs, select your target chip from the path “installation path\SEGGER\JLinkARM_V476f\Samples\JFlash\ProjectFiles\Freescale” (I chose MKL15Z128xxx4.jflash, as that is the only one I have), as shown in the image below:

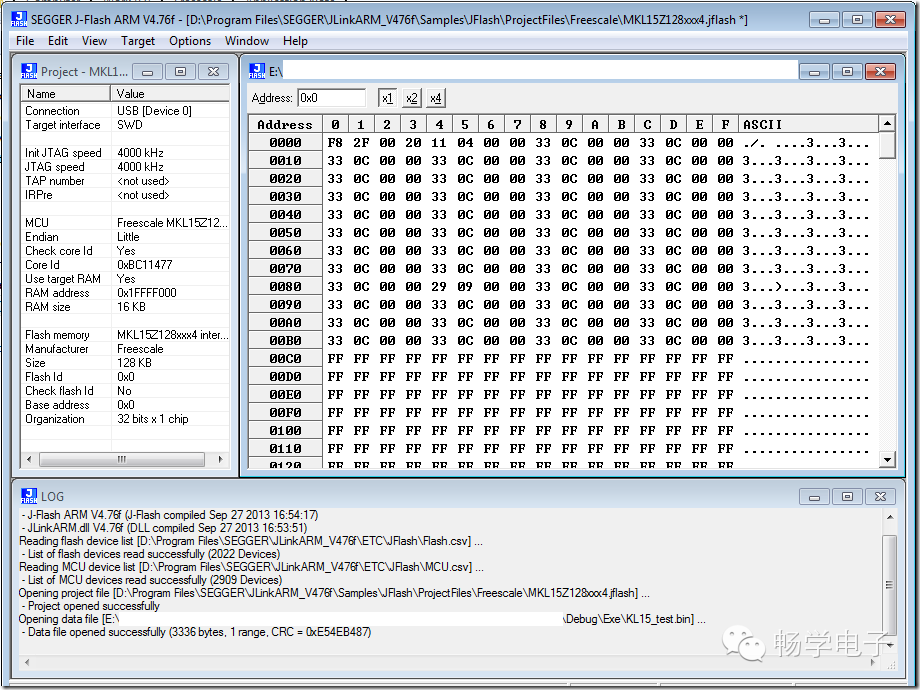
(3) Click “start J-Flash” to enter the project management interface, then click File->Open data file to find the bin file or S19 file you need to download and load it into the J-Flash project. The interface after loading is shown in the image below:

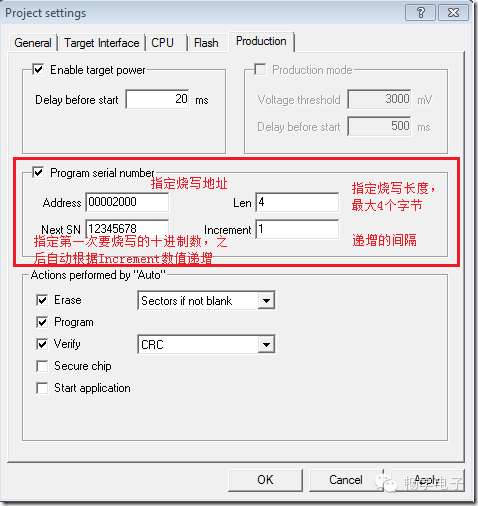
(4) Everything is ready, and now we will start setting the serial number. Click “Options->Project Settings->Production”, select “Program Serial Number”, and set it as shown below:

(5) Click “OK” to complete the settings (only set once), then connect to the target chip by clicking “Target->Connect”. Once connected successfully, click “Auto”; the system will automatically add the configured serial number to the corresponding address in the S19 file and start the download. A file named “_Serial.txt” will also be generated in the J-Flash project directory (the directory of the previously loaded sample project), with the following content, where “12345679” is the next data to be written, and the system automatically increments it (determined by “Increment”):


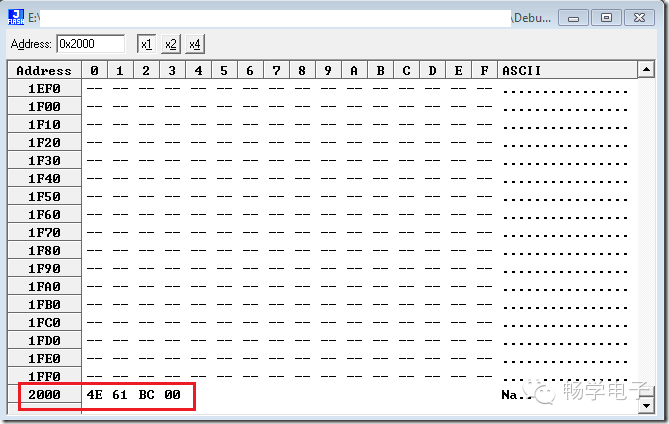
(6) We read back the data written to the chip (Target->Read Back->Entire chip), then jump to address “0x2000” to see that the serial number (in hexadecimal, 12345678) has been written, as shown in the image below:

Notes:
(1) When programming, you must click “Auto” to download; this will generate the “_Serial.txt” file and automatically add the serial number to the S19 file before programming. Directly clicking “Program” or “Program&Verify” will only program the original S19 file without adding the serial number.
(2) J-Flash supports programming a maximum of 4 bytes for the serial number. If the data exceeds four bytes, J-Flash will take the first four bytes and program them, so effectively only 4 bytes are functional. However, as a serial number, this is certainly sufficient; 4 bytes equal 32 bits, which is the same as an IPv4 address, haha. I can’t imagine any product exceeding this range; if so, Freescale would surpass Motorola, haha.
(3) Regarding the programming address, theoretically, it should be within the Code Flash address range of the target chip and not overlap with the original running code address. This is because J-Flash’s programming principle is to add data to the corresponding position in the original bin or S19 file and then program the entire file. Therefore, when writing the serial number, there is no need to erase the sector again, which would destroy the original data in the same sector. However, if the flash space is large enough, it is not recommended to place the serial number programming address too close to the original code; it is advisable to write the serial number at the end of the Flash to mitigate risks.
(4) In fact, J-Flash can also program more than 4 bytes of data, but this requires manually editing a txt file. I won’t elaborate on this here; you can refer to the attached document.
I’ve been extremely busy lately, and finally found time to complete this document. It wasn’t easy! Until next time, to be continued~
Attachment: UM08003_JFlashARM.pdf http://www.eeskill.com/file/id/26151.
> > > > > > > > > > > > > > > > > > > > > > > > > > > > > > > > > > > > > > > > > > > > > > > > > > > > > >
==> Visit www.eeskill.com to learn more!