Before sharing the content, let’s announce the course updates:
Good news, << Upgraded Video Application Basics Chapter 6: Text and Image Display >> has been updated with 5 new lessons:
1. ASCII Character Bitmap Display (9 minutes, free)
2. Chinese Character Bitmap Display (16 minutes, free)
3. Universal Command for Cross-Compilation Programs: Example with Freetype (16 minutes, free)
4. Displaying a Single Character with Freetype (19 minutes, free)
5. Displaying a Line of Text with Freetype (15 minutes, free)
Watch here:
1. Bilibili (Remember to follow us for the latest updates):
https://www.bilibili.com/video/BV1w4411B7a4 (P53-P57)
2. 100ask.com
www.100ask.net
New Series of Tutorials on Embedded Linux -> [Part 4] Basic Knowledge of Embedded Linux Application Development -> [Chapter 6] Text and Image Display
3. Baidu Cloud
Link:
https://eyun.baidu.com/s/3c2XmIVA
Password: askNEWCourseA
Path:
-> 04_Embedded Linux Application Development Basics
We have released 9 months of video content for free. If you want to see paid content, you can subscribe here: << In-depth Explanation of Synchronization and Mutual Exclusion in Drivers >>:
https://www.100ask.net/detail/p_5eea075980c7d_sPLtIVIV/6
7 lessons for only 29 yuan, incredibly reasonable. Thank you for your support.
Announcement finished, let’s return to the main topic: sharing how to use Freetype to display a line of text.
Using Freetype to Display a Line of Text:
The documents related to this video are as follows:
6.6 Using Freetype to Display a Line of Text
After downloading the source code using GIT, the source code for this section is located in the following directory:
01_all_series_quickstart04_Embedded Linux Application Development Basics\source\10_freetype04_show_line\show_line.c
Git download link:
https://e.coding.net/weidongshan/01_all_series_quickstart.git
The goal of this section: to display a line of text on an LCD at a specified top-left coordinate (x, y). In the figure below, the outline of the text is represented by a dashed line, and the top-left corner of the outline is the coordinate (x, y).

6.6.1 Cartesian Coordinate System
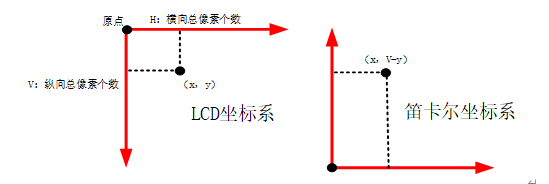
In the LCD coordinate system, the origin is at the top left of the screen. In a Cartesian coordinate system, the origin is at the bottom left. Freetype uses a Cartesian coordinate system, so it needs to be converted to the LCD coordinate system when displaying. As shown in the figure below, the X-direction coordinate values are the same. In the Y-direction, the coordinate value needs to be converted; assuming the height of the LCD is V. In the LCD coordinate system, the coordinates are (x, y), then in the Cartesian coordinate system, the coordinate values are (x, V-y). Conversely, in the Cartesian coordinate system, if the coordinates are (x, y), then in the LCD coordinate system, the coordinate values are (x, V-y).
6.6.2 Each Character May Have Different Sizes
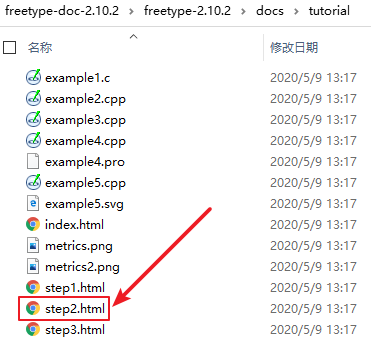
When using the FT_Set_Pixel_Sizes function to set font sizes, this is only an “expected value”. For example, for “百问网www.100ask.net”, if the period is displayed the same size as other Chinese characters, it does not look good. Therefore, when displaying a line of text, the position of subsequent characters will be affected by the previous characters. Fortunately, Freetype takes these effects into account. For the Freetype font size (Freetype Metrics), please refer to the document shown below:
The document above lists a figure, excerpted as follows:
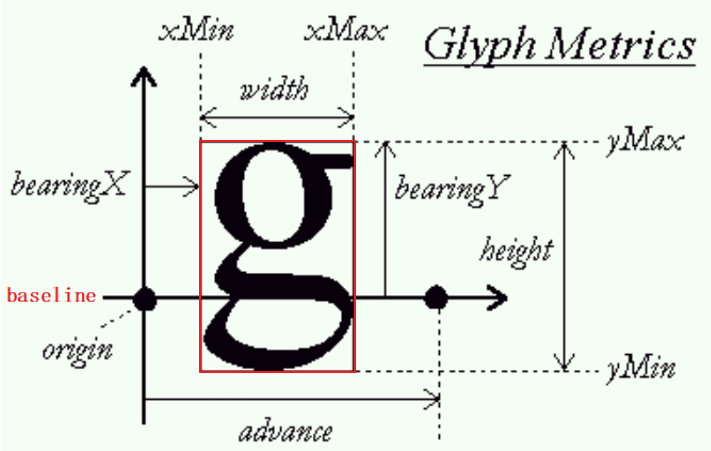
When displaying a line of text, these characters will be drawn based on the same baseline: baseline. On the baseline, each character has its own origin, for example, the black dot to the left of the baseline is the origin of the letter “g”. The current origin plus advance gives the origin of the next character, as shown by the black dot to the right of the baseline. When displaying multiple characters in a line, the origin of the latter character depends on the origin of the former character and the advance.
The bitmap of a character may extend beyond the baseline; for example, in the figure above, the letter “g” has an image below the baseline. The red box in the figure above shows the bitmap of the letter “g”, and its four corners may not align with the origin. How to obtain xMin, xMax, yMin, yMax? You can use the FT_Glyph_Get_CBox function to obtain these parameters of a font, which will be stored in an FT_BBox structure. This information will be needed later when calculating the bounding box of a line of text:

6.6.3 How to Display a Line of Text at a Specified Position
To display a line of text, each character has its own bounding box: xMin, xMax, yMin, yMax. By taking the minimum values from these characters’ xMin and yMin, and the maximum values from their xMax and yMax, we can determine the bounding box of the line of text. To display this line of text at the specified position (x, y), the steps are shown in the figure below:
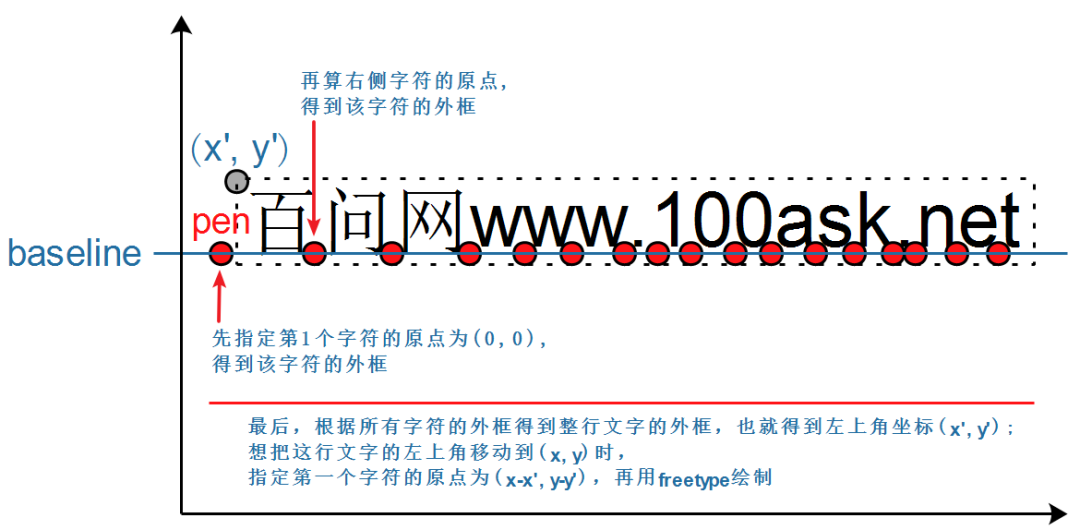
① First, specify the origin pen coordinate of the first character as (0, 0) and calculate its bounding box.
② Then calculate the origin of the next character and calculate its bounding box. After processing all characters, we can obtain the overall bounding box of the line of text: assume the top-left corner of the bounding box is (x’, y’).
③ To display this line of text at (x, y), simply adjust the pen coordinates. How to adjust? When the pen is (0, 0), it corresponds to the top-left corner (x’, y’); thus, when the top-left corner is (x, y), we can calculate the pen as (x-x’, y-y’).
6.6.4 Several Important Data Structures in Freetype
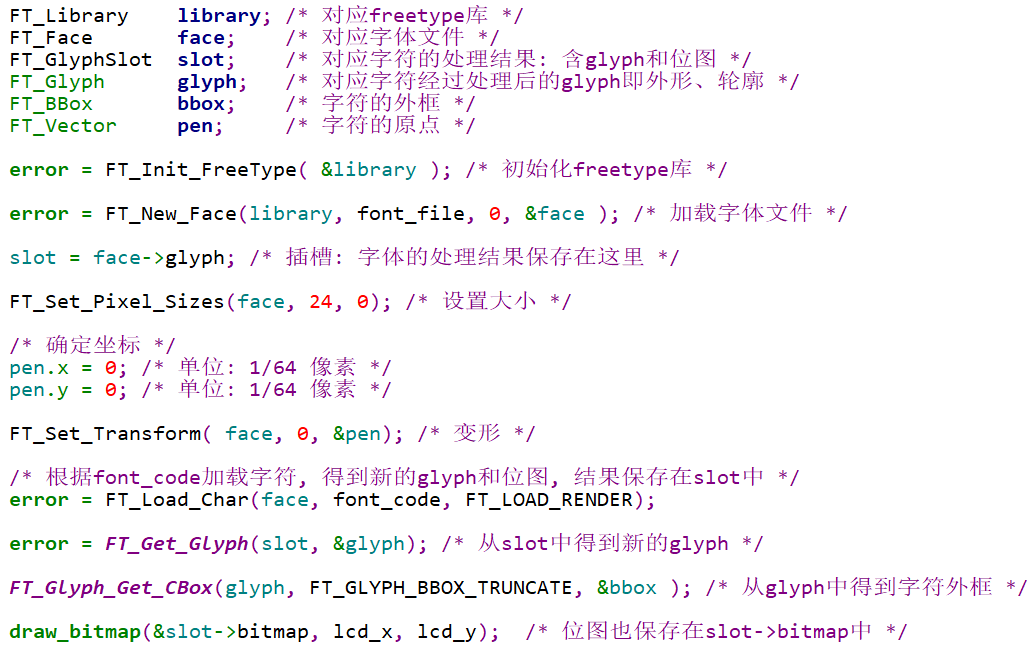
To understand the program visually, we need to introduce several data structures in Freetype:
-
FT_Library Corresponds to the Freetype library; before using Freetype, you must call the following code:
FT_Library library; /* Corresponds to Freetype library */error = FT_Init_FreeType( &library ); /* Initialize Freetype library */-
FT_Face It corresponds to a vector font file. After opening the font file using the FT_New_Face function in the source code, you can obtain a face. Why is it called a face? It’s probably because the text is written on a two-dimensional plane, facing the human face? No need to worry about the reason, just consider it corresponds to a font file. The code is as follows:
error = FT_New_Face(library, font_file, 0, &face ); /* Load font file */-
FT_GlyphSlot Slot? Used to store the processing results of characters: for example, the converted glyph, bitmap, as shown in the figure: 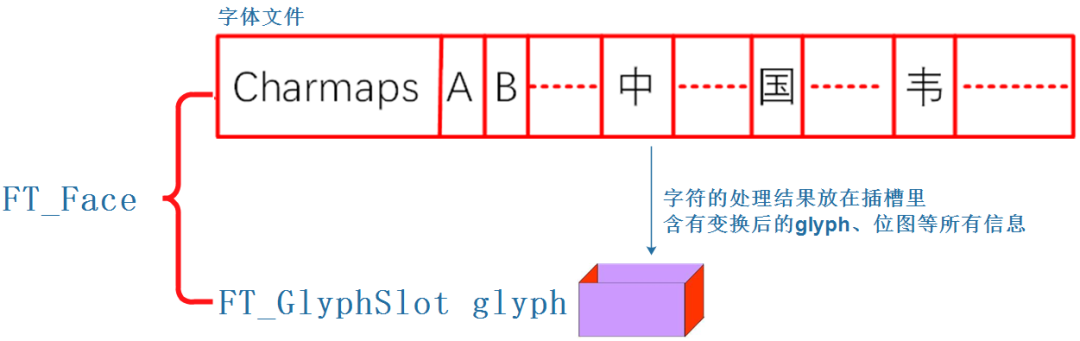
There are many characters in a face, and when generating the bitmap for a character, where is the bitmap stored? It’s stored in the slot: face->glyph. When generating the bitmap for the first character, it is stored in face->glyph; when generating the bitmap for the second character, it will also be stored in face->glyph, overwriting the bitmap of the first character. The code is as follows:
FT_GlyphSlot slot = face->glyph; /* Slot: the results of font processing are stored here */-
FT_Glyph The original key point information of characters is stored in the font file, and using Freetype’s functions, these new key points can be enlarged, reduced, or rotated, and these new key points are stored in the slot (note: the bitmap is also stored in the slot). The new key points are represented by FT_Glyph, and you can use the following code to obtain the glyph from the slot:
error = FT_Get_Glyph(slot , &glyph);-
FT_BBox The FT_BBox structure is defined as follows, representing the bounding box of a character, i.e., the bounding box of the new glyph:
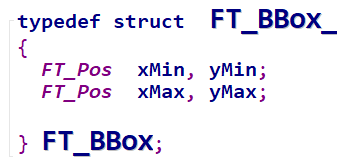
You can use the following code to obtain this information from the glyph:
FT_Glyph_Get_CBox(glyph, FT_GLYPH_BBOX_TRUNCATE, &bbox );For the above process, the sample code is as follows:
6.6.5 Calculating the Bounding Box of a Line of Text
As mentioned earlier, in a line of text: the origin of the latter character = the origin of the former character + advance. Therefore, to calculate the bounding box of a line of text, we need to process each character in order. The code is as follows, with comments explaining it clearly:
102 int compute_string_bbox(FT_Face face, wchar_t *wstr, FT_BBox *abbox)103 {104 int i;105 int error;106 FT_BBox bbox;107 FT_BBox glyph_bbox;108 FT_Vector pen;109 FT_Glyph glyph;110 FT_GlyphSlot slot = face->glyph;111112 /* Initialize */113 bbox.xMin = bbox.yMin = 32000;114 bbox.xMax = bbox.yMax = -32000;115116 /* Specify the origin as (0, 0) */117 pen.x = 0;118 pen.y = 0;119120 /* Calculate the bounding box for each character */121 /* First translate, then load char to obtain its bounding box */122 for (i = 0; i < wcslen(wstr); i++)123 {124 /* Transformation */125 FT_Set_Transform(face, 0, &pen);126127 /* Load bitmap: load glyph image into the slot (erase previous one) */128 error = FT_Load_Char(face, wstr[i], FT_LOAD_RENDER);129 if (error)130 {131 printf("FT_Load_Char error\n");132 return -1;133 }134135 /* Get glyph */136 error = FT_Get_Glyph(face->glyph, &glyph);137 if (error)138 {139 printf("FT_Get_Glyph error!\n");140 return -1;141 }142143 /* Get bounding box from glyph */144 FT_Glyph_Get_CBox(glyph, FT_GLYPH_BBOX_TRUNCATE, &glyph_bbox);145146 /* Update bounding box */147 if ( glyph_bbox.xMin < bbox.xMin )148 bbox.xMin = glyph_bbox.xMin;149150 if ( glyph_bbox.yMin < bbox.yMin )151 bbox.yMin = glyph_bbox.yMin;152153 if ( glyph_bbox.xMax > bbox.xMax )154 bbox.xMax = glyph_bbox.xMax;155156 if ( glyph_bbox.yMax > bbox.yMax )157 bbox.yMax = glyph_bbox.yMax;158159 /* Calculate the origin of the next character: increment pen position */160 pen.x += slot->advance.x;161 pen.y += slot->advance.y;162 }163164 /* Return string bounding box */165 *abbox = bbox;166 }6.6.6 Adjusting the Origin and Drawing
The code is as follows, which is not complicated:
169 int display_string(FT_Face face, wchar_t*wstr, int lcd_x, int lcd_y)
170 {
171 int i;
172 int error;
173 FT_BBox bbox;
174 FT_Vector pen;
175 FT_Glyph glyph;
176 FT_GlyphSlot slot = face->glyph;
177
178 /* Convert LCD coordinates to Cartesian coordinates */
179 int x = lcd_x;
180 int y = var.yres – lcd_y;
181
182 /* Calculate bounding box */
183 compute_string_bbox(face, wstr,&bbox);
184
185 /* Reverse calculate the origin */
186 pen.x = (x – bbox.xMin) * 64; /* Unit: 1/64 pixel */
187 pen.y = (y – bbox.yMax) * 64; /* Unit: 1/64 pixel */
188
189 /* Process each character */
190 for (i = 0; i < wcslen(wstr); i++)
191 {
192 /* Transformation */
193 FT_Set_Transform(face, 0, &pen);
194
195 /* Load bitmap: load glyph image into the slot (erase previous one) */
196 error = FT_Load_Char(face, wstr[i],FT_LOAD_RENDER);
197 if (error)
198 {
199 printf(“FT_Load_Char error\n”);
200 return -1;
201 }
202
203 /* Draw on LCD: use LCD coordinates */
204 draw_bitmap( &slot->bitmap,
205 slot->bitmap_left,
206 var.yres -slot->bitmap_top);
207
208 /* Calculate the origin of the next character: increment pen position */
209 pen.x += slot->advance.x;
210 pen.y += slot->advance.y;
211 }
212
213 return 0;
214 }
6.6.7 Practical Experiment
Compilation command (if your cross-compilation toolchain prefix is not arm-buildroot-linux-gnueabihf, please modify the command accordingly):
$ arm-buildroot-linux-gnueabihf-gcc -o show_line show_line.c -lfreetypeCopy the compiled show_line file and the simsun.ttc font file to the development board. Place these two files in the same directory, then execute the following command (the three numbers represent the LCD’s X coordinate, Y coordinate, and font size):
[root@board:~]# ./show_line ./simsun.ttc 10 200 80If the experiment is successful, you will see a line of text “百问网www.100ask.net” on the LCD.