Project Name: [Air Mouse][Gesture Control] BlueGo
Project Author: Geek Fantasy
I developed an ESP32 based “Air Mouse + Gesture Control” called BlueGo, which is even better than a mouse!
Let’s scroll down to see its featured functions!
Function Demonstration, Hardware Description, Assembly Instructions,Design Diagram,Open Source Material Download, Conclusion
BlueGo can connect to mobile phones,tablets,TVs,computers via low-power Bluetooth, and perform air mouse, gesture interaction, and keyboard macro functions.
It can also achieve gesture and button function customization through the accompanying Android App.
This chapter will share the 5 main functions of BlueGo.
The 3 keys of the five-way button can be mapped to the left, middle, and right mouse buttons.

The device uses an MPU6500 gyroscope, and calculates the Z/X-axis angular speed integral to determine the “angle change”, which is converted into mouse X/Y “coordinate changes” to achieve cursor movement.
I mapped the Y-axis rotation to the mouse scroll wheel.
You just need to rotate your wrist left and right to achieve scrolling of the wheel.

Considering that mouse movements might trigger accidentally, a relatively high trigger threshold is set here. The scroll wheel will only be triggered when the wrist rotation exceeds a certain speed.
It can be a bit taxing on the wrist (manual humor).
The device uses PAJ7620 with 8 gestures, mapping them to some basic operations on the mobile phone.
For example: swiping up and down, left and right, tapping, going back…

A typical application is air control for short video software.

Suitable for scenarios where it is inconvenient to touch the phone directly, such as while eating, cooking, or washing.
The device implements simple keyboard macros, with various preset keys and combinations that can be mapped to the five-way button or the 8 gestures.
Suitable for PPT remote control, gesture control of virtual desktops, remote phone photography, etc.
I developed an Android App for this device.
After connecting the device to the App via Bluetooth, it can achieve various functional modes with 【free switching】 and 【customizable】 function modes.

To control BlueGo with a phone, you need to install the APK, which I placed in the open-source page under “Attachment Download”.
Capable users can design more touch gestures, add more shortcut keys, to achieve more interesting functions.
Open your imagination, and it will have endless uses.


BlueGo integrates gesture recognition module (PAJ7620U2) + inertial sensor chip (MPU6500) + a five-way button + lithium battery management chip + lithium battery.
Here are the main parameters of the modules.
| Name | Parameter |
|---|---|
| Main Control | ESP32-Pico-V3-02 |
| IMU | MPU6500 |
| Gesture Module | PAJ7620 |
| Battery Management | TP4056 |
| Lithium Battery |
200 mah Length*Width*Thickness: 30*20*4 Unit: mm |
Module installation order is shown in the exploded view.


Here are 8 notes before and after installation.
The lens installed in front of the device PAJ7620 and the red frame is the same as the Apple 11Pro/Max.
Button caps are used from the classic red dot navigation key on Thinkpad.
Assembly requires 5 pieces of M1.6 * 8mm hex screws.
The device’s shell is 3D FDM printed by myself. If printed using 0.12mm, the installation precision is quite good.
The shell is designed using solidworks.
After powering on the device, it needs to be placed still for a few seconds to allow the MPU6500 to calibrate itself; otherwise, the air mouse will experience pointer drift.
The direction of the five-way button is slightly off, but it doesn’t significantly affect usage. If correction is needed, please rotate clockwise by 45%.
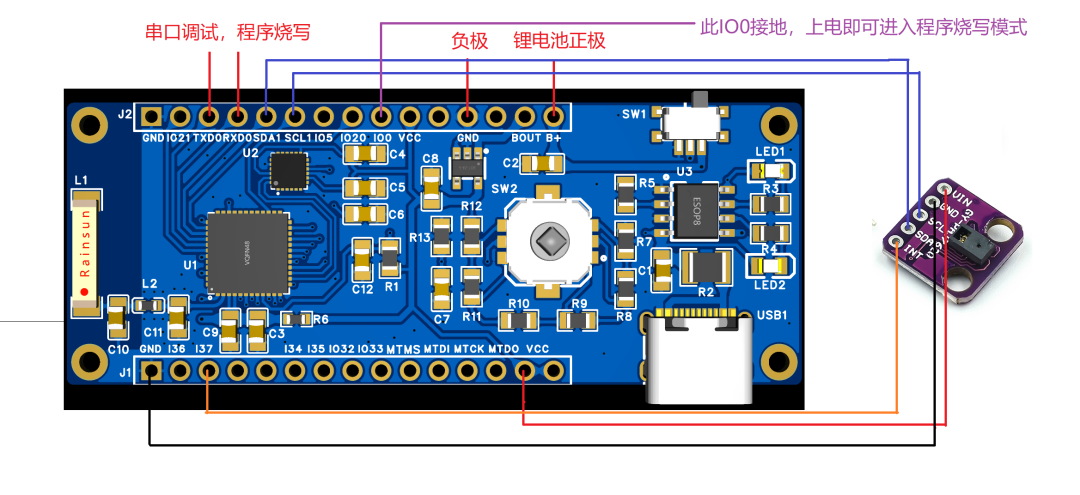
The main board can be used directly as a development board.
When I was developing the board, I guided almost all the IO to both sides of the board, soldered the pin headers, and it immediately transformed into a development board, and it also comes with buttons, IMU and battery management module.

The circuit code for this project has been open-sourced. If you need 【firmware burning, 3D shell, code, circuit】 and other open-source materials, you can click on “Read Original” at the end of the article to obtain.
Step One:Click“Read Original”.

Step Two:After entering the open-source page, click “Open Editor” to view the circuit source file.


Click “Attachment Download Text Link” to download firmware burning, 3D shell, and other attachments.

Step Three:In the text, you can jump to the source code open-source page.

Since having BlueGo, my mom no longer has to worry about me getting tendonitis! (Not really)

*This article is a reprint of a user creation from the “Lichuang Open Source Hardware Platform”. If there is any infringement, please contact for deletion.

