17 Virtualization
In computer systems, the term “virtual” can be somewhat ambiguous. It primarily refers to a mediator that transforms complex or fragmented underlying systems into a simplified interface that can be utilized by multiple consumers. A familiar example is virtual memory, which allows multiple processes to access a large memory pool as if each process has its own independent memory space.
This definition can be daunting, so it’s best to clarify the typical purpose of virtualization: to create isolated environments so that multiple systems can run without conflict.
Since virtual machines are relatively easy to understand at a higher level, we will start our journey into virtualization from here. However, our discussion will remain at a high level, aiming to explain some of the terminology you may encounter when using virtual machines without delving into the vast implementation details. We will explore more technical details regarding containers, which utilize technologies you have already seen in this book, allowing you to see how these components fit together. Additionally, exploring containers interactively is relatively straightforward.
17.1 Virtual Machines
Virtual machines are based on the same concept as virtual memory, but they utilize all the hardware of the machine, not just memory. In this mode, you can create an entirely new machine (processor, memory, I/O interfaces, etc.) using software and run a complete operating system (including the kernel) within it. This type of virtual machine is more accurately referred to as a system virtual machine and has been around for decades. For example, IBM mainframes traditionally use system virtual machines to create multi-user environments; in turn, users can obtain their own virtual machines to run simple single-user operating systems like CMS.
You can build a virtual machine entirely through software (often referred to as an emulator) or leverage the underlying hardware as much as possible (like virtual memory). In the case of Linux, we will explore the latter due to its superior performance, but note that many popular emulators support older computers and gaming systems, such as the Commodore 64 and Atari 2600.
The world of virtual machines is diverse, with a plethora of terminology to cover. Our exploration of virtual machines will primarily focus on the relationship between these terms and the issues you, as a typical Linux user, may encounter. We will also discuss some differences you might find in virtual hardware.
Fortunately, using virtual machines is much simpler than describing them. For example, in VirtualBox, you can create and run virtual machines using a graphical user interface, and if you need to automate the process in scripts, you can even use the command-line VBoxManage tool. The web interface of cloud services also facilitates management. Due to the ease of use, we will focus more on the technology and terminology of virtual machines rather than operational details.
17.1.1 Hypervisors
The software that manages one or more virtual machines on a computer is called a hypervisor or virtual machine monitor (VMM), which operates similarly to how an operating system manages processes. There are two types of hypervisors, and the way virtual machines are used depends on the type. For most users, the second type of hypervisor is the most familiar, as it runs on common operating systems like Linux. For example, VirtualBox is a type 2 hypervisor that you can run on your system without extensive modifications. You may have already used it to test and explore different types of Linux systems while reading this book.
On the other hand, type 1 hypervisors are more like their own operating systems (especially the kernel), built specifically to run virtual machines quickly and efficiently. This type of hypervisor may occasionally use traditional auxiliary systems (like Linux) to assist with management tasks. Although you may never have run this type of hypervisor on your own hardware, you have been interacting with type 1 hypervisors. All cloud computing services run as virtual machines under type 1 hypervisors like Xen. When you access a website, you are almost certainly clicking on software running on such virtual machines. Creating operating system instances on cloud services like AWS is essentially creating virtual machines on type 1 hypervisors.
Generally, virtual machines with operating systems are referred to as guests. The device running the hypervisor is called the host. For type 2 hypervisors, the host is your local system. For type 1 hypervisors, the host is the hypervisor itself, which may be combined with a dedicated auxiliary system.
17.1.2 Hardware in Virtual Machines
Theoretically, the hypervisor should provide hardware interfaces to guest systems simply. For example, to provide a virtual disk device, you could create a large file somewhere on the host and present it as a disk through standard device I/O emulation. This method is a strict form of hardware virtualization but is inefficient. To meet various needs, some changes must be made to the virtual machine.
Most of the differences you may encounter between real hardware and virtual hardware are the result of bridging, which allows guests to access host resources more directly. Bypassing virtual hardware between the host and guest is known as paravirtualization. Network interfaces and block devices are most likely to be treated this way; for example, the /dev/xvd device on cloud computing instances is a Xen virtual disk that communicates directly with the hypervisor using Linux kernel drivers. Sometimes, the use of paravirtualization is for convenience; for instance, on desktop systems like VirtualBox, drivers can be used to coordinate mouse movement between the virtual machine window and the host environment.
Regardless of the mechanism used, the goal of virtualization is always to reduce the problem to a level where the guest operating system treats virtual hardware like any other device. This ensures that all layers on the device can function correctly. For example, on a Linux guest system, you want the kernel to access the virtual disk as a block device so that you can partition it and create a filesystem using common tools.
- Virtual Machine CPU Modes
Most of the details about how virtual machines work are beyond the scope of this book, but the CPU is worth mentioning since we have already discussed the difference between kernel mode and user mode. The specific names of these modes vary by processor (for example, x86 processors use a system called privilege rings), but the concept remains the same. In kernel mode, the processor can do almost anything; in user mode, certain instructions are not allowed, and memory access is restricted.
The first virtual machines on x86 architecture ran in user mode. This posed a problem because the kernel running in the virtual machine wanted to be in kernel mode. To address this, the hypervisor can detect any restricted instructions issued by the virtual machine and respond (“trap”). With a little processing, the hypervisor can simulate restricted instructions, allowing the virtual machine to run on an architecture designed for non-kernel mode. Since most instructions executed by the kernel are unrestricted, they can run normally with minimal performance impact.
Shortly after the introduction of such hypervisors, processor manufacturers realized that there was a market for processors that assist hypervisors by eliminating the need for instruction traps and emulation. Intel and AMD released these feature sets under the names VT-x and AMD-V, respectively, and now most hypervisors support them. In some cases, they are required.
If you want to learn more about virtual machines, you can refer to Jim Smith and Ravi Nair’s “Virtual Machines: Versatile Platforms for Systems and Processes” (Elsevier, 2005). This book also includes content on process virtual machines, such as the Java Virtual Machine (JVM), which we will not discuss here.
17.1.3 Common Uses of Virtual Machines
In the Linux world, the use of virtual machines is typically divided into the following categories:
- Testing and Experimentation
When you need to try something outside of a normal or production environment, virtual machines have many use cases. For example, when developing production software, it is essential to test the software on a machine separate from the developer’s machine. Another use is to experiment with new software, such as a new distribution, in a secure “one-off” environment. Virtual machines allow you to do this without purchasing new hardware.
- Application Compatibility
When you need to run certain programs under an operating system different from the usual, virtual machines are essential.
- Servers and Cloud Services
As mentioned earlier, all cloud services are based on virtual machine technology. If you need to run internet servers like web servers, the quickest way is to purchase virtual machine instances from a cloud provider. Cloud providers also offer dedicated servers for databases and other pre-configured software sets running on virtual machines.
17.1.4 Disadvantages of Virtual Machines
For many years, virtual machines have been a common method for isolation and scaling services. Since you can create servers with just a few clicks or through an API, it is very convenient to create servers without installing and maintaining hardware. However, there are still some hassles in daily operations:
- Installing and/or configuring systems and applications can be cumbersome and time-consuming.
Tools like Ansible can automate this process, but starting a system from scratch still takes a significant amount of time. If you are testing software using virtual machines, you will find that this time accumulates quickly.
- Even with correct configurations, the startup and reboot speed of virtual machines is relatively slow.
There are some ways to address this issue, but you still need to boot a complete Linux system.
- You must maintain a complete Linux system, keeping it updated and secure on each virtual machine.
These systems have systemd and sshd, along with any tools that applications depend on. Your applications may conflict with the standard software set on the virtual machine. Some applications have strange dependencies that do not always play well with the software on production computers. Additionally, dependencies like libraries may change with machine upgrades, breaking programs that once worked.
- Isolating services in different virtual machines is both wasteful and expensive. The standard industry practice is to run no more than one application service on a system, which is both robust and easy to maintain. Furthermore, some services can be further subdivided; if you run multiple websites, it is better to place them on different servers. However, this contradicts cost reduction, especially when using cloud services, as cloud services charge per virtual machine instance.
These issues are not fundamentally different from those encountered when running services on real hardware, and they are not necessarily obstacles in small operations. However, once you start running more services, these problems become more apparent, consuming time and money. At that point, you might consider using containers to provide services.
17.2 Containers
While virtual machines can effectively isolate entire operating systems and their running applications, sometimes you need a lighter alternative. Container technology is a common method to meet this need. Before delving into the details, let’s review its development history.Traditionally, computer networks operate by running multiple services on the same physical machine; for example, a name server might also serve as an email server and perform other tasks. However, you should not really trust any software, including servers, to be secure or stable. To enhance system security and prevent services from interfering with each other, there are some basic methods to set barriers around server daemons, especially when you do not fully trust one of the daemons.
One method of isolating services is to use the chroot() system call to change the root directory to a directory outside the actual system root. Programs can change their root directory to a directory like /var/spool/my_service, thus preventing access to anything outside that directory. In fact, there is a chroot program that allows you to run programs with a new root directory. This type of isolation is sometimes referred to as a chroot jail because processes cannot (typically) escape it.
Another limitation is the kernel’s resource limit (rlimit) feature, which can restrict the CPU time a process can use or the size of its files.
These are the concepts on which containers are based: you change the environment and limit the resources available to processes. While there is no single defining characteristic, containers can be broadly defined as a restricted runtime environment for a set of processes, meaning these processes cannot access anything outside that environment on the system. Generally, this is referred to as operating system-level virtualization.
It is important to note that a machine running one or more containers still has only one underlying Linux kernel. However, processes within containers can use user space environments from different Linux distributions than the underlying system.Restrictions within containers are built using several kernel features. Processes running in containers have the following important aspects:
- They have their own cgroups.
- They have their own devices and filesystems.
- They cannot see or interact with any other processes on the system.
- They have their own network interfaces.
Integrating all these elements is a complex task. While it is possible to manually change everything, it is also quite challenging; just mastering cgroups for a process can be tricky. To assist you, many tools can perform the necessary subtasks to create and manage effective containers. The two most popular tools are Docker and LXC. This chapter primarily focuses on Docker, but we will also touch on LXC to see how it differs.
17.2.1 Docker, Podman, and Permissions
To run the examples in this book, you need a container tool. The examples here are built using Docker, which can typically be installed smoothly through distribution packages.
In addition to Docker, there is a tool called Podman. The main difference between these two tools is that Docker requires a server to run containers, while Podman does not. This affects how the two systems set up containers. Most Docker configurations require superuser permissions to access the kernel features used by its containers, and the dockerd daemon handles the related tasks. In contrast, you can run Podman as a regular user, known as rootless operation. When running this way, it uses different techniques to achieve isolation.
You can also run Podman as a superuser, allowing it to switch to some of the isolation techniques used by Docker. Conversely, newer versions of dockerd support rootless mode.Fortunately, Podman is command-line compatible with Docker. This means you can replace docker with podman in the examples here, and they will still work. However, the implementations differ, especially when running Podman in rootless mode, so these differences will be noted where applicable.
References
- Software testing quality book documentation download continuously updated https://github.com/china-testing/python-testing-examples Please like, thank you!
- The Python testing development libraries mentioned in this article Thank you for liking! https://github.com/china-testing/python_cn_resouce
- Python quality book download https://github.com/china-testing/python_cn_resouce/blob/main/python_good_books.md
- Linux quality book download https://www.cnblogs.com/testing-/p/17438558.html
- Python Bazi scheduling https://github.com/china-testing/bazi
17.2.2 Docker Example
The simplest way to familiarize yourself with containers is to get hands-on experience. The Docker example here illustrates the main features of containers, but providing an in-depth user manual is beyond the scope of this book. After reading this book, you should be able to easily understand the online documentation, and if you want a comprehensive guide, you might try Nigel Poulton’s “Docker Deep Dive”.
First, you need to create an image, which includes the filesystem and some other functionalities that define how the container runs. Your image is almost always based on a pre-built image downloaded from an internet repository.
Note that images and containers can be easily confused. You can think of an image as the filesystem of a container; processes do not run in the image but run in the container. This statement is not entirely accurate (especially since when you change files in a Docker container, you are not changing the image), but it is close enough for now.Install Docker on your system (your distribution’s additional packages may suffice), create a new directory somewhere, switch to that directory, and then create a file named Dockerfile containing the following lines:
FROM alpine:latest
RUN apk add bash
CMD ["/bin/bash"]
This configuration uses the lightweight Alpine distribution. The only change we made was to add the bash shell, which is not only for increased interactivity but also to create a unique image to see how the program works. It is possible (and common) to use a public image without making any changes; in that case, you do not need a Dockerfile.Use the following command to build the image, reading the Dockerfile in the current directory and applying the identifier hlw_test to the image:
$ docker build -t hlw_test .
Note: You may need to add yourself to the docker group on your system to run Docker commands as a regular user.
Be prepared for a lot of output. Don’t ignore it; reading it the first time will help you understand how Docker works. Let’s break it down into steps corresponding to each line of the Dockerfile. The first task is to pull the latest version of the Alpine distribution container from the Docker registry:
Sending build context to Docker daemon 2.048kB
Step 1/3 : FROM alpine:latest
latest: Pulling from library/alpine
cbdbe7a5bc2a: Pull complete
Digest:
sha256:9a839e63dad54c3a6d1834e29692c8492d93f90c59c978c1ed79109ea4b9a54
Status: Downloaded newer image for alpine:latest
---> f70734b6a266
Notice the extensive use of SHA256 digests and shorter identifiers. Get used to them; Docker needs to track many small fragments. At this step, Docker creates a new image with the identifier f70734b6a266 for the base Alpine distribution image. You can refer to this specific image later, but you may not need to, as it is not the final image. Docker will build more on top of it. Images that are not intended as final products are referred to as intermediate images.
Note: When using Podman, the output will differ, but the steps are the same.
The next part of the configuration is to install the bash shell package in Alpine. As you read the output of the apk add bash command below (bolded), you may recognize it:
Step 2/3 : RUN apk add bash
---> Running in 4f0fb4632b31
fetch http://dl-cdn.alpinelinux.org/alpine/v3.11/main/x86_64/
APKINDEX.tar.gz
fetch http://dl-cdn.alpinelinux.org/alpine/v3.11/community/x86_64/
APKINDEX.tar.gz
(1/4) Installing ncurses-terminfo-base (6.1_p20200118-r4)
(2/4) Installing ncurses-libs (6.1_p20200118-r4)
(3/4) Installing readline (8.0.1-r0)
(4/4) Installing bash (5.0.11-r1)
Executing bash-5.0.11-r1.post-install
Executing busybox-1.31.1-r9.trigger
OK: 8 MiB in 18 packages
Removing intermediate container 4f0fb4632b31
---> 12ef4043c80a
What is less obvious is how this happens. Think about it: you are not running Alpine on your machine. So how can you run the apk command that belongs to Alpine?The key is in the line “Running in 4f0fb4632b31.” You have not requested to use a container, but Docker has already created a new container based on the Alpine intermediate image from the previous step. Containers also have identifiers; unfortunately, they look no different from image identifiers. Even more confusingly, Docker refers to temporary containers as intermediate containers, which is different from intermediate images. Intermediate images continue to exist after the build, while intermediate containers do not.After setting up the (temporary) container with the ID 4f0fb4632b31, Docker runs the apk command inside that container to install bash, then saves the changes to the filesystem in a new intermediate image with the ID 12ef4043c80a. Note that Docker also removes the container after completion.
Finally, Docker makes the last changes so that when starting a container from the new image, it runs the bash shell:
Step 3/3 : CMD ["/bin/bash"]
---> Running in fb082e6a0728
Removing intermediate container fb082e6a0728
---> 1b64f94e5a54
Successfully built 1b64f94e5a54
Successfully tagged hlw_test:latest
Note: Any operations completed using the RUN command in the Dockerfile occur during the image build process, not when starting a container using the image afterward. The CMD command is used at container runtime; that’s why it appears last.In this example, you now have a final image with the ID 1b64f94e5a54, but since you tagged it (in two steps), you can also refer to it as hlw_test or hlw_test:latest. Run docker images to verify that your image and the Alpine image exist:
$ docker images
REPOSITORY          TAG                 IMAGE ID            CREATED             SIZE
hlw_test            latest              1b64f94e5a54        1 minute ago        9.19MB
alpine              latest              f70734b6a266        3 weeks ago         5.61MB
- Running Docker Containers
Now you can start a container. There are two basic ways to run a container with Docker: one is to create a container and then run it (two steps); the other is to create and run in one step. Let’s get started directly by launching a container using the image you just created:
$ docker run -it hlw_test
You will see a bash shell prompt where you can run commands inside the container. The shell will run as the root user.
Note: If you forget the -it option (interactive, connect terminal), the prompt will not appear, and the container will almost immediately terminate. These options are somewhat uncommon in daily use (especially -t).If you are curious, you might want to see what’s around the container. Run some commands (like mount and ps) and explore the filesystem. You will quickly find that while most things look like a typical Linux system, some things do not. For example, if you run a complete process list, you will find only two entries:
# ps aux
PID   USER     TIME  COMMAND
    1 root      0:00 /bin/bash
    6 root      0:00 ps aux
Somehow, in the container, the shell is process ID 1 (remember, on a normal system, this is init), and there are no other processes running except for the process list you are executing.At this point, it is important to remember that these processes are only the processes you can see on the normal (host) system. If you open another shell window on the host system, you can find the container processes in the list, but it may take a little searching. It should look like this:
root 20189 0.2 0.0 2408 2104 pts/0 Ss+ 08:36 0:00 /bin/bash
This is our first encounter with one of the kernel features used for containers: Linux kernel namespaces specifically for process IDs. A process can start from PID 1, creating a whole new set of process IDs for itself and its child processes, which can only see those process IDs.
- Overlay FilesystemNext, explore the filesystem within the container. You will find it somewhat minimal; this is because it is based on the Alpine distribution. We used Alpine not only because it is small but also because it may differ from what you are used to. However, looking at how the root filesystem is mounted, you will find it is quite different from the typical device-based mount:
overlay on / type overlay (rw,relatime,lowerdir=/var/lib/docker/overlay2/l/
C3D66CQYRP4SCXWFFY6HHF6X5Z:/var/lib/docker/overlay2/l/K4BLIOMNRROX3SS5GFPB
7SFISL:/var/lib/docker/overlay2/l/2MKIOXW5SUB2YDOUBNH4G4Y7KF1,upperdir=/
var/lib/docker/overlay2/d064be6692c0c6ff4a45ba9a7a02f70e2cf5810a15bcb2b728b00
dc5b7d0888c/diff,workdir=/var/lib/docker/overlay2/d064be6692c0c6ff4a45ba9a7a02
f70e2cf5810a15bcb2b728b00dc5b7d0888c/work)
This is an overlay filesystem, a feature of the kernel that allows you to create a filesystem by stacking existing directories into layers and storing changes in one location. If you look on the host system, you can see it (and access the component directories) and find the location of the original mounts added by Docker.
Note: In rootless mode, Podman uses a FUSE version of the overlay filesystem. In this case, you cannot see these details from the filesystem mount, but you can obtain similar information by checking the fuse-overlayfs process on the host system.In the mount output, you will see the lowerdir, upperdir, and workdir directory parameters. The lower directory is actually a series of colon-separated directories, and if you look for these directories on the host system, you will find that the last directory is the base Alpine distribution set up in the first step of the image build (just look inside the directory to see the distribution’s root). If you trace the previous two directories, you will find they correspond to the other two build steps. Thus, these directories are “stacked” from right to left.The upper directory is where any changes to the mounted filesystem will appear, and while it does not necessarily start empty, it makes little sense to place anything there at the beginning for the container. The work directory is where the filesystem driver works before writing changes to the upper directory, and it must be empty when mounted.
It is easy to imagine that containers with many build steps have many layers in their images. This can sometimes be a problem, and there are various strategies to minimize the number of layers, such as merging RUN commands and multi-stage builds. We will not elaborate on this here.
- Networking
While you can choose to have containers run on the same network as the host, for security reasons, you typically want some isolation in the network stack. In Docker, there are several ways to achieve this, but the default (and most common) method is to use another namespace—the network namespace (netns), specifically a bridge network. Before running any program, Docker creates a new network interface on the host system (usually docker0), typically assigned to a private network like 172.17.0.0/16, so in this example, the interface will be assigned to 172.17.0.1. This network is used for communication between the host and its containers.
Then, when creating a container, Docker creates a new network namespace, which is almost completely empty. Initially, the new namespace (the namespace in the container) only contains a new private loopback (lo) interface. To prepare the namespace for actual use, Docker creates a virtual interface on the host that simulates a link between two actual network interfaces (each with its own device) and places one of those devices into the new namespace. By configuring the network with Docker network addresses (in this case, 172.17.0.0/16) on the device in the new namespace, processes can send packets on that network and receive them on the host. This can be confusing because different interfaces in different namespaces can use the same name (for example, the container’s interface can be eth0, and the host can also be eth0).
Since this uses a private network (network administrators may not want to blindly route anything to these containers), if kept this way, processes in containers using that namespace cannot connect to the outside world. To connect to external hosts, Docker’s network on the host is configured with NAT.
The diagram below shows a typical setup. It includes the physical layer with interfaces, the internet layer of the Docker subnet, and the NAT that connects that subnet to the rest of the host and its external connections.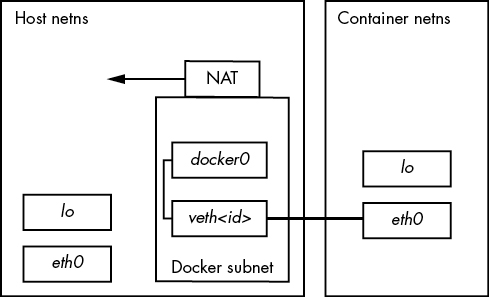
Note: You may need to check the subnet of the Docker interface network. Sometimes it can conflict with NAT-based networks assigned by telecom router hardware.
Rootless operation in Podman is different because setting up virtual interfaces requires superuser access. Podman still uses a new network namespace, but it requires an interface that can set operations in user space. This is a TAP interface (usually located at tap0), along with a forwarding daemon called slirp4netns, allowing container processes to connect to the outside world. This method has limited capabilities; for example, containers cannot connect to each other.There is much more to network connections, including how to expose ports in the container’s network stack for external services, but understanding the network topology is the most crucial aspect.
- Docker Operations
At this point, we could continue discussing the various isolations and limitations that Docker can achieve, but that would take a long time, and you may already understand it. Containers do not come from a specific feature but from a collection of them. Therefore, Docker must track everything we do when creating containers and also be able to clean them up.As long as there are processes running, Docker defines a container as “running.” You can display currently running containers with docker ps:
$ docker ps
CONTAINER ID   IMAGE       COMMAND       CREATED       STATUS      PORTS    NAMES
bda6204cecf7   hlw_test    "/bin/bash"   8 hours ago   Up 8 hours           boring_lovelace
8a48d6e85efe   hlw_test    "/bin/bash"   20 hours ago  Up 20 hours          awesome_elion
Once all processes terminate, Docker places them in an exited state but still retains the container (unless you start it with the –rm option). This includes any changes made to the filesystem. You can easily access the filesystem using docker export.You need to be aware of this because docker ps does not display exited containers by default; you must use the -a option to see everything. Exited containers can easily pile up, and if the applications running in the containers create a lot of data, disk space can run out without you knowing why. Use docker rm to remove terminated containers.The same applies to old images. Development images are often a repetitive process, and when you tag an image with the same tag as an existing image, Docker does not remove the original image. Old images simply lose their tags. If you run docker images to display all images in the system, you will see all images. Below is an example showing an old version of an image without a tag:
$ docker images
REPOSITORY          TAG                 IMAGE ID            CREATED             SIZE
hlw_test            latest              1b64f94e5a54        43 hours ago        9.19MB
<none>              <none>              d0461f65b379        46 hours ago        9.19MB
alpine              latest              f70734b6a266        4 weeks ago         5.61MB
</none></none>
Use docker rmi to delete images. This will also remove unnecessary intermediate images based on that image. If you do not delete images, they will accumulate over time. Depending on the contents and how the images are built, this can take up a significant amount of storage space in the system.In general, Docker performs a lot of detailed version control and checkpointing. This layer of management reflects a particular philosophy compared to tools like LXC, which you will soon see.
- Docker Service Process ModelOne potentially confusing aspect of Docker containers is the lifecycle of processes within them. Before a process completely terminates, its parent process should use the wait() system call to collect (“reap”) its exit code. However, in containers, there are cases where dead processes may continue to exist because the parent process does not know how to handle them. Coupled with the way many images are configured, this may lead you to conclude that you should not run multiple processes or services in a Docker container. This is incorrect.
You can run multiple processes in a container. The shell we ran in the example starts a new child process when running commands. What is crucial is that when you have child processes, the parent process cleans up when it exits. Most parent processes do this, but in some cases, you may encounter situations where the parent process does not do this, especially when the parent process is unaware of its child processes. This situation can occur in cases of multi-level process generation, where PID 1 in the container ultimately becomes the parent of child processes it does not know about.To address this issue, if you have a simple one-way service that only generates a few processes, and it seems to leave behind lingering processes even when the container should terminate, you can add the –init option to docker run. This will create a very simple init process that runs in the container as PID 1 and acts as the parent process, knowing what to do when child processes terminate.
On this note, if you are considering this pattern for containers, you might want to consider another solution that does not involve Docker.
17.2.3 LXC
Our discussion has revolved around Docker, not only because it is the most popular system for building container images but also because it makes it very easy to get started and enter the isolation layers that containers typically provide. However, there are other packages for creating containers that take different approaches. Among them, LXC is one of the oldest packages. In fact, the initial version of Docker was built on LXC. If you understand the discussion about how Docker works, you will not find the technical concepts of LXC difficult, so we will not provide examples. Instead, we will only explore some practical differences.
The term LXC is sometimes used to refer to a series of kernel features that make containers possible, but most people use it to specifically refer to a library and package that contains many utilities for creating and operating Linux containers. Unlike Docker, LXC requires a lot of manual setup. For example, you must create your own container network interfaces and provide user ID mappings.
Initially, LXC aimed to install as much of a complete Linux system as possible within the container—booting and all. After installing a special version of a distribution, you can install everything needed for any program running inside the container. This part is not much different from what you see in Docker, but it requires more setup; in Docker, you just download a bunch of files and start running.
Therefore, you may find LXC more flexible in adapting to different needs. For example, LXC does not use the overlay filesystem by default as Docker does, but you can add one. Since LXC is built on a C API, you can use this granularity in your own software applications if necessary.
A companion management package called LXD can help you with some of the finer manual operations of LXC (like network creation and image management), and it also provides a REST API that you can use to access LXC instead of the C API.
17.2.4 Kubernetes
Speaking of management, containers are popular in many types of network servers because you can start multiple containers from one image, providing excellent redundancy. Unfortunately, this can be challenging to manage. You need to perform the following tasks:
- Track which machines can run containers.
- Start, monitor, and restart containers on those machines.
- Configure container startup.
- Configure container networking as needed.
- Load new versions of container images and gracefully update all running containers.
This is not a complete list, nor does it accurately express the complexity of each task. To address this, people have sought to develop software, and among the solutions that have emerged, Google’s Kubernetes has become dominant. One of the biggest reasons for this may be its ability to run Docker container images.
Kubernetes has two basic aspects, just like any client-server application. The server involves machines available to run containers, while the client is primarily a set of command-line utilities for starting and operating container clusters. The configuration files for containers (and the groups they comprise) can be quite large, and you will quickly find that much of the client’s work involves creating the corresponding configurations.
You can explore the configurations yourself. If you do not want to set up the server yourself, you can use the Minikube tool to install a virtual machine running a Kubernetes cluster on your machine.
17.2.5 Pitfalls of Containers
If you think about how services like Kubernetes operate, you will realize that systems using containers are not without costs. At the very least, you still need one or more machines to run containers, and this must be a complete Linux machine, whether on real hardware or in a virtual machine. While maintaining core infrastructure may be simpler than maintaining configurations that require installing a lot of custom software, maintenance costs still exist.
Maintenance costs come in various forms. If you choose to manage your infrastructure, you will need to invest a significant amount of time, along with hardware, hosting, and maintenance costs. If you choose to use container services like Kubernetes clusters, then you will have to pay for someone else to do it.When considering containers themselves, keep the following points in mind:
- Containers can waste storage space.
To allow any application to run inside a container, the container must include all necessary support for the Linux operating system, such as shared libraries. This can become quite large, especially if you are not particularly careful about the base distribution you choose for the container. Then consider your application itself: how large is it? When using overlay filesystems with multiple identical container replicas, this situation is somewhat alleviated because they share the same base files. However, if your application generates a lot of runtime data, the upper layers of all these overlay layers will become large.
- You still need to consider other system resources, such as CPU time.
You can configure limits on the consumption of containers, but you are still limited by the processing power of the underlying system. The system still has a kernel and block devices. If overloaded, either the container, the underlying system, or both will be affected.
- You may need to rethink where to store data.
In container systems (like Docker) that use overlay filesystems, changes made to the filesystem during runtime are discarded after the process terminates. In many applications, all user data is stored in a database, which simplifies this issue to database management. But what about logs? Logs are essential for the normal operation of server applications, but you still need a way to store logs. For any large-scale production, a separate logging service is essential.
- Most container tools and operating modes are geared towards network servers.
If you are running a typical network server, you will find a wealth of support and information about running network servers in containers. Especially Kubernetes, which has many security features to prevent server code from going awry. This can be an advantage as it compensates for the flaws of most network applications (frankly) poorly written. However, when you try to run another type of service, it can sometimes feel like trying to fit a square peg into a round hole.
- Careless container builds can lead to bloat, configuration issues, and failures.
You are creating an isolated environment, but that does not prevent you from making mistakes within that environment. You may not have to worry too much about the complexity of systemd, but there are still many other things that can go wrong. When any type of system has issues, inexperienced users often add things haphazardly in an attempt to make the problem disappear. This can continue (often blindly) until a somewhat functional system is formed, but with many additional problems. You need to understand the changes you are making.
- Version management can be problematic.
In the examples in this book, we used the latest tag. This should be the latest (stable) version of a container, but it also means that when you build a container based on the latest version of a distribution or package, some of the underlying content may change, breaking your application. A standard practice is to use specific version tags for the base containers.
- Trust can be an issue.
This is especially true for images built with Docker. When you base your container on images from the Docker image library, you need to trust an additional layer of management to ensure they have not been modified, do not introduce more security issues than usual, and are available when you need them. This contrasts sharply with LXC, which encourages you to build your own to some extent.
Considering these issues, you might think that containers have many disadvantages compared to other system environment management methods. However, this is not the case. Regardless of the method you choose, these issues will exist to some degree and form, and some of these issues are easier to manage in containers. Remember, containers do not solve all problems. For example, if your application takes a long time to start on a normal system, it will also take a long time to start in a container.
17.3 Runtime-Based Virtualization
The last type of virtualization to mention is runtime-based virtualization, which pertains to the type of environment used for developing applications. This differs from the system virtual machines and containers we have seen so far because it does not involve placing applications on different machines. Instead, it is a separation that applies only to specific applications.
The reason for using this type of environment is that multiple applications on the same system may use the same programming language, leading to potential conflicts. For example, in a typical distribution, Python is used in multiple places and may include many additional packages. If you want to use the system version of Python in your own package, you may run into trouble if you want to use a different version of some additional software.Let’s take a look at how Python’s virtual environment feature creates a version of Python that contains only the required packages. The starting point is to create a new directory for the environment as follows:
python3 -m venv test-venv
Now, check the new test-venv directory. You will see many directories similar to the system, such as bin, include, and lib. To activate the virtual environment, you need to source (not execute) the test-venv/bin/activate script:
$ . test-env/bin/activate
The reason for sourcing is that activation essentially sets environment variables, and running an executable cannot do this. At this point, when you run Python, you will get the version in the test-venv/bin directory (which is just a symbolic link), and the VIRTUAL_ENV environment variable is set to the base directory of the environment. You can run deactivate to exit the virtual environment.
There is nothing more complex than this. With this environment variable set, you can have a new, empty package library in test-venv/lib, and any new software you install in the virtual environment will go into this library instead of the main system library.Not all programming languages allow for virtual environments like Python, but it is worth understanding if only to eliminate confusion about the term “virtual.”