[Source] https://sourl.cn/hMw7yT
Single sign-on (SSO) is a popular login method for multi-domain enterprise sites. This article aims to clarify the principles of OAuth 2.0 in implementing single sign-on, using real-life scenarios for better understanding. It also summarizes the implementation solutions for access control and its application in microservice architecture.
What is Single Sign-On?
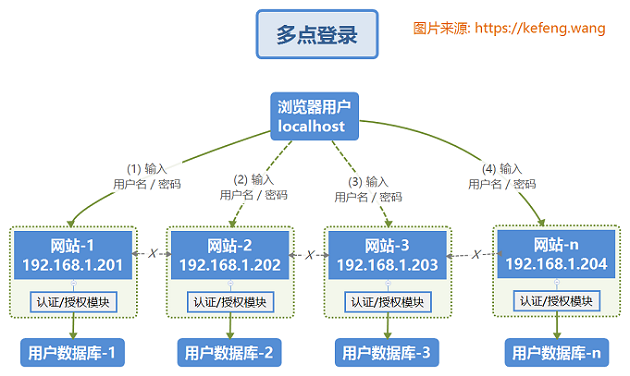
Multiple Logins
In traditional multiple login systems, each site has its own dedicated account database and login module. The login states of each site do not recognize each other, requiring users to log in manually to each site. As shown in the diagram below, there are two terms defined as follows:
- Authentication: Verifying the user’s identity;
- Authorization: Verifying the user’s access rights.
Single Sign-On
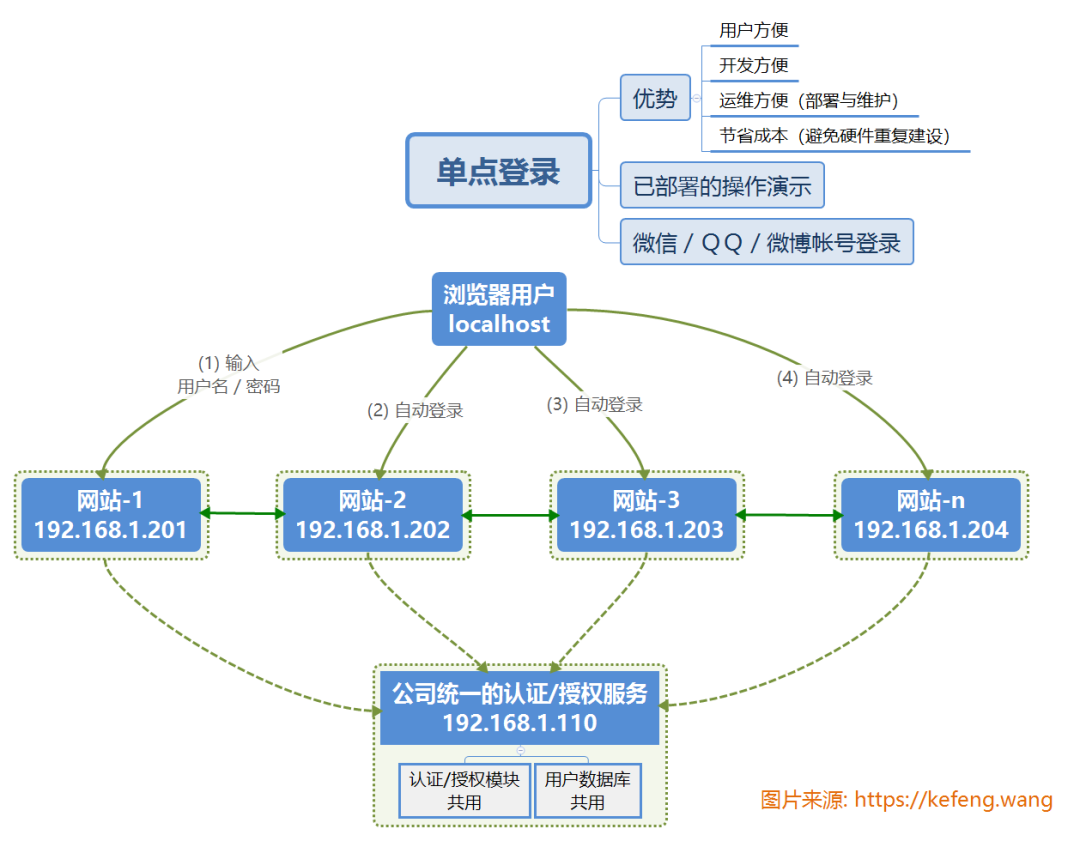
Single sign-on, abbreviated as SSO, allows multiple sites (192.168.1.20X) to share a single authentication and authorization server (192.168.1.110, which shares the user database and authentication/authorization module).
After a user logs in through any of the sites (for example, 192.168.1.201), they can access all other sites without needing to log in again. Moreover, the login status can be directly interacted with between sites.
The principle and process of OAuth2 authentication and authorization
Real-Life Example [★★Key Point★★]
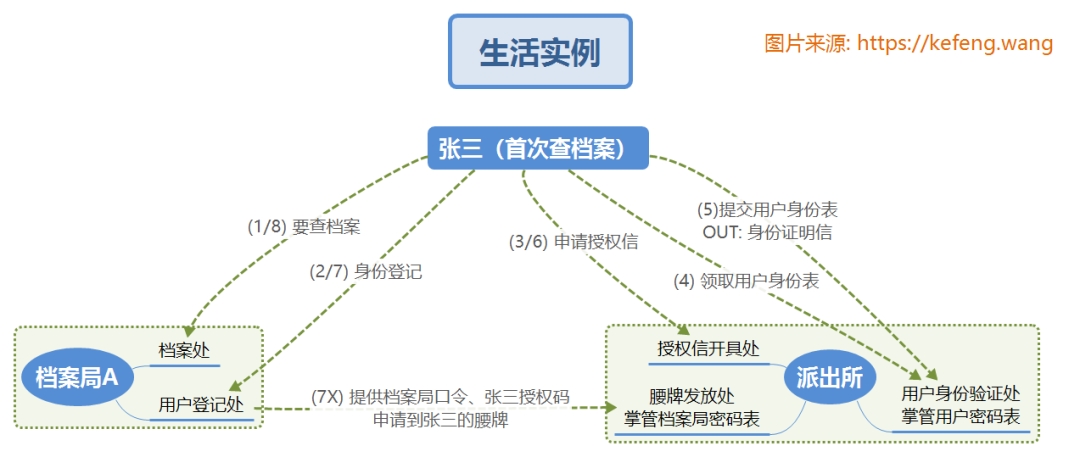
To intuitively understand the process of OAuth 2.0, let us assume the following real-life scenario:
(1) Archive Bureau A (Client): Identified by “Archive Bureau ID/Password”, it is an institution that manages archival resources. There are many other Archive B/C/… that store different archival content (Resource), such as political, economic, military, and cultural materials;
(2) Citizen Zhang San (Resource Owner): Identified by “Username/Password”, he needs to check archives at various bureaus;
(3) Police Station (Authorization Server): This can be a single large police station or a cluster of data-sharing police stations, managing information and providing external interface functions as follows:
- Archive Bureau Information: All Archive Bureau’s “Archive Bureau ID/Password”, proving the identity of the bureau;
- Citizen Information: All citizens’ “Username/Password”, providing proof that Zhang San is indeed Zhang San (Authentication).
- Citizen’s permissions for the Archive Bureau: A mapping table that shows the permissions of citizens regarding the Archive Bureau, indicating whether each citizen has operational permissions (Authorization). Typically, the design adds a layer of official position (Role), indicating which official position (role) each citizen belongs to and which specific Archive Bureau has operational permissions.
Zhang San’s First Visit to Archive Bureau A
Zhang San has never visited Archive Bureau A before. This is his first time. Understanding it with reference to the numbered diagram:
(1) Zhang San arrives at the “Archive Department” of “Archive Bureau A”, which requires real-name registration before he can check the archives, and is directed to the “User Registration Office” to handle it (HTTP Redirection);
(2) Zhang San arrives at the “User Registration Office” of “Archive Bureau A”, where he cannot prove his identity (Authentication) or validate his permission to check Archive A (Authorization). Zhang San carries the identifier of Archive Bureau A (client-id) and is redirected to the “Authorization Letter Issuance Office”;
(3) Zhang San arrives at the “Authorization Letter Issuance Office” of the police station, presenting the identifier of Archive Bureau A, hoping to obtain an authorization letter (Authorization). This office requires him to first prove his identity (Authentication) and redirects him to the “User Identity Verification Office”;
(4) Zhang San arrives at the “User Identity Verification Office” of the police station and receives a user identity form (Web Login Form);
(5) Zhang San fills in his username and password and submits them to the (Submit) “User Identity Verification Office”, which checks the private database for matching username and password, confirms that he is Zhang San, issues an identity proof letter, and completes the Authentication. Zhang San brings the identity proof letter and the identifier of Archive Bureau A, and is redirected to the “Authorization Letter Issuance Office”;
(6) Zhang San again arrives at the “Authorization Letter Issuance Office”, presenting the identity proof letter and the identifier of Archive Bureau A. This office checks the private database and finds that Zhang San’s official position is at the mayor level (role), which has query permissions for Archive Bureau A, thus issuing an “authorization letter allowing Zhang San to query Archive Bureau A” (Authorization Code). Zhang San takes the authorization letter and is redirected to the “User Login Office” of the “Archive Bureau”;
(7) Zhang San arrives at the “User Login Office” of the “Archive Bureau”, where he privately presents the identifier of Archive Bureau A (client-id) and password, along with the authorization letter he presented (code), to apply for a “token” (token) from the “Badge Issuance Office” of the police station. In the future, Zhang San can carry this token to prove his identity and permissions. He is redirected to the “Archive Department”;
(8) Zhang San’s session (Session) has now been associated with the token (token), allowing him to directly check the archives through the “Archive Department”.
Zhang San’s First Visit to Archive Bureau B
Zhang San has successfully accessed Archive Bureau A, and now he wants to visit Archive Bureau B. Understanding it with reference to the numbered diagram:
(1)/(2) Same as above;
(3) Zhang San already has the “identity proof letter” and directly obtains an authorization letter for “visiting Archive Bureau B” from the “Authorization Letter Issuance Office” of the police station;
(4)/(5)/(6) are omitted;
(7) The “User Registration Office” of “Archive Bureau B” completes the registration;
(8) The “Archive Department” of “Archive Bureau B” checks the archives.
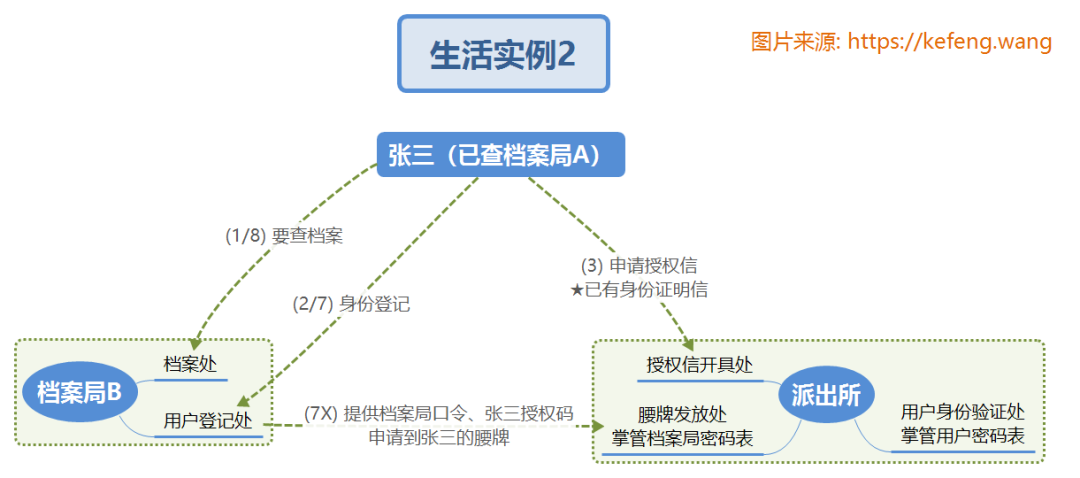
Zhang San’s Second Visit to Archive Bureau A
Zhang San has successfully accessed Archive Bureau A, and now he wants to visit Archive Bureau A again. Understanding it with reference to the numbered diagram:
(1) He directly checks the archives successfully;
(2~8) are all omitted.
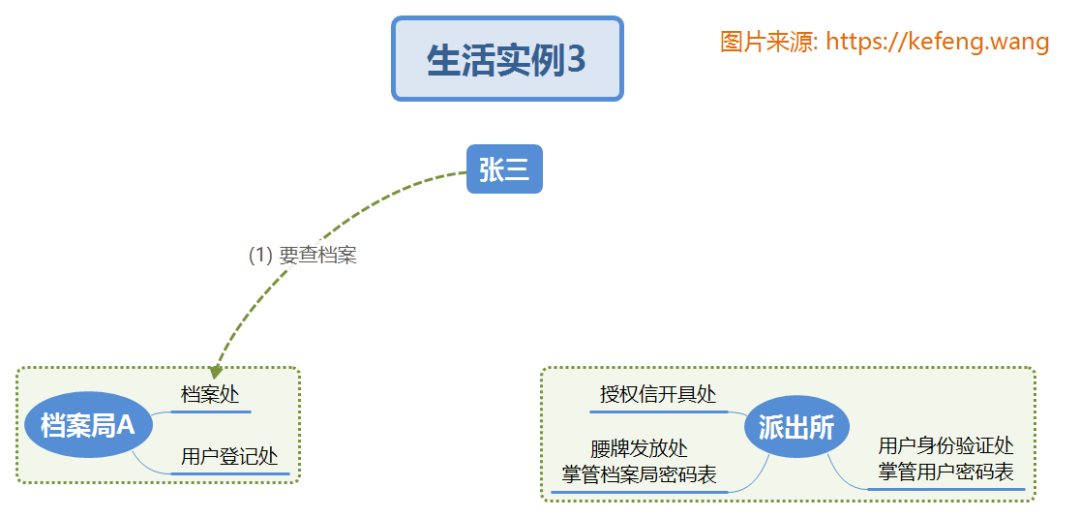
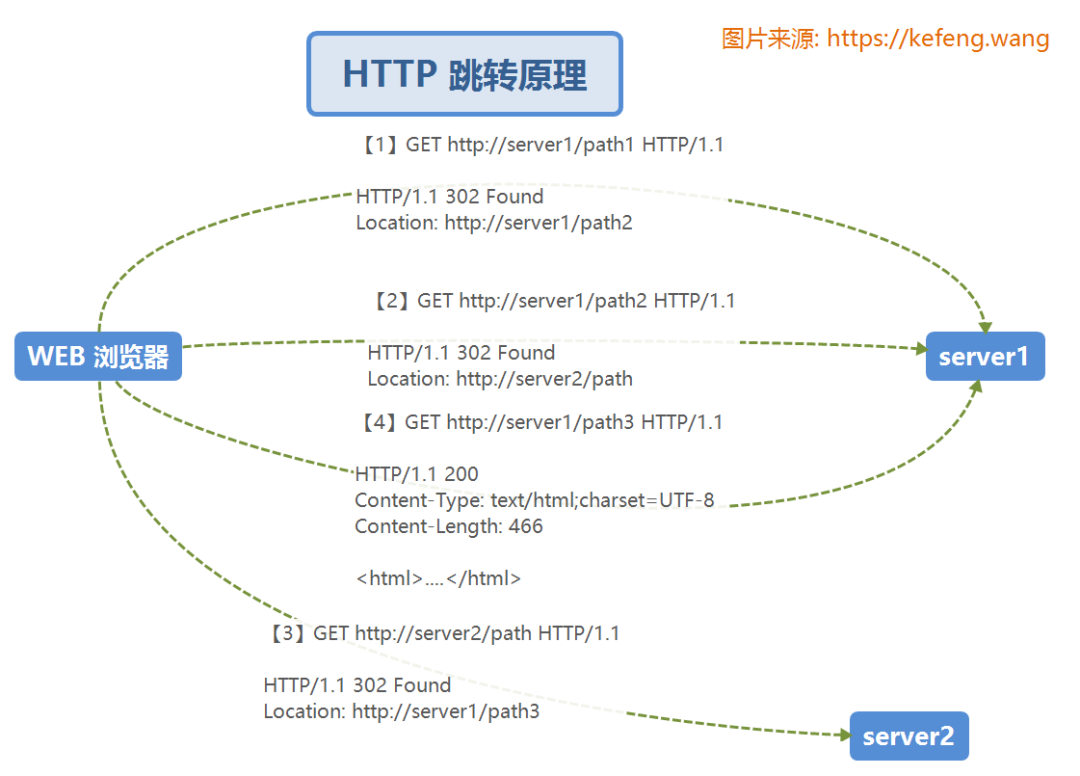
HTTP Redirection Principle
In the HTTP protocol, after the browser sends a REQUEST to the server, if the server finds that the business does not belong to its jurisdiction, it will redirect you to a certain interface (uri) of its own server or another server (host).
Just like when we go to government departments for services, at each window, the staff will say, “Bring material A to window X of this office, or to window Z of another Y office” for the next procedure.
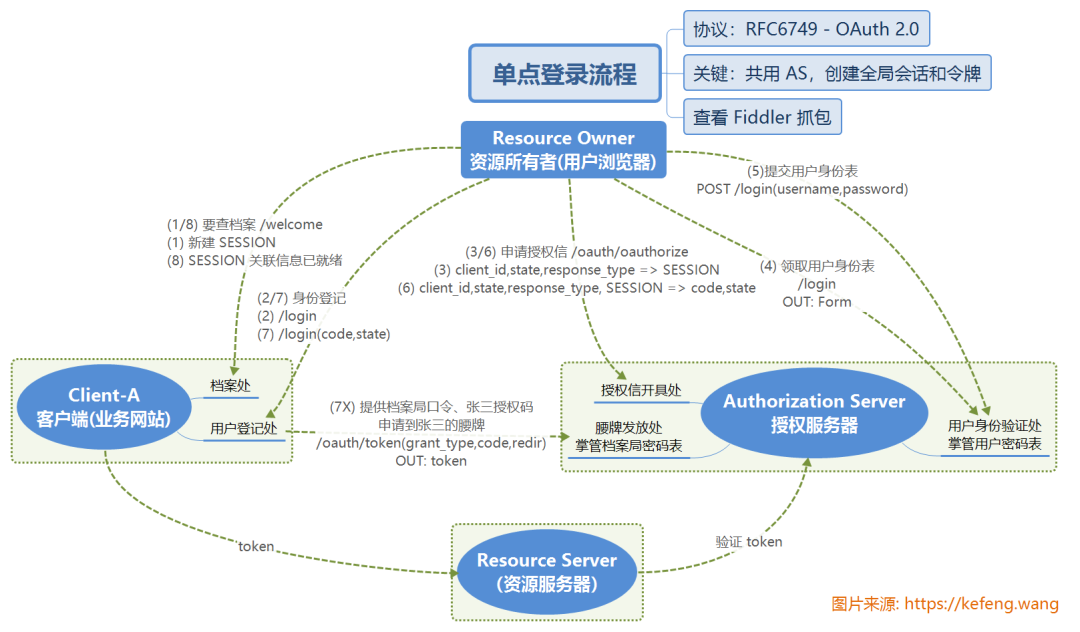
SSO Workflow
At this point, it is not difficult to understand the authentication/authorization process of OAuth 2.0, and it will not be elaborated further here. Please refer to the diagram below to understand it in conjunction with section “2.1 Real-Life Example”.
OAuth 2.0 Advanced Topics
-
RFC 6749: The OAuth 2.0 Authorization Framework
https://tools.ietf.org/html/rfc6749
-
RFC 6750: The OAuth 2.0 Authorization Framework: Bearer Token Usage
https://tools.ietf.org/html/rfc6750
-
In-depth understanding of the OAuth 2.0 protocol
https://blog.csdn.net/seccloud/article/details/8192707
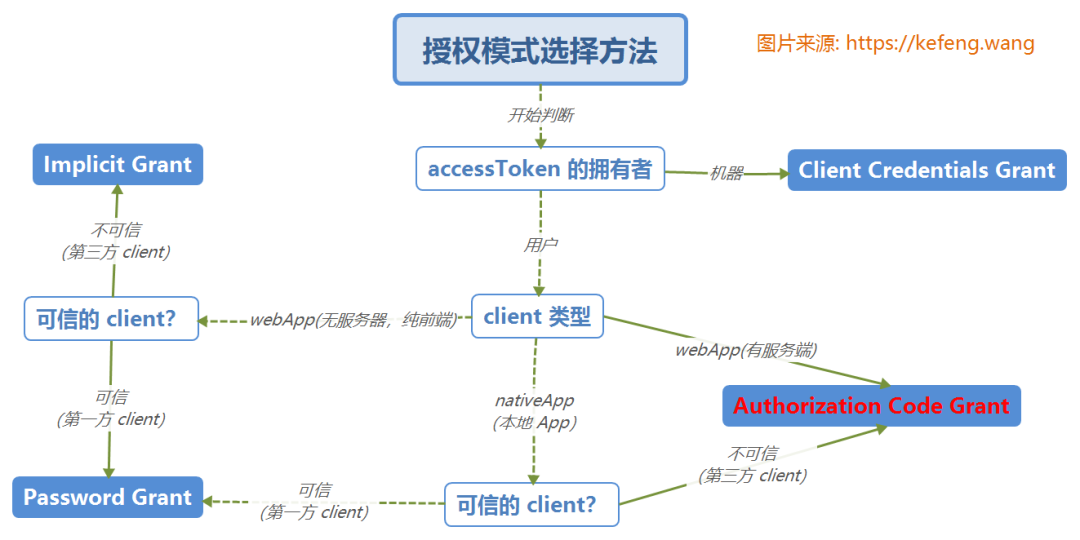
According to official standards, OAuth 2.0 supports four authorization modes:
- Authorization Code: Used between server-side applications; this is the most complex and the mode used in this article;
- Implicit: Used in mobile apps or web apps (these apps run on the user’s device, such as invoking WeChat on a phone for authentication and authorization)
- Resource Owner Password Credentials (password): Applications are directly trusted (developed by the same company, as in this example)
- Client Credentials: Used for application API access.
Implementing authentication/authorization based on SpringBoot
Official Documentation: Spring Cloud Security
(https://sourl.cn/nVgcBq)
Authorization Server
pom.xml
<dependency>
    <groupId>org.springframework.cloud</groupId>
    <artifactId>spring-cloud-starter-oauth2</artifactId>
</dependency>
application.properties
server.port=8110 ## Listening port
AuthorizationServerApplication.java
@EnableResourceServer // Enable resource server
public class AuthorizationServerApplication {
    // ...
}
Configuring authorization service parameters
@Configuration
@EnableAuthorizationServer
public class Oauth2AuthorizationServerConfigurer extends AuthorizationServerConfigurerAdapter {
    @Override
    public void configure(final ClientDetailsServiceConfigurer clients) throws Exception {
        clients.inMemory()
                .withClient("webapp").secret("secret") // Client ID/secret
                .authorizedGrantTypes("authorization code") // Authorization mode
                .scopes("user_info")
                .autoApprove(true) // Auto-approval
                .accessTokenValiditySeconds(3600); // Valid for 1 hour
    }
}

@Configuration
public class Oauth2WebSecurityConfigurer extends WebSecurityConfigurerAdapter {
    @Override
    protected void configure(HttpSecurity http) throws Exception {
        http.requestMatchers()
                .antMatchers("/login", "/oauth/authorize/oauth/logout")
                .and().authorizeRequests().anyRequest().authenticated()
                .and().formLogin().permitAll();
    }

    @Override
    protected void configure(AuthenticationManagerBuilder auth) throws Exception {
        auth.inMemoryAuthentication().withUser("admin").password("admin123").roles("ADMIN");
    }
}
Client (Business Website)
pom.xml
<dependency>
    <groupId>org.springframework.cloud</groupId>
    <artifactId>spring-cloud-starter-oauth2</artifactId>
</dependency>
application.properties
server.port=8080
security.oauth2.client.client-id=webapp
security.oauth2.client.client-secret=secret
security.oauth2.client.access-token-uri=http://localhost:8110/oauth/token
security.oauth2.client.user-authorization-uri=http://localhost:8110/oauth/authorize
security.oauth2.resource.user-info-uri=http://localhost:8110/oauth/user
Configuring WEB Security
@Configuration
@EnableOAuth2Sso
public class Oauth2WebSecurityConfigurer extends WebSecurityConfigurerAdapter {
    @Override
    public void configure(HttpSecurity http) throws Exception {
        http.antMatcher("/**").authorizeRequests()
                .antMatchers("/", "/login").permitAll()
                .anyRequest().authenticated();
    }
}

@RestController
public class Oauth2ClientController {
    @GetMapping("/")
    public ModelAndView index() {
        return new ModelAndView("index");
    }

    @GetMapping("/welcome")
    public ModelAndView welcome() {
        return new ModelAndView("welcome");
    }
}
User Permission Control (Based on Roles)
- In the authorization server, define the roles that each user has: user=USER, admin=ADMIN/USER, root=ROOT/ADMIN/USER
- In the business website (client), annotations indicate which roles are allowed
@RestController
public class Oauth2ClientController {
    @GetMapping("/welcome")
    public ModelAndView welcome() {
        return new ModelAndView("welcome");
    }

    @GetMapping("/api/user")
    @PreAuthorize("hasAuthority('USER')")
    public Map<String, Object> apiUser() {
    }

    @GetMapping("/api/admin")
    @PreAuthorize("hasAuthority('ADMIN')")
    public Map<String, Object> apiAdmin() {
    }

    @GetMapping("/api/root")
    @PreAuthorize("hasAuthority('ROOT')")
    public Map<String, Object> apiRoot() {
    }
}
Comprehensive Application
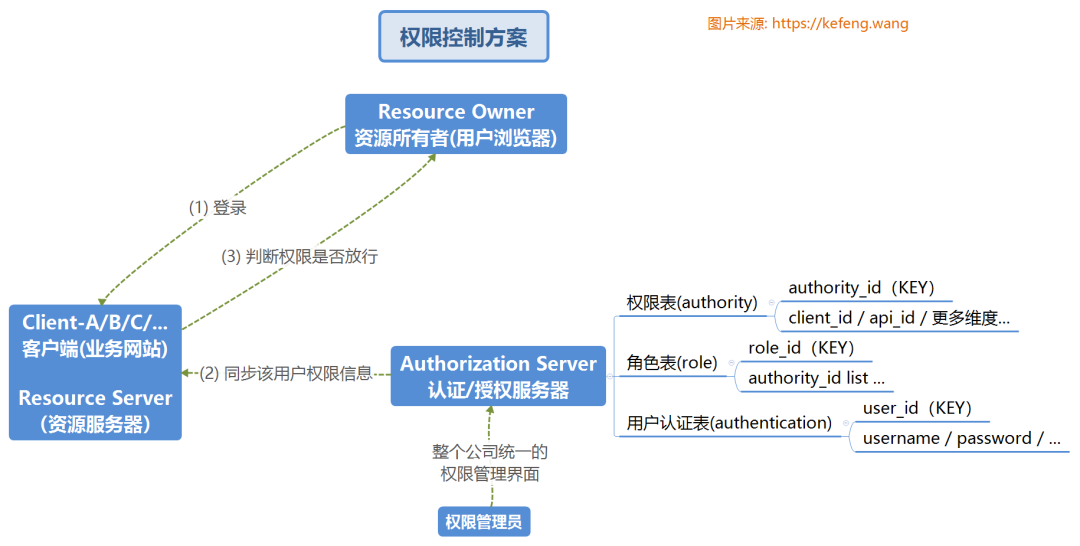
Access Control Scheme
The diagram below is a basic authentication/authorization control scheme, primarily designed to define the relevant data tables on the authentication and authorization server. It can be understood in conjunction with section “2.1 Real-Life Example” of this article.
Application in Microservice Architecture
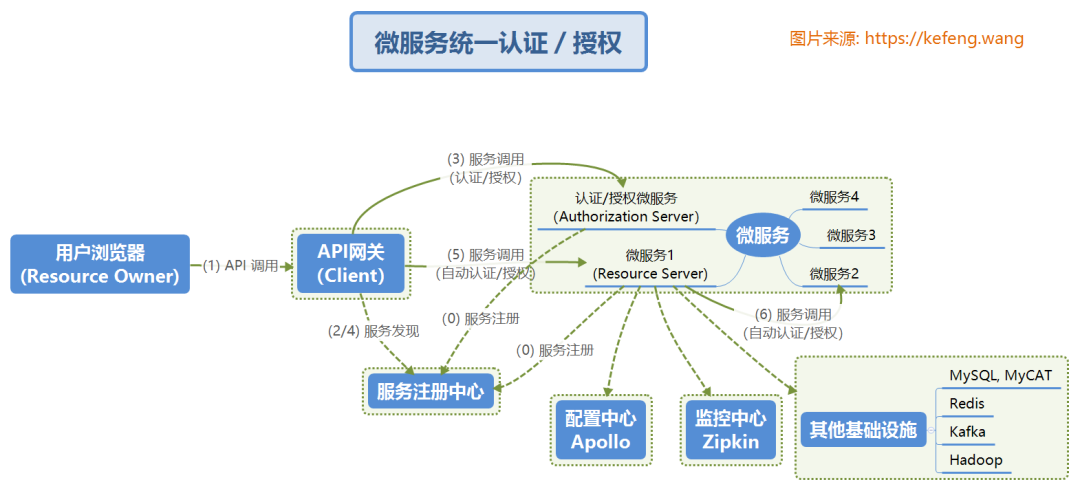
Unlike conventional service architectures, in microservice architecture, the Authorization Server/Resource Server exists as microservices. User login can be completed through the API gateway at once, without needing to redirect to the internal Authorization Server.