
 What is Overclocking Raspberry Pi?
Overclocking is the easiest way to enhance the performance of computer hardware for free. Specifically, it refers to increasing the rated frequency of hardware devices such as the CPU, GPU, and RAM to operate at higher frequencies for better performance. Therefore, overclocking is also seen as a reflection of the technical level of DIY enthusiasts and a measure of the R&D capabilities of DIY manufacturers.
So how exactly can I overclock the Raspberry Pi? However, before proceeding with specific operations, I first need to select the device. Currently, the Raspberry Pi 3 and Raspberry Pi 2 are the two popular models on the market. Since the performance of the Raspberry Pi 3 is superior to that of the Raspberry Pi 2 in all aspects, I can achieve greater power through techniques such as overclocking and overvoltage. However, since the basic technical characteristics of the two models are similar, the overclocking techniques for the Raspberry Pi 3 also apply to the Raspberry Pi 2, although the effect of overclocking will be significantly reduced.
In short, overclocking is a method to enhance the hardware performance of the Raspberry Pi by adjusting multiple device parameters. For this, additional hardware and special operational skills are required.
If you want to know what projects require an overclocked Raspberry Pi, you can find relevant information at the end of this article or consider using ExaGear Desktop software for testing. Also, remember that you need to perform multiple tests to ensure that the changes take effect and that the device is not damaged.
 Overclocking can improve computer performance, so what preparations are needed for overclocking?
First, a good hardware system is required; the CPU, memory, and GPU must be healthy and can operate at 100% load with reasonable temperature and power consumption.
Next is hardware preparation; overclocking requires a powerful motherboard to support it, especially the power supply section of the motherboard. Considering that the power consumption increases significantly after overclocking the CPU and memory, the high and low level signal requirements must not be vague, so the power supply section of the motherboard must reach 4+1 or a higher number of phases, so that the pressure on each power supply can be small.
Finally, overclocking also requires a powerful cooler and power supply; the former can keep the CPU and GPU operating at reasonable temperatures, enhancing overclocking potential and stability during the overclocking process, while the latter can provide sufficient power support for the hardware, even if power consumption increases.
This means that there are some risks associated with overclocking the Raspberry Pi 3. So specifically, what are these risks and how can they be avoided?
 Warnings Related to Overclocking
Warning 1
Currently, there is no official support for overclocking the Raspberry Pi 3, so you may damage your device. So please be advised, if you damage your Raspberry Pi by following my methods, I will not be responsible. So important things are worth repeating: please be cautious before overclocking!
Warning 2
Overclocking may raise the hardware temperature to nearly 90°C. This may lead to program crashes, CPU damage, and memory chip damage. To prevent this, the chip’s cooling must be very good. Since fans enhance cooling effects, it is strongly recommended to use them. Again, important things are worth repeating: do not overclock without cooling.
 Additional Hardware Required for Overclocking
If you want to overclock your Raspberry Pi, you need to configure three important hardware components:
1. Raspberry Pi, in this article, I used a Raspberry Pi 3 Model B V1.2 running Raspbian GNU/Linux 8 (Jessie).
2. Power supply, it is strongly recommended to use a reliable power supply; the overclocked Raspberry Pi 3 can use 1.5A or even higher current. Therefore, the power supply used in this article is 2A.
3. Cooling devices, to prevent the Raspberry Pi from overheating, I must find fans and heatsinks.
Important Note: You can use the following command to upgrade the installed packages to the latest version:
$ sudo apt-get update && sudo apt-get dist-upgrade
During the start and finish processes, you need to check the system performance. You can easily do this using the “sysbench” tool, which can be installed with the following command.
$ sudo apt-get install sysbench
The following image shows all the overclocking equipment I need.

Specifically, they are:
1. Raspberry Pi 3;
2. Power supply voltage of 5 volts, current of 2500 milliamps;
3. A built-in fan;
4. Three heatsinks;
5. A base with space for memory cooling and fan space.
The following image is a schematic of the equipment after I assembled it:
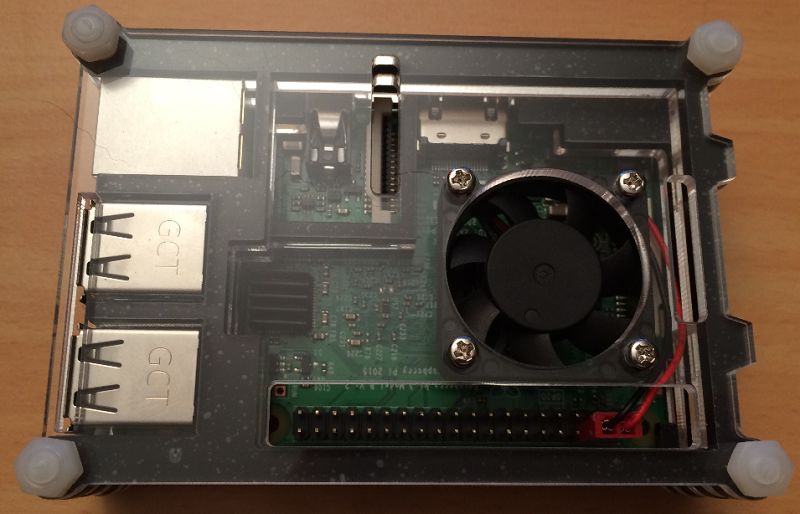
Note that in this photo, the largest heatsink is below the fan, and the copper heatsink is at the bottom of this image.
 Routine Checks Before Overclocking
However, before starting to overclock the Raspberry Pi, I need to prepare and check some overclocking conditions.
Monitor CPU Frequency
To understand the current operating frequency of the CPU, I must read the proc files cpuinfo_min_freq, cpuinfo_max_freq, and cpuinfo_cur_freq from the /sys/devices/system/cpu/cpu0/cpufreq/ directory, where:
cpuinfo_min_freq represents the minimum frequency in “idle” mode;
cpuinfo_max_freq represents the maximum frequency;
cpuinfo_cur_freq represents the current operating frequency of the Raspberry Pi.

Monitor CPU Temperature
To know the current CPU temperature, I can run the vcgencmd measure_temp command. Additionally, to observe the temperature every second, I can run it in a “while” loop as follows:
$ while true ; do vcgencmd measure_temp ; sleep 1 ; done

This loop will run until I terminate it with CTL + C.
Set Default Speed
The default CPU configuration of the Raspberry Pi board is in idle mode when no tasks are running, as follows:
arm_freq = 600 mhz
core_freq = 250 mhz
If processes are running, the frequency will rise to:
arm_freq = 1200
core_freq = 400 (this is the maximum default value for the Raspberry Pi 3).
To prevent the idle mode from being disrupted, I must set the following lines in /boot/config.txt:
force_turbo = 1, note! Changing this parameter will automatically void the warranty
boot_delay = 1
Then, restart your Raspberry Pi and check the current operating frequency again; it should now be set to 1200000KHz.

Perform Performance Testing on the Raspberry Pi Without Overclocking
During the first performance test, I ran the following command.
$ sysbench –test=memory –cpu-max-prime=2000 –num-threads=4 run
The output is as follows:
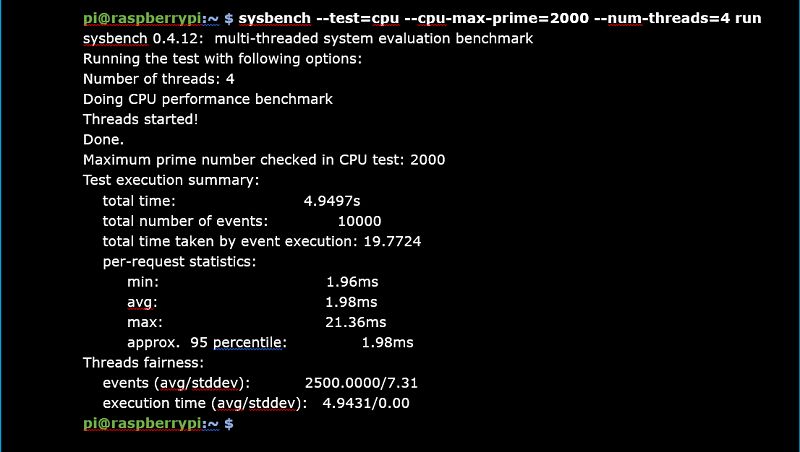
At this point, the normal test for the Raspberry Pi 3 is complete.
 How to Overclock Your Raspberry Pi 3
Raspberry Pi Overclocking Options
The overclocking configuration should be set in the /boot/config.txt file, and to overclock, I only need to set various system configuration parameters in this file. There are six methods to achieve overclocking:
1. Overclocking the Raspberry Pi CPU, which means changing the “arm_freq” parameter – the frequency of the ARM (in MHz);
2. Overclocking the Raspberry Pi GPU, which means changing the “core_freq” parameter – the frequency of the GPU processor core (in MHz). Since it drives the L2 cache, it will affect the performance of the ARM;
3. Overclocking the Raspberry Pi memory, which means changing the “sdram_freq” parameter – the frequency of the SDRAM, in MHz;
4. Additional expansion of the Raspberry Pi memory, which means using ZRAM to compress the memory (see below for details);
5. Additional overclocking parameter “Over_voltage”, which is the ARM/GPU core voltage adjustment. Only values above 6 are allowed when the “force_turbo” or “current_limit_override” parameters are specified (set in the warranty bit);
6. Additional overclocking parameter “Force_turbo”, which disables the dynamic cpufreq driver and requires the next minimum setting, at which point the warranty is void.
Before changing any parameters, ensure that the /boot/config.txt file is backed up.
Since the performance of different models of Raspberry Pi varies, the correct values can only be determined by trying various parameters. This means that the best values on each Raspberry Pi must be tested individually on their respective devices.
Problems that Occur During Overclocking
Most overclocking problems will show up immediately when they occur and pause the startup. If this happens, hold down the “shift” key during the next startup. This will temporarily disable all overclocking, allowing you to start and then edit the corresponding settings.
Overclocking Methods
Through this method, you can know how to adjust the values of CPU, GPU, and memory frequencies to achieve better performance, which also includes adjusting the “over_voltage” parameter to stabilize overclocked hardware. Another method is to overclock your Raspberry Pi 3 by adjusting the memory frequency, and at this point, I will monitor it using ZRAM. So, I just need to execute the following:
1. The following are the default values for the Raspberry Pi 3:
arm_freq=1200
gpu_freq=400
core_freq=400
sdram_freq=450
over_voltage_sdram=0
2. So, I can write the following configuration to the /boot/config.txt file and then restart the Raspberry Pi.
arm_freq=1300
gpu_freq=500
sdram_freq=500
over_voltage_sdram=0
3. If the Raspberry Pi starts and runs, I can further try the next configuration, which is to increase the value of arm_freq to 1500, save it, and restart.
4. If your Raspberry Pi fails to start or runs unstably, calculate the value of over_voltage_sdram until the Pi runs normally.
5. If adjusting over_voltage_sdram does not help stabilize your Raspberry Pi’s operation or it cannot even start, you must decrease the value of arm_freq until the Raspberry Pi runs again. Additionally, note that the system must be restarted after every change to the /boot/config.txt file.
 How to Overclock Using ZRAM
The ZRAM method is an additional option to enhance the performance of the Raspberry Pi device; this method requires you to expand the memory, and overclocking can be achieved by using the compressed internal storage of ZRAM.
ZRAM uses compression algorithms LZ4 and LZO, where LZO is the default, and this algorithm creates a block device that can be used for swapping or as a general RAM disk.
How to load ZRAM? Since ZRAM is already integrated into the Linux kernel, I only need to use the command sudomodprobezram to load the module. To check whether the ZRAM module is running, execute the command sudolsmod | grep ZRAM.

If I want to optimize the ZRAM settings for the Raspberry Pi, I can obtain the script zram.sh from GitHub. This script creates an additional compressed RAM swap disk for each CPU core and can activate them without further configuration.
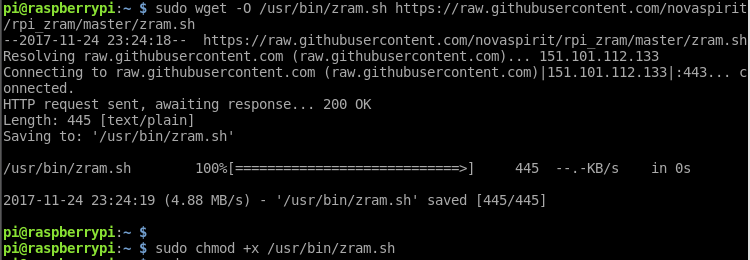
You can download the script with the following command:
sudowget -O /usr/bin/zram.sh https://raw.githubusercontent.com/novaspirit/rpi_zram/master/zram.sh
Then make it executable as follows.
Now, before activating ZRAM, let’s check the memory information. The free -h and swap -s commands show that I have only activated 100MB of swap space in the Raspberry Pi.


Now I can run ZRAM with the command:
sudozram.sh
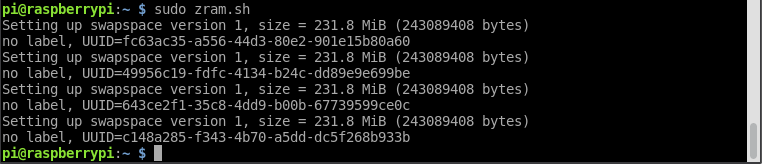
This script will generate a swap space of about 232 MB for each CPU core, and if I check again using the free -h command, it will show that the swap space has increased to 1GB.

By running swap -s again, I can see that four additional swap partitions have been created and are running.

To set the Raspberry Pi to automatically run ZRAM at startup, I must edit the /etc/rc.local file and insert /usr/bin/zram.sh & before the exit 0 line. Then, you can check the end of the /etc/rc.local file.
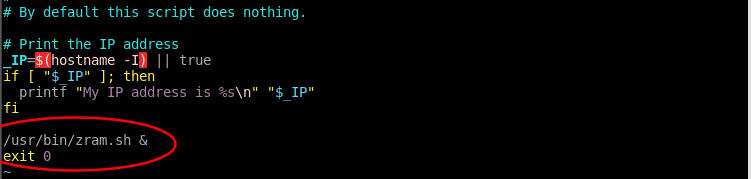
After restarting the Raspberry Pi, the identification with ZRAM memory configuration will appear. However, I still need to use the free -h and swap -s commands to check again to ensure that ZRAM starts and runs.
 Performance Testing Under Overclocking
Now, after completing the overclocking of the Raspberry Pi, I want to perform another performance test to see if the device is functioning properly. For this, I will run the following command again.
sysbench –test=memory –cpu-max-prime=2000 –num-threads=4 run
The output is as follows:
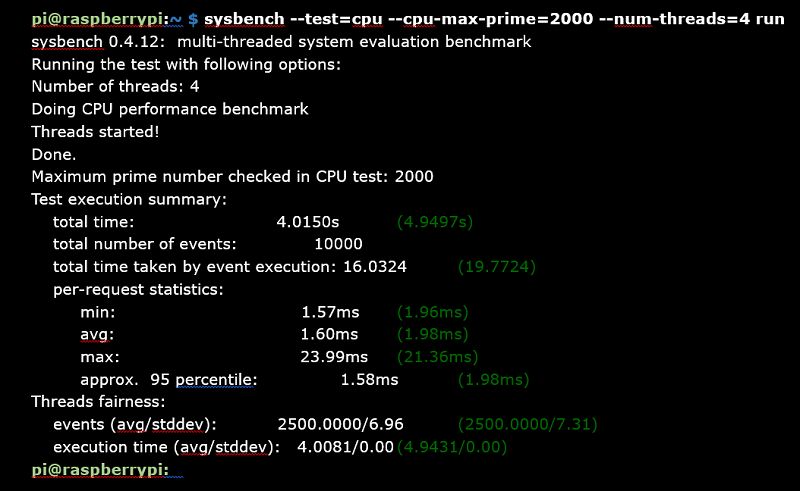
As you can see, all test values are better than those when not overclocked; the values marked in green in the above image are the running values when not overclocked.
 How to Remove Overclocking
If you want to remove overclocking from the Raspberry Pi, simply delete the changes from the /boot/config.txt file. If you implemented it by creating a backup file, just copy it back to the /boot directory and overwrite the config.txt file.
Additionally, you must remove the /usr/bin/zram.sh & line from the /etc/rc.local file. Then restart the Raspberry Pi, and all overclocking configurations will be disabled.
 Conclusion
Now I have successfully overclocked my Raspberry Pi device and can start doing different interesting projects on this accelerated ARM device.
Moreover, many people want to know what their overclocked Raspberry Pi 3 can be used for?
First of all, if your Raspberry Pi runs stably after overclocking, you will definitely get better device performance and speed; isn’t that great? For example, you can try running x86 applications with high technical requirements and perform heavy workloads, such as extensive calculations. To run x86 applications on the Raspberry Pi and other ARM devices, you will also need additional software, such as Exagear Desktop, which works with Wine. You can find many such examples on my blog, such as:
1. Plex media server on Raspberry Pi, in this case, I installed and launched Plex to manage media integration applications on the Raspberry Pi.
2. Running Spotify on Raspberry Pi, this case involves storing, transmitting, and managing music (audio) files on the Raspberry Pi, which can serve as a stable and inexpensive music storage server.
3. Running Dropbox on Raspberry Pi, the Dropbox on Raspberry Pi will build its own file storage and intelligent backup system for your project files.
4. TeamSpeak 3 server (voice server) on Raspberry Pi, if you are a gamer (or a gaming team), this case will create an audio communication environment for your team.
5. Raspberry Pi on Google Chrome, this case describes the complex task of installing and running the Google Chrome browser on Raspbian, which can be used for tasks that other open-source browsers cannot solve.
6. Netflix on Raspberry Pi, this is a good case for the usage of the Google Chrome browser. Netflix can run better through this browser. However, the technical implementation is quite challenging. In fact, it is quite difficult to run applications like Netflix on the Raspberry Pi without overclocking.
7. Using Raspberry Pi + RetroPie to create a nostalgic gaming console; sometimes I miss the days of playing video games with friends on the little white console, when very few families had gaming consoles, and several friends would wait to play on one console. Back then, there weren’t many games to play, but life was simple and happy. Although you can still buy little white consoles on Taobao, the sense of achievement from making one yourself is far greater.
Additionally, please note that Exagear Desktop can run almost any x86 application on Raspberry Pi and other ARM-based devices, including but not limited to Odroid, Banana Pi, Beagleboard, Cubox, Jetson, Cubieboard, etc.