As we all know, the “Raspberry Pi” is a microcomputer board designed for students’ computer programming education or embedded development, based on an ARM processor. This card-sized microcomputer has all the basic functions of a computer and can be used for programming, surfing the internet, listening to music, watching movies, playing games, etc.—just connect it to a monitor and keyboard/mouse, and it can also be remotely accessed via a connected computer. The operating system of Raspberry Pi (which has multiple versions) is based on Linux, and the most common installation method is to “burn” the downloaded image file onto a TF card; once the operating system installation is complete, we can insert the TF card into the Raspberry Pi’s TF card slot, connect the HDMI output to a monitor (through a VGA adapter), connect the mouse via USB, and power it on for normal system startup. Of course, for convenience in future operations, it is generally recommended to write the WiFi wireless network settings into the TF card, allowing us to use the “Remote Desktop Connection” program in Windows for remote control.
Step 1: Download the Raspbian Raspberry Pi System File Compressed Package from the Official Website
There are many operating systems available for Raspberry Pi to meet various needs of different users. The official recommends two: NOOBS and Raspbian, especially the latter, which is currently the most widely used operating system. Here, we will take Raspbian as an example.
On any computer that can access the internet, visit the Raspberry Pi official download area (https://www.raspberrypi.org/downloads/), click on the top “Downloads” option, then click on the second option “Raspbian”; choose “Raspbian Buster with desktop and recommended software.” Due to its large size (2.5G B), first click the first “Download Torrent” button to download the torrent file (which is only 25KB), and then use a multi-threaded downloader like Thunder to download the ZIP type system compressed file (as shown in Figure 1).

Figure 1
Step 2: “Burn” the Downloaded and Unzipped IMG Image File onto the TF Card
Unzip the downloaded “2019-09-26-raspbian-buster-full.zip” compressed file to generate an IMG type image file (note: the target path for extraction cannot contain Chinese characters), which is 6.34GB in size; then correctly insert the TF card into the card reader and connect it to the computer. Next, download a tool software named “win32_disk_imager” (https://pan.baidu.com/s/1LOwtJzsH4UEgfsnHBgFT3Q), unzip it, and double-click to run the Win32DiskImager.exe program. Click the folder icon to locate the just-extracted IMG image file, and the “Device” section will automatically select the inserted TF card (H drive)—if selected incorrectly, it can be manually located; click the “Write” button below, and the program will prompt “Confirm overwrite: Writing to the physical device may cause it to become unusable (Device: [H:”]). Do you want to continue?” Click the “Yes” button to continue, and about seven or eight minutes later, the process of “burning” the operating system onto the TF card will be completed—prompting “Write successful.” Click the “OK” button and then the “Exit” button (as shown in Figure 2).

Figure 2
It is worth mentioning that at this time, if you check the TF card in Windows “My Computer,” it is not difficult to find that its capacity will show serious “shrinkage”: this boot (H:) actually shows “200MB available, total 252MB” (the actual capacity of the TF card should be 32GB). This is because Windows only recognizes the Fat32 type Boot partition, and there is another 6GB primary partition and a 24GB unallocated area (Ext4 type Linux partition). You can check this by right-clicking on the “Start” menu in Windows and selecting “Disk Management.” After selecting “boot (H:)” below, detailed partition capacity information such as “Disk 3 removable 29.72GB” will appear (as shown in Figure 3).

Figure 3
Step 3: Write the “wpa_supplicant.conf” Configuration File for Automatic WiFi Access
When using Raspberry Pi for the first time, it needs to be connected to the same WiFi as the computer for remote control. The general method is to use Windows Notepad to create a new file named “wpa_supplicant.conf” in the root directory (note that the extension is not .txt), with the following content:
country=CN
ctrl_interface=DIR=/var/run/wpa_supplicant GROUP=netdev
update_config=1
network={
ssid=”TP-LINK_108″
psk=”zyyz0108″
key_mgmt=WPA-PSK
priority=1
}
Note: The line “ssid=”TP-LINK_108″” means that the SSID of the WiFi service that Raspberry Pi is preparing to connect to is “TP-LINK_108”, and the line “psk=”zyyz0108″” indicates that the password for connecting to this WiFi is “zyyz0108”, which can be modified according to the actual situation.
Step 4: Obtain the IP Address of the Raspberry Pi Operating System
If the Raspberry Pi operating system has been started with a connected monitor, it will display “IP: 192.168.1.113” on the “Welcome to the Raspberry Pi Desktop!” welcome screen. However, if you did not notice this prompt or did not connect a monitor to start it, how can you obtain the Raspberry Pi’s IP address (this IP address is dynamically assigned by the router’s DHCP and may change each time it connects to the network)? You can easily scan for the IP address range using the tool software “Advanced IP Scanner” (https://pan.baidu.com/s/1HZSDZwjj3LeSnai1eRVJCQ). After downloading and unzipping, double-click to run the Advanced IPScanner.exe program and click the “Scan” button in the upper left corner to scan for devices connected to the current WiFi LAN, among which the device with the manufacturer “Raspberry Pi Foundation” and the IP address “192.168.1.113” is the Raspberry Pi operating system that has started but not connected to a monitor (as shown in Figure 4).

Figure 4
After obtaining the IP address of the Raspberry Pi operating system, you still cannot use Windows Remote Desktop to connect (there will be an error prompt “Remote Desktop cannot connect to the remote computer for one of the following reasons”), because the related service has not been installed and started.
Step 5: Install and Start the Xrdp Service for Remote Access to the Raspberry Pi Operating System
Xrdp is an open-source implementation of Microsoft’s Remote Desktop Protocol (RDP), allowing us to control the remote operating system graphically. After several failed attempts to install the Xrdp service directly in the Raspberry Pi operating system, I finally managed to install Xrdp remotely from the connected computer, as follows:
First, download and unzip putty-0.70cn (https://pan.baidu.com/s/1yq81CpybcS0aElO4COn2Aw) and run the putty.exe program. Enter the Raspberry Pi’s IP address “192.168.1.113” in the “Host Name (or IP address)” section on the right, keep the “Connection type” below as default “SSH,” and click the “Open” button at the bottom (as shown in Figure 5);

Figure 5
At this point, Putty will pop up a “black window” command line prompting us to log in. Enter the system’s default account “pi” after “login as:” and then enter the default password “raspberry.” After pressing Enter, the command prompt changes to “pi@raspberrypi:~$”; enter the installation command for the Xrdp service “sudo apt-get install xrdp,” and after pressing Enter, it will start reading the software package list and analyzing dependency trees, followed by several software package extractions and settings, until there is a prompt “Processing triggers for XXX” and finally returns to the command prompt “pi@raspberrypi:~$,” indicating that the Xrdp service has been successfully installed (as shown in Figure 6).
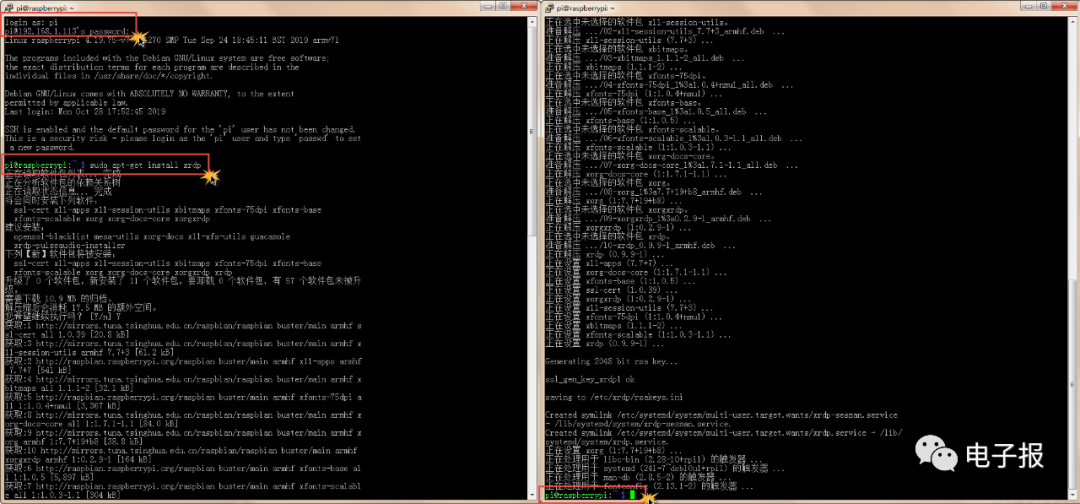
Figure 6
Next, to start the newly installed Xrdp service, enter the command “sudo service xrdp restart” at the prompt and press Enter (as shown in Figure 7).

Figure 7
Step 6: Use Windows “Remote Desktop Connection” to Achieve Remote Control of the Raspberry Pi Operating System
By now, all preliminary preparations have been completed. We can start the “Remote Desktop Connection” program on a computer connected to the same WiFi as the Raspberry Pi, input the IP address “192.168.1.113,” and click the “Connect” button below. After a moment, the “Login to raspberrypi” window will pop up. Enter the default account “pi” and password “raspberry” (the same as the account and password used to log in with Putty) in the “username” and “password” fields, and then click the “OK” button. The Raspberry Pi’s remote desktop will finally appear, identical to the display output from the HDMI interface (as shown in Figure 8). Now, we can keep the Raspberry Pi in a powered-on state with normal startup (without needing a separate monitor and mouse), using the “Remote Desktop Connection” from the connected computer to perform various real operations on the Raspberry Pi operating system (such as Python programming), which is very convenient.

Figure 8
Shandong Mu Xiaodong Yang Xinfang