Follow+Star Public Account Number, don’t miss exciting content

Source | Renesas Embedded Encyclopedia
To create a better atmosphere, many electronic products have applied breathing lights.
There are many methods to achieve breathing lights, which are relatively simple. Today, I will describe a few simple steps to configure a breathing light effect with the Renesas microcontroller.
Overview
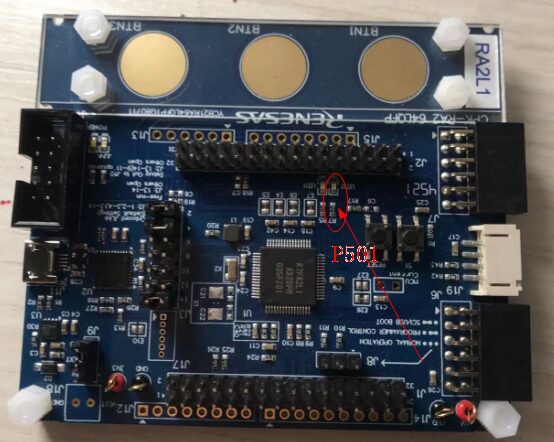
Hardware Preparation
Create Project
1. Select File-New C/C++ Project from the menu, choose as shown in the figure below, and then click Next.

2. Fill in the project name and the location to save the project, please note not to include Chinese paths, then click Next.

3. FSP version selection → Device selection → Debugging method selection. As shown in the table below, then click Next, and you can directly click Next on the next interface.

4. Select the project template, as shown in the figure below, and click Finish if confirmed.

5. After the project is created, the interface shown in the figure below appears, where you can confirm whether your configuration information is correct.

Project Configuration
Project configuration is the key to the project, involving the configuration of the peripherals used in the project, including BSP, Clocks, Pins, Interrupts, Stacks, etc.
1. Click on the Stacks tab from the previous interface, and add the TIMER for this project. As shown below:


2. Click on the newly created stack, as shown below, to pop up the properties window.

Note: If the properties window does not pop up, you can find it from the menu Window-Show View.
3. Double-click Properties to go full screen, double-click again to exit full screen. The specific configuration of properties is as follows.

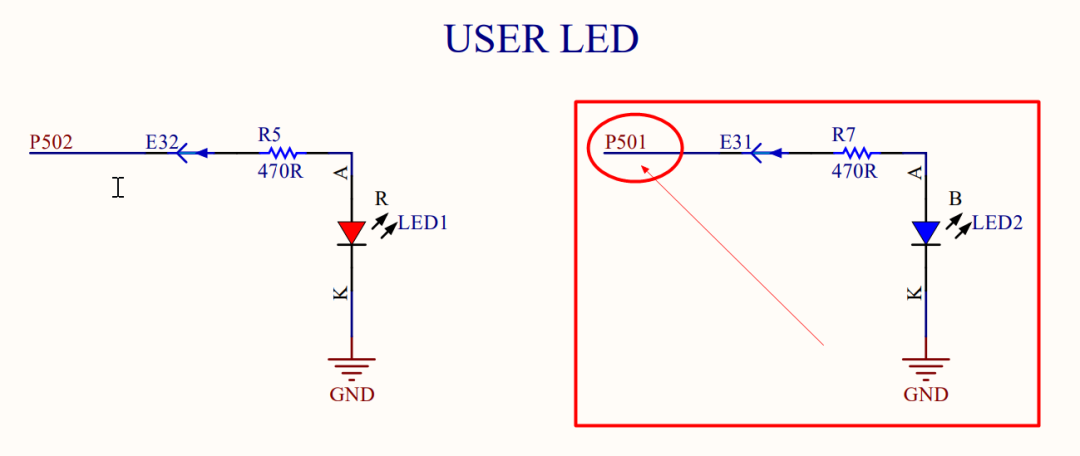
4. Assign the pins to P501, and after the configuration is complete, click the triangle button (Generate Project Content) in the upper right corner.

Software Development
After entering the software development interface, find the hal_entry.c file in the src folder to implement software development.

Before the formal software development, let me introduce some tips for e2studio development, otherwise beginners may feel stuck. Familiarizing with e2studio will make development much more convenient for engineers.
The first tip is the Developer Assistance under the project directory. Double-click to open it, and all related driver functions for the configured peripherals will be inside. Experienced engineers can understand the function and usage based on the literal meaning. Beginners may see the functions but still struggle to understand them, so it is necessary to refer to the FSP (Flexible Software Package) user manual for function usage instructions. This is also the second tip for software development.
Open hal_entry.c, find the place where you can add your code, and add the corresponding application function.

The specific method of adding functions is as follows (click the function you need to add on the left side with the mouse, and drag it to the corresponding position on the right side).

Engineers interested can study each function. The specific research method refers to the FSP document. For example, the function for this project is extracted based on FSP, as shown in the figure below.

The specific code used for controlling the breathing light with the TIMER PWM output is shown in the figure below.

The project adopts a 1% step adjustment duty cycle to achieve PWM pulse width modulation, thereby achieving the breathing light function.
The effect of duty cycle adjustment and the effect of breathing light are shown in the figure below. Two small videos of the experimental process can be found in the attachment.
Summary
The above is the complete development process to achieve the breathing light effect based on the CPK-RA2L1 evaluation board and the e2studio development environment. The CPK-RA2L1 evaluation board is an entry-level kit launched by Renesas, with all IO ports brought out through pin headers, making it very convenient for other functional module expansion and debugging. Only one USB debugging cable is needed to connect the evaluation board and PC to realize power supply, program download, and debugging of the evaluation board. e2studio is Renesas’ integrated development environment, which, based on the graphical user interface of FSP, can conveniently achieve peripheral selection, configuration, code generation, and code development, significantly accelerating the development process. Like many mainstream MCU manufacturers’ development environments, e2studio is also developed based on eclipse, with a similar development interface, allowing users to quickly familiarize themselves with Renesas MCU development.
———— END ————
Based on IAR to set up MCU serial port and RTT Viewer printing
Using SystemView tool to analyze MCU running status under RTOS

Important contents in the MCU FSP library startup file