The Zephyr development environment supports three major operating systems: Windows, Linux, and MacOS. However, the most comprehensive support is for Linux, so it is recommended to use Linux for beginners. This article is based on Ubuntu 22.04. In some sense, this is a rehash of previous articles because similar content has been covered:
-
Building Zephyr Compilation Environment -
Setting Up Zephyr-ESP32 Environment -
Switching Zephyr Compilation Environment to Windows -
Switching Zephyr Flashing and Debugging Environment to Windows -
Using JTAG to Debug Zephyr-ESP32
However, due to significant differences between these earlier articles and the latest version of Zephyr (v3.5.0-rc2), and because the earlier compilation and debugging articles were separate, the continuity of reading and referencing is poor. Therefore, this article will explain everything from setting up the compilation environment to flashing and debugging the code.
Hardware
Based on the Espressif official ESP32-S3-DevKitC-1 development board, this board brings out the built-in USB-JTAG of the ESP32-S3, allowing for debugging without needing additional external JTAG hardware, which is very convenient.
Setting Up the Compilation Environment
Based on native Ubuntu 20.04, it is strongly recommended for beginners to directly use Linux as the development environment. Additionally, it is important to note that if any of the steps below encounter errors, it is advisable to first check the network environment, especially during the process of pulling the Zephyr code.
1. Update the Operating System
sudo apt update
sudo apt upgrade
2. Install Dependencies
Below are the minimum version requirements for some major software:
-
CMake 3.20.5 -
Python 3.8 -
Devicetree Compiler 1.4.6
-
If the version of Ubuntu is lower than 20.04, you need to execute the command below to install a higher version of CMake.
wget https://apt.kitware.com/kitware-archive.sh
sudo bash kitware-archive.sh
-
Install the software packages.
sudo apt install --no-install-recommends git cmake ninja-build gperf \
  ccache dfu-util device-tree-compiler wget \
  python3-dev python3-pip python3-setuptools python3-tk python3-wheel xz-utils file \
  make gcc gcc-multilib g++-multilib libsdl2-dev libmagic1
-
Check if the versions meet the requirements.
cmake --version
python3 --version
dtc --version
3. Pull Zephyr
-
Install venv.
sudo apt install python3-venv
-
Create a pip virtual environment to avoid affecting the system with Zephyr’s pip.
python3 -m venv ~/zephyrproject/.venv
-
Activate the virtual environment.
source ~/zephyrproject/.venv/bin/activate
-
Install west.
pip install west
-
Pull the Zephyr code.
west init ~/zephyrproject
cd ~/zephyrproject
west update
-
Export the Zephyr CMake package.
west zephyr-export
-
Install the pip packages required by Zephyr.
pip install -r ~/zephyrproject/zephyr/scripts/requirements.txt
You can deactivate the virtual environment in the terminal by using ~/zephyrproject/.venv/bin/deactivate. After reopening the terminal, you need to execute source ~/zephyrproject/.venv/bin/activate again; otherwise, the Zephyr pip environment will be incomplete.
4. Install Zephyr SDK
cd ~
wget https://github.com/zephyrproject-rtos/sdk-ng/releases/download/v0.16.3/zephyr-sdk-0.16.3_linux-x86_64.tar.xz
wget -O - https://github.com/zephyrproject-rtos/sdk-ng/releases/download/v0.16.3/sha256.sum | shasum --check --ignore-missing
tar xvf zephyr-sdk-0.16.3_linux-x86_64.tar.xz
cd zephyr-sdk-0.16.3
./setup.sh
Install the host tool into the system.
./zephyr-sdk-x86_64-hosttools-standalone-0.9.sh
Add udev rules to allow non-root users to access the USB of the board and debugger that comes with Zephyr.
sudo cp ~/zephyr-sdk-0.16.3/sysroots/x86_64-pokysdk-linux/usr/share/openocd/contrib/60-openocd.rules /etc/udev/rules.d
sudo udevadm control --reload
Add the current user to the udev rule’s plugdev group; for example, if my username is frank:
sudo usermod -a -G plugdev frank
5. Setting Up the ESP32-S3 Environment
Pull the libraries required for ESP32:
west blobs fetch hal_espressif
west update
Compiling Example Code
cd ~/zephyrproject
west build -b esp32s3_devkitm --sysbuild zephyr/samples/hello_world
The generated results are placed in zephyrproject/build. Using --sysbuild will simultaneously build both mcuboot and the app image booted by mcuboot, which are:
-
mcuboot: build/mcuboot/zephyr/zephyr.bin -
app image: uild/hello_world/zephyr/zephyr.bin
Flashing and Debugging
OpenOCD Configuration
Since the OpenOCD included in the Zephyr SDK’s host tool does not support the ESP32-S3’s on-chip USB JTAG, you need to download the latest OpenOCD from Espressif and replace it in the host tool.
wget https://github.com/espressif/openocd-esp32/releases/download/v0.12.0-esp32-20230921/openocd-esp32-linux-amd64-0.12.0-esp32-20230921.tar.gz
tar -xvf ./openocd-esp32-linux-amd64-0.12.0-esp32-20230921.tar.gz -C ~/
cp ~/openocd-esp32/bin/openocd /home/frank/work/zpro/tools/zephyr-sdk-0.16.3/sysroots/x86_64-pokysdk-linux/usr/bin/
cp -r ~/openocd-esp32/share/openocd/* /home/frank/work/zpro/tools/zephyr-sdk-0.16.3/sysroots/x86_64-pokysdk-linux/usr/share/openocd/
Add udev rules for the USB JTAG. Additionally, the development board also has a CP2102 USB-to-serial chip, so add udev rules for it as well. The content of the file /etc/udev/rules.d/40-dfuse.rules is as follows:
SUBSYSTEMS=="usb", ATTRS{idVendor}=="303a", ATTRS{idProduct}=="10??", GROUP="plugdev", MODE="0666"
SUBSYSTEMS=="usb", ATTRS{idVendor}=="1a86", ATTRS{idProduct}=="55??", GROUP="plugdev", MODE="0666"
After saving, reload udev:
sudo udevadm control --reload
Flashing
Executing the following command will flash the compiled image to the ESP32-S3:
west flash
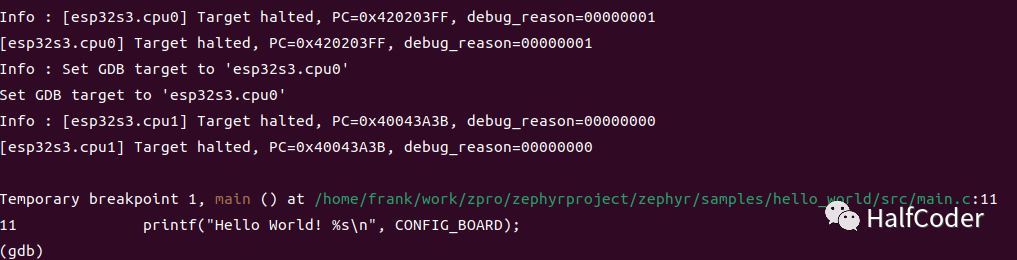
Debugging
The Zephyr west tool integrates gdb; executing the command below will directly invoke gdb for debugging:
west debug
You can also invoke gdbserver with the command below. Since the replaced OpenOCD from Espressif does not support the reset init command, you must remove the default DEFAULT_OPENOCD_RESET_HALT_CMD parameter by using --cmd-reset-halt:
west -v debugserver --cmd-reset-halt ""
After starting gdbserver, you can use third-party tools to call gdb and connect remotely to 127.0.0.1:3333 for GUI debugging.
Tool Setup Tips
When encountering issues with the west command, use -v to display the details of the west command, for example:
west -v flash
west -v debugserver
By displaying details, you can better understand what commands and parameters west is calling. For example, I initially installed the official OpenOCD from Espressif directly, and by using which openocd, I confirmed that the system default OpenOCD was the one I built. However, when executing west flash, I kept getting the message esp_usb_jtag could not find or open device. Later, by using the -v option, I discovered that west was looking for the OpenOCD in the host tool, which led to the earlier action of replacing OpenOCD.
References
https://docs.zephyrproject.org/latest/develop/getting_started/index.html