(Click the official account above to follow quickly)
Source: Rainstorm,
github.com/c-rainstorm/blog/blob/master/devops/Building-a-Three-Node-K8s-Cluster-on-Local-Machine.md
The graduation project is to write a highly available application system based on microservices. The deployment of microservices uses docker + k8s, so the prerequisite is to have a k8s cluster. During the setup process, I encountered some issues, and I have documented the entire process to review the setup and hope to help future k8s beginners avoid some pitfalls.
This article focuses on practical operations; for basic concepts of k8s components, please refer to the official k8s documentation or Kubernetes Guide – by feiskyer.
https://kubernetes.io/docs/concepts/
https://github.com/feiskyer/kubernetes-handbook
If you have any suggestions, opinions, or questions about this article, feel free to raise an issue or directly send an email (the email can be easily found, so it will not be provided here).
Environment Dependencies
This article assumes that the reader can use the Linux command line.
The k8s image source is outside the Great Firewall, so readers need to master the skills of scientific internet access. This part is not within the scope of this article; my solution is Shadowsocks + Privoxy, feel free to contact me if needed.
– Docker : 1.13.1
– kube* : 1.10
– flannel : 0.10.0
– virtualBox: 5.2.8
– OS : ubuntu-16.04.4-server-amd64.iso
The version of virtualBox is not very important; it is best to use the k8s recommended versions for Docker and kube*, otherwise, there may be issues. The recommended Docker version can be found in the release documentation. The methods for configuring may vary slightly depending on the OS version.
Setup Objectives
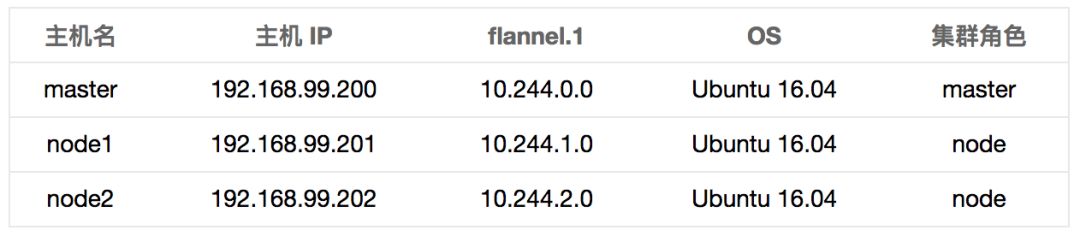
flannel.1 is a VNI on each machine, and you can check the interface information using the ifconfig command.
If you can ping the IP of flanel.1 from any of the machines, the cluster setup is considered successful.
# from master
$ ping 10.244.1.0
PING 10.244.1.0 (10.244.1.0) 56(84) bytes of data.
64 bytes from 10.244.1.0: icmp_seq=1 ttl=64 time=0.659 ms
64 bytes from 10.244.1.0: icmp_seq=2 ttl=64 time=0.478 ms
64 bytes from 10.244.1.0: icmp_seq=3 ttl=64 time=0.613 ms
^C
— 10.244.1.0 ping statistics —
3 packets transmitted, 3 received, 0% packet loss, time 1999ms
rtt min/avg/max/mdev = 0.478/0.583/0.659/0.079 ms
$ ping 10.244.2.0
PING 10.244.2.0 (10.244.2.0) 56(84) bytes of data.
64 bytes from 10.244.2.0: icmp_seq=1 ttl=64 time=0.459 ms
64 bytes from 10.244.2.0: icmp_seq=2 ttl=64 time=0.504 ms
64 bytes from 10.244.2.0: icmp_seq=3 ttl=64 time=0.553 ms
^C
— 10.244.2.0 ping statistics —
3 packets transmitted, 3 received, 0% packet loss, time 2058ms
rtt min/avg/max/mdev = 0.459/0.505/0.553/0.042 ms
Relationship Between K8s Components
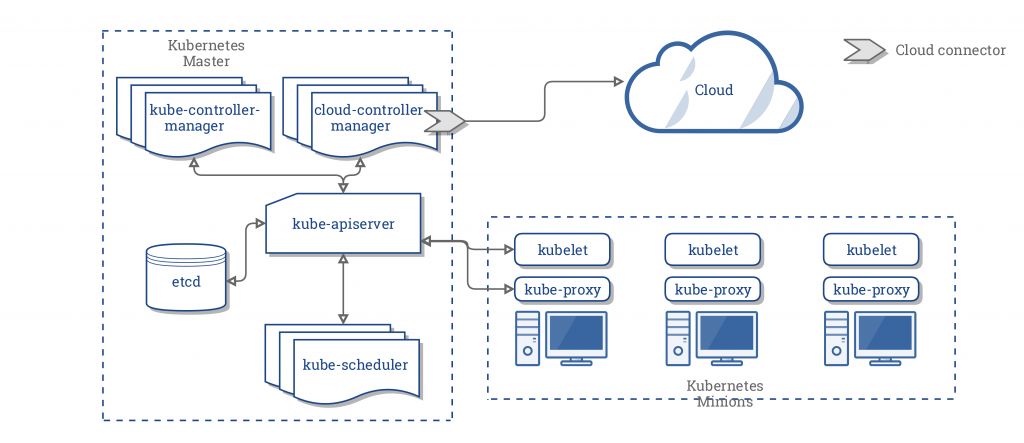
There is no need to elaborate on this; Kubernetes Components or Kubernetes Core Components – by feiskyer have already explained this very well. Here, I just want to emphasize the importance of this part.
https://kubernetes.io/docs/concepts/overview/components/
https://kubernetes.feisky.xyz/zh/components/
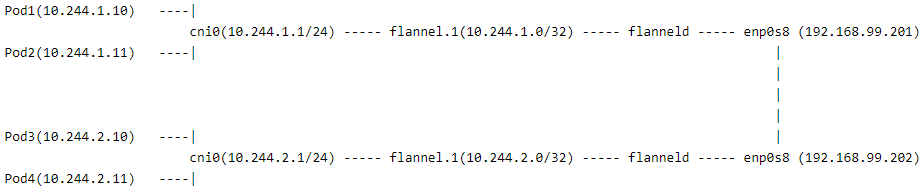
Introduction to K8s Pod Network Model
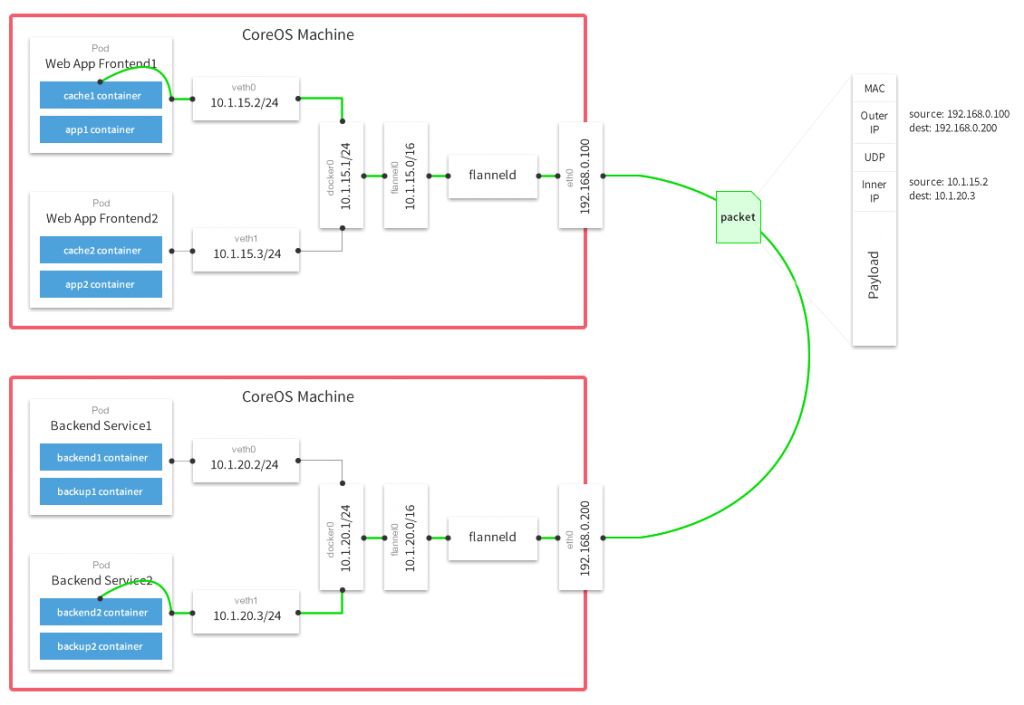
Image source: Flannel and Docker network connectivity issue troubleshooting
http://www.cnblogs.com/ericnie/p/8028681.html
To save time, I directly quoted someone else’s model diagram. A simple description of the cluster model set up this time is as follows:
-
cni0 and flannel.1 are both VNIs created by the flannel component, which can be viewed using ifconfig after the cluster is set up.
-
The flannel component runs a flanneld on each machine, which is used to forward traffic and solve the communication problem between hosts.
-
enp0s8 is the Host-Only adapter of virtualBox.
Configuration Process
Use virtualBox to create three virtual machines
The installation of virtualBox is relatively simple and will not be introduced here; the GUI tool is also very convenient to use. This part will only introduce what I think needs to be highlighted.
-
Recommended memory is 2048M, CPU is recommended to be 2 cores.
-
By default, there is only one NAT adapter; add a Host-Only Adapter. The NAT adapter is used for the virtual machine to access the internet, and the Host-Only adapter is used for communication between virtual machines.
-
Start the virtual machine in Normal Start mode after installing the system. Since it is a server version image, there is no graphical interface; just log in with the username and password.
-
Modify the configuration; enp0s8 uses a static IP. Please refer to SSH between Mac OS X host and Virtual Box guest. Note to change the network interface name to match your own Host-Only Adapter.
-
After creating one virtual machine, you can use the clone method to copy out two nodes; make sure to reinitialize the MAC address of the new machine’s network card when cloning.
-
Once the static IPs of all three virtual machines are configured, you can use ssh from the local host terminal to operate the three virtual machines. The virtual machines will start in Headless Start mode.
https://gist.github.com/c-rainstorm/1bbd44b388acd35ca6eaf07d1fbd9bc7
Install Docker
Install on all three
The current version of Docker for Ubuntu is just right, so you can install it directly, but it is necessary to check the Docker version in advance to avoid installing the wrong one.
# apt search docker.io
apt-get update
apt-get install -y docker.io
systemctl enable docker
systemctl start docker
Configure Docker Proxy. The image source is outside the Great Firewall, and docker pull image requires a proxy.
mkdir -p /etc/systemd/system/docker.service.d
cat <<EOF >/etc/systemd/system/docker.service.d/http-proxy.conf
[Service]
Environment=”HTTP_PROXY=https://192.168.99.1:8118/”
Environment=”HTTPS_PROXY=https://192.168.99.1:8118/”
Environment=”NO_PROXY=localhost,127.0.0.1,localaddress,.localdomain.com”
EOF
systemctl daemon-reload
systemctl restart docker
Test Configuration
docker info | grep Proxy # If there is output, the configuration is successful
docker pull gcr.io/google-containers/busybox:1.27 # If the pull is successful, it indicates that everything is working fine.
Google Image Repository
https://console.cloud.google.com/gcr/images/google-containers/GLOBAL?project=google-containers
Install Kube* Components
Install on all three
apt-get update && apt-get install -y apt-transport-https
curl -s https://packages.cloud.google.com/apt/doc/apt-key.gpg | apt-key add –
cat <<EOF >/etc/apt/sources.list.d/kubernetes.list
deb http://apt.kubernetes.io/ kubernetes-xenial main
EOF
apt-get update
apt-get install -y kubelet kubeadm kubectl
systemctl enable kubelet
systemctl start kubelet
Master node configuration cgroup driver
docker info | grep -i cgroup # Usually it is cgroupfs
cat /etc/systemd/system/kubelet.service.d/10-kubeadm.conf # The default value for –cgroup-driver is systemd
# If the two values are inconsistent, use the following command to modify
sed -i “s/cgroup-driver=systemd/cgroup-driver=cgroupfs/g” /etc/systemd/system/kubelet.service.d/10-kubeadm.conf
# Restart kubelet
systemctl daemon-reload
systemctl restart kubelet
curl accesses websites outside the Great Firewall; if it cannot be accessed, you can configure a system proxy.
http://192.168.99.1:8118/ is the HTTP proxy I use locally, and Privoxy listens on port 8118; please modify this address according to your actual situation.
# Global proxy, not recommended
cat <<EOF >>/etc/environment
http_proxy=”http://192.168.99.1:8118/”
https_proxy=”http://192.168.99.1:8118/”
no_proxy=”master, node1, node2, 192.168.99.1″
EOF
source /etc/environment
# Current shell, recommended
export http_proxy=”http://192.168.99.1:8118/”
export https_proxy=”http://192.168.99.1:8118/”
export no_proxy=”master, node1, node2, 192.168.99.1″
apt uses proxy
cat <<EOF >>/etc/apt/apt.conf
Acquire::http::Proxy “http://192.168.99.1:8118/”;
Acquire::https::Proxy “https://192.168.99.1:8118/”;
EOF
Set Up the Cluster
Disable Swap
This is explicitly required by the k8s documentation.
Disable on all three
swapoff -a
Initialize the Master Node
The initialization process will access websites outside the Great Firewall; if init cannot be executed smoothly, please configure a global proxy.
kubeadm init –apiserver-advertise-address=192.168.99.200 –pod-network-cidr=10.244.0.0/16
-
–apiserver-advertise-address=192.168.99.200 binds the apiserver to the Host-Only adapter address of the master node; by default, it binds to the NAT address, making it inaccessible from other machines.
-
–pod-network-cidr=10.244.0.0/16 specifies the pod network address space; we must use this space with the flannel component.
-
The complete reference manual for kubeadm is the kubeadm reference guide.
-
It is recommended to save the last output join command to a file (to avoid forgetting or losing it), which makes it easy to add nodes to the cluster. If forgotten and the output cannot be found, there are methods online to generate a hash value; please search for it.
Configure kubectl to access the cluster
# root user
export KUBECONFIG=/etc/kubernetes/admin.conf
# non-root user
mkdir -p $HOME/.kube
sudo cp -i /etc/kubernetes/admin.conf $HOME/.kube/config
sudo chown $(id -u):$(id -g) $HOME/.kube/config
# To operate from the local host, you need to install the kubectl client locally
mkdir -p ~/.kube
scp <username>@192.168.99.200:/home/<username>/.kube/config ~/.kube/config # Copy the config file from master to local
Test Configuration
kubectl cluster-info # Normal output indicates success
Install Flannel Network
The default listening interface of flannel is the NAT adapter interface; we need the Host-Only adapter interface, so we need to modify the kube-flannel.yml file.
wget https://raw.githubusercontent.com/coreos/flannel/master/Documentation/kube-flannel.yml
Add the –iface=”enp0s8″ parameter to the /opt/bin/flanneld command # enp0s8 is the interface corresponding to the Host-Only adapter
kubectl apply -f kube-flannel.yml
Test Configuration
kubectl get pods –all-namespaces -o wide # Wait a moment; downloading images takes some time; eventually, flannel pods should show Running status, and kube-dns should also be Running.
Eliminate master isolation. By default, no pods are scheduled on the master; to allow other pods to run on the master, execute this command:
kubectl taint nodes –all node-role.kubernetes.io/master-
Add nodes to the cluster
Execute the join command output from kubeadm init on the nodes:
kubeadm join –token <token> <master-ip>:<master-port> –discovery-token-ca-cert-hash sha256:<hash>
Finally
Feiskyer wrote an automation script for this setup process; feel free to try it out if interested.
https://github.com/feiskyer/ops
References
-
K8s Official Documentation
https://kubernetes.io/docs/concepts/
-
Kubernetes Guide – by feiskyer
https://github.com/feiskyer/kubernetes-handbook
-
Flannel and Docker network connectivity issue troubleshooting
http://www.cnblogs.com/ericnie/p/8028681.html
-
coreos/flannel – README
https://github.com/coreos/flannel/blob/master/README.md
-
Installing kubeadm
https://kubernetes.io/docs/setup/independent/install-kubeadm/
-
Docker Ubuntu Behind Proxy
https://stackoverflow.com/questions/26550360/docker-ubuntu-behind-proxy?utm_medium=organic&utm_source=google_rich_qa&utm_campaign=google_rich_qa
-
Using kubeadm to Create a Cluster
https://kubernetes.io/docs/setup/independent/create-cluster-kubeadm/
Did you gain something from this article? Please share and forward it to more people.
Follow “ImportNew” to enhance your Java skills