⏱️ Reading time: Approximately 10 minutes
✨ Follow us for more quantitative knowledge insights
Project Introduction
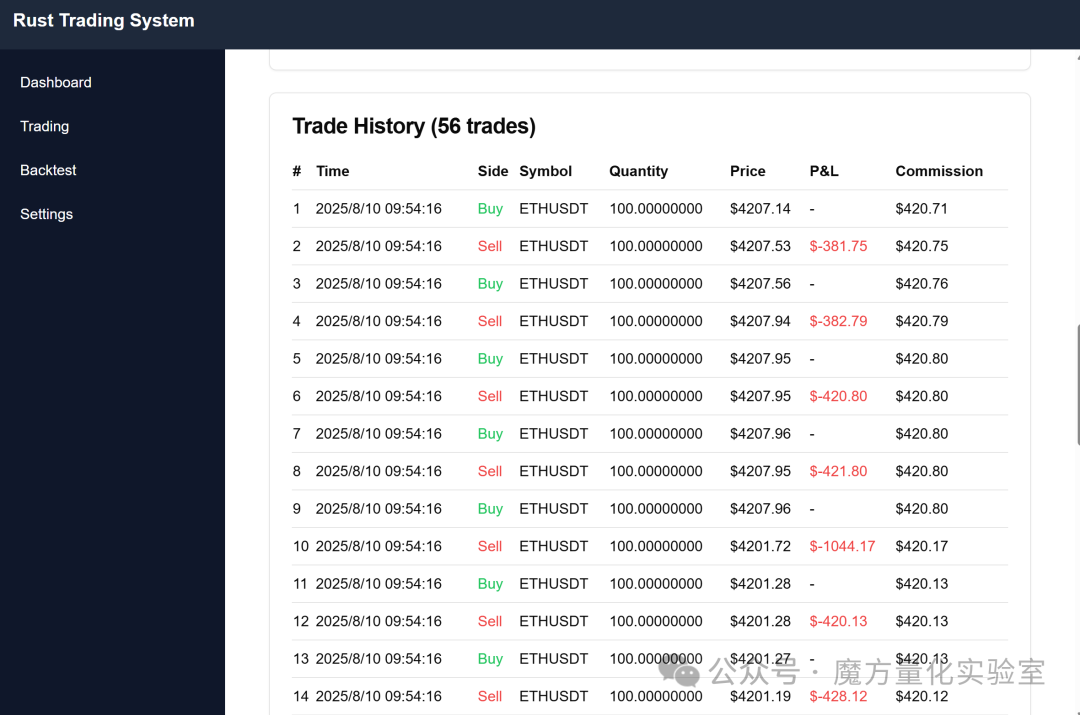
Rust Trade is a comprehensive cryptocurrency trading system that combines high-performance market data processing capabilities with sophisticated backtesting tools, providing a one-stop solution for cryptocurrency quantitative trading. The system has the following core features:
- Real-time data collection: Obtains real-time market data from exchanges
- Advanced backtesting engine: Supports backtesting analysis for various trading strategies
- Professional desktop interface: Intuitive and user-friendly graphical interface
- Cross-platform support: Can run on Windows, macOS, and Linux
Project Structure
Rust Trade adopts a clear modular architecture design, dividing the entire project into the following core modules:
Core Module Introduction
1. trading-core (Core Trading System)
This is the core of the entire system, written in Rust, responsible for data processing, strategy execution, and trade management.
trading-core/
├── src/
│   ├── backtest/          # Backtesting engine and strategies
│   │   ├── engine.rs      # Core backtesting logic
│   │   ├── metrics.rs     # Performance metrics calculation
│   │   ├── portfolio.rs   # Portfolio management
│   │   └── strategy/      # Trading strategy implementation
│   │       ├── sma.rs     # Simple Moving Average strategy
│   │       └── rsi.rs     # Relative Strength Index strategy
│   ├── data/              # Data access layer
│   │   ├── cache.rs       # Multi-level cache implementation
│   │   ├── repository.rs  # Database operations
│   │   └── types.rs       # Core data structures
│   ├── exchange/          # Exchange integration
│   │   └── binance.rs     # Binance exchange interface
│   ├── live_trading/      # Real-time trading system
│   │   └── paper_trading.rs # Paper trading implementation
│   ├── service/           # Business logic services
│   │   └── market_data.rs # Market data processing service
│   ├── config.rs          # Configuration management
│   ├── lib.rs             # Library entry
│   └── main.rs            # CLI application entry
├── Cargo.toml             # Rust dependency configuration
└── README.md              # Module documentation
2. src-tauri (Desktop Application Backend)
Backend of the desktop application built on the Tauri framework, responsible for handling communication between the frontend interface and the trading core.
src-tauri/
├── src/
│   ├── commands.rs        # Tauri command implementation
│   ├── main.rs            # Application entry point
│   ├── state.rs           # Application state management
│   └── types.rs           # Frontend interface types
├── Cargo.toml             # Tauri dependency configuration
└── tauri.conf.json        # Tauri configuration file
3. frontend (Frontend Interface)
Modern frontend interface built with Next.js, providing an intuitive user experience.
frontend/
├── src/
│   ├── app/               # Application routing pages
│   │   ├── backtest/      # Backtesting interface
│   │   ├── trading/       # Real-time trading interface
│   │   ├── settings/      # Settings interface
│   │   └── page.tsx       # Home page
│   ├── components/        # UI components
│   │   ├── layout/        # Layout components
│   │   └── ui/            # Basic UI components
│   ├── lib/               # Utility functions
│   └── types/             # TypeScript type definitions
├── package.json           # Frontend dependency configuration
└── next.config.ts         # Next.js configuration
Configuration and Documentation
.
├── config/                # Global configuration files
│   ├── development.toml   # Development environment configuration
│   ├── schema.sql         # Database table structure
│   └── live_strategy_log.sql # Strategy log table structure
├── README.md              # Project main documentation
└── Cargo.toml             # Workspace configuration
Source Code Architecture
Core Source Code Analysis
1. Data Model Design
In the types.rs file, the core data structure TickData is defined, which corresponds exactly to the tick_data table structure in the database. This design ensures data consistency and integrity.
/// Standard trading data structure - corresponds to tick_data table fields
#[derive(Debug, Clone, Serialize, Deserialize, PartialEq)]
pub struct TickData {
    /// UTC timestamp, supports millisecond precision
    pub timestamp: DateTime,
    /// Trading pair, e.g., "BTCUSDT"
    pub symbol: String,
    /// Trading price
    pub price: Decimal,
    /// Trading quantity
    pub quantity: Decimal,
    /// Trading direction
    pub side: TradeSide,
    /// Original trade ID
    pub trade_id: String,
    /// Whether the buyer is the maker
    pub is_buyer_maker: bool,
}
2. Exchange Interface Implementation
In the binance.rs file, the WebSocket connection and REST API calls for the Binance exchange are implemented. Through an asynchronous programming model, the system can efficiently handle real-time data streams.
/// Binance exchange implementation
pub struct BinanceExchange {
    ws_url: String,
    api_url: String,
    client: reqwest::Client,
}
This implementation supports an automatic reconnection mechanism, ensuring continuous data retrieval even in unstable network conditions.
3. Data Storage and Caching
In repository.rs, persistent data storage and multi-level caching mechanisms are implemented. The system uses PostgreSQL as the primary storage and Redis as the secondary cache, with memory as the primary cache, forming an efficient three-tier caching architecture.
/// TickData data repository, responsible for database operations
pub struct TickDataRepository {
    pool: PgPool,
    cache: TieredCache,
}
4. Backtesting Engine Core
In engine.rs, a complete backtesting engine is implemented. This engine supports various trading strategies and provides detailed performance metrics calculations.
pub struct BacktestEngine {
    portfolio: Portfolio,
    strategy: Box,
    config: BacktestConfig,
}
5. Portfolio Management
In portfolio.rs, portfolio management functions are implemented, including position management and profit-loss calculations.
pub struct Portfolio {
    pub initial_capital: Decimal,
    pub cash: Decimal,
    pub positions: HashMap,
    pub trades: Vec,
    // ...
}
6. Strategy Interface and Implementation
The strategy module adopts an object-oriented design philosophy, defining a unified strategy interface to facilitate the extension of new trading strategies.
pub trait Strategy {
    fn name(&self) -> &str
    fn initialize(&mut self, params: HashMap) -> Result<(), String>;
    fn reset(&mut self);
    fn on_tick(&mut self, tick: &TickData) -> Signal;
}
7. Performance Metrics Calculation
In metrics.rs, rich performance metrics calculation functions are implemented, including Sharpe ratio, maximum drawdown, win rate, etc.
pub struct BacktestMetrics;

impl BacktestMetrics {
    /// Calculate Sharpe ratio
    pub fn calculate_sharpe_ratio(returns: &[Decimal], risk_free_rate: Decimal) -> Decimal {
        // ...
    }

    /// Calculate maximum drawdown
    pub fn calculate_max_drawdown(equity_curve: &[Decimal]) -> Decimal {
        // ...
    }
}
Strategy Engine
Rust Trade comes with two classic trading strategies built-in, providing users with an out-of-the-box quantitative trading experience.
Simple Moving Average Strategy (SMA)
This strategy is based on the dual moving average crossover principle, generating a buy signal when the short-term moving average crosses above the long-term moving average, and a sell signal when the short-term moving average crosses below the long-term moving average. The strategy parameters are configurable, allowing users to adjust the lengths of the short and long periods to adapt to different market conditions.
The strategy implementation in sma.rs is as follows:
fn on_tick(&mut self, tick: &TickData) -> Signal {
    self.prices.push_back(tick.price);

    // Maintain reasonable data length
    if self.prices.len() > self.long_period * 2 {
        self.prices.pop_front();
    }

    if let (Some(short_sma), Some(long_sma)) =
        (self.calculate_sma(self.short_period), self.calculate_sma(self.long_period)) {

        // Golden cross: short-term SMA crosses above long-term SMA
        if short_sma > long_sma &&
           !matches!(self.last_signal, Some(Signal::Buy { .. })) {
            let signal = Signal::Buy {
                symbol: tick.symbol.clone(),
                quantity: Decimal::from(100),
            };
            self.last_signal = Some(signal.clone());
            return signal;
        }
        // Death cross: short-term SMA crosses below long-term SMA
        else if short_sma < long_sma &&
                matches!(self.last_signal, Some(Signal::Buy { .. })) {
            let signal = Signal::Sell {
                symbol: tick.symbol.clone(),
                quantity: Decimal::from(100),
            };
            self.last_signal = Some(signal.clone());
            return signal;
        }
    }

    Signal::Hold
}
Relative Strength Index Strategy (RSI)
The RSI strategy is based on the Relative Strength Index indicator, generating a buy signal when the RSI indicator is below the oversold level, and a sell signal when the RSI indicator is above the overbought level. This strategy captures reversal opportunities by identifying the market’s overbought and oversold states.
The strategy implementation in rsi.rs is as follows:
fn on_tick(&mut self, tick: &TickData) -> Signal {
    // Calculate price changes
    if let Some(last_price) = self.prices.back() {
        let change = tick.price - last_price;

        if change > Decimal::ZERO {
            self.gains.push_back(change);
            self.losses.push_back(Decimal::ZERO);
        } else {
            self.gains.push_back(Decimal::ZERO);
            self.losses.push_back(-change);
        }

        // Maintain fixed length
        if self.gains.len() > self.period {
            self.gains.pop_front();
            self.losses.pop_front();
        }
    }

    self.prices.push_back(tick.price);
    if self.prices.len() > self.period + 1 {
        self.prices.pop_front();
    }

    if let Some(rsi) = self.calculate_rsi() {
        // Buy signal when oversold
        if rsi < self.oversold &&
           !matches!(self.last_signal, Some(Signal::Buy { .. })) {
            let signal = Signal::Buy {
                symbol: tick.symbol.clone(),
                quantity: Decimal::from(100),
            };
            self.last_signal = Some(signal.clone());
            return signal;
        }
        // Sell signal when overbought
        else if rsi > self.overbought &&
                matches!(self.last_signal, Some(Signal::Buy { .. })) {
            let signal = Signal::Sell {
                symbol: tick.symbol.clone(),
                quantity: Decimal::from(100),
            };
            self.last_signal = Some(signal.clone());
            return signal;
        }
    }

    Signal::Hold
}
Quick Start
Environment Preparation and Installation
1. Install Necessary Tools
# Install Rust (ensure version >= 1.70)
curl --proto '=https' --tlsv1.2 -sSf https://sh.rustup.rs | sh
source $HOME/.cargo/env

# Verify installation
rustc --version
cargo --version

# Install Node.js (version >= 18)
# Windows users can download the installer from https://nodejs.org/
# macOS users can use brew install node
# Linux users can install via package manager

# Install PostgreSQL (version >= 12)
# Windows: Download from https://www.postgresql.org/download/windows/
# macOS: brew install postgresql
# Ubuntu: sudo apt install postgresql postgresql-contrib

# Install Redis (optional, version >= 6)
# Windows: https://github.com/microsoftarchive/redis/releases
# macOS: brew install redis
# Ubuntu: sudo apt install redis-server
2. Clone the Project and Configure the Database
# Clone the project code
git clone
cd rust-trade-master

# Create the database
# Windows users execute in PowerShell:
# psql -U postgres -c "CREATE DATABASE trading_core;"

# macOS/Linux users execute:
createdb trading_core

# Import the database table structure
# Windows users:
# psql -U postgres -d trading_core -f config/schema.sql

# macOS/Linux users:
psql -d trading_core -f config/schema.sql
3. Configure Environment Variables
Create a <span>.env</span> file in the project root directory:
# .env file content
DATABASE_URL=postgresql://localhost/trading_core
REDIS_URL=redis://127.0.0.1:6379
RUN_MODE=development
RUST_LOG=info
Compile and Run the Project
1. Compile the Core Module
# Enter the core module directory
cd trading-core

# Compile the project
cargo build

# For production environment, use optimized compilation
cargo build --release
2. Install Frontend Dependencies
# Return to the project root directory
cd ..

# Enter the frontend directory
cd frontend

# Install frontend dependencies
npm install
3. Run in Different Modes
Run in CLI Mode
# Return to the trading-core directory
cd ../trading-core

# View help information
cargo run -- --help

# Start real-time data collection
cargo run live

# Start real-time data collection with paper trading enabled
cargo run live --paper-trading

# Start backtesting mode
cargo run backtest

# Sync historical data (example)
cargo run sync --symbol BTCUSDT --days 30
Desktop Application Mode
# Enter the frontend directory
cd ../frontend

# Run in development mode (with hot reload)
npm run tauri dev

# Build production version
npm run tauri build
Pure Web Interface Mode
# In the frontend directory
# Start the development server
npm run dev

# Build production version
npm run build

# Start the production server
npm start
Configure Trading Pairs and Parameters
Configure trading pairs in the <span>config/development.toml</span> file:
# Trading pairs to monitor
symbols = ["BTCUSDT", "ETHUSDT", "ADAUSDT"]

[server]
host = "0.0.0.0"
port = 8080

[database]
max_connections = 5
min_connections = 1
max_lifetime = 1800

[cache]
[cache.memory]
max_ticks_per_symbol = 1000
ttl_seconds = 300

[cache.redis]
pool_size = 10
ttl_seconds = 3600
max_ticks_per_symbol = 10000
Backtesting Execution Example
Command Line Backtesting
# Enter the trading-core directory
cd trading-core

# Start the backtesting interactive interface
cargo run backtest

# Backtesting interface operation example:
# 1. Select strategy (SMA or RSI)
# 2. Select trading pair (e.g., BTCUSDT)
# 3. Set initial capital (e.g., 50000)
# 4. Set commission rate (e.g., 0.1%)
# 5. Start backtesting
Programmatic Backtesting Execution
// Execute backtesting in Rust code
use trading_core::backtest::{BacktestEngine, BacktestConfig};
use trading_core::backtest::strategy::{SmaStrategy};

// Create strategy instance
let strategy = Box::new(SmaStrategy::new());

// Configure backtesting parameters
let config = BacktestConfig::new(Decimal::from(10000)) // Initial capital 10000
    .with_commission_rate(Decimal::from_str("0.001").unwrap()); // 0.1% commission

// Create backtesting engine
let mut engine = BacktestEngine::new(strategy, config)?;

// Load historical data (from database or other sources)
let historical_data = load_historical_data("BTCUSDT")?;

// Execute backtesting
let result = engine.run(historical_data);

// Output results
result.print_summary();
Real-time Trading Execution Example
Start Real-time Data Collection
# In the trading-core directory
cargo run live
Start Real-time Mode with Paper Trading
# In the trading-core directory
cargo run live --paper-trading
Programmatically Start Real-time Trading
// Start real-time trading in Rust code
use trading_core::service::MarketDataService;
use trading_core::exchange::BinanceExchange;

// Create exchange instance
let exchange = Arc::new(BinanceExchange::new());

// Create data repository
let repository = Arc::new(TickDataRepository::new(pool, cache));

// Configure trading pairs to monitor
let symbols = vec!["BTCUSDT".to_string(), "ETHUSDT".to_string()];

// Create market data service
let service = MarketDataService::new(exchange, repository, symbols);

// Start service
service.start().await?;
Practical Case Study
BTCUSDT Trading Backtest
Let us demonstrate the powerful features of Rust Trade through a practical backtesting case. We will use the Bitcoin to US Dollar (BTCUSDT) trading pair for backtesting analysis with the Simple Moving Average strategy.
During the backtesting process, the system will load historical data and execute trades according to the strategy rules. After the backtest is complete, the system will generate a detailed analysis report, including:
- Initial capital and final asset value
- Total profit and loss and return rate
- Trade count statistics
- Win rate and profit-loss ratio
- Maximum drawdown and Sharpe ratio and other risk indicators
Through these indicators, users can comprehensively evaluate the performance of the strategy and optimize parameters based on the results.
Performance Advantages
Rust Trade demonstrates excellent performance, thanks to the high-performance characteristics of the Rust language and the carefully designed architecture:
- Single data insertion takes about 390 microseconds
- Batch insertion of 100 data takes about 13 milliseconds
- Cache hit response time is about 10 microseconds
- Historical data query takes about 450 microseconds
This outstanding performance enables Rust Trade to meet the demands of high-frequency trading scenarios.
Configuration Flexibility
Rust Trade offers a rich set of configuration options, allowing users to customize according to their needs:
- Supports multiple trading pair configurations
- Configurable database connection parameters
- Flexible log level settings
- Multi-environment configuration support (development, production, testing)
Conclusion
As an open-source cryptocurrency trading system, Rust Trade provides powerful tools for quantitative trading enthusiasts, enabling them to enhance trading efficiency and optimize investment decisions through this system.
Project Address
https://github.com/Erio-Harrison/rust-trade
Follow 【Magic Cube Quant】 to master open-source quantitative trading!