1. Why Choose Flutter for Embedded Device Development?
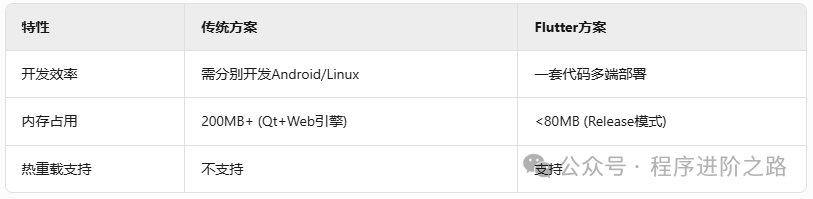
1. Cross-Platform Capability
2. Industrial-Grade Hardware Support
- Raspberry Pi 4B: Stable 60FPS at 1080P Interface
- Jetson Nano: Drives 4 Touch Screens Simultaneously
- Allwinner H616:
2. Full-Stack Development Environment Setup for Raspberry Pi
1. Trimming Embedded Linux System
# Build a minimized system (only keep components necessary for Flutter) sudo apt-get install --no-install-recommends \ libgl1-mesa-dev \ libgles2-mesa-dev \ libinput-dev \ libxkbcommon-dev 2. Flutter Embedded Compilation Chain
# flutter-pi specific configuration (flutter.yaml) target: os: linux arch: arm64 env: embedded desktop: enabled: false embedder: backend: egl # Use hardware acceleration 3. Flashing System Image Practical
# Write Raspberry Pi image (with pre-installed Flutter Runtime) xzcat flutterpi-os-lite-v2.3.img.xz | sudo dd of=/dev/sdb bs=4M 3. Smart Home Control Panel Development
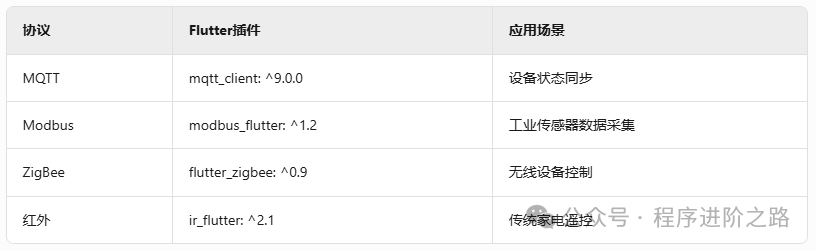
1. Hardware Communication Protocol Matrix
2. Multi-Screen Collaborative Architecture Design
// Master Screen void sendToSecondary(String command) { MqttService.publish('panels/control', command); } // Slave Screen MqttService.subscribe('panels/control').listen((cmd) { if (cmd == 'show_temp') _displayTemperature(); }); 3. Industrial-Grade UI Component Design Specifications
class IndustrialSwitch extends StatelessWidget { @override Widget build(BuildContext context) { return Container( decoration: BoxDecoration( border: Border.all(width: 3, color: Colors.grey[800]!), borderRadius: BorderRadius.circular(16), ), child: PhysicalModel( elevation: 6, color: Colors.grey[900]!, child: CupertinoSwitch( activeColor: Colors.blue[500], trackColor: Colors.grey[700], ), ), ); } } 4. Direct Hardware Connection Practical Case
1. GPIO Control Relay
import 'dart:ffi'; import 'package:gpiod/gpiod.dart'; void controlLight(bool turnOn) { final chip = GpioChip.open('/dev/gpiochip0'); final line = chip.getLine(23) ..requestOutput(flags: RequestFlag.OUTPUT_OPEN_DRAIN); line.setValue(turnOn ? 1 : 0); # Trigger high level chip.close(); } 2. RS485 Read Meter Data
final port = SerialPort('/dev/ttyUSB0', BaudRate.b19200); port.write(Uint8List.fromList([0x01, 0x03, 0x00, 0x0A, 0x00, 0x02])); Timer.periodic(Duration(milliseconds: 100), (_) { final data = port.read(7); // Example return: [01][03][04][00][13][27][0F] final voltage = (data[3] << 8 | data[4]) / 10.0; // Parse to 19.5V }); 5. Production Environment Deployment Plan
1. Power Failure Protection Mechanism
// Save device state on power failure PowerMonitor.addCallback(PowerState.lowBattery, () { SharedPreferences.getInstance().then((prefs) { prefs.setString('last_state', _getDeviceStates()); _forceFlushFilesystem(); // Force sync to disk }); }); void _forceFlushFilesystem() { // Linux system call final syscall = DynamicLibrary.process(); final sync = syscall.lookupFunction<Void Function(), void Function()>('sync'); sync(); } 2. OTA Remote Upgrade Architecture

6. Whole House Smart Deployment
Device Topology Diagram:
Main Control Panel (Raspberry Pi 4B) ├──Repeater 1 (Jetson Nano) │ ├──Air Conditioner Controller (Modbus) │ ├──Security Camera (RTSP Stream) ├──Repeater 2 (Allwinner H616) ├──Smart Curtains (ZigBee) ├──Lighting System (MQTT Cluster) Performance Data:
- Number of devices controlled simultaneously: 32
- Control response delay: <80ms
- Standby power consumption: 4.2W