
Materials List
-
TTGO T7 V1.0 (ESP32 WiFi Module) × 1 -
2-inch IPS LCD × 1 -
402035 LiPo Lithium Battery × 1 -
D-shaped Carabiner Clip × 1
3D Printed Shell
<span>https://www.thingiverse.com/thing:4564272</span>Soldering Circuit Part


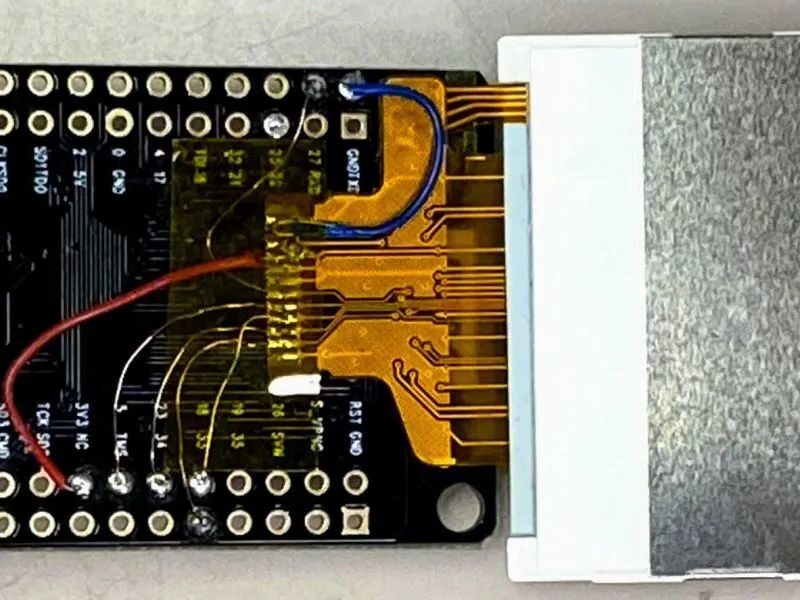
ESP32   -> LCD
GND     -> Pin  1 GND
        -> Pin  2 LED K
3v3.    -> Pin  4 Vcc -> 20 Ohm -> Pin 3 LEDA
GPIO 27 -> Pin  7 D/C
GPIO  5 -> Pin  8 CS
GPIO 18 -> Pin  9 SCK
GPIO 23 -> Pin 10 MOSI
GPIO 33 -> Pin 11 RST

Assembly
Programming
Arduino IDE
<span>https://www.arduino.cc/en/main/software</span>ESP32 Support
<span>https://github.com/espressif/arduino-esp32</span>Arduino_GFX Library
<span>https://github.com/moononournation/Arduino_GFX</span>Compile and Upload
-
Connect to the computer with a USB cable, open Arduino IDE.
-
Open the ESPWiFiAnalyzer example code (“File” -> “Example” -> “Arduino_GFX” -> “ESPWiFiAnalyzer”)
-
Click the “Upload” button in Arduino IDE.
-
The ESPWiFiAnalyzer.ino code file is also provided for download at the end of the article.
Completion

Original link: https://www.instructables.com/Portable-IoT-Display/
Original author: Chen Liang
Translation first published in: Fun Without End
Editor: DF Maker Community
Copyright statement:This article is sourced from the internet, freely conveying knowledge, and the copyright belongs to the original author. If there are any copyright issues, please contact me for deletion.
You May Also Like
Sharing an OTA upgrade related application practice!
A key handling module applied to microcontrollers!
Practical | Sharing several very useful open-source projects
How to send and receive float type data with STM32?
How to view the source code of Linux command tools?
Sharing an essential drawing tool for embedded developers!
Reply1024 in the WeChat public account chat interface to obtain embedded resources; reply m to view the article summary.