| Many development boards use NOR Flash such as AM29LV800 or AM29LV160, and can operate normally with the u-boot provided by this website; yesterday, a user discovered that they could not erase SST39VF1601, for example, the following phenomenon occurred: when attempting to erase a sector starting at 0x2000, it showed success, but reading the contents revealed it was not 0xff: |
OpenJTAG> erase 2000 +1000
. done
Erased 1 sectors
OpenJTAG> md.l 2000
00002000: e3a03a0f e283300d e5823000 e582000c .:…0…0……
00002010: e3e0314f e5820010 e24335ff e2433603 O1…….5C..6C.
00002020: e5823008 e8bd8400 00012e7c 00000158 .0……|…X…
00002030: e3a00000 e1a0f00e e92d45f0 e3a07000 ………E-..p..
00002040: e59fa0f0 e2800007 e59f30ec e08fa00a ………0……
00002050: e79a2003 e3c05007 e5924000 e1a08003 . …P…@……
00002060: e1540007 0a000029 e2856014 e5d40004 ..T.)….`……
00002070: e3500000 1a000022 e5943008 e1530005 ..P.”….0….S.
00002080: 3a000013 e0653003 e3530014 e3a02001 …:.0e…S.. ..
00002090: e5c42004 9a00001d e3a03a0f e283300d . …….:…0..
000020a0: e7843006 e0841006 e5814010 e594200c .0…….@… ..
000020b0: e581200c e5943008 e5c10004 e0653003 . …0…….0e.
000020c0: e2433014 e5813008 e584100c e5845008 .0C..0…….P..
000020d0: ea00000e e594300c e3530000 02273001 …..0….S..0′.
000020e0: 13a03000 e3530000 0a000005 ebffffcf .0….S………
000020f0: e3500000 179a3008 13a07001 15934000 ..P..0…p…@..
Now let’s start debugging:1. According to the SST39VF1601 datasheet’s erase command, manually erase using the u-boot mw.w command:  Execute in u-boot (note, mw.w is used because SST39VF1601 is 16-bit; the addresses AAAA and 5554 come from the 5555h and 2AAAH in the above image shifted left by one bit — because the CPU’s ADDR1 is connected to SST39VF1601’s ADDR0):
OpenJTAG> mw.w AAAA AA
OpenJTAG> mw.w 5554 55
OpenJTAG> mw.w AAAA 80
OpenJTAG> mw.w AAAA AA
OpenJTAG> mw.w 5554 55
OpenJTAG> mw.w 2000 30
OpenJTAG>
OpenJTAG> md.l 2000
00002000: ffffffff ffffffff ffffffff ffffffff …………….
00002010: ffffffff ffffffff ffffffff ffffffff …………….
00002020: ffffffff ffffffff ffffffff ffffffff …………….
00002030: ffffffff ffffffff ffffffff ffffffff …………….
00002040: ffffffff ffffffff ffffffff ffffffff …………….
00002050: ffffffff ffffffff ffffffff ffffffff …………….
00002060: ffffffff ffffffff ffffffff ffffffff …………….
00002070: ffffffff ffffffff ffffffff ffffffff …………….
00002080: ffffffff ffffffff ffffffff ffffffff …………….
00002090: ffffffff ffffffff ffffffff ffffffff …………….
000020a0: ffffffff ffffffff ffffffff ffffffff …………….
000020b0: ffffffff ffffffff ffffffff ffffffff …………….
000020c0: ffffffff ffffffff ffffffff ffffffff …………….
000020d0: ffffffff ffffffff ffffffff ffffffff …………….
000020e0: ffffffff ffffffff ffffffff ffffffff …………….
000020f0: ffffffff ffffffff ffffffff ffffffff …………….
It can be seen that the manual erase was successful, indicating that there is no hardware issue, and it should be a software bug. If you do not understand the principle of the commands issued above, you can refer back to the previous sections on NOR flash, which are explained in detail.
2. Locate the code for the erase command, which is around line 1099 in drivers/cfi_flash.c, as shown in the image below:
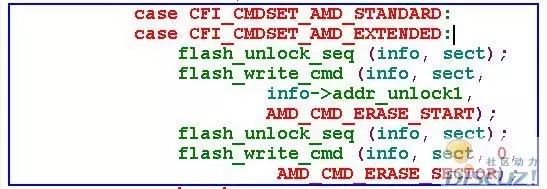
3. Debug u-boot according to the OpenJTAG tutorial, set a breakpoint at the aforementioned code. From step 1, it can be seen that the actual operation to erase NOR Flash consists of those 6 write operations.
 In the code, it ultimately calls the flash_write16 function 6 times.4. Now let’s start debugging:① In Eclipse, set a breakpoint at the flash_write16 function;② In the serial port, execute the “erase 2000 +1000” command,③ It is found that Eclipse automatically jumps to the flash_write16 function, observe the variables of this function, as shown in the image below:
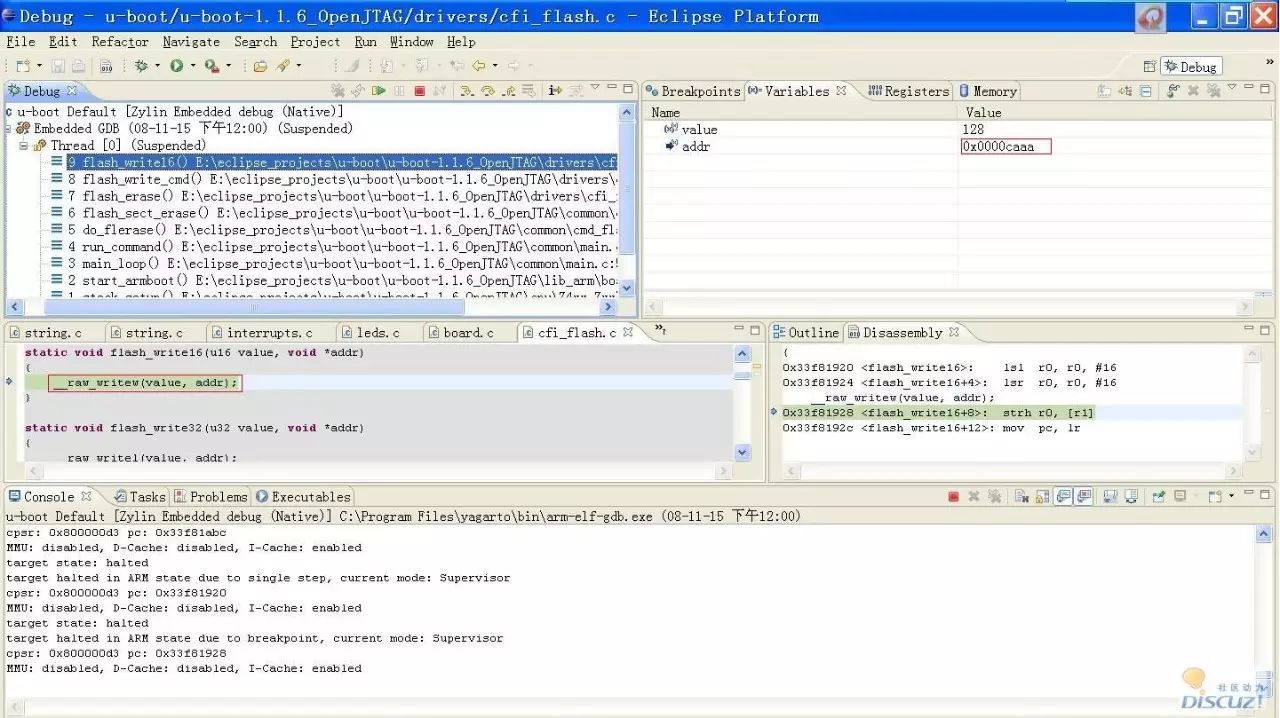
It is discovered that when writing val 128, which is 0x80, addr is 0xcaaa, which is problematic compared to the “mw.w AAAA 80” from step 1!!!Where does 0xcaaa come from? It should be the erased address 0x2000 plus 0xAAAA.It is evident that the root of the problem is: do not add 0x2000.Thus, the code modification is as follows:
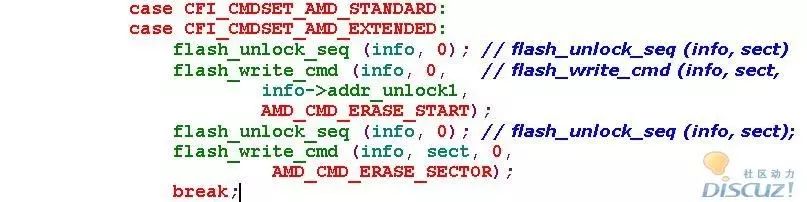 Recompile u-boot, after verification, the issue is resolved!
Note: This is an old forum post, originally published in November 2008