Click the card below,Star it!
Reply “1024” to get2TB of learning resources!
Setting up a K8s cluster version 1.27.0 using kubeadm successfully in one go, the specific steps are as follows:
-
Cluster planning and architecture -
System initialization preparation (synchronized operation on all nodes) -
Install and configure the cri-dockerd plugin -
Install kubeadm (synchronized operation on all nodes) -
Initialize the cluster -
Add Node nodes to the cluster -
Install the Calico network component -
Test CoreDNS resolution availability
Cluster planning and architecture
Official documentation: https://kubernetes.io/docs/reference/setup-tools/kubeadm/
Environment planning
-
Pod network segment: 10.244.0.0/16 -
Service network segment: 10.10.0.0/16 -
Note: Pod and service network segments must not conflict; if they do, K8S cluster installation will fail.

System initialization preparation (synchronized operation on all nodes)
Disable firewall
systemctl disable firewalld --now
setenforce 0
sed  -i -r 's/SELINUX=[ep].*/SELINUX=disabled/g' /etc/selinux/config
Configure domain name resolution
cat  >> /etc/hosts << EOF
16.32.15.200 master-1
16.32.15.201 node-1
16.32.15.202 node-2
EOF
Modify the hostname on the specified host.
hostnamectl set-hostname master-1 && bash
hostnamectl set-hostname node-1 && bash
hostnamectl set-hostname node-2 && bash
Configure server time to stay consistent
yum -y install ntpdate
ntpdate ntp1.aliyun.com
Add a timed synchronization to automatically sync time at 1 AM every day
echo "0 1 * * * ntpdate ntp1.aliyun.com" >> /var/spool/cron/root
crontab -l
Disable swap partition (kubernetes requires it to be disabled)
swapoff --all
Prevent swap partition from starting automatically on boot
sed -i -r '/swap/ s/^/#/' /etc/fstab
Modify Linux kernel parameters, add bridge filtering and address forwarding functions
cat >> /etc/sysctl.d/kubernetes.conf <<EOF
net.bridge.bridge-nf-call-ip6tables = 1
net.bridge.bridge-nf-call-iptables = 1
net.ipv4.ip_forward = 1
EOF

sysctl -p /etc/sysctl.d/kubernetes.conf
Load the bridge filtering module
modprobe br_netfilter
lsmod | grep br_netfilter # Verify if it is effective
Configure ipvs functionality
In Kubernetes, there are two proxy models for Service, one based on iptables and the other based on ipvs; ipvs has higher performance compared to iptables. If you want to use the ipvs model, you need to manually load the ipvs module.
yum -y install ipset ipvsadm

cat > /etc/sysconfig/modules/ipvs.modules <<EOF
modprobe -- ip_vs
modprobe -- ip_vs_rr
modprobe -- ip_vs_wrr
modprobe -- ip_vs_sh
modprobe -- nf_conntrack_ipv4
EOF

chmod +x /etc/sysconfig/modules/ipvs.modules
# Execute the script
/etc/sysconfig/modules/ipvs.modules

# Verify ipvs module
lsmod | grep -e ip_vs -e nf_conntrack_ipv4
Install Docker container component
curl -o /etc/yum.repos.d/CentOS-Base.repo https://mirrors.aliyun.com/repo/Centos-7.repo
wget -O /etc/yum.repos.d/epel.repo http://mirrors.aliyun.com/repo/epel-7.repo
yum makecache

# yum-utils software is used to provide yum-config-manager program
yum install -y yum-utils

# Use yum-config-manager to create a Docker Ali repository
yum-config-manager --add-repo http://mirrors.aliyun.com/docker-ce/linux/centos/docker-ce.repo

yum install docker-ce-20.10.6 docker-ce-cli-20.10.6 -y
Docker configuration acceleration source:
mkdir /etc/docker
cat <<EOF > /etc/docker/daemon.json
{
  "registry-mirrors": ["https://aoewjvel.mirror.aliyuncs.com"],
  "exec-opts": ["native.cgroupdriver=systemd"]
}
EOF

# Start docker and set it to start on boot
systemctl enable docker --now
systemctl status docker
Restart the server (can be skipped)
reboot
Install and configure the cri-dockerd plugin
Download from the official website: https://github.com/Mirantis/cri-dockerd/releases
Note: Operate simultaneously on three servers
Install the cri-dockerd plugin
wget https://github.com/Mirantis/cri-dockerd/releases/download/v0.3.1/cri-dockerd-0.3.1-3.el7.x86_64.rpm
rpm -ivh cri-dockerd-0.3.1-3.el7.x86_64.rpm
Backup and update cri-docker.service file
mv /usr/lib/systemd/system/cri-docker.service{,.default}
vim /usr/lib/systemd/system/cri-docker.service

[Unit]
Description=CRI Interface for Docker Application Container Engine
Documentation=https://docs.mirantis.com
After=network-online.target firewalld.service docker.service
Wants=network-online.target
Requires=cri-docker.socket
[Service]
Type=notify
ExecStart=/usr/bin/cri-dockerd --network-plugin=cni --pod-infra-container-image=registry.aliyuncs.com/google_containers/pause:3.7
ExecReload=/bin/kill -s HUP $MAINPID
TimeoutSec=0
RestartSec=2
Restart=always
StartLimitBurst=3
StartLimitInterval=60s
LimitNOFILE=infinity
LimitNPROC=infinity
LimitCORE=infinity
TasksMax=infinity
Delegate=yes
KillMode=process
[Install]
WantedBy=multi-user.target
Start cir-dockerd
systemctl daemon-reload
systemctl start cri-docker.service
systemctl enable cri-docker.service
Install kubeadm (synchronized operation on all nodes)
Configure domestic yum source
One-click installation of kubeadm, kubelet, kubectl.
cat <<EOF > /etc/yum.repos.d/kubernetes.repo
[kubernetes]
name=Kubernetes
baseurl=https://mirrors.aliyun.com/kubernetes/yum/repos/kubernetes-el7-x86_64/
enabled=1
gpgcheck=0
EOF

yum install -y kubelet-1.27.0 kubeadm-1.27.0 kubectl-1.27.0
Kubeadm will use the kubelet service to deploy the main services of Kubernetes in container mode, so you need to start the kubelet service first.
systemctl enable kubelet.service --now
Initialize the cluster
Operate on the master-1 host
Generate default configuration file for initialization
kubeadm config print init-defaults > kubeadm.yaml
We modify the default configuration file according to our needs. I mainly changed the following configurations:
-
advertiseAddress: changed to the IP address of the master -
criSocket: specify the container runtime -
imageRepository: configure the domestic acceleration source address -
podSubnet: pod network segment address -
serviceSubnet: services network segment address -
Added the specification to use ipvs at the end, enabling systemd -
nodeRegistration.name: changed to the current host name
The final initialization configuration file is as follows:
apiVersion: kubeadm.k8s.io/v1beta3
bootstrapTokens:
- groups:
  - system:bootstrappers:kubeadm:default-node-token
token: abcdef.0123456789abcdef
ttl: 24h0m0s
usages:
  - signing
  - authentication
kind: InitConfiguration
localAPIEndpoint:
  advertiseAddress: 16.32.15.200
  bindPort: 6443
nodeRegistration:
  criSocket: unix:///var/run/cri-dockerd.sock
  imagePullPolicy: IfNotPresent
  name: master-1
  taints: null
---
apiServer:
  timeoutForControlPlane: 4m0s
apiVersion: kubeadm.k8s.io/v1beta3
certificatesDir: /etc/kubernetes/pki
clusterName: kubernetes
controllerManager: {}
dns: {}
etcd:
  local:
    dataDir: /var/lib/etcd
imageRepository: registry.cn-hangzhou.aliyuncs.com/google_containers
kind: ClusterConfiguration
kubernetesVersion: 1.27.0
networking:
  dnsDomain: cluster.local
  podSubnet: 10.244.0.0/16
  serviceSubnet: 10.96.0.0/12
scheduler: {}
---
apiVersion: kubeproxy.config.k8s.io/v1alpha1
kind: KubeProxyConfiguration
mode: ipvs
---
apiVersion: kubelet.config.k8s.io/v1beta1
kind: KubeletConfiguration
cgroupDriver: systemd
Perform initialization
kubeadm init --config=kubeadm.yaml --ignore-preflight-errors=SystemVerification
Initialization was successful, and the output is as follows:
[init] Using Kubernetes version: v1.27.0
[preflight] Running pre-flight checks
[preflight] Pulling images required for setting up a Kubernetes cluster
[preflight] This might take a minute or two, depending on the speed of your internet connection
[preflight] You can also perform this action in beforehand using 'kubeadm config images pull'
W0504 22:24:16.508649    4725 images.go:80] could not find officially supported version of etcd for Kubernetes v1.27.0, falling back to the nearest etcd version (3.5.7-0)
[certs] Using certificateDir folder "/etc/kubernetes/pki"
[certs] Generating "ca" certificate and key
[certs] Generating "apiserver" certificate and key
[certs] apiserver serving cert is signed for DNS names [kubernetes kubernetes.default kubernetes.default.svc kubernetes.default.svc.cluster.local master-1] and IPs [10.96.0.1 16.32.15.200]
[certs] Generating "apiserver-kubelet-client" certificate and key
[certs] Generating "front-proxy-ca" certificate and key
[certs] Generating "front-proxy-client" certificate and key
[certs] Generating "etcd/ca" certificate and key
[certs] Generating "etcd/server" certificate and key
[certs] etcd/server serving cert is signed for DNS names [localhost master-1] and IPs [16.32.15.200 127.0.0.1 ::1]
[certs] Generating "etcd/peer" certificate and key
[certs] etcd/peer serving cert is signed for DNS names [localhost master-1] and IPs [16.32.15.200 127.0.0.1 ::1]
[certs] Generating "etcd/healthcheck-client" certificate and key
[certs] Generating "apiserver-etcd-client" certificate and key
[certs] Generating "sa" key and public key
[kubeconfig] Using kubeconfig folder "/etc/kubernetes"
[kubeconfig] Writing "admin.conf" kubeconfig file
[kubeconfig] Writing "kubelet.conf" kubeconfig file
[kubeconfig] Writing "controller-manager.conf" kubeconfig file
[kubeconfig] Writing "scheduler.conf" kubeconfig file
[kubelet-start] Writing kubelet environment file with flags to file "/var/lib/kubelet/kubeadm-flags.env"
[kubelet-start] Writing kubelet configuration to file "/var/lib/kubelet/config.yaml"
[kubelet-start] Starting the kubelet
[control-plane] Using manifest folder "/etc/kubernetes/manifests"
[control-plane] Creating static Pod manifest for "kube-apiserver"
[control-plane] Creating static Pod manifest for "kube-controller-manager"
[control-plane] Creating static Pod manifest for "kube-scheduler"
[etcd] Creating static Pod manifest for local etcd in "/etc/kubernetes/manifests"
W0504 22:24:34.897353    4725 images.go:80] could not find officially supported version of etcd for Kubernetes v1.27.0, falling back to the nearest etcd version (3.5.7-0)
[wait-control-plane] Waiting for the kubelet to boot up the control plane as static Pods from directory "/etc/kubernetes/manifests". This can take up to 4m0s
[apiclient] All control plane components are healthy after 10.002479 seconds
[upload-config] Storing the configuration used in ConfigMap "kubeadm-config" in the "kube-system" Namespace
[kubelet] Creating a ConfigMap "kubelet-config" in namespace kube-system with the configuration for the kubelets in the cluster
[upload-certs] Skipping phase. Please see --upload-certs
[mark-control-plane] Marking the node master-1 as control-plane by adding the labels: [node-role.kubernetes.io/control-plane node.kubernetes.io/exclude-from-external-load-balancers]
[mark-control-plane] Marking the node master-1 as control-plane by adding the taints [node-role.kubernetes.io/control-plane:NoSchedule]
[bootstrap-token] Using token: abcdef.0123456789abcdef
[bootstrap-token] Configuring bootstrap tokens, cluster-info ConfigMap, RBAC Roles
[bootstrap-token] Configured RBAC rules to allow Node Bootstrap tokens to get nodes
[bootstrap-token] Configured RBAC rules to allow Node Bootstrap tokens to post CSRs in order for nodes to get long term certificate credentials
[bootstrap-token] Configured RBAC rules to allow the csrapprover controller automatically approve CSRs from a Node Bootstrap Token
[bootstrap-token] Configured RBAC rules to allow certificate rotation for all node client certificates in the cluster
[bootstrap-token] Creating the "cluster-info" ConfigMap in the "kube-public" namespace
[kubelet-finalize] Updating "/etc/kubernetes/kubelet.conf" to point to a rotatable kubelet client certificate and key
[addons] Applied essential addon: CoreDNS
[addons] Applied essential addon: kube-proxy

Your Kubernetes control-plane has initialized successfully!

To start using your cluster, you need to run the following as a regular user:

  mkdir -p $HOME/.kube
  sudo cp -i /etc/kubernetes/admin.conf $HOME/.kube/config
  sudo chown $(id -u):$(id -g) $HOME/.kube/config

Alternatively, if you are the root user, you can run:

  export KUBECONFIG=/etc/kubernetes/admin.conf

You should now deploy a pod network to the cluster.
Run "kubectl apply -f [podnetwork].yaml" with one of the options listed at:
  https://kubernetes.io/docs/concepts/cluster-administration/addons/

Then you can join any number of worker nodes by running the following on each as root:

kubeadm join 16.32.15.200:6443 --token abcdef.0123456789abcdef \
 --discovery-token-ca-cert-hash sha256:afef55c724c1713edb7926d98f8c4063fbae928fc4eb11282589d6485029b9a6
Configure the kubectl configuration file, which is equivalent to authorizing kubectl, so that the kubectl command can manage the k8s cluster using this certificate.
mkdir -p $HOME/.kube
sudo cp -i /etc/kubernetes/admin.conf $HOME/.kube/config
sudo chown $(id -u):$(id -g) $HOME/.kube/config
Verify that you can use kubectl command
kubectl get nodes
Add Node nodes to the cluster
Perform operations on the two node nodes
Use the following command to create and view the token
kubeadm token create --print-join-command
Execute on the two node nodes
Note to add --cri-socket= to specify cri-dockerd.sock.
kubeadm join 16.32.15.200:6443 --token abcdef.0123456789abcdef --discovery-token-ca-cert-hash sha256:d3d7853ba7691fad218fdfa1027390c7c68e8cf0d3c5033e37170ce00d09901c --cri-socket=unix:///var/run/cri-dockerd.sock
Successfully joined the cluster as shown in the figure below: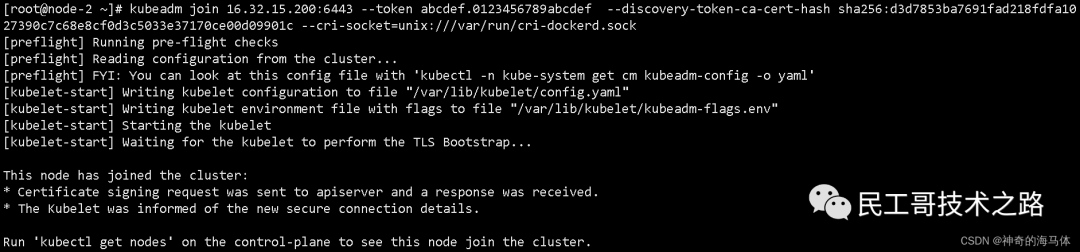
Label the two node nodes
Execute on the master-1 host
kubectl label nodes node-1 node-role.kubernetes.io/work=work
kubectl label nodes node-2 node-role.kubernetes.io/work=work
View cluster nodes
kubectl get nodes

Install the Calico network component
-
Calico online documentation address: https://docs.projectcalico.org/manifests/calico.yaml
Upload the calico.yaml file to the server, the following provides the content of the calico.yaml file: execute on the master host.
kubectl apply -f calico.yaml
Check cluster status && check built-in Pod status
kubectl get nodes
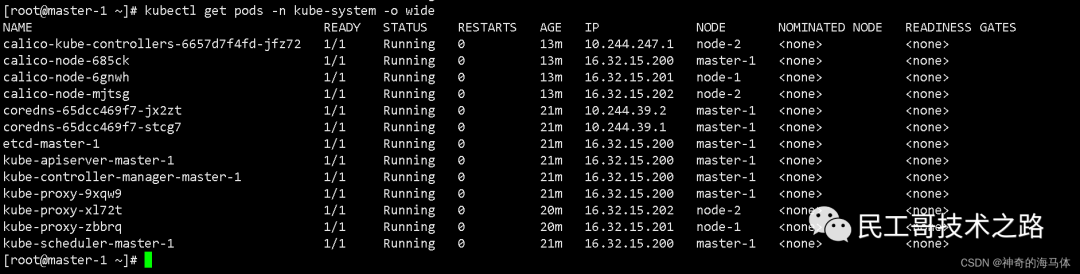
 Check the component status to see if it is in Running status as shown below:
kubectl get pods -n kube-system -o wide
Test CoreDNS resolution availability
Download busybox:1.28 image
docker pull busybox:1.28
Test coredns
kubectl run busybox --image busybox:1.28 --restart=Never --rm -it busybox -- sh

If you don't see a command prompt, try pressing enter.

/ # nslookup kubernetes.default.svc.cluster.local
Server:    10.96.0.10
Address 1: 10.96.0.10 kube-dns.kube-system.svc.cluster.local

Name:      kubernetes.default.svc.cluster.local
Address 1: 10.96.0.1 kubernetes.default.svc.cluster.local
Note: Busybox must use the specified version 1.28, the latest version cannot be used; the latest version cannot resolve DNS and IP.
Source: https://blog.csdn.net/weixin_45310323/article /details/130494823
Build a high-quality technical communication community, welcome those engaged in backend development and operation and maintenance technology to join the group (Note the position; please do not re-add if already in the technical exchange group). Mainly focused on technical exchanges, internal referrals, and industry discussions, please speak civilly. Advertisers are not allowed, and do not trust private chats to prevent being scammed.
Scan to add me as a friend, and I will pull you into the group

Tencent announced: 154.625 billion!
Suddenly collapsed! 340 billion giants filed for bankruptcy…
The strongest domestic open-source monitoring system recommendation! Really awesome…
Abandon Docker! It has been proven to be more awesome…
Still decided to go to Huawei!!!
Quickly build a virtual development environment in 10 minutes, efficiency artifact!

PS: Because the public account platform has changed the push rules, if you don’t want to miss the content, remember to read it to the end and click “Looking”, and add a “Star”, so that every time a new article is pushed, it will appear in your subscription list as soon as possible. Click “Looking” to support us!