Omron EtherCAT: Sharing on High-Speed Fieldbus for Synchronous Control Systems
Introduction: Starting from My Experience
Hello everyone! I am an engineer with many years of experience in industrial automation, primarily working with industrial fieldbus, motion control, and equipment debugging. In past projects, I have frequently encountered EtherCAT, especially in applications involving high-precision synchronous control systems. I remember when I first came across EtherCAT, I was quite confused and encountered many pitfalls. However, as I gained experience, I gradually understood its design concepts, configuration techniques, and how to achieve reliable synchronous control with it.
Today, I would like to discuss the application of Omron EtherCAT in synchronous control systems, covering both hardcore technology and some of my experiences with pitfalls. If you are researching EtherCAT or working in the field of industrial automation, this article may provide you with some practical insights.
Main Content
1. Hardware Configuration and Environmental Requirements
To understand EtherCAT’s synchronous control, we first need to know what kind of hardware and environmental support is required. Based on my experience, here is a simple checklist:
Hardware Requirements
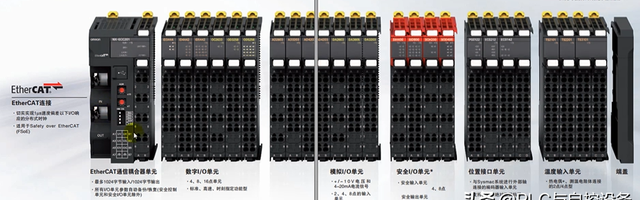
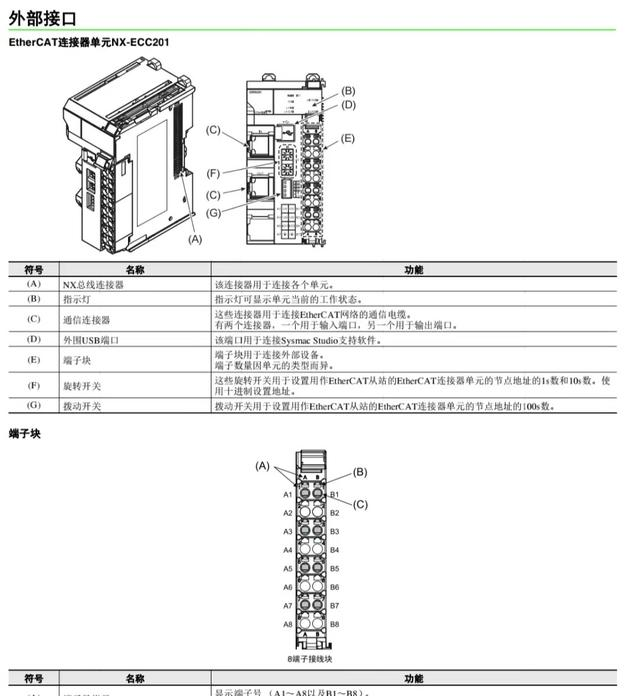
- Controller (Master): It is recommended to choose Omron’s NJ/NX series controllers, which have built-in EtherCAT master functionality, stable performance, and support high-speed communication.
- Slave Devices: Various servo drives, I/O modules, encoders, etc. Omron’s slave devices have good compatibility and also support third-party EtherCAT slaves.
- Network Hardware: Industrial Ethernet cables (it is recommended to use CAT6 standard or higher) and switches (if a branching topology is needed).
Environmental Requirements
- Software Tools: Omron’s Sysmac Studio is the core tool for configuring the EtherCAT network and writing programs. It is powerful but requires some time to get used to.
- Network Topology: EtherCAT supports linear, tree, and ring topologies, but the most commonly used is the linear topology, which is simple and easy to debug.
- Electrical Wiring: The length of network cables should not exceed 100 meters, and when wiring, keep away from high-power devices to reduce interference.
Tip: Remember to confirm in advance whether the hardware devices support the EtherCAT protocol and ensure that the device firmware version is compatible with the controller to avoid wasting debugging time.
2. Core Principles and Design Concepts
The core highlight of EtherCAT is its Distributed Clock (DC), which is key to achieving high-precision synchronous control. Here is a brief discussion of its principles:
- Function of the Distributed Clock: In synchronous control, all slave devices must operate based on a unified time reference. EtherCAT broadcasts time synchronization signals from the master, and slaves calibrate their clocks based on the received signals.
- Synchronization Mechanism: The master sends synchronization information (SM Synchronization Manager) to the slaves during each periodic communication, and the slaves adjust the timing of their actions based on the synchronization signals.
- Time Synchronization Error: In a typical EtherCAT network, synchronization errors can be controlled within 1 microsecond.
Design Concepts:
- The master controller is responsible for generating the synchronization cycle, usually set to 1ms or shorter.
- Each slave device executes periodic tasks precisely according to its own tasks (e.g., motion control of servo drives).
- When designing, try to minimize the number of slave devices and communication load to improve system response speed.
Recommendation: When designing an EtherCAT network, tasks can be reasonably divided, such as separating high-speed control devices from low-speed I/O to avoid communication bottlenecks affecting the overall system’s synchronization performance.
3. Code Implementation and Technical Details
After completing the hardware connections and network configuration, we can use Sysmac Studio to write programs for synchronous control. Here, I will share the main code and configuration points using a simple example of synchronous motion for servo motors.

Network Configuration
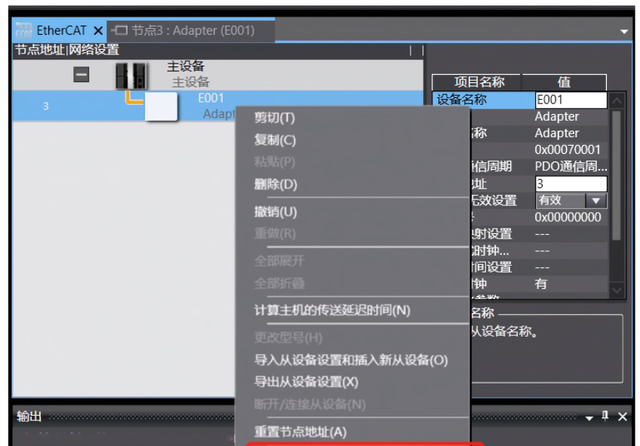
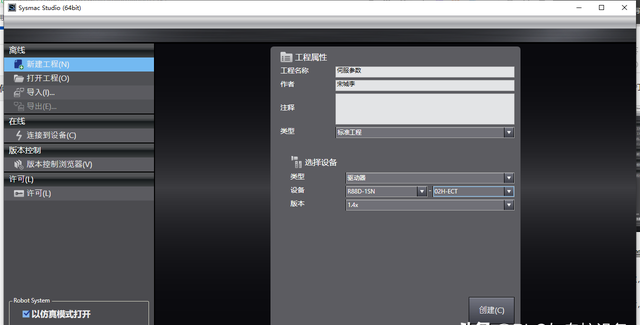
- Open Sysmac Studio, create a new project, and add the EtherCAT master.
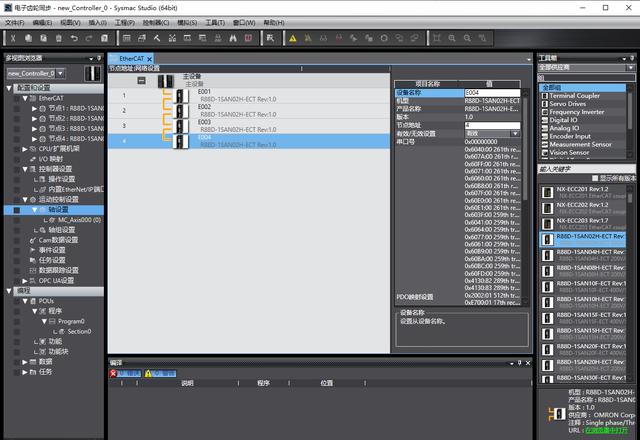
- Scan the network devices and add the slave devices to the project.
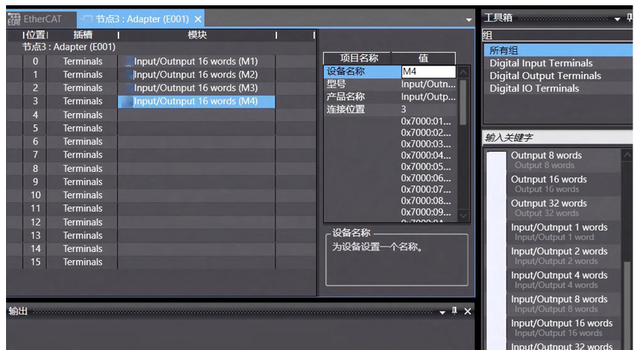
- Set up the Distributed Clock (DC):
- Select the servo drive and enable the DC Synchronization Mechanism from the properties.
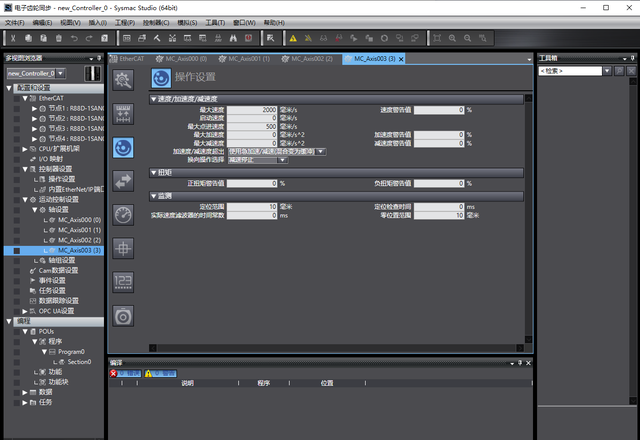
- Set the synchronization cycle for each slave, e.g., 1ms.
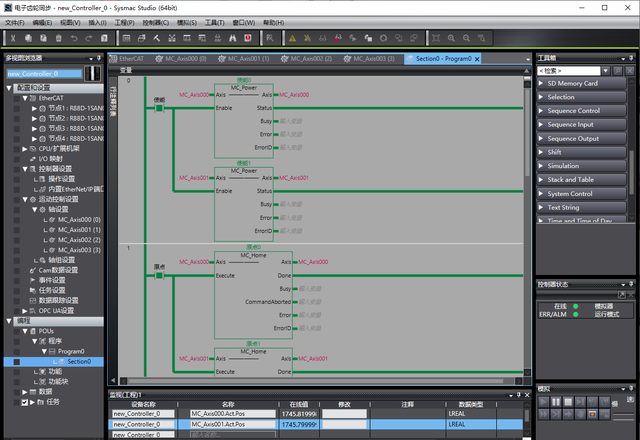
Code Implementation
Below is a simple synchronous control program for controlling two servo motors to perform synchronous linear motion:
iec copy
PROGRAM Main
VAR
    Position1 : LREAL; // Target position for Servo 1
    Position2 : LREAL; // Target position for Servo 2
    Speed : LREAL := 100.0; // Motion speed
END_VAR

// Initialize servo parameters
Servo1.Enable := TRUE;
Servo2.Enable := TRUE;

// Set target positions (synchronous motion)
Position1 := 500.0; // Target position 1
Position2 := 500.0; // Target position 2

// Send motion commands
Servo1.MoveAbsolute(Position1, Speed);
Servo2.MoveAbsolute(Position2, Speed);
Tip: During debugging, you can use the EtherCAT network monitoring function to view the status of the slaves and synchronization errors in real-time to ensure the system operates normally.
4. Function Expansion and Practical Application Cases
Function Expansion
- Multi-Axis Synchronization: In addition to simple two-axis synchronization, you can expand to multi-axis linkage, such as CNC machining or robotic trajectory control.
- Real-Time Data Acquisition: Utilizing EtherCAT’s high-speed communication characteristics, real-time sensor data can be collected for dynamic adjustment of control parameters.
Practical Application Cases
Recently, in a project, we implemented synchronous control of a five-axis robotic arm using EtherCAT. By reasonably designing the distributed clock and motion trajectory planning, we controlled the synchronization error of each joint to within 2 microseconds, greatly improving processing accuracy.
5. Debugging Methods and Common Issues
Debugging Methods
- Network Monitoring: Use the EtherCAT debugging tools in Sysmac Studio to check the network status and synchronization errors of slave devices.
- Log Analysis: Check the controller’s debugging logs for communication anomalies, such as slave packet loss or timeouts.
- Step-by-Step Troubleshooting: If the system cannot synchronize properly, check the master configuration, slave parameters, and hardware connections one by one.
Common Issues and Solutions
- Slave Device Not Responding: Check the network wiring and ensure the device power is normal.
- Excessive Synchronization Error: Reduce the number of slaves and optimize the synchronization cycle.
- Program Running Slowly: Check for tasks that occupy the CPU for extended periods and adjust task priorities.
Conclusion: Summary of Experiences and Personal Insights
Through these years of practice, I have increasingly felt the power of EtherCAT. It is not only fast and highly precise in synchronization, but more importantly, its openness and compatibility allow us to freely choose devices and flexibly design control systems.
If you are also working on EtherCAT-related projects, don’t be afraid of pitfalls; when encountering problems, refer to materials and communicate more. Technical growth takes time, but as long as you maintain curiosity and a spirit of exploration, you will always find solutions.
Finally, feel free to leave comments or private messages for discussion. If you have better solutions or encounter difficulties, let’s discuss them together! I hope this sharing can help you, and I wish everyone smooth sailing on the technical path! 😊
Click to follow me👇👇 May joy always be with you