▲ NVIDIA vGPU DLS License Server Setup
©2025 Leadtek Technology
Copyright © Leadtek Technology
This video is produced by Leadtek Technology. If you have any questions or need assistance,
please contact Leadtek Technology.
In the previous issue, we discussed the creation and deployment process of the CLS license server (click here to jump). This article details the steps to create and deploy the DLS license server. If you choose the DLS service method, you need to deploy the DLS license server virtual machine locally.
1 Download DLS Image
In the left navigation menu of the NVIDIA Licensing Portal page, click on “Software Downloads”, select “Non-Driver downloads”, and download the corresponding image template based on your system.
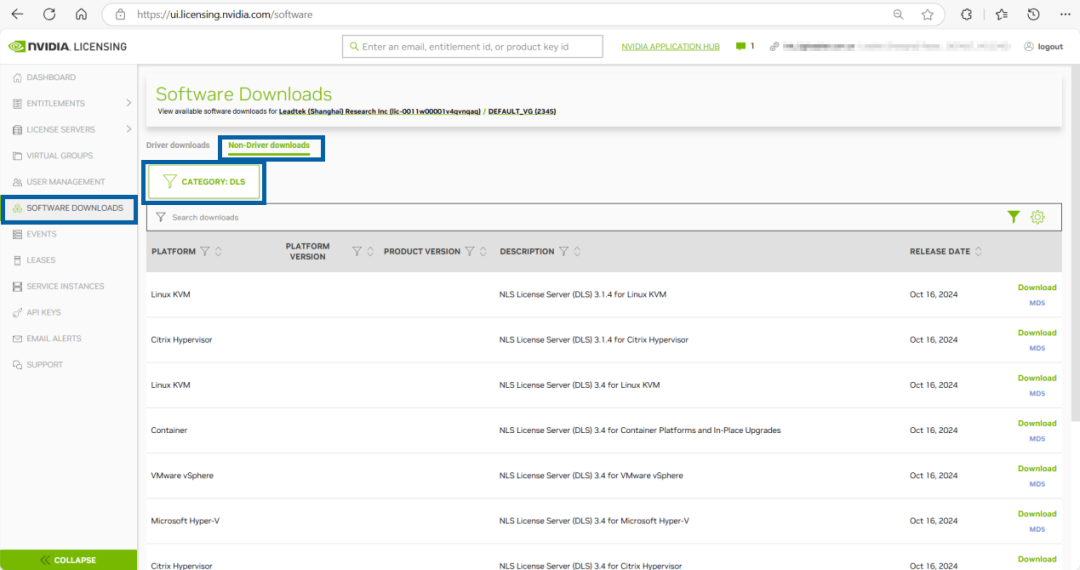
Among them:
-
The DLS image for Citrix Hypervisor is distributed in a ZIP archive that contains the XVA file;
-
The DLS image for Hyper-V Microsoft Windows Server is distributed in a ZIP archive;
-
The DLS image for Red Hat Enterprise Linux KVM is distributed in a ZIP archive that contains the QEMU Copy-On-Write (QCOW2) image file;
-
The DLS image for Red Hat Virtualization is distributed in a ZIP archive that contains a QEMU Copy-On-Write (QCOW2) image file;
-
The DLS image for Ubuntu Hypervisor is distributed in a ZIP archive that contains a QEMU Copy-On-Write (QCOW2) image file;
-
The DLS image for VMware vSphere is distributed in a ZIP archive containing the OVA file;
-
The containerized software DLS image is distributed as a ZIP archive nls-3.2.0-bios.zip.
This ZIP archive contains the following items:
dls_appliance_3.2.0.tar.gz (DLS application container)
dls_pgsql_3.2.0.tar.gz (PostgreSQL database container)
2 Import DLS Image
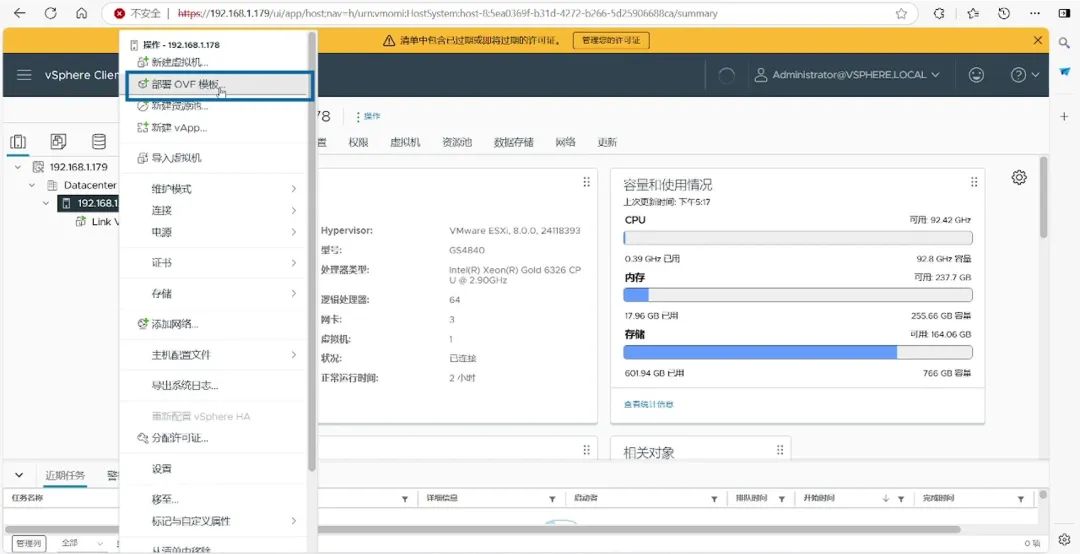
2.1 Taking VMware vSphere as an example, right-click on the Esxi host and select “Deploy OVF Template”.
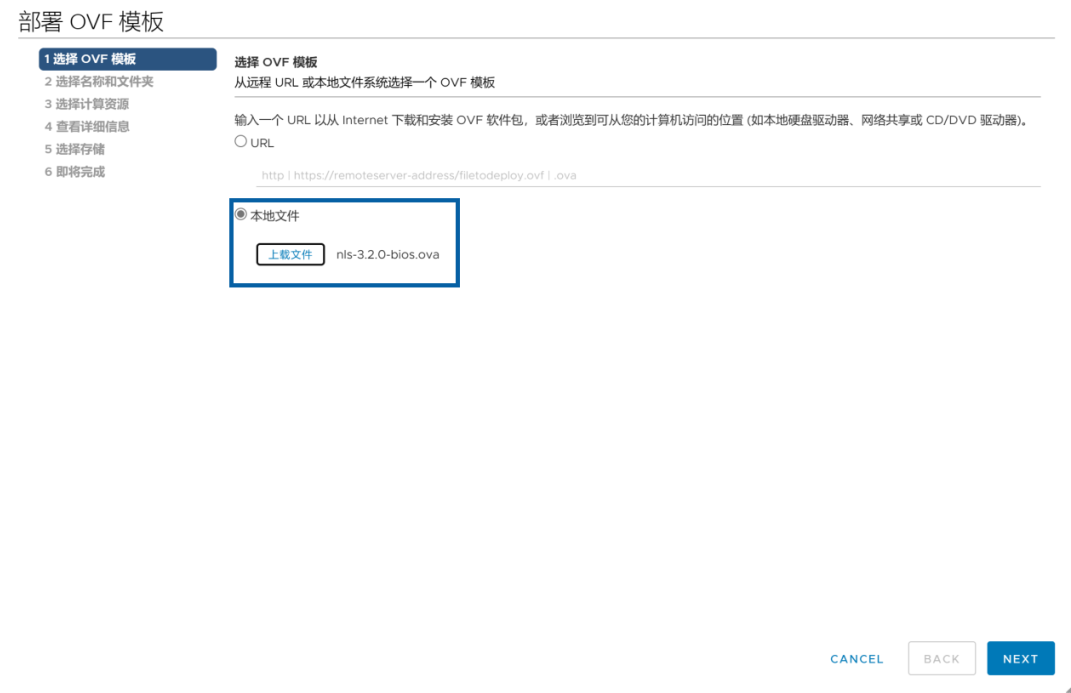
2.2 Upload the nls-3.2.0-bios.ova file from the DLS image ZIP package for VMware vSphere.
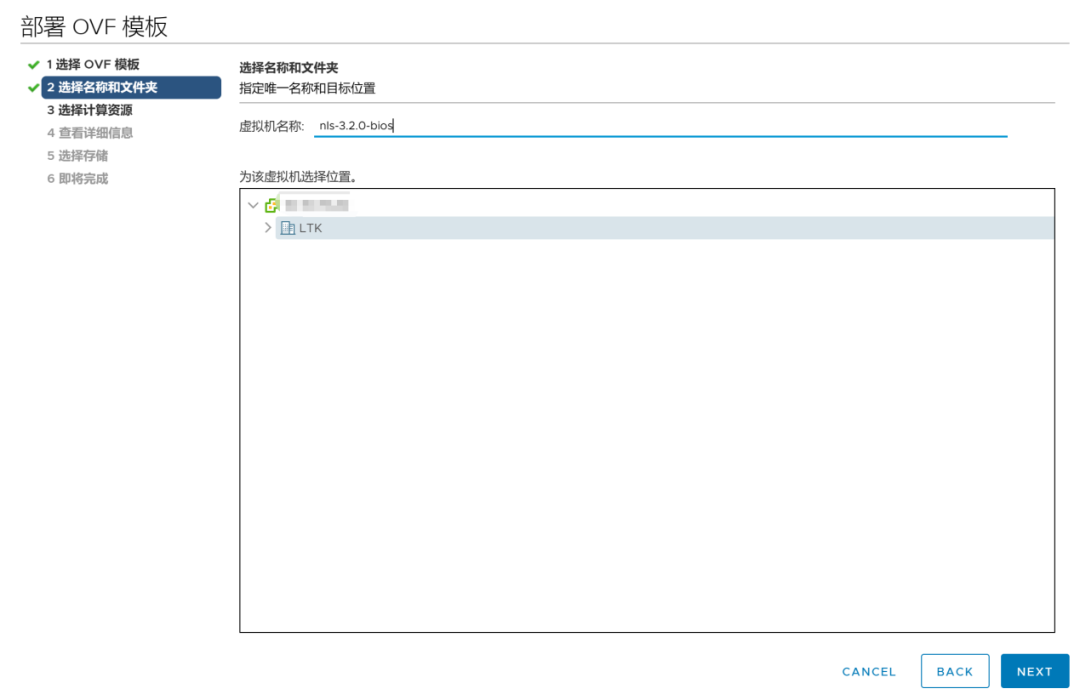
2.3 Choose a name and folder (enter the virtual machine name and select the location of the virtual machine).
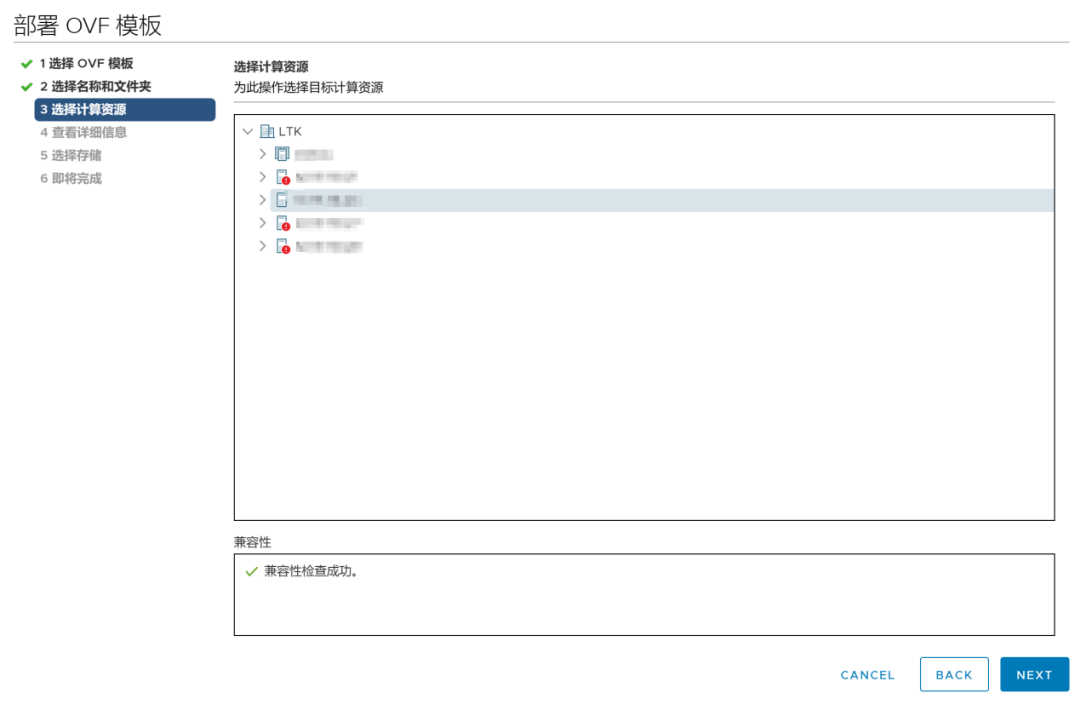
2.4 Select compute resources.
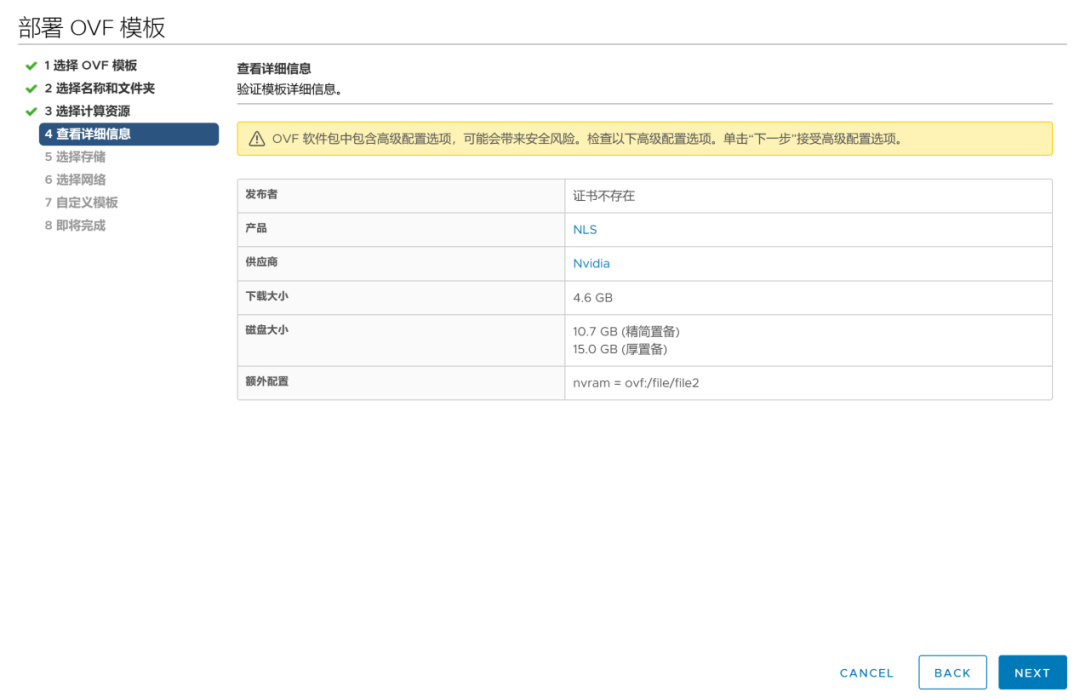
2.5 Review details (details of the template being deployed).
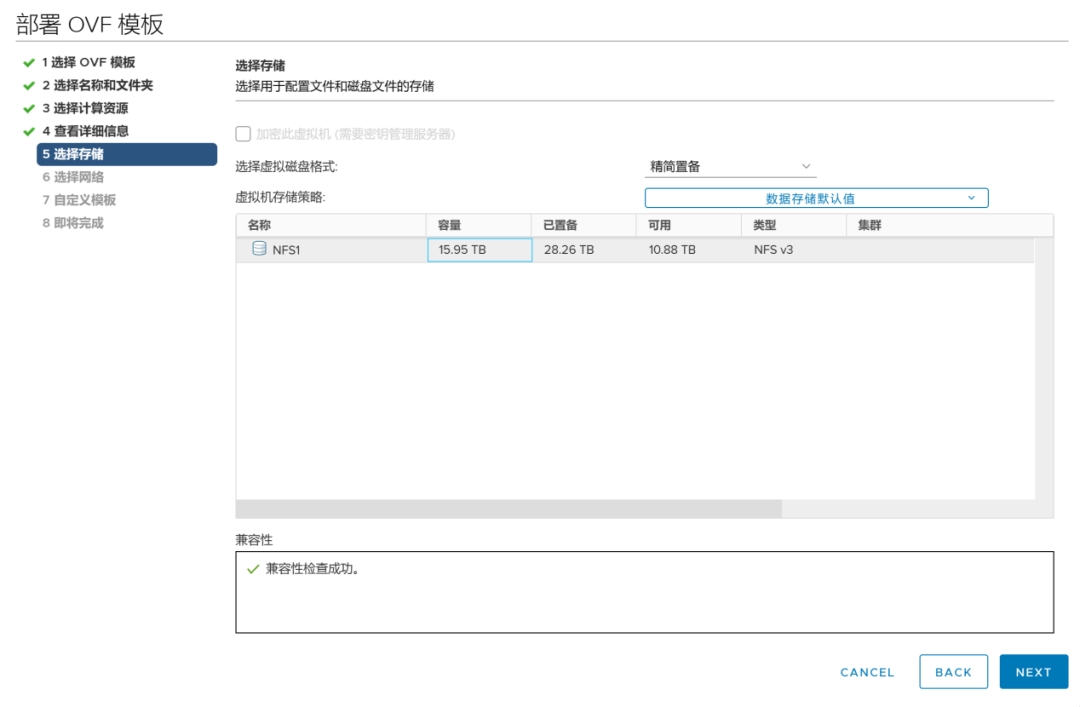
2.6 Select storage (storage for virtual device configuration and disk files).
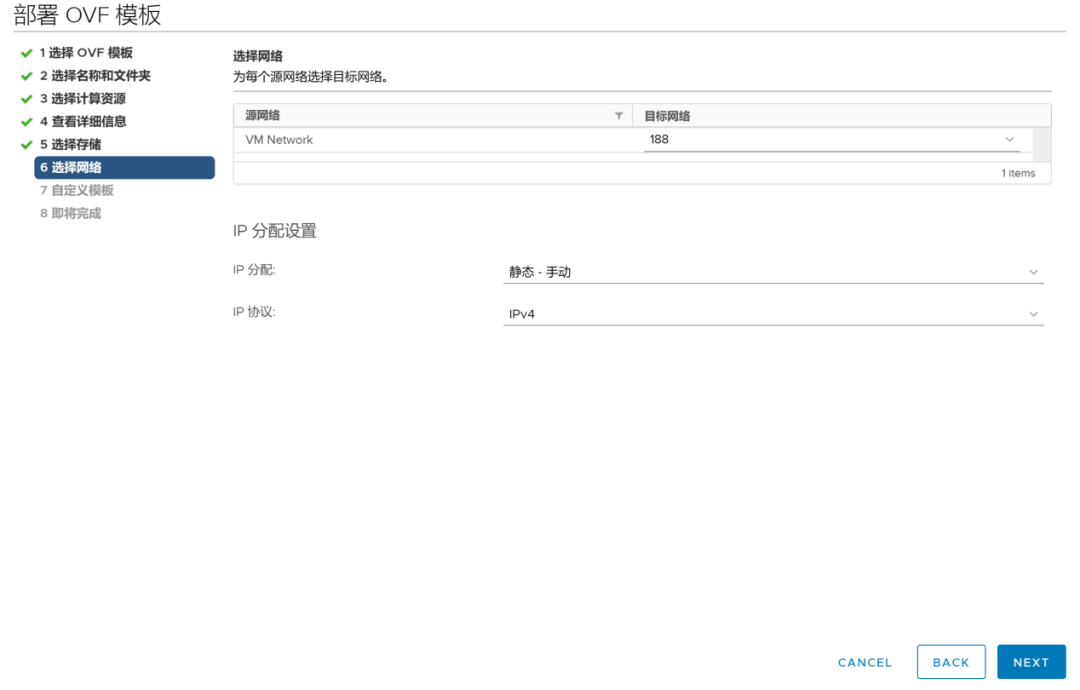
2.7 Select network (default static – manual is sufficient).
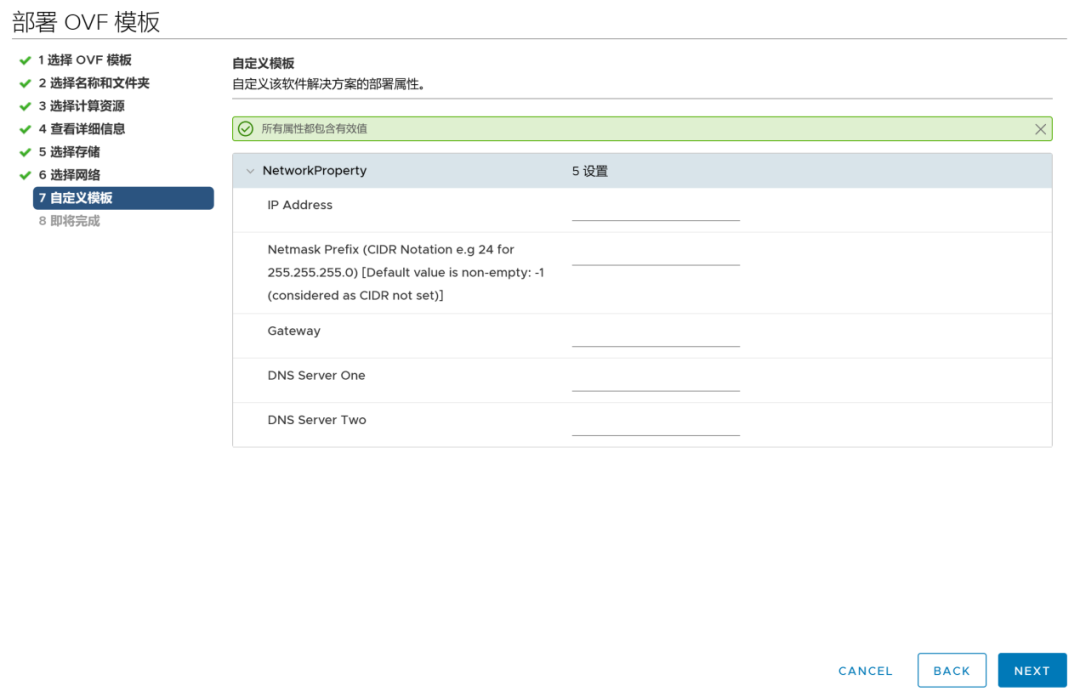
2.8 Customize template (leave it blank by default, allowing the virtual machine to obtain an IP address automatically via DHCP).
2.9 Complete and start the import.
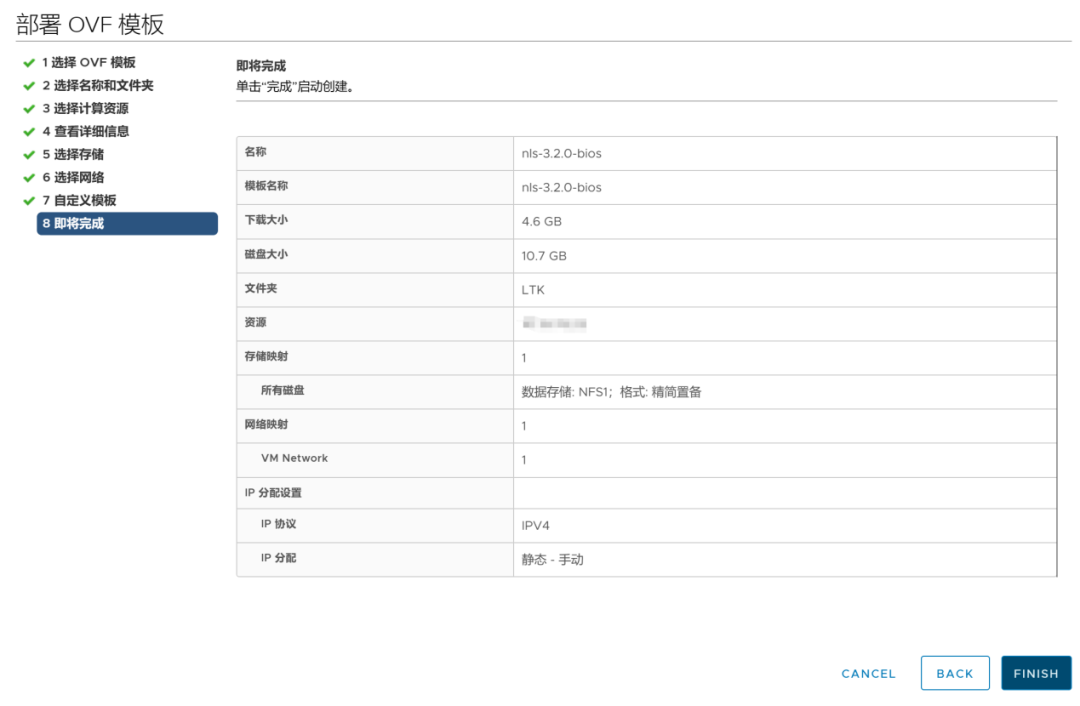
2.10 Wait for the import to complete.

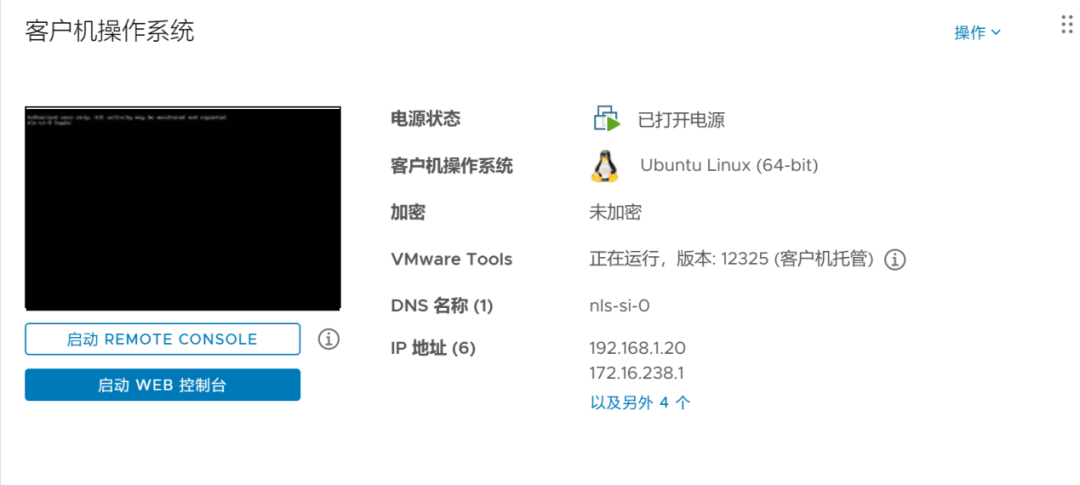
2.11 After starting the DLS virtual machine, you can see the operating system, IP address, and other information.
2.12 Manual IP Setup
If the network environment does not have DHCP or the IP address is not displayed, you can log in to the DLS virtual machine using the Hypervisor management console as user dls_admin. If the dls_admin user is not yet registered, the default password is welcome. After logging into the virtual machine, use ip a to check the IP:
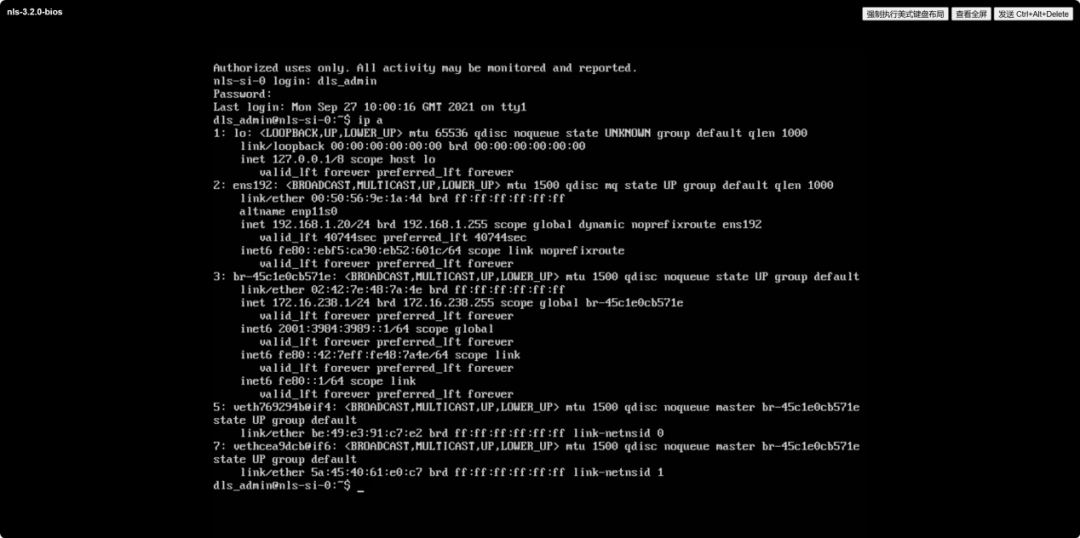
If there is no IP, run the /etc/adminscripts/set-static-ip-cli.sh script. When prompted, enter the details for the static IP address you wish to set, including:
-
Input the number representing the IP version used by the virtual device network.
For IPv4 networks, type 4.
For IPv6 networks, type 6.
-
Input the IP address to be assigned to the DLS virtual device.
-
Input the IP address of the default gateway for the DLS virtual device.
*Note:If the default gateway address is omitted, the DLS virtual device will use DHCP settings.
-
Input the IP address of the first DNS server to be used for name resolution.
-
Input the IP address of the second DNS server to be used for name resolution.
-
Input the subnet mask for the DLS virtual device network in CIDR format, without the leading slash character (/). To get the CIDR format subnet mask from the decimal equivalent, refer to IETF RFC 1878: Table on Page 2 of Variable Length Subnet Table for IPv4. For example, the CIDR format subnet mask for the decimal equivalent 255.255.255.0 is 24.
After setting the IP address, the log file containing the script progress messages will be found in /tmp/static-ip-cli-logs directory.
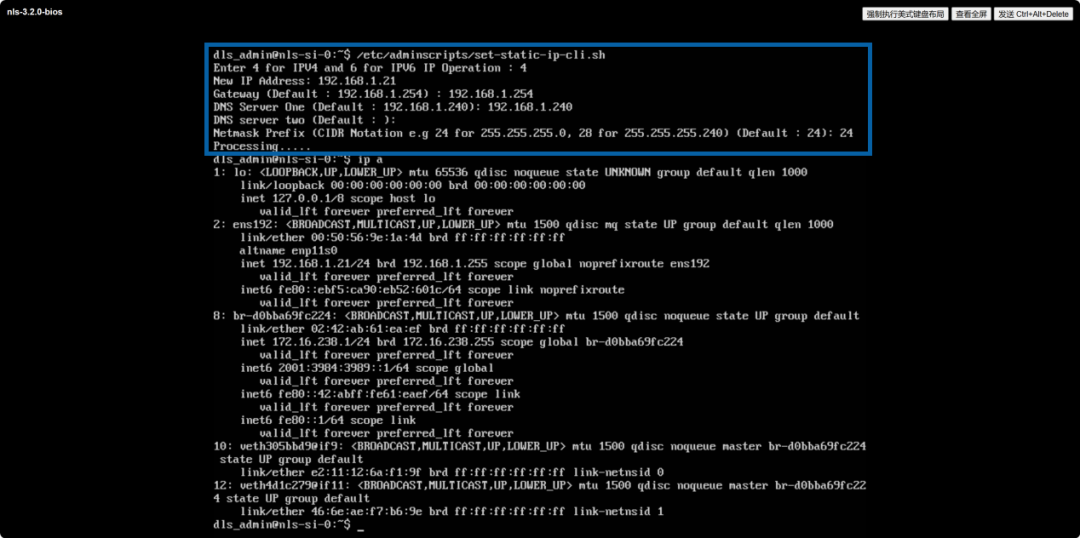
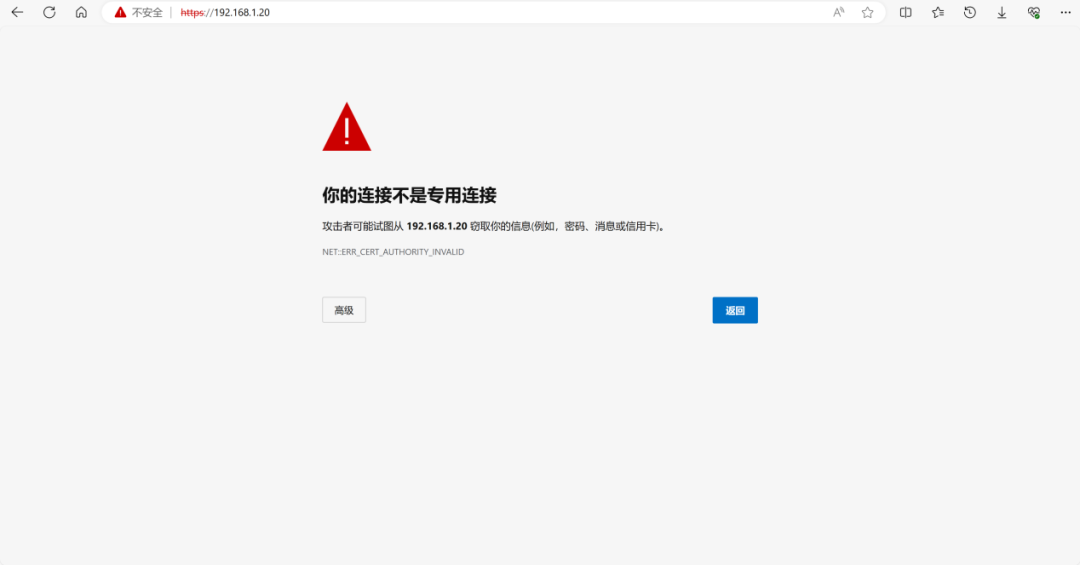
2.13 After successfully obtaining the IP, the DLS boot time is about 15 minutes (affected by factors such as CPU core performance), and you can access the webpage via https://IP address.
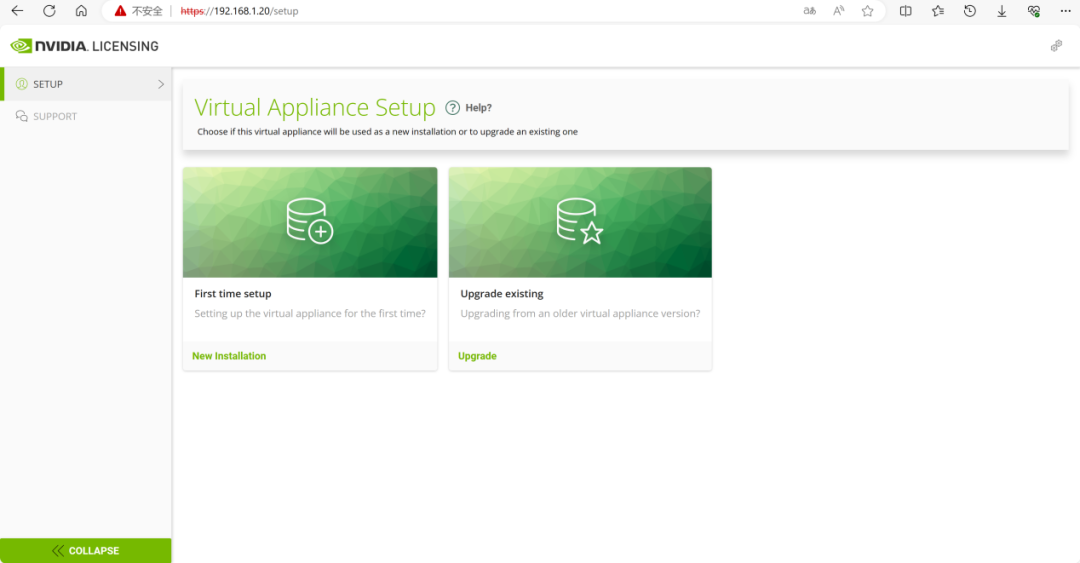
2.14 After entering the webpage, select “New Installation”.
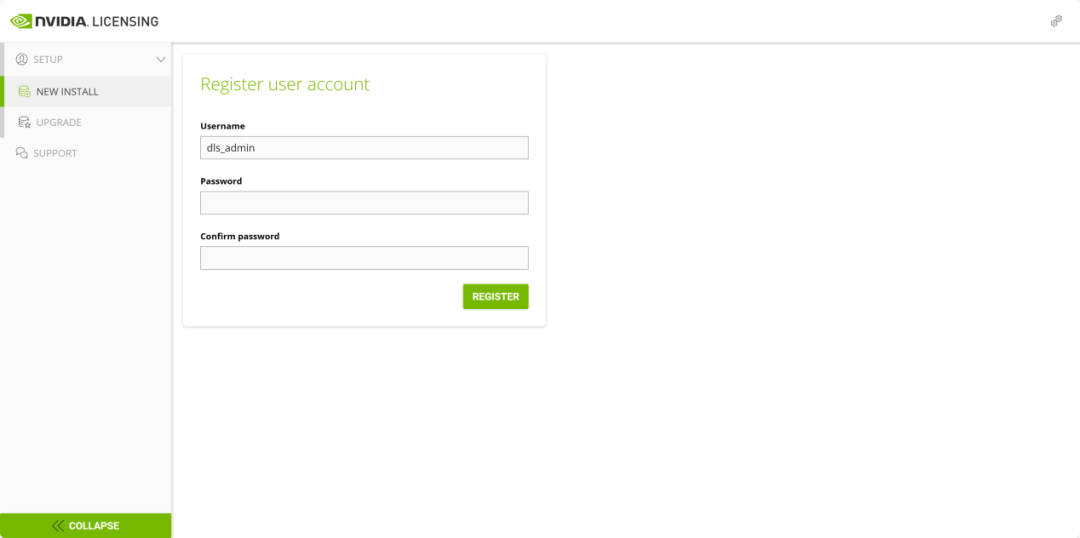
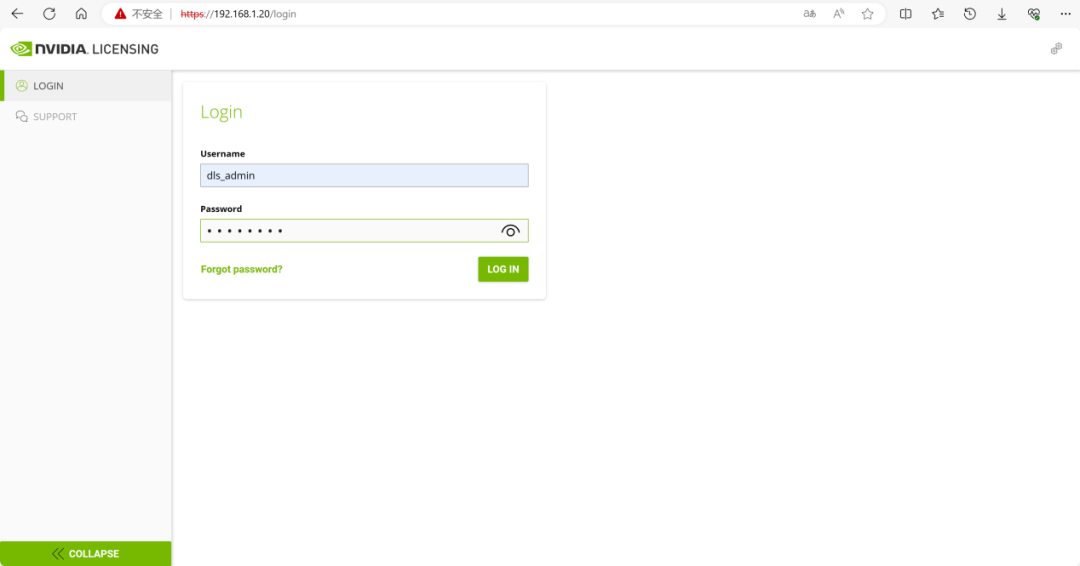
2.15 Fill in the username and password to create a new account.
2.16 Log in using the registered account password.
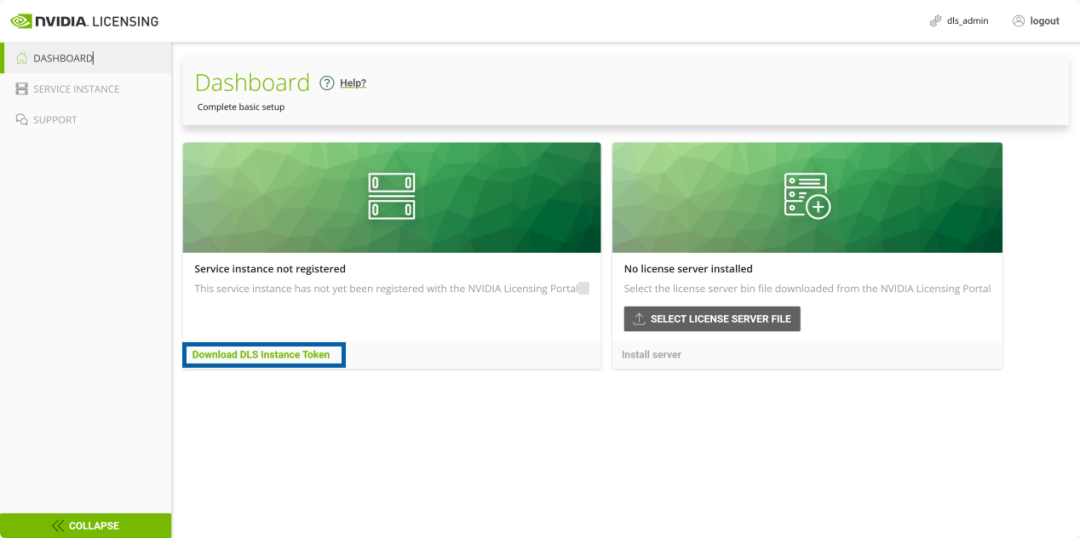
2.17 Click “Download DLS Instance Token” to download the DLS Instance Token file named dls_instance_token_mm-dd-yyyy-hh-mm-ss.tok.

3 Create DLS License Server
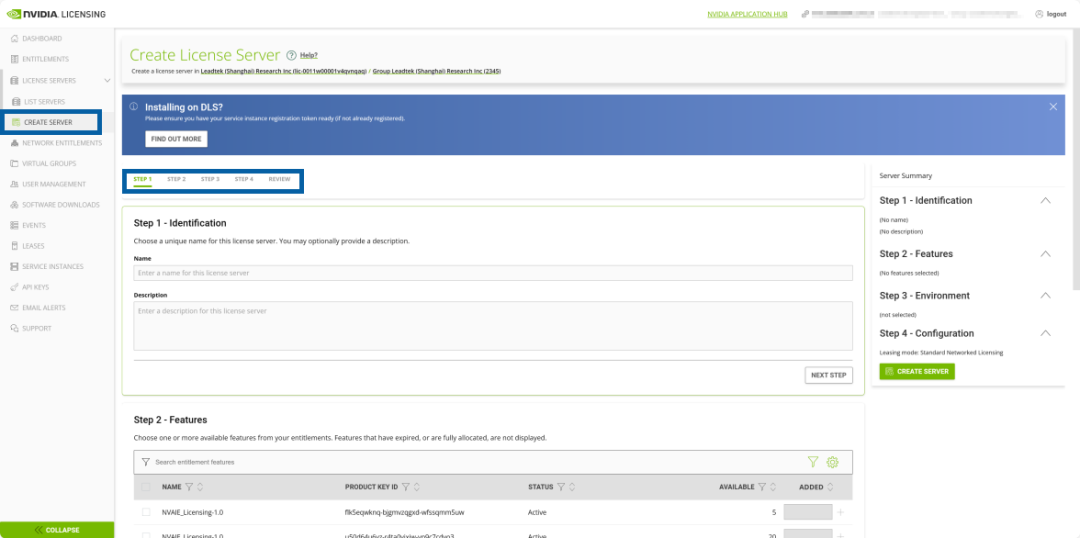
Select “LICENSE SERVER” in the left navigation menu of the NVIDIA Licensing Portal page, click the “CREATE SERVER” button in the upper right corner to start “Create License Server”. On this page, follow the prompts to gradually complete the configuration requirements and provide details for the license server.
3.1 Identification and Features
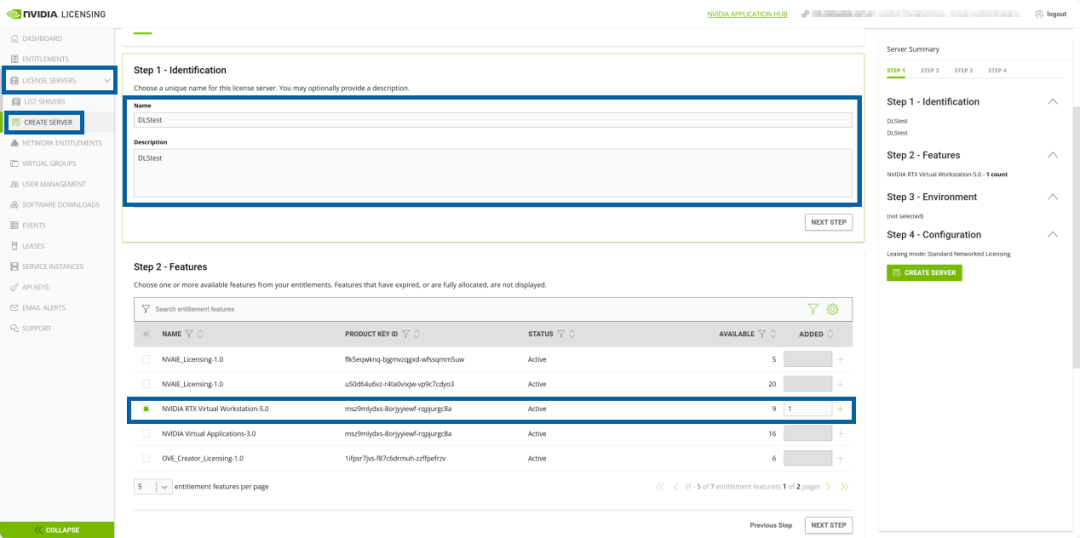
In the “Name” field, enter the chosen license server name. In the “Description” field, enter a textual description of the license server. This description is required and will be displayed on the details page of the created license server.
Select one or more available licenses from the authorization and fill in the quantity assigned to this license server.
3.2 Environment
Select “On-Premises (DLS)” and upload the DLS Instance Token file.
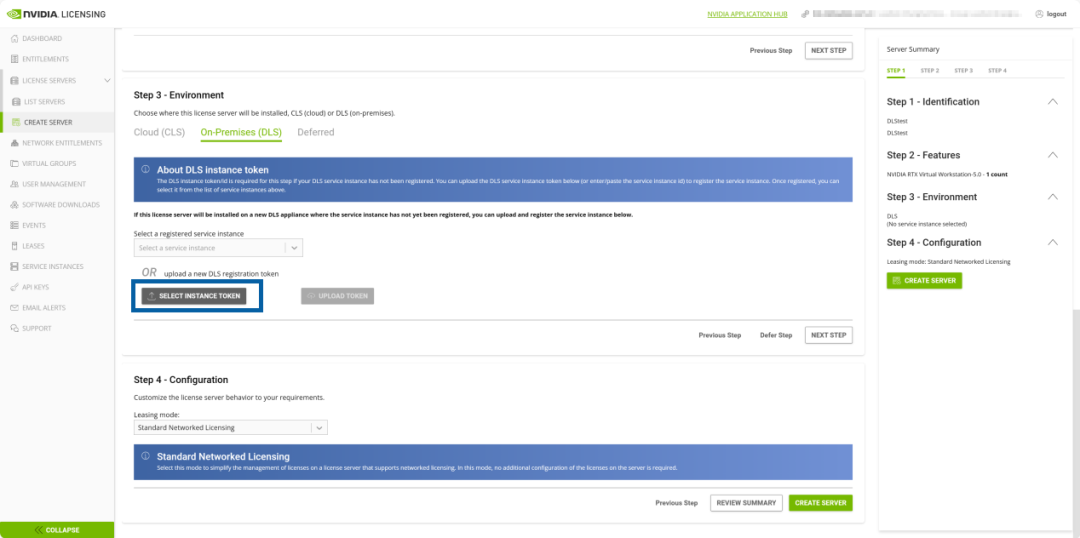
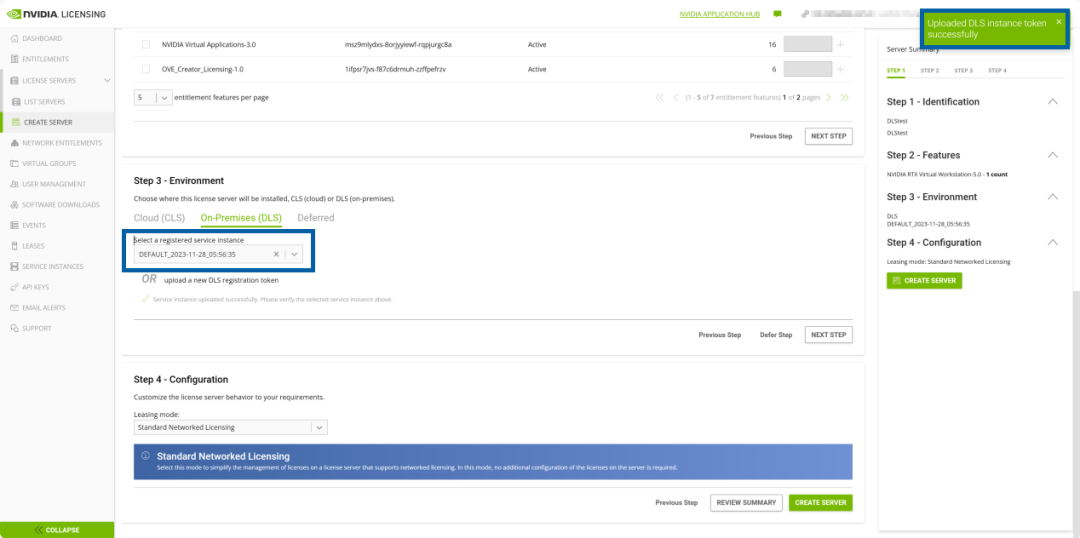
After selecting the previously downloaded dls_instance_token_mm-dd-yyyy-hh-mm-ss.tok file, click “UPLOAD TOKEN” to upload. After a successful upload, the instance will be displayed, and there will be a corresponding prompt in the upper right corner of the page.
3.3 Configuration
In the “Leasing Mode” dropdown list, select one of the modes (the specific differences have been introduced in the CLS article, which will not be repeated here), and after selecting, click “Create Server” to create the service.
4 Expand License Server
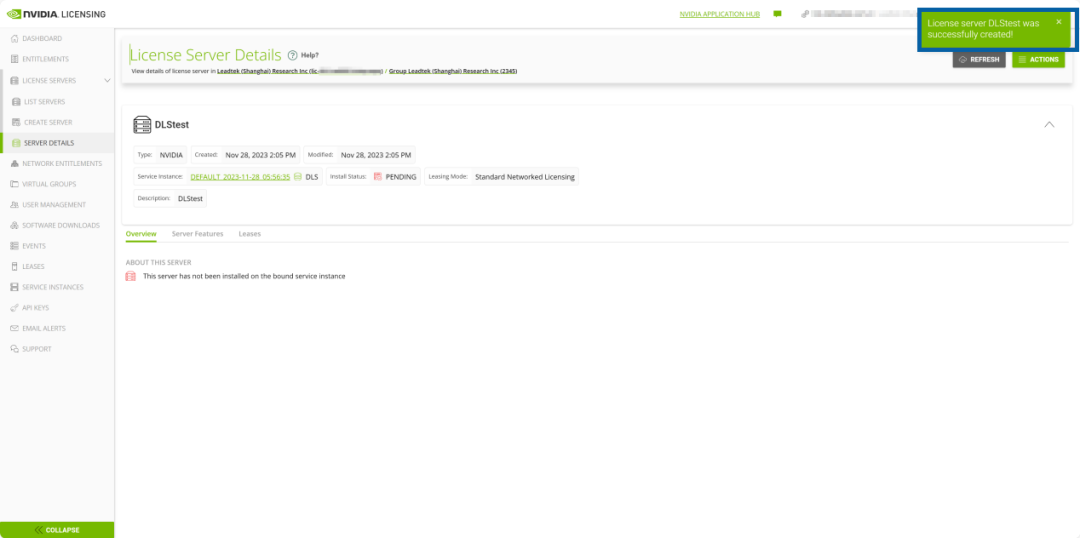
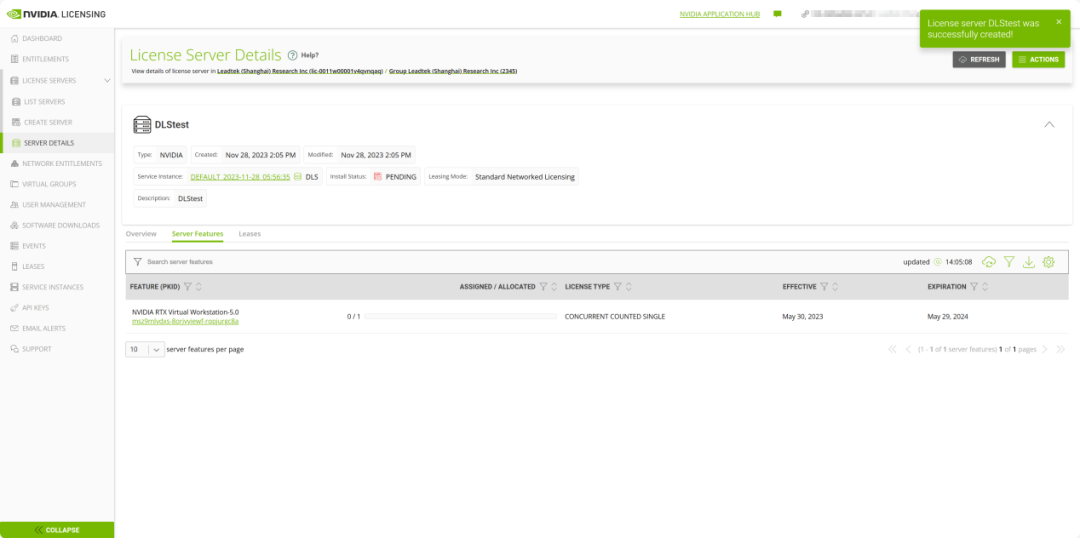
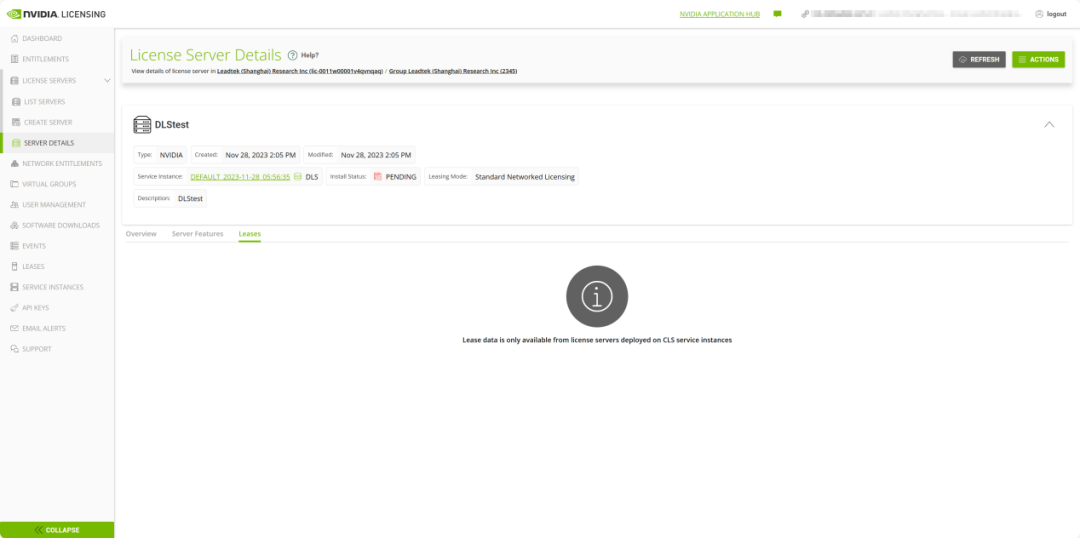
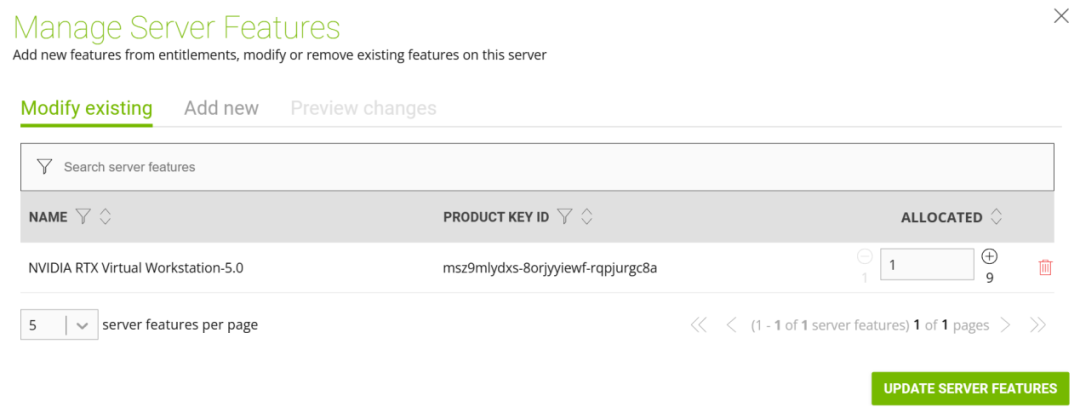
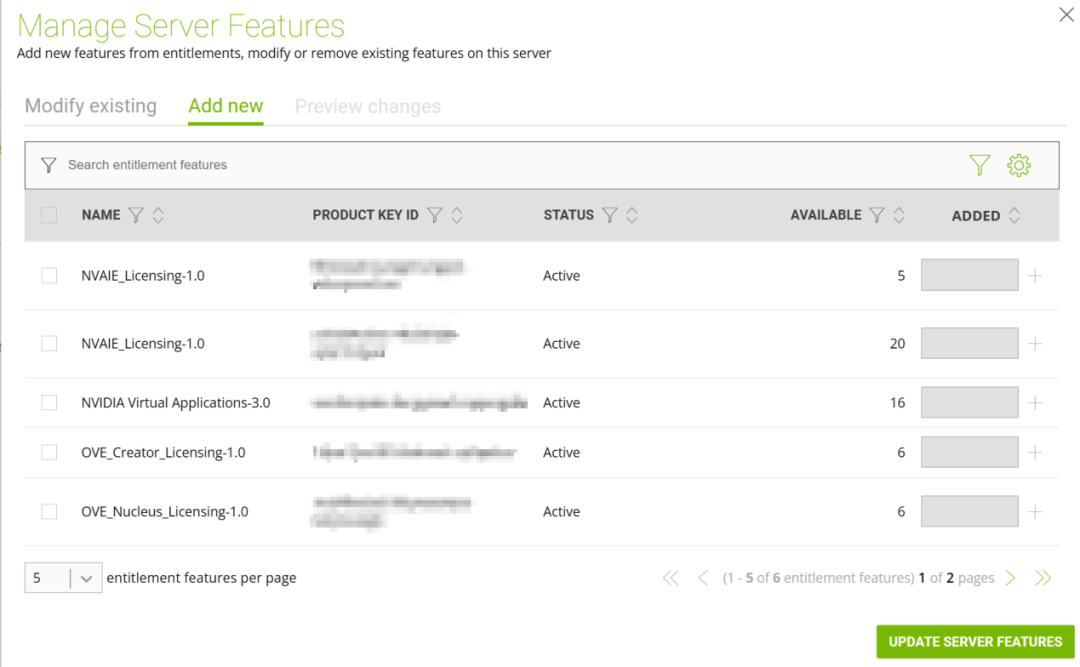
After creation, similar to the CLS, you can click on the “LICENSE SERVERS” option in the NVIDIA Licensing Portal page to expand and query all created License Servers and related information.
5 Download DLS License Server File
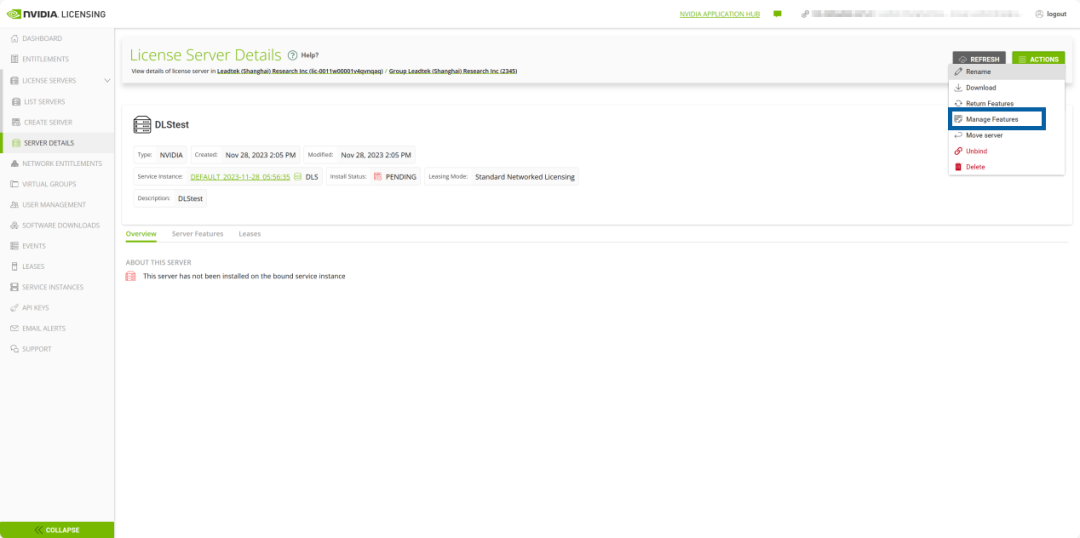
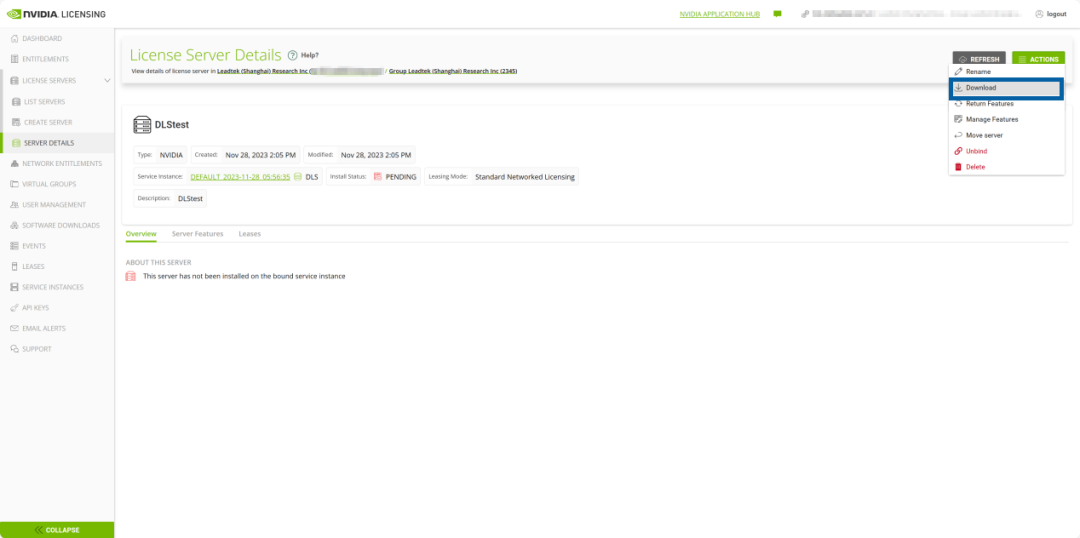
5.1 On the “License Server Details” page, click the “ACTIONS” button in the upper right corner and select “Download”.
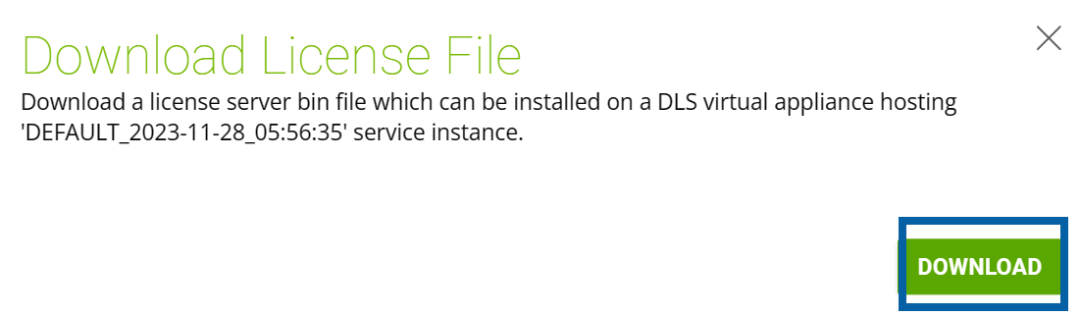
5.2 Download the license server file named license_mm-dd-yyyy-hh-mm-ss.bin .

6 Upload License Server File
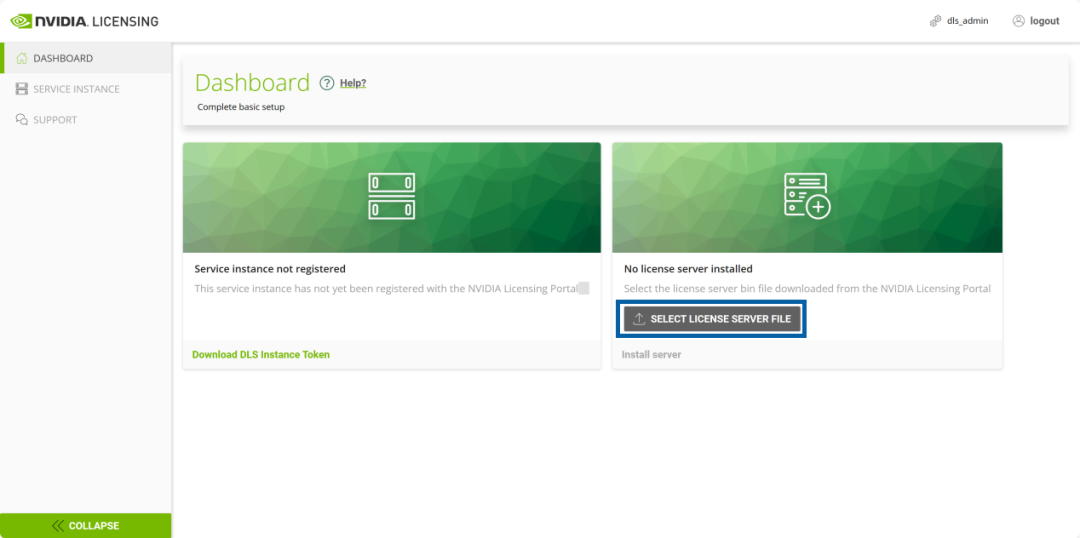
6.1 Return to the local DLS webpage and upload the license server file you just downloaded.
6.2 Click “Install server”.
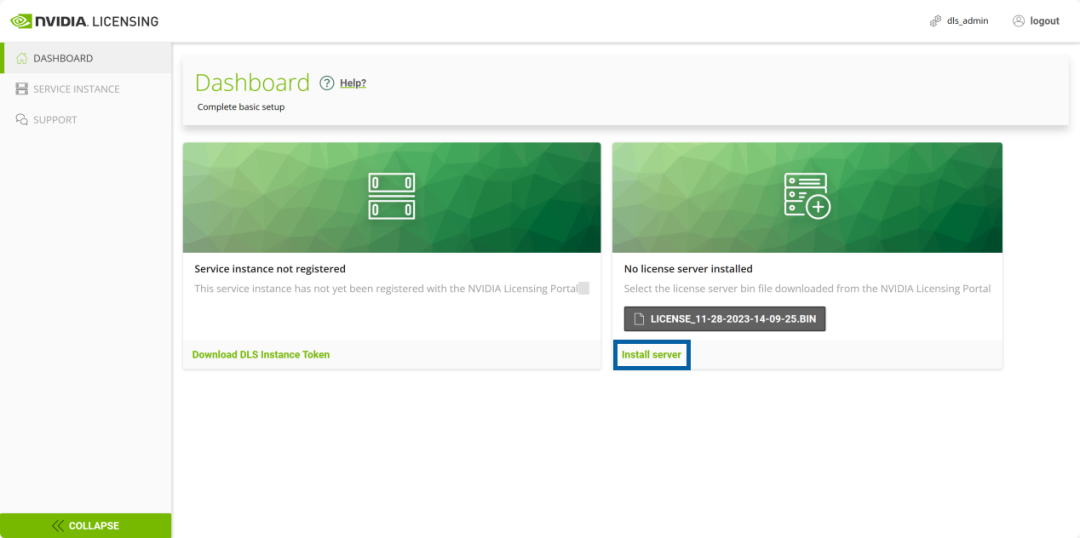
6.3 The webpage will automatically redirect after the installation is complete.
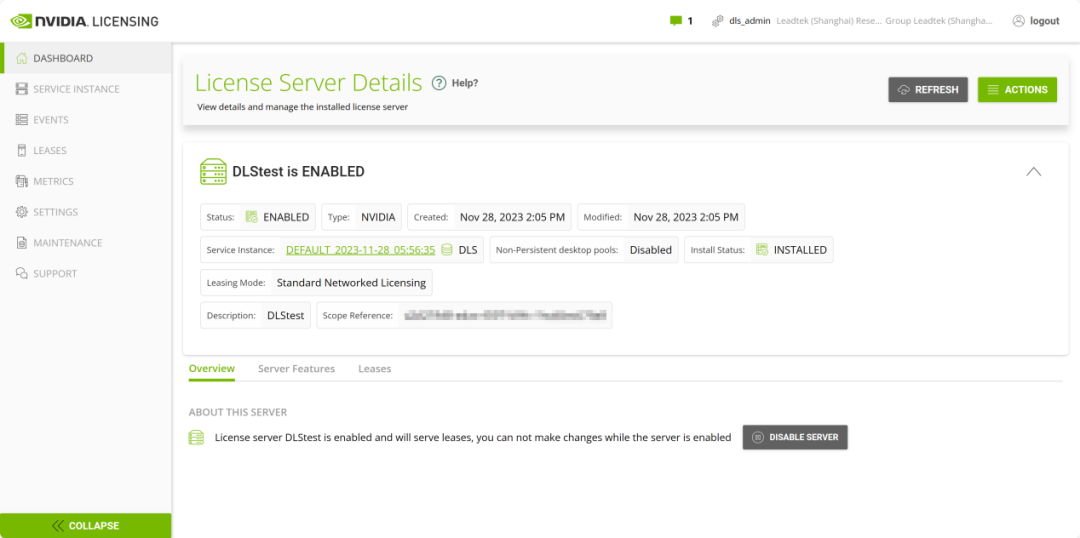
7 Download Client Configuration Token File
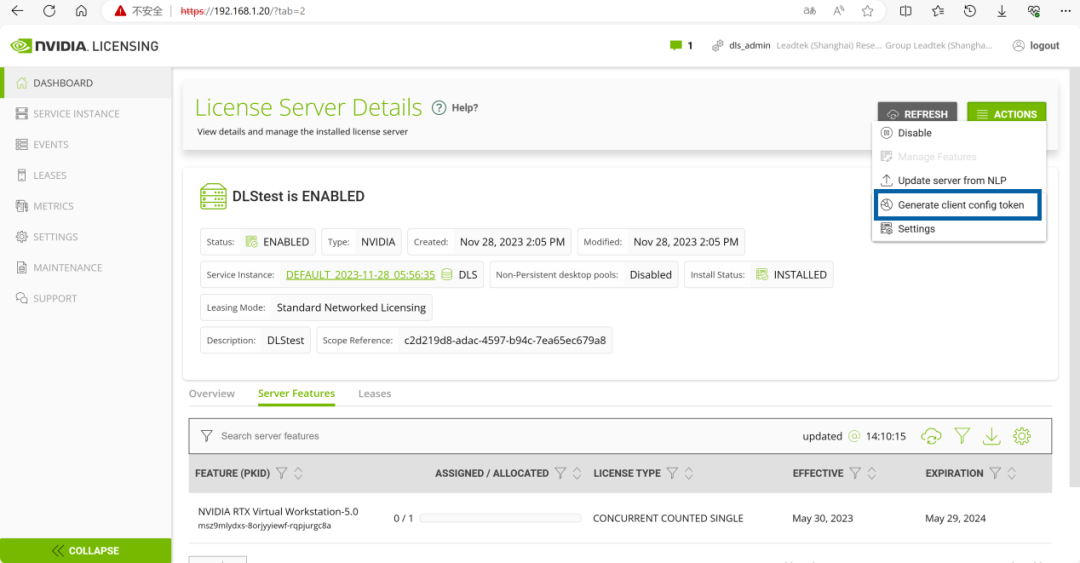
7.1 On the “License Server Details” page, click the “ACTIONS” button in the upper right corner, then select “Generate Client Configuration Token”.
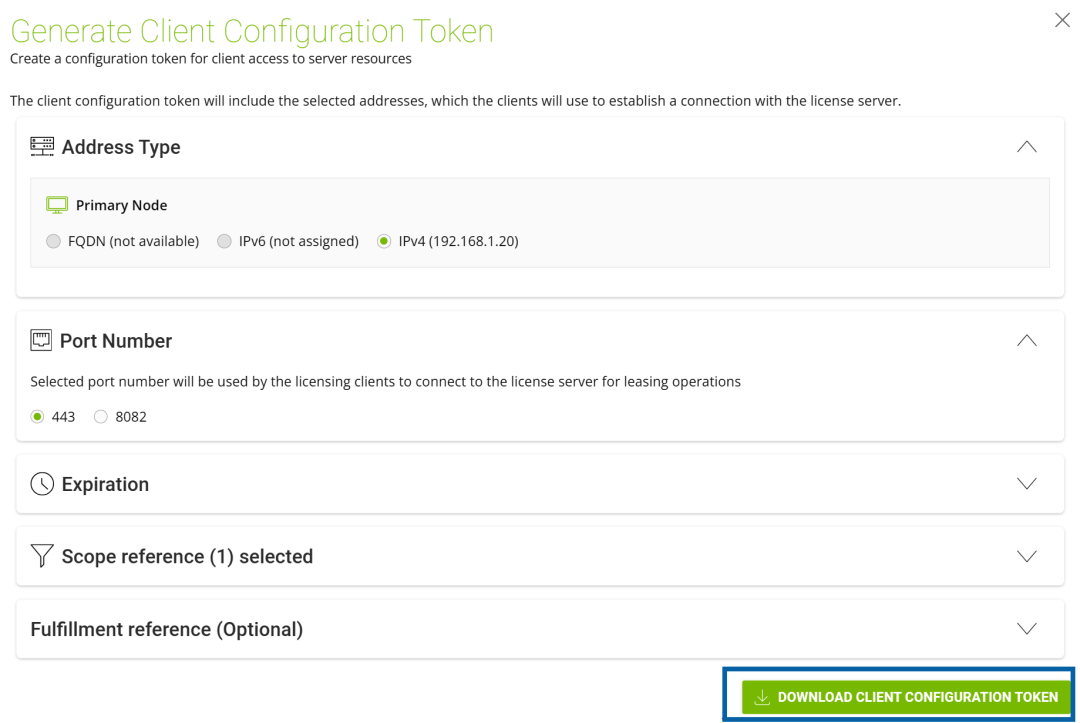
7.2 In the pop-up window, the address defaults to IPv4. Click “DOWNLOAD CLIENT CONFIGURATION TOKEN” to download.

8 NTP Time Synchronization
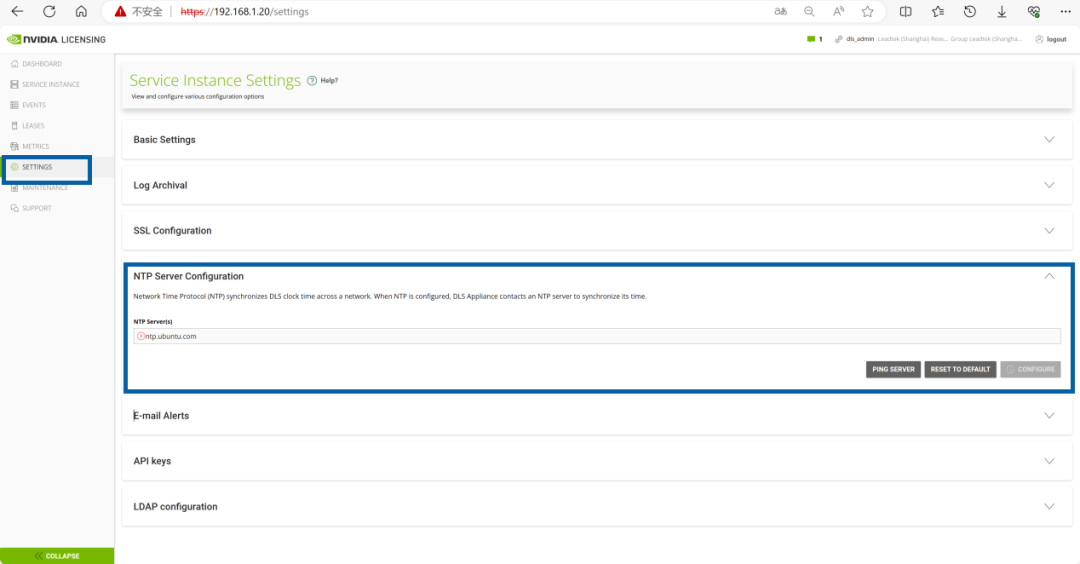
To prevent the DLS virtual machine time from drifting, resulting in license acquisition failure, you can set up NTP time synchronization service. This can be configured through the “SETTINGS” option menu page under “NTP Server Configuration”.
9 Create DLS Sudo User Account
The predefined DLS sudo user account has elevated permissions required to install DLS device software updates released by NVIDIA regularly.
-
In the Hypervisor, log in to the DLS virtual machine using the username (dls_admin) and password (welcome).
-
Run /etc/adminscripts/enable_sudo.sh script.
-
When prompted, provide the password for the rsu_admin user.
-
Create an rsu_admin user account with sudo privileges.
10 DLS Communication Port Requirements
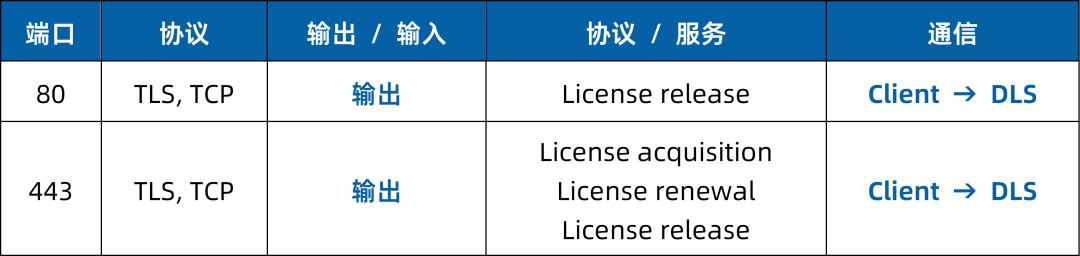
To enable communication between the license client and the DLS instance, the following ports must be opened in the firewall or proxy server:
For inquiries and information regarding the purchase and subscription of NVIDIA vGPU product solutions, please contact Leadtek Technology:
400-138-8886
GTC 2025 will be held from March 17 to 21, 2025 in San Jose, California, USA, and online simultaneously. Click “Read the original text” or scan the QR code below to register for the online conference or purchase tickets for the on-site event.

*Images or videos related to NVIDIA products (in whole or in part) are copyrighted by NVIDIA Corporation.
END