‖ System Learning
Life is like a marathon; sometimes you need to pause and take a breather to go further.
| Recently, there have been many industrial control PLC projects, so the upcoming updates will mostly focus on industrial control PLC content. All programming knowledge is provided by project team member “Tang Lu Lu” and organized and explained by Xiao Yu. Please feel free to point out any shortcomings. |
In the last issue, we discussed a simple multi-axis encapsulated FB program for Xinjie PLC. In this issue, we will talk about the multi-axis encapsulated FB block for Huichuan PLC. We used a medium PLC AC800 for demonstration, and ST language as the main programming language, as Huichuan has predominantly used ST language in recent years, so we will not use ladder diagrams. Note: This issue requires knowledge of ST language; otherwise, it may be confusing.
Current equipment: PLC is AC801, servo driver is: InoSV630N. Software used: InoProShop (V1.9.0.1)
Instruction Issues
We use single-axis drive instructions. For usage details, you can download the “Medium PLC Programming Manual (Motion Control Section)” from the Huichuan official website, which provides a detailed introduction to the usage of the instructions.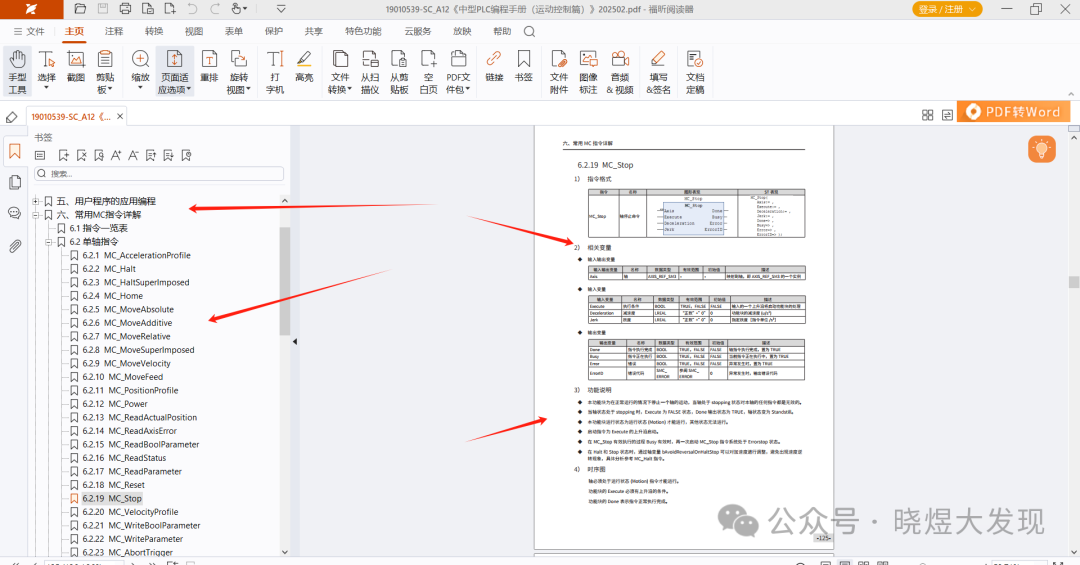
    Power        :MC_Power;//Enable
    Home        :MC_Home;//Return to origin
    Reset         :MC_Reset;//Reset axis
    Stop          :MC_Stop;//Stop axis
    Halt          :MC_Halt;//Immediately stop axis
    JOG          :MC_Jog;//Jog

    MoveA       :MC_MoveAbsolute;//Absolute position
    MoveR       :MC_MoveRelative;//Relative position
    SetPosition :MC_SetPosition;//Set current axis position
    PersistPosition1:SMC3_PersistPosition;//This instruction is used to maintain the recorded absolute encoder position of the actual axis (restores the recorded value before power failure after the controller is restarted)
    ReadParameter  :MC_ReadParameter;//Read axis status
MC instructions are our instructions; I just instantiated them. These are the commonly used axis control instructions.
EtherCAT Communication Configuration
When using EtherCAT communication, we need to set up the network, adding the corresponding PLC and servos.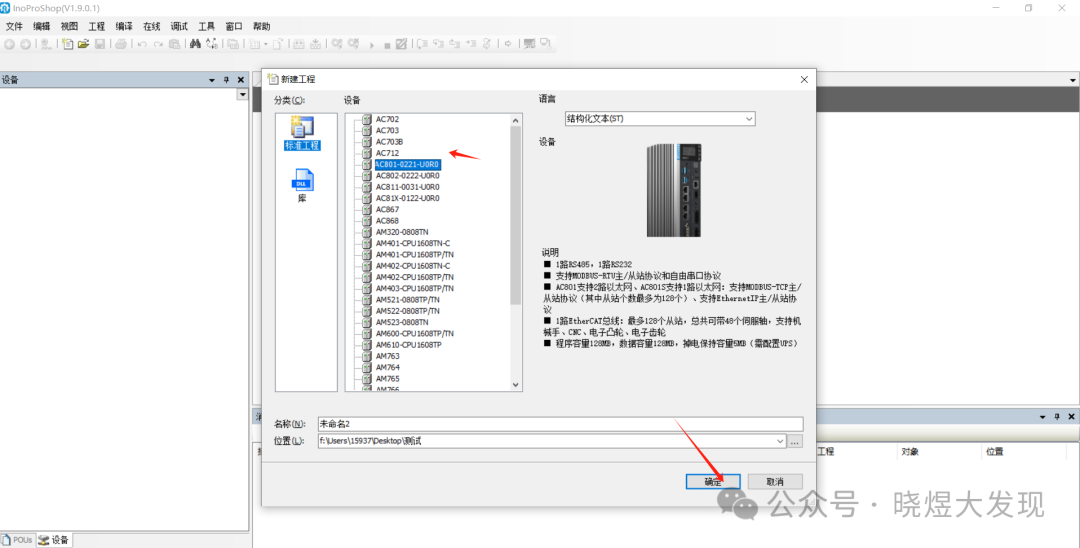
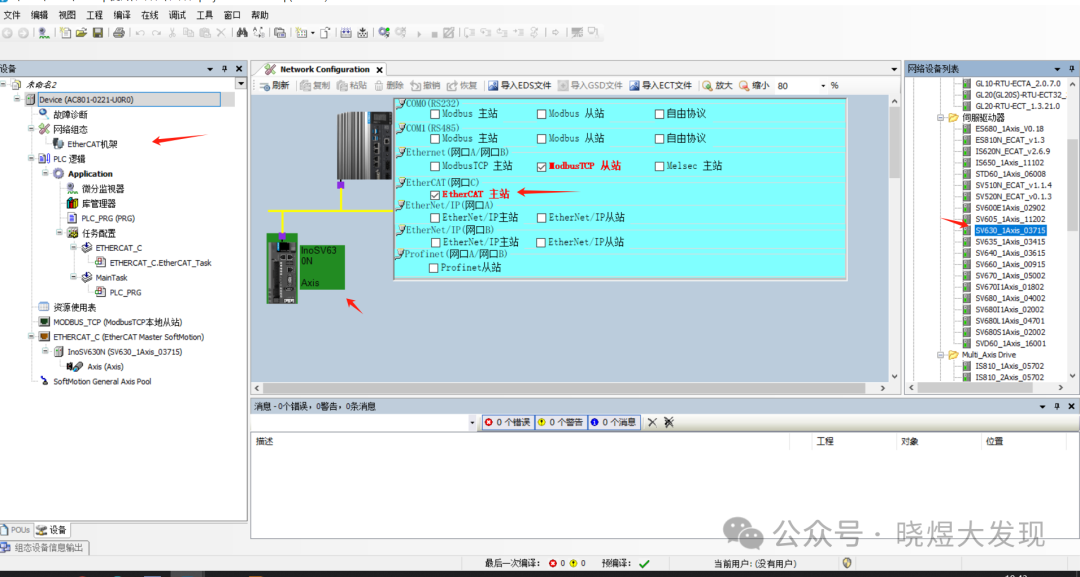 Now we have added the corresponding servo driver and PLC. At the bottom, we can see the Axis name for this servo motor; clicking on it will show the corresponding settings. There is nothing complicated here; it can be understood literally, so I won’t elaborate further.
Encapsulated FB Block
We right-click on the PLC logic Application to add a block.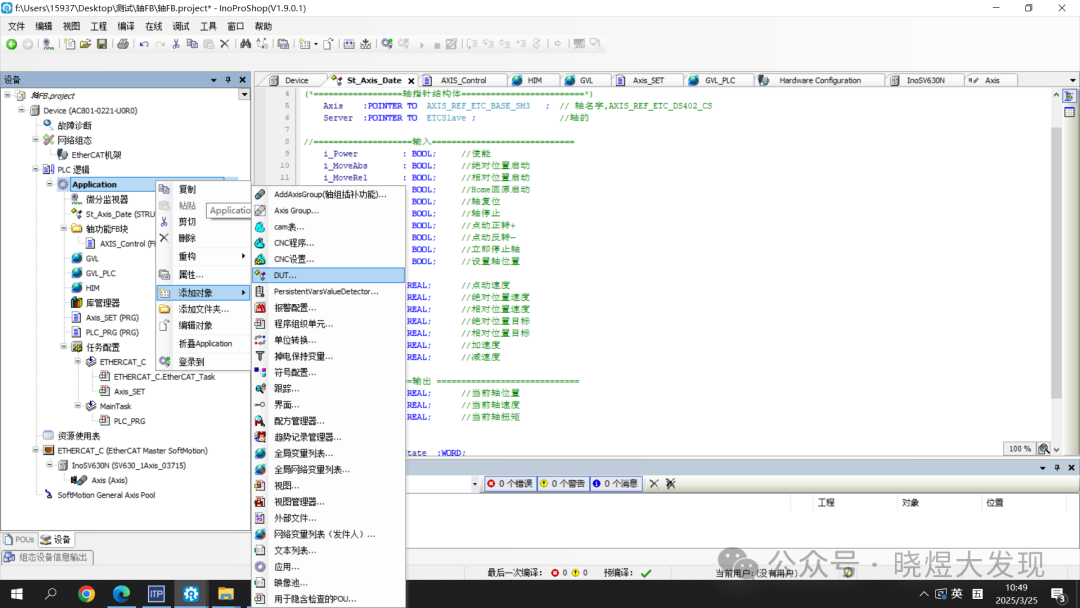
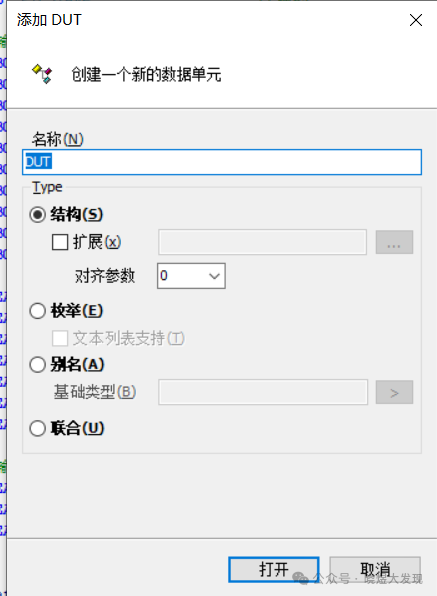
Input our structure name, for example, my naming:St_Axis_Date
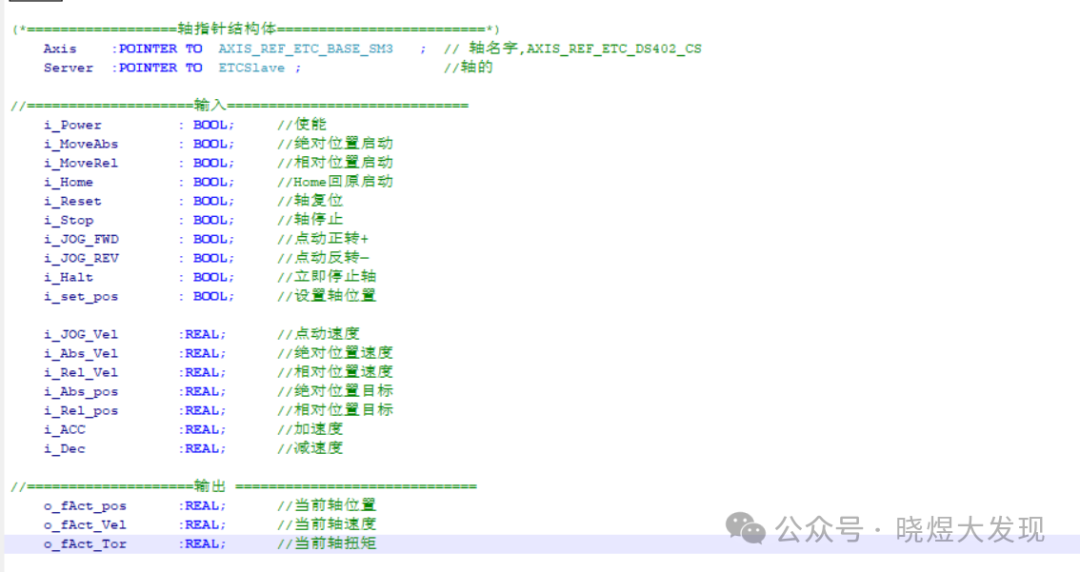
We write the variables needed for one axis into it, so we don’t need to recreate them one by one.
Create FB
We right-click on the PLC logic Application to add an FB block (program organization unit) and select the FB block.
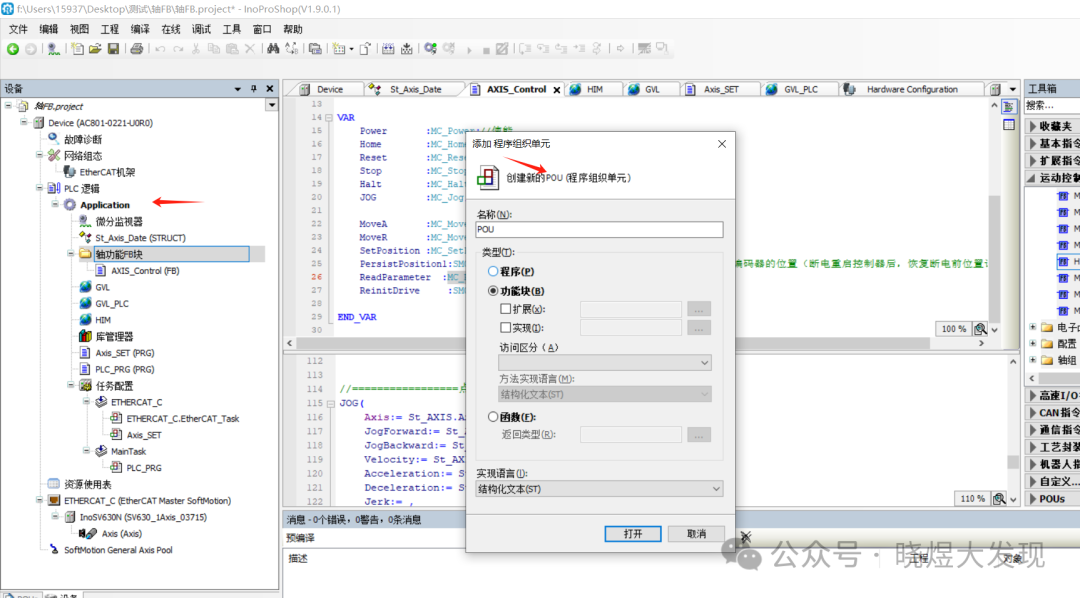
After creating it, we need to instantiate the MC instructions. I named it as follows:
VAR_OUTPUT
END_VAR
VAR_IN_OUT
St_AXIS :St_Axis_Date; //Call structure
PersistPosition_Data :SMC3_PersistPosition_Data;//Power-off save register
END_VAR
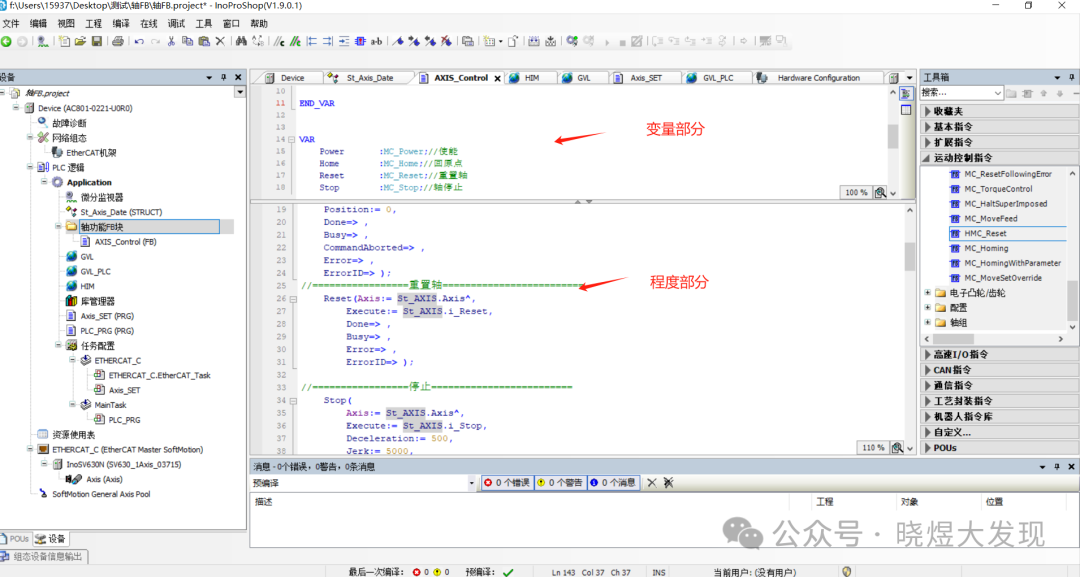
VAR
Power :MC_Power;//Enable
Home :MC_Home;//Return to origin
Reset :MC_Reset;//Reset axis
Stop :MC_Stop;//Stop axis
Halt :MC_Halt;//Immediately stop axis
JOG :MC_Jog;//Jog
MoveA :MC_MoveAbsolute;//Absolute position
MoveR :MC_MoveRelative;//Relative position
SetPosition :MC_SetPosition;//Set current axis position
PersistPosition1:SMC3_PersistPosition;//This instruction is used to maintain the recorded absolute encoder position of the actual axis (restores the recorded value before power failure after the controller is restarted)
ReadParameter :MC_ReadParameter;//Read axis status
ReinitDrive :SMC3_ReinitDrive;
END_VAR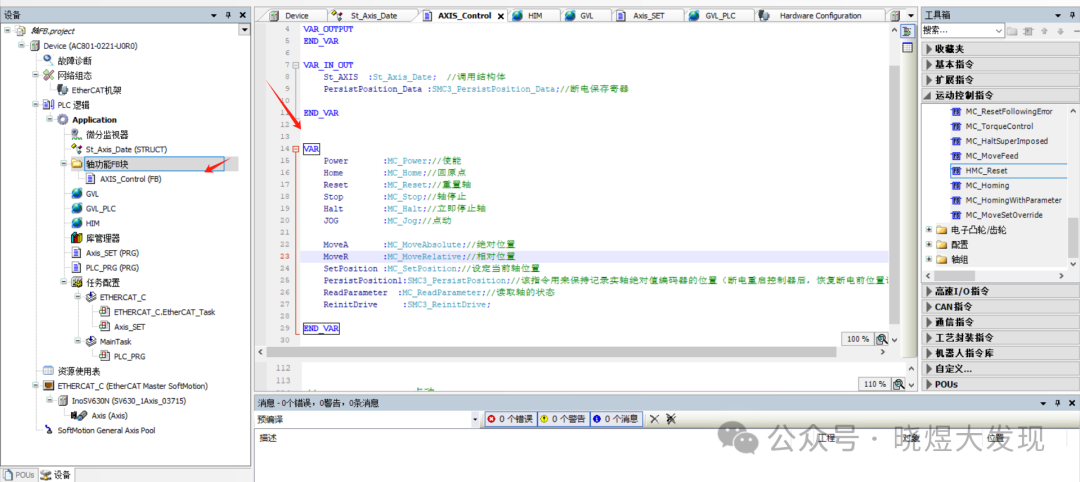
FB Program
//=================Enable=========================
Power(
    Axis := St_AXIS.Axis^,     //Axis name pointer
    Enable  := TRUE,
    bRegulatorOn:= St_AXIS.i_Power,     //Switch
    bDriveStart := St_AXIS.i_Power,
    Status  => ,
    bRegulatorRealState => ,
    bDriveStartRealState=> ,
    Busy    => ,
    Error   => ,
    ErrorID => );
//=================Home=========================
Home(
Axis:= St_AXIS.Axis^,
Execute:=St_AXIS.i_Home,
Position:= 0,
Done=> ,
Busy=> ,
CommandAborted=> ,
Error=> ,
ErrorID=> );//=================Reset Axis=========================
Reset(Axis:= St_AXIS.Axis^,
Execute:= St_AXIS.i_Reset,
Done=> ,
Busy=> ,
Error=> ,
ErrorID=> );
//=================Stop=========================
    Stop(
        Axis:= St_AXIS.Axis^,
        Execute:= St_AXIS.i_Stop,
        Deceleration:= 500,
        Jerk:= 5000,
        Done=> ,
        Busy=> ,
        Error=> ,
        ErrorID=> );
//=================Immediately Stop Axis=========================
Halt(
Axis:= St_AXIS.Axis^,
Execute:= St_AXIS.i_Halt,
Deceleration:= 1000,
Jerk:= ,
Done=> ,
Busy=> ,
CommandAborted=> ,
Error=> ,
ErrorID=> ); //=================Absolute Position=========================
MoveA(
Axis:= St_AXIS.Axis^,
Execute:= St_AXIS.i_MoveAbs,
Position:= St_AXIS.i_Abs_pos,
Velocity:= St_AXIS.i_Abs_Vel,
Acceleration:= St_AXIS.i_ACC,
Deceleration:= St_AXIS.i_Dec,
Jerk:= ,
Direction:= ,
BufferMode:= ,
Done=> ,
Busy=> ,
Active=> ,
CommandAborted=> ,
Error=> ,
ErrorID=> ); //=================Relative Position=========================
MoveR(
Axis:= St_AXIS.Axis^,
Execute:= St_AXIS.i_MoveRel,
Distance:= St_AXIS.i_Abs_pos,
Velocity:= St_AXIS.i_Abs_Vel,
Acceleration:= St_AXIS.i_ACC,
Deceleration:= St_AXIS.i_Dec,
Jerk:= ,
BufferMode:= ,
Done=> ,
Busy=> ,
Active=> ,
CommandAborted=> ,
Error=> ,
ErrorID=> );//=================Set Current Axis Position to 0========================
SetPosition(
Axis:= St_AXIS.Axis^,
Execute:= St_AXIS.i_set_pos,
Position:= 0, //You can use a variable; here it is directly set to 0
Mode:= ,
Done=> ,
Busy=> ,
Error=> ,
ErrorID=> );//=================Power-off Save Encoder Value========================
PersistPosition1(
Axis:= St_AXIS.Axis^,
PersistentData:= PersistPosition_Data,
bEnable:= FALSE, //TRUE to execute the function block, FALSE not to execute. If you want to restore the last stored position during initialization, this value must be set to TRUE from the application startup.
bPositionRestored=> ,
bPositionStored=> ,
bBusy=> ,
bError=> ,
eErrorID=> ,
eRestoringDiag=> ); //=================Jog========================
JOG(
Axis:= St_AXIS.Axis^,
JogForward:= St_AXIS.i_JOG_FWD,
JogBackward:= St_AXIS.i_JOG_REV,
Velocity:= St_AXIS.i_JOG_Vel,
Acceleration:= St_AXIS.i_ACC,
Deceleration:= St_AXIS.i_Dec,
Jerk:= ,
Busy=> ,
CommandAborted=> ,
Error=> ,
ErrorId=> );//=================Axis Status========================
St_AXIS.o_fAct_pos := LREAL_TO_REAL(St_AXIS.Axis^.fActPosition); //Display current axis position
St_AXIS.o_fAct_Vel := LREAL_TO_REAL(St_AXIS.Axis^.fActVelocity); //Display current axis speed
St_AXIS.o_fAct_Tor := LREAL_TO_REAL(St_AXIS.Axis^.fActTorque); //Display current axis torque
St_AXIS.o_wCommunicationState := St_AXIS.Axis^.wCommunicationState; //Axis communication status
 When programming in ST language, it is important to define the variables in the program. You can use many of the St_AXIS.xxxx because I instantiated the structure here. Initially, we defined the structure, and using the St_AXIS variable replaced our structure, so when we input, we directly input St_AXIS. and it will come up. This greatly saves our time in variable naming.
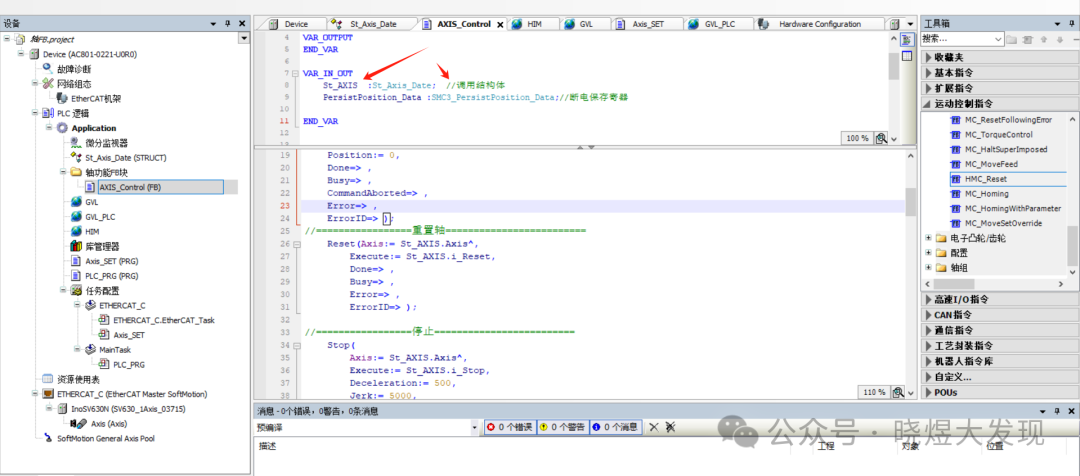
Main Program Design
We need to right-click on the PLC logic Application to add the main program, and then pull the program into the EtherCAT task cycle for it to run.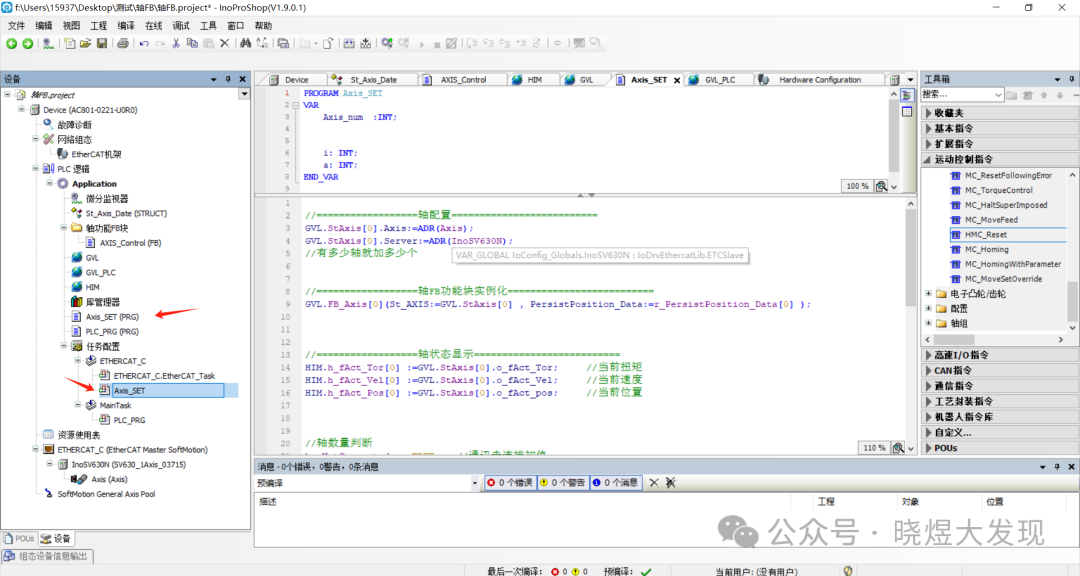
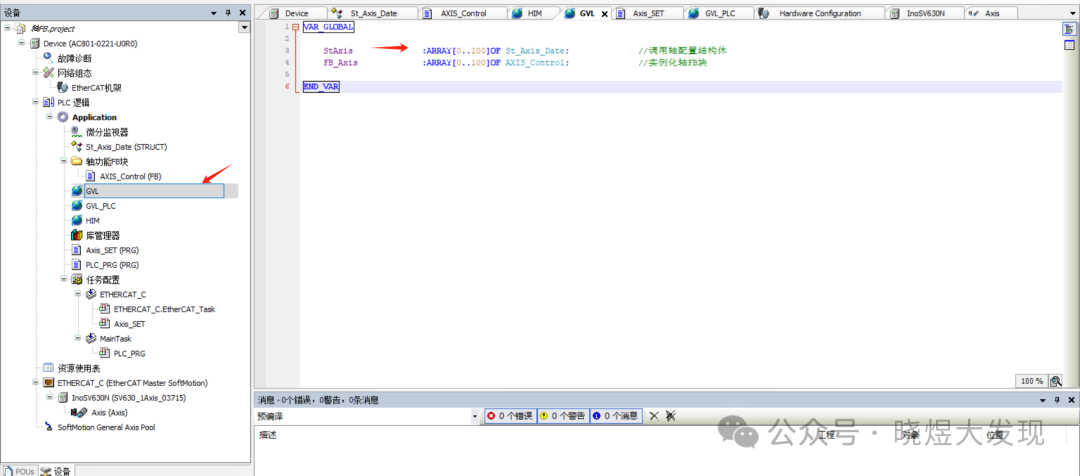
We first configure two global variables: one is the global variable for calling the FB block. If you have as many axes as you want, write the array length accordingly. I have 200 axes, so my array length is 200. If you have 10 axes, your array length is 10. Of course, you can write a bit more like me; it doesn’t matter.
I also instantiated the structure with the name StAxis, which is used in EtherCAT, separate from the FB block to avoid confusion. Of course, you can name it well; that works too.
Enter the main program priority and configure the axis parameters.
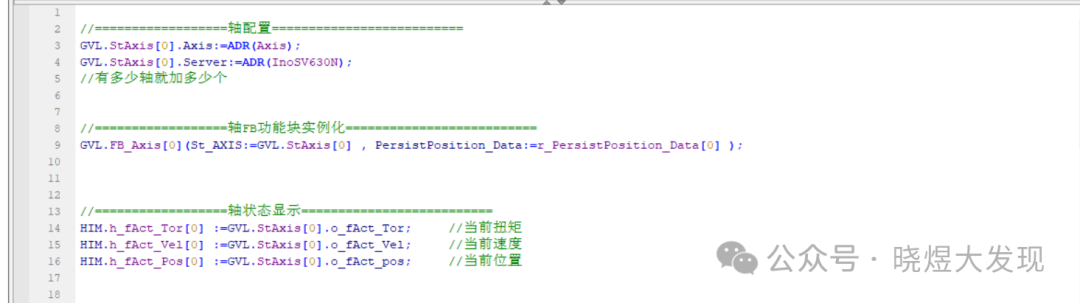
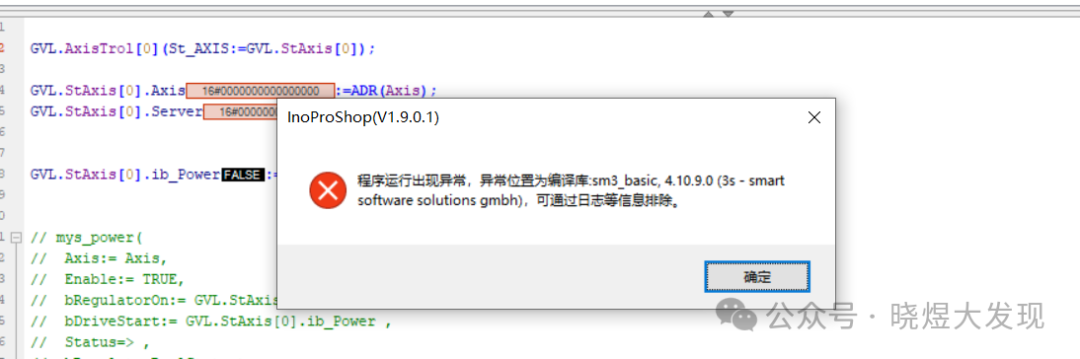
First configure the axis name before configuring the axis FB instantiation; otherwise, it will report an error. If the axis name is not specified before instantiation, it will report this error. This is something to note.
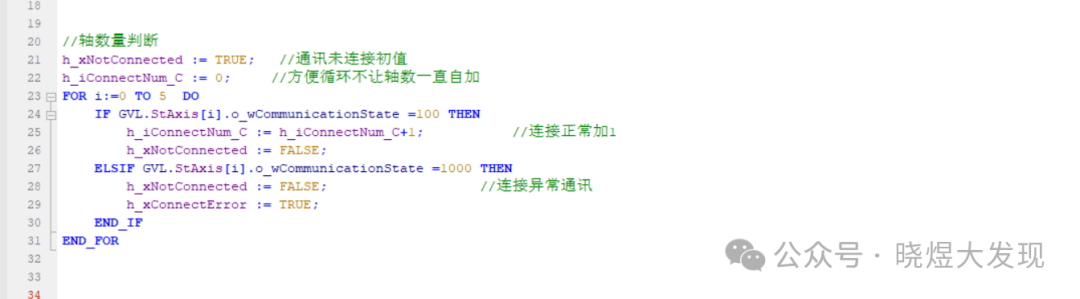
For axis quantity judgment, I used a for loop. The “To 5” can be replaced with a variable; I wrote it as a fixed number for the example to check if there are 5 axes. If so, it adds 1 normally.
In the if statement, 100 is the output flag for normal EtherCAT communication.
1000 is the error flag.
Conclusion
This issue was discussed a bit hurriedly, and you may not fully understand it because this medium PLC is quite clear to those who have used it. If you haven’t used it, you need to look at the operation manual and videos; this is not something that can be understood in one article. The main purpose of this issue is still to share program logic and some precautions, requiring a certain foundation. Please feel free to point out any shortcomings.If you need the program, you can take it from:https://pan.quark.cn/s/07f4b58e95e5Teaching a man to fish is better than giving him a fish.