^_^Hello everyone, I am from Code Sea Intelligence!^_^

In enterprise applications, Linux is the preferred operating system for servers, primarily used for databases, middleware servers, and application servers. It is also leading in the deployment of large models that have recently gained popularity!
01
—
Environment Preparation
Download the Linux version of the MySQL server. Download the appropriate version based on your needs; I downloaded:
mysql-8.0.25-1.el7.x86_64.rpm-bundle.tarCheck if there are any old versions of the MySQL package, as some CentOS images may come with it by default. The check is as follows:
rpm -qa | grep mariadb[root@xhqHost xhqMysql]# rpm -qa|grep mariadb mariadb-libs-5.5.56-2.el7.x86_64If there is one, it needs to be deleted; if not, you can skip the next steps (there is one in this instance). Check if the deletion was successful:
[root@xhqHost xhqMysql]# rpm -e mariadb-libs-5.5.56-2.el7.x86_64 --nodeps [root@xhqHost xhqMysql]# rpm -qa|grep mariadbRequired software and tools: SecureCRT or WinSCP (using these two tools here), Xshell or PuTTY, Xftp or FileZilla, mysql-8.0.25-1.el7.x86_64.rpm-bundle.tar, MySQL’s Linux version software apache-tomcat-8.0.58.tar.gz
02
—
Installing MySQL on Linux
-
Create a directory:
Create a directory for installing MySQL in the user directory of the Linux system with the following command: cd usr/local mkdir -m 777 xhqMysql

Note: If the created folder does not have read and write permissions, you need to authorize it: a. Authorize when creating: mkdir -m 777 myTomcat b. Authorize an already created folder: chmod -R 777 myTomcat
-
Copy the installation package
Use WinSCP software to copy the downloaded MySQL installation package to the newly created directory

-
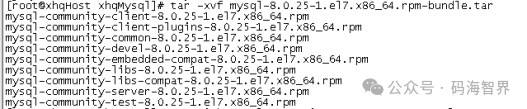
Unzip the installation package
Unzip: tar -xvf mysql-8.0.25-1.el7.x86_64.rpm-bundle.tar
-
Install common
rpm -ivh mysql-community-common-8.0.25-1.el7.x86_64.rpm --nodeps --force
-
Install libs
rpm -ivh mysql-community-libs-8.0.25-1.el7.x86_64.rpm --nodeps --force
-
Install client
rpm -ivh mysql-community-client-8.0.25-1.el7.x86_64.rpm --nodeps --force
-
Install server
rpm -ivh mysql-community-server-8.0.25-1.el7.x86_64.rpm --nodeps --force
-
Check the installed MySQL packages
rpm -qa|grep mysql
-
Initialize the MySQL database and related configurations
mysqld --initialize; Initialize MySQL chown mysql:mysql /var/lib/mysql -R; Grant permissions to operation files systemctl start mysqld.service; Start MySQL service systemctl enable mysqld; Set to start on boot
-
View the generated default password
cat /var/log/mysqld.log/|grep password
-
Log in to MySQL using the password just found and change the password
mysql -uroot -p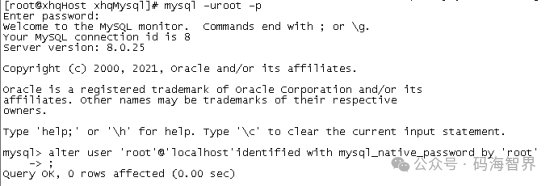
-
Change the MySQL user password to root, then exit
alter user 'root'@'localhost' identified with mysql_native_password by 'root'
-
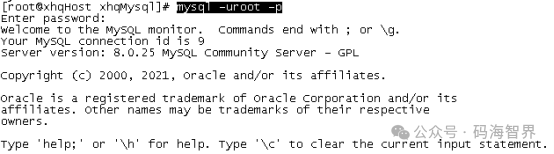
Log in again with the new password and authorize remote access
Login: mysql -uroot -p
Authorize:
create user 'root'@'%' identified with mysql_native_password by 'root'grant all privileges on *.* to 'root'@'%' with grant option; flush privileges- Exit MySQL
At this point, MySQL is installed, but usually, remote access is still not possible because the system firewall is not turned off. The following step is optional; if the work environment does not allow turning off the firewall, you need to separately enable the remote port for MySQL and add the MySQL port to the firewall whitelist.
03
—
Firewall Configuration
-
Turn off the firewall
systemctl stop firewalld.service Stop the firewall systemctl disable firewalld.service Disable the firewall systemctl mask firewalld.service Prevent it from starting on boot-
Check the firewall status
systemctl status firewalld.serviceAt this point, the entire server deployment is successfully running!
^_^If this was helpful to you, remember to give afollow/like/recommend!^_^

 Give afollow!


Recent Hot Articles:
| vLLM+Dify+Local DeepSeek easily applies file upload and question functionality to practice | This article is enough for combining files to answer questions! The ultimate solution for knowledge base agents! Ollama+BGE-M3 docking Vllm+Dify+Local DeepSeek large model detailed operation Linux system setup tomcat service and deploy web projects | Detailed enterprise-level process | Solution description! Dify upgrade unsuccessful? You just need to do this step correctly, upgrading is really simple! vLLM+DeepSeek local deployment of large models ultimate solution, detailed beyond imagination! |
