In Linux, commands typically consist of three parts:Command, Options, Arguments
First Part: Command.
The input at the command prompt must be a command, or the path to an executable program, or the path/name of a script.
Second Part: Options.
Options must be separated from the command by a space, and they serve to modify the execution method and characteristics of the command. Multiple options can be used simultaneously, and there are both long and short options; some options can have parameters.
Short Options: Usually introduced by a single dash “-” followed by a letter. If multiple short options are added to a command, they can be combined under a single dash “-” without spaces between them, or each short option can be individually introduced with a dash “-” but must be separated by spaces.
Long Options: Typically introduced by two dashes “–” and a word-format option. Long options usually cannot be combined and must be introduced separately.
Third Part: Arguments.
These are the objects of the command, defining where the command takes effect. The acceptance of arguments and their count varies among different commands.
1. Basic ls Command
Function: Lists the subdirectories and files under the specified path or the current directory.
Command usage format: ls directory/file, when ls is used without parameters, it only lists the subdirectories and files in the current directory.
Common options are as follows.
-h: Performs unit conversion.
-a: Displays all files in the directory, including hidden files.
-l: Views files in long format.
-A: Displays all files and directories in the directory, including hidden files, but does not show “.” and “..”.
-d: Displays the properties of the directory itself.
-S: Sorts by file size.
-i: Displays the file’s index number.
-r: Displays files in reverse order, default displays files in normal order.
-R: Recursively displays, this method is resource-intensive, for example, if a directory contains hundreds of directories and each directory has hundreds of layers and thousands of files, the data to be displayed will be loaded into memory first, and using this method will consume a lot of memory for displaying directories.
Using the ls command without any options.

(1) -l:
Lists detailed information about files, such as creator, creation time, and read/write permission list, in long format.
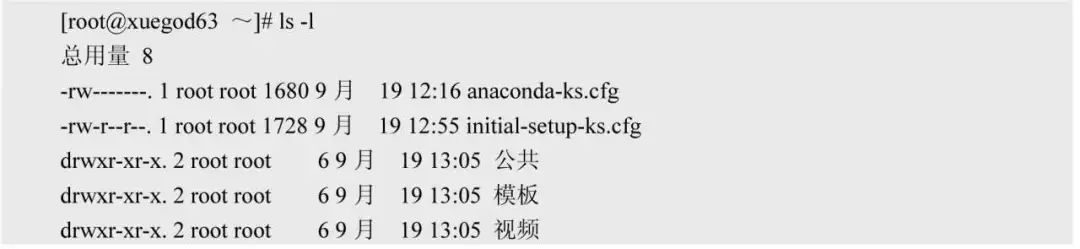
(2) The meaning of each segment of file attributes is shown in the figure below.
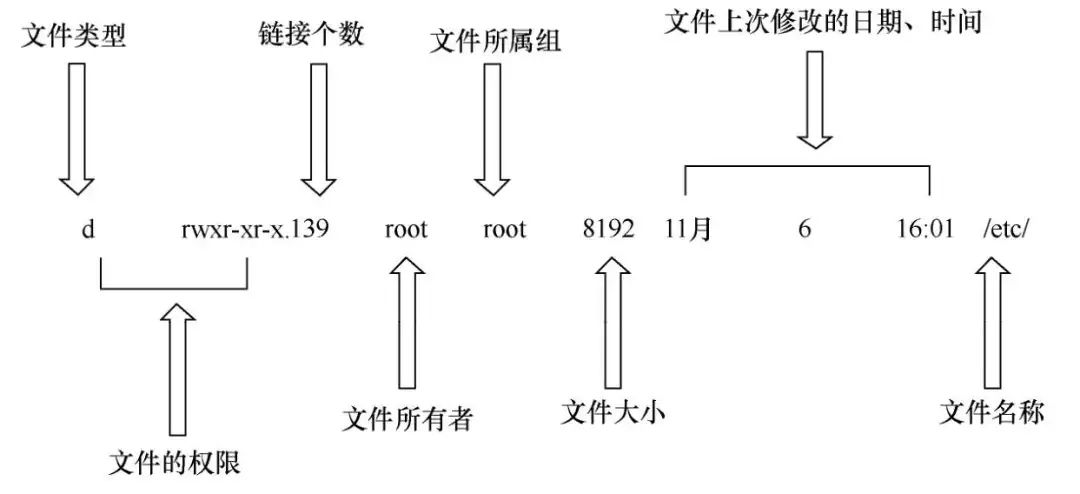
① The first character denotes the file type and includes the following:
• d: Directory file.
• l: Link file.
• b: Block device file.
• c: Character device file.
• p: Pipe file.
• -: Regular file.
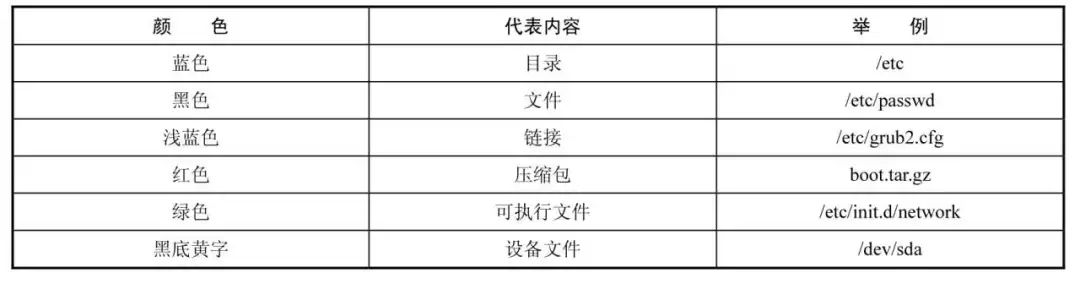
② Different colors in the Linux system represent different file types, detailed in the table below.
(3) -a
Lists all files in the directory, including hidden files that start with “.” (hidden files in Linux start with “.”, indicating the current directory; if there are two dots “..”, it indicates the parent directory).

(4) -d
Views the directory (without viewing its contents, generally used with the -l parameter, using -d alone is of little significance).

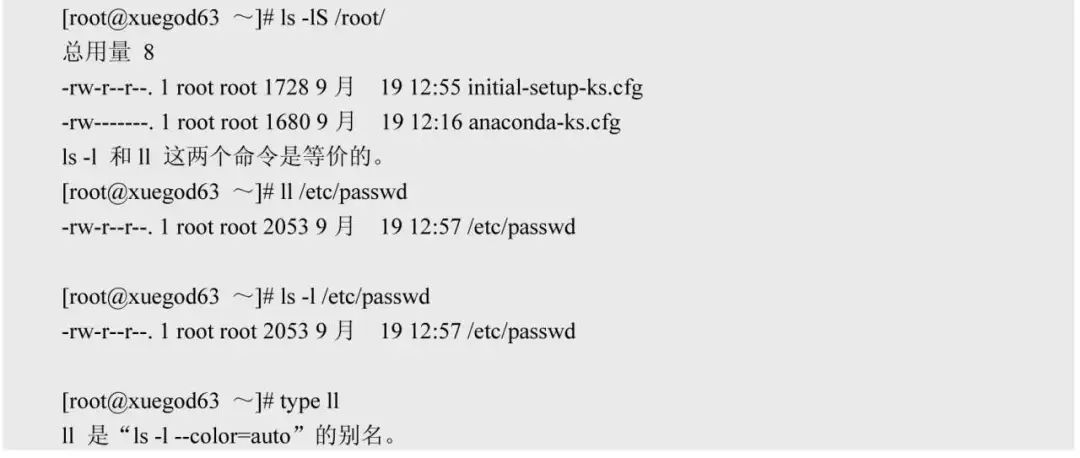
(5) -S
Sorts by file size.
2. Using Command Aliases
A command alias defines one command name as another name, allowing users to use either the original command or its alias.
To define a command alias, use the alias command, and the command can include options and parameters; if there are spaces between the command, options, and parameters, enclose them in single quotes.
Defining a command alias is a feature of the Shell, effective only in the current terminal; when the user exits the current terminal, the defined alias becomes ineffective.
Even if the same user opens a Shell again, it will not take effect, meaning that command aliases defined in the Shell are only valid during the current Shell’s lifecycle.The effective range of an alias is limited to the current Shell process; to make it permanent, one must modify the relevant Bash configuration files.
Command aliases effective for the current user are only usable under that user, while globally effective command aliases can be used by all users in the system.
1. Defining Command Aliases
The command is alias, used to define command aliases.
Command usage format: alias custom_alias=’existing_system_command’, this method temporarily defines a command alias.

When using a command alias, you are actually using the command corresponding to the alias; for instance, executing the command alias vimens33 actually runs vim /etc/sysconfig/network-scripts/ifcfg-ens33.
2. Deleting Command Aliases
The command is unalias, used to cancel/delete command aliases.
Command usage format: unalias alias_name.

3. Setting Command Aliases to be Permanent (Two Effective Ranges)
(1) Setting the current user’s command alias to be permanently effective (valid only for the current user).

(2) Setting a globally effective command alias to be permanently effective (valid for all users in the system).
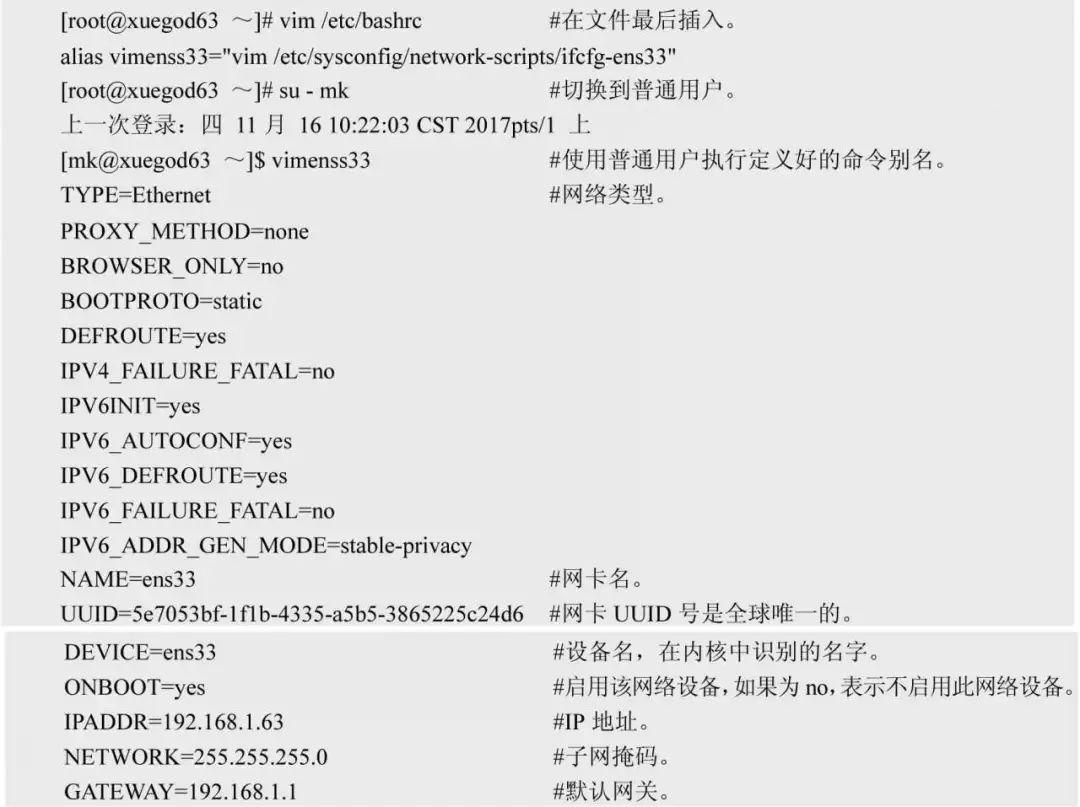
Summary: The permanence of command aliases can be achieved through global definition or personal definition by modifying configuration files.
Global definition: Modify /etc/bashrc and add alias cls=clear to the file.

Personal definition: Modify ~/.bashrc and add alias cls=clear to the file, where ~ indicates the current user’s home directory.

3. Basic cd Command
Function: Switch directories (Change Directory).
Command usage format: cd [directory].
Note: Directly entering cd returns to the current user’s home directory.
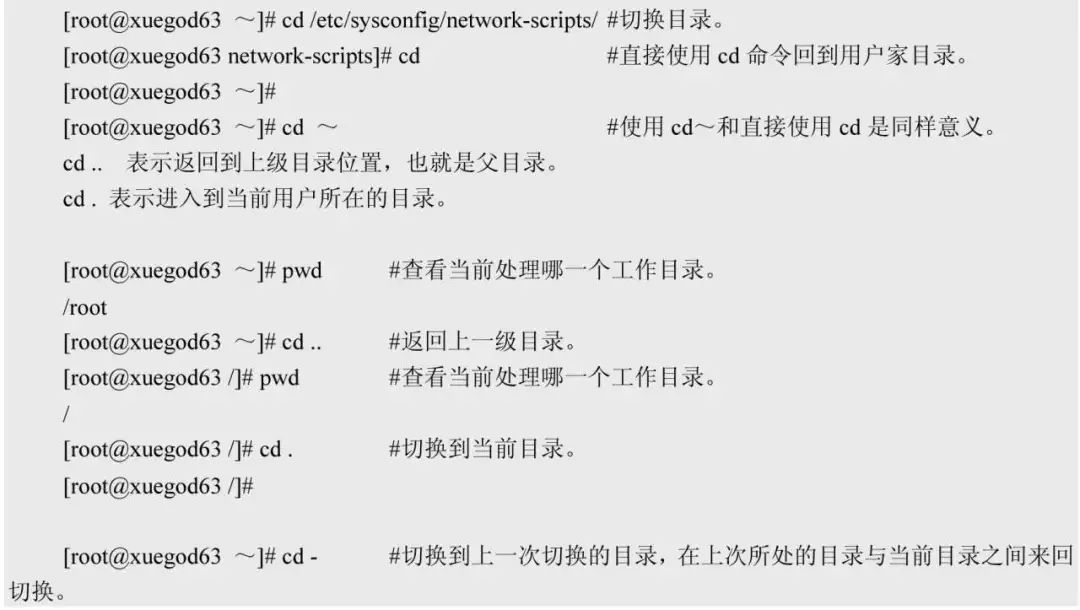
Example: Using cd.

4. Basic history Command
Function: Used to view and manage executed commands.
Command usage format: history [options].
Here are four quick tips for finding Linux historical commands.
(1) Use the ↑↓ keys on the keyboard.
(2) Use the Ctrl + R combination key, enter a keyword of a command to find the corresponding command, and press the right arrow key.
(3) “!number” represents executing the Nth command from the history.
(4) “!string” represents searching for the most recent command starting with the xxxx string, such as !vim.
5. Shortcuts in Linux
There are several shortcuts in Linux (where ^ represents the Ctrl key).
(1) ^C: Terminates the currently running foreground program, for example, after pinging g.cn, press Ctrl+C to stop the program.
(2) ^D: Exits, equivalent to exit.
(3) ^L: Clears the screen, same function as the clear command.
(4) ^R: Searches historical commands based on keywords.
(5) Tab key: Completes commands, can only complete commands and file names.
(6) !$: References the last parameter of the previous command, equivalent to:


Author’s Note: In today’s internet age, regardless of the profession, having some understanding of IT is beneficial for personal development. I will continuously update my IT learning skills in the future, hoping to benefit you while pushing myself forward.
Everyone is welcome to follow, comment, and discuss skills and techniques, learning and growing together.
Author’s Declaration: Since the establishment of this account, I have shared knowledge for public benefit, not for advertising, only for sharing interests.
Scan the QR code
to get more exciting IT technology tips