padluo
Reading time required: 4 minutes
Quick read only takes 2 minutes
Related Concepts
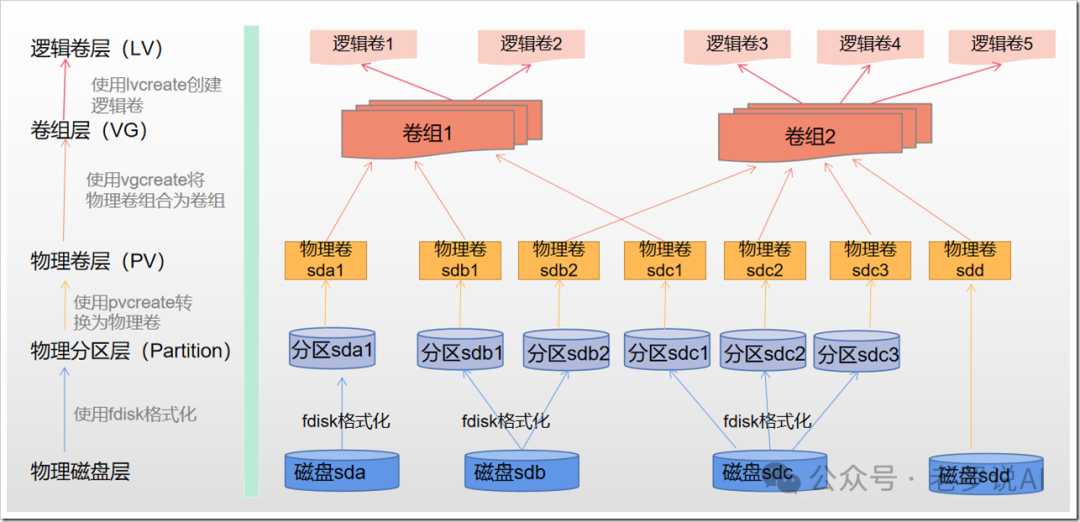
Let’s first look at several concepts of LVM (Logical Volume Manager):
In LVM (Logical Volume Manager), the relationships between various components can be summarized as follows:
-
Physical Volume (PV): This is an actual disk partition or an entire disk that, after initialization, is used by LVM to provide raw storage space.
-
Volume Group (VG): This combines one or more physical volumes into a unified storage pool. The space in this storage pool can be flexibly allocated later.
-
Logical Volume (LV): This is a virtual partition allocated from a volume group, used just like traditional partitions. Logical volumes can be used to create file systems, mounted for use, and support advanced features such as dynamic resizing and snapshots.
-
LVM: This is the software layer that manages all the above components, providing unified management of physical volumes, volume groups, and logical volumes, enabling flexible allocation and expansion of storage space.
The requirement is as follows: merge the spaces of nvme0n1 and nvme1n1 disks and mount them to the /data directory.
Configuring and Managing Physical Volumes (PV), Logical Volumes (LV), and Volume Groups (VG)
-
Initialize Physical Volumes: Use
pvcreateto initialize the two disks as physical volumes for LVM (assuming there is no important data on the disks):sudo pvcreate /dev/nvme0n1 /dev/nvme1n1 -
Create a Volume Group: Add the two physical volumes to the same volume group (for example, named
data_vg):sudo vgcreate data_vg /dev/nvme0n1 /dev/nvme1n1 -
Create a Logical Volume: Create a logical volume in the volume group (for example, named
data_lv), using all remaining space in the volume group:sudo lvcreate -l 100%FREE -n data_lv data_vg -
Format the Logical Volume: Format the newly created logical volume with a file system (for example,
ext4orxfs):sudo mkfs.ext4 /dev/data_vg/data_lvor:
sudo mkfs.xfs /dev/data_vg/data_lv -
Create a Mount Point and Mount: Create a new mount point
/dataand mount the logical volume:sudo mkdir /data sudo mount /dev/data_vg/data_lv /data -
Set Up Automatic Mounting at Boot: Edit
/etc/fstaband add the following line (it is recommended to use UUID for mounting, which can be queried usingblkid):/dev/data_vg/data_lv /data xfs defaults 0 0 # UUID="xxxxxxxx" /data xfs defaults 0 0If using the
ext4file system, changexfstoext4. -
View and Verify:
# View Physical Volumes
sudo pvs
sudo pvdisplay
# View Volume Groups
sudo vgs
sudo vgdisplay
# View Logical Volumes
sudo lvs
sudo lvdisplay
WeChat public account “padluo” shares the self-cultivation of data scientists. Since we have met, let’s grow together. Follow the public account “Lao Luo Talks AI” and reply with “article” to obtain the complete collection of articles from “Lao Luo Talks AI”.