Hello everyone! If you are like me and a loyal user of the Windows Subsystem for Linux (WSL), you must be impressed by Ubuntu’s performance within it. Many of us may still be using the stable and reliable Ubuntu 22.04 LTS (Jammy Jellyfish). But now, an exciting new era has arrived—Ubuntu 24.04 LTS (Noble Numbat) has officially been released, and a direct upgrade path from 22.04 LTS is now open!
Upgrading to the latest LTS (Long Term Support) version means we can enjoy not only the latest features, performance optimizations, and security updates but also ensure continued official support for the coming years. So, why upgrade? How can we safely and smoothly complete this “migration”?
Don’t worry, this guide will walk you through the entire process from backup to verification, ensuring our WSL environment upgrades painlessly. Let’s get started!

Why Upgrade to Ubuntu 24.04 LTS?
Before we get started, let’s take a look at the enticing new features that “Noble Numbat” brings us:
- Linux Kernel 6.8: Brings stronger hardware support, performance improvements, and new system call functionalities.
- Default .NET 8 Enabled: A huge boon for .NET developers, ready to use out of the box without additional configuration.
- Updated Toolchain: Includes GCC 14, Glibc 2.39, Python 3.12, OpenJDK 21, etc., keeping our development environment at the cutting edge of technology.
- Enhanced Security: Provides stricter kernel security settings and application restrictions, safeguarding our work.
- Enterprise-Level Management Improvements: Introduces new management tools and policies, simplifying large-scale deployment and maintenance.
In short, upgrading is embracing the future. Now, let’s ensure this process is foolproof.
Overview of the Upgrade Process
To have a clear understanding of the entire process, I have drawn the following flowchart:
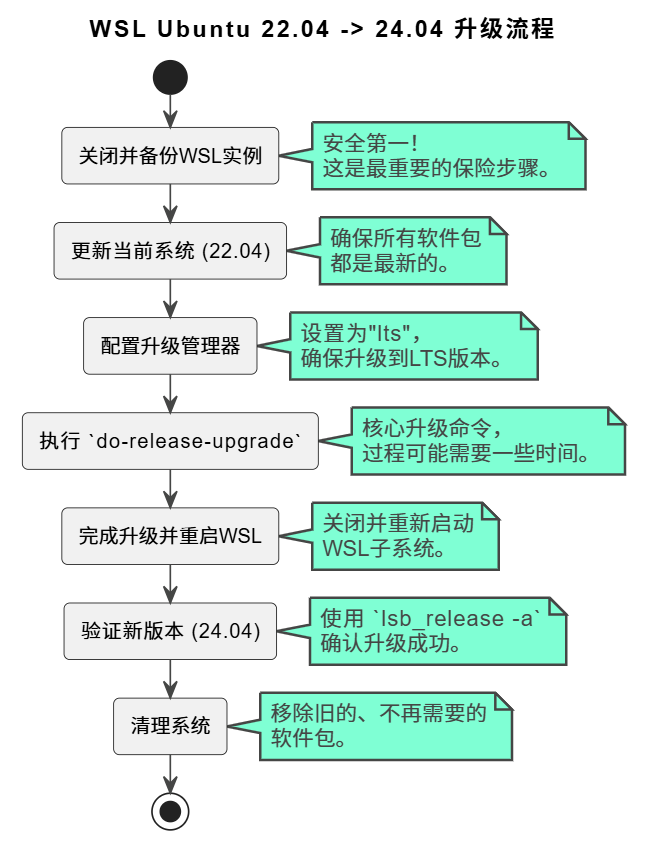
Step 1: Safety First! Backup Our WSL Instance
Before making any major system changes, backups are our “insurance policy”. Although the WSL upgrade process is generally stable, we must prepare for the worst-case scenario.
-
Completely Shut Down WSL Services To ensure file system consistency, open PowerShell or CMD in Windows and run the following command:
wsl --shutdown -
Export the Ubuntu Instance Next, we will package the entire Ubuntu 22.04 environment into a file. Please continue to run in PowerShell:
# Format: wsl --export <instance_name> <backup_file_path.tar>
wsl --export Ubuntu-22.04 "D:\wsl-backups\Ubuntu-22.04-backup-$(Get-Date -Format 'yyyyMMdd').tar"
Note:
- Replace
<span>Ubuntu-22.04</span>with the exact name of our WSL instance (which can be viewed using the<span>wsl -l -v</span>command). - Replace
<span>D:\wsl-backups\</span>with a backup directory of your choice that has enough space.
After completing this step, we have a solid backup. If the upgrade fails, we can always restore it using the <span>wsl --import</span> command.
Step 2: Prepare for the Upgrade—Update the Existing System
Before “jumping” to the new version, we need to ensure the current system is in optimal condition.
-
Start the Ubuntu 22.04 WSL Instance.
-
In the Ubuntu terminal, execute the following commands in sequence:
# Update package list
sudo apt update

# Upgrade all installed packages
sudo apt upgrade -y

# Handle any potential dependency changes
sudo apt dist-upgrade -y

# Remove old dependencies that are no longer needed
sudo apt autoremove -y

# Clean up old package cache
sudo apt autoclean
This “one-stop service” ensures our system is clean and up-to-date, clearing the way for the version upgrade.
Step 3: Configure the Upgrade Manager, Targeting LTS
We need to clearly inform the system that our target is the next LTS version, not an intermediate non-LTS version.
-
Edit the Upgrade Configuration File Use an editor (here we use
<span>nano</span>as an example) to open the configuration file:sudo nano /etc/update-manager/release-upgrades -
Ensure the
<span>Prompt</span>value is<span>lts</span>Find the line in the file that says<span>Prompt=</span>and ensure its value is<span>lts</span>.# /etc/update-manager/release-upgrades [DEFAULT] # Default prompting behavior, valid options: # # never - Never check for a new release. # normal - Check to see if a new release is available. If so, inform the # user but don't offer to upgrade unless the user runs # do-release-upgrade. # lts - Check to see if a new LTS release is available. If so, # inform the user and turn on the upgrade button in # update-manager. Prompt=ltsIf it is already set to
<span>lts</span>, no modification is needed. If not, please modify it, save, and exit (in nano, press<span>Ctrl+X</span>-><span>Y</span>-><span>Enter</span>).
Step 4: Execute the Upgrade! Witness the Moment of Miracles
Everything is ready, just waiting for the right moment. Now, let’s start the upgrade process.
-
Run the Upgrade Command In the Ubuntu terminal, enter this magical command:
sudo do-release-upgrade -
Follow the On-Screen Prompts
- The system will check the software sources and inform us that it has found the new version “24.04 LTS”.
- It will calculate the download size, disk space, and other information required for the upgrade and ask if we want to continue. Brave users can type
<span>y</span>and press<span>Enter</span>. - During the upgrade process, the system may ask how to handle modified configuration files. Usually, it is safe to choose to keep the latest version provided by the maintainer (default option) or to keep our own version. If unsure, pressing
<span>Enter</span>to select the default is usually safe. - For core libraries like
<span>libc6</span>, the system may ask whether to restart services during the upgrade. It is recommended to choose<span>Yes</span>to avoid potential service interruptions.
This process will download hundreds of packages and configure them, with the time required depending on our network speed and computer performance. Brew a cup of coffee and wait patiently.
Step 5: Final Touches and Verification
After the upgrade is complete, we need to perform final confirmations and cleanups.
-
Restart WSL The upgrade script will finally prompt us to restart. In the WSL environment, this means closing the current session.
- First, run
<span>wsl --shutdown</span>in PowerShell again to ensure all WSL instances are closed. - Then, restart our Ubuntu instance.
Verify the Upgrade Results—The Moment of Truth Open a new Ubuntu terminal and run the following command:
lsb_release -a
If we see the following output, then we have successfully upgraded!
No LSB modules are available.
Distributor ID: Ubuntu
Description:    Ubuntu 24.04 LTS
Release:        24.04
Codename:       noble
Final Cleanup On the new system, we will do another cleanup to ensure all dependencies are correct and remove any unnecessary packages generated after the upgrade.
sudo apt update
sudo apt upgrade -y
sudo apt autoremove -y
sudo apt autoclean
Frequently Asked Questions (FAQ)
-
What if my WSL version is too old? Ubuntu 24.04 LTS requires a newer version of WSL. Run
<span>wsl --update</span>in PowerShell to update WSL to the latest version, which can avoid many strange issues. -
What if the upgrade fails? Don’t panic! This is why we made a backup in the first step. We can delete or unregister the failed instance (
<span>wsl --unregister YourInstanceName</span>) and then restore our 22.04 environment from the previous backup file using the<span>wsl --import</span>command. -
What if my third-party PPA (Personal Package Archive) is broken after the upgrade? This is normal. The upgrade process disables all third-party PPAs for safety. After a successful upgrade, we need to manually check if these PPAs support 24.04, then re-edit the source files (usually in the
<span>/etc/apt/sources.list.d/</span>directory) and enable them. -
Upgrade prompts insufficient space? The upgrade requires additional disk space to download and unpack new packages. Please ensure our WSL virtual disk has enough space (at least 15-20GB of free space is recommended).
Conclusion
We have successfully brought our WSL development environment into the new era of “Noble Numbat”. Through this upgrade, we not only gained the latest features and performance but, more importantly, laid a solid and reliable foundation for development work in the coming years.
I hope this detailed guide helps everyone complete the upgrade smoothly. Enjoy the fun of running the latest Ubuntu seamlessly on Windows!