△Star Mark ☆DOP Design, never miss a valuable article.

Source: google.cn
DOP Design (ID: dopdesign) Original
Author | DOP Design
Editor | Lizi
As people’s pursuit of refinement and high quality increases, every detail in interior design has become more meticulous. In addition to the “invisible light” hidden design, the design of skirting boards has also become popular with the concept of “visible feet, invisible feet”.
Today, let’s discuss the invisible embedded skirting board from the following aspects:
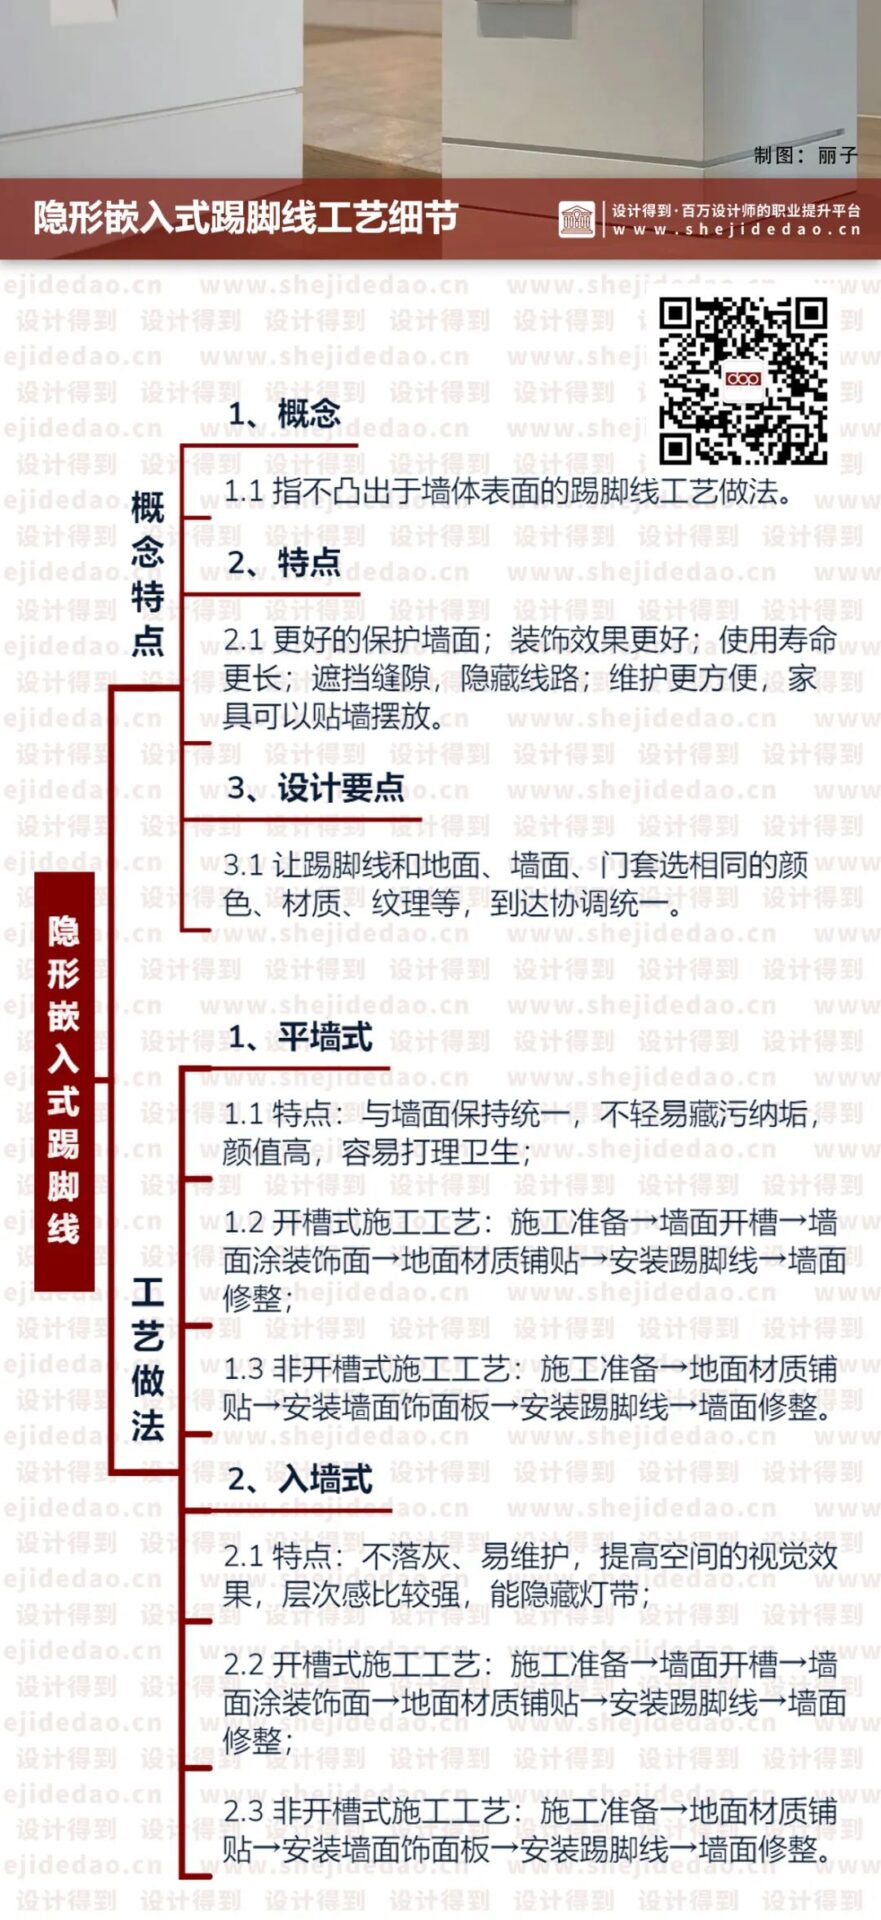
1.What is an invisible embedded skirting board?
2.Crafting methods for embedded skirting boards
PS: The special event for reading day has started, grab good books for free every day. Today we share “Residential Layout Anatomy Book”PDF, the way to get it is as follows:

01. What is an invisible embedded skirting board?
www.shejidedao.com丨Contact VX:dop024 Reply “Public Account” to join the group
Source: google.cn
1.Concept
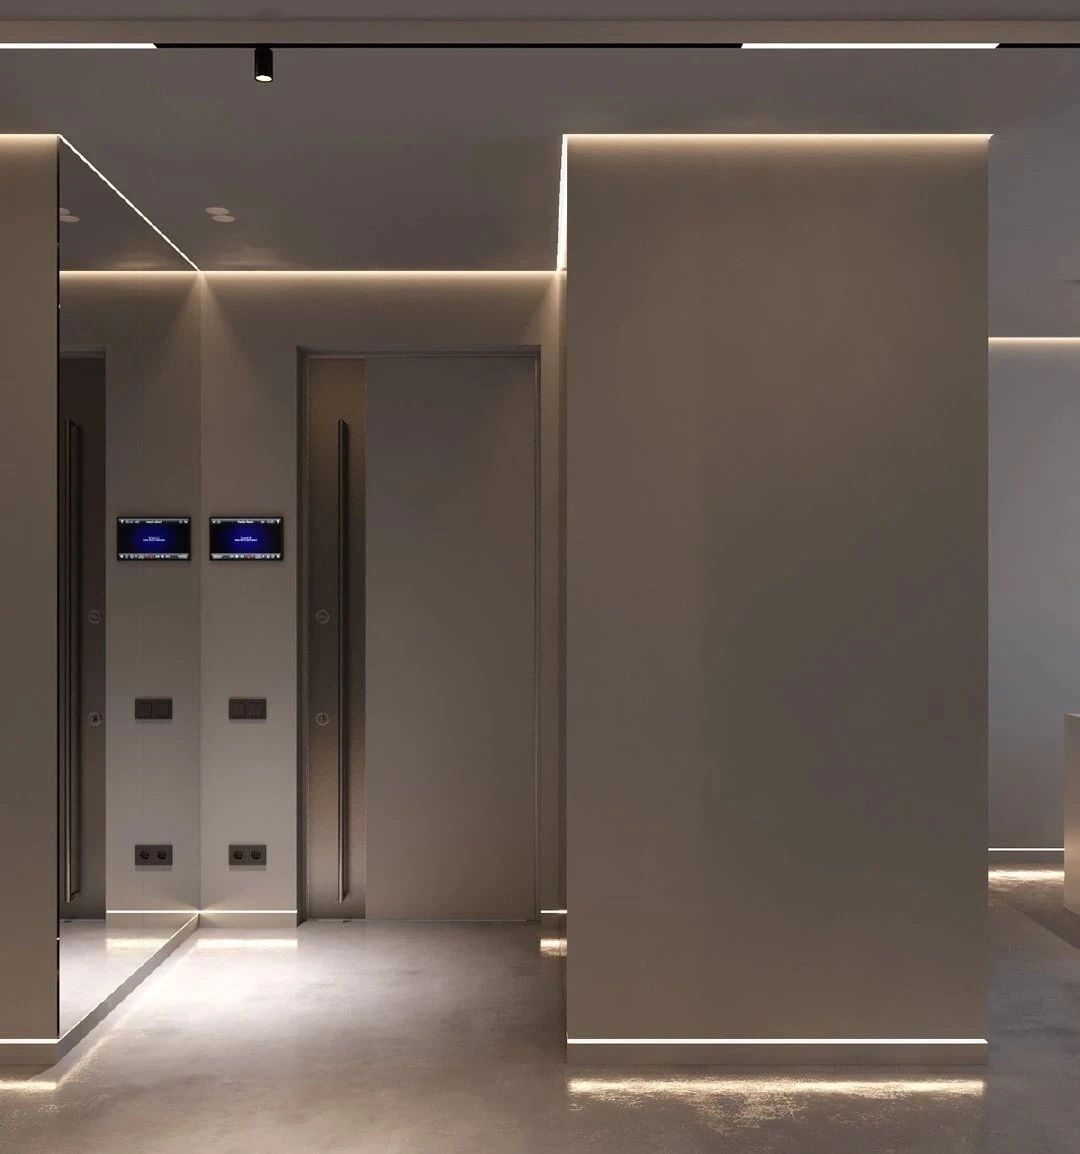
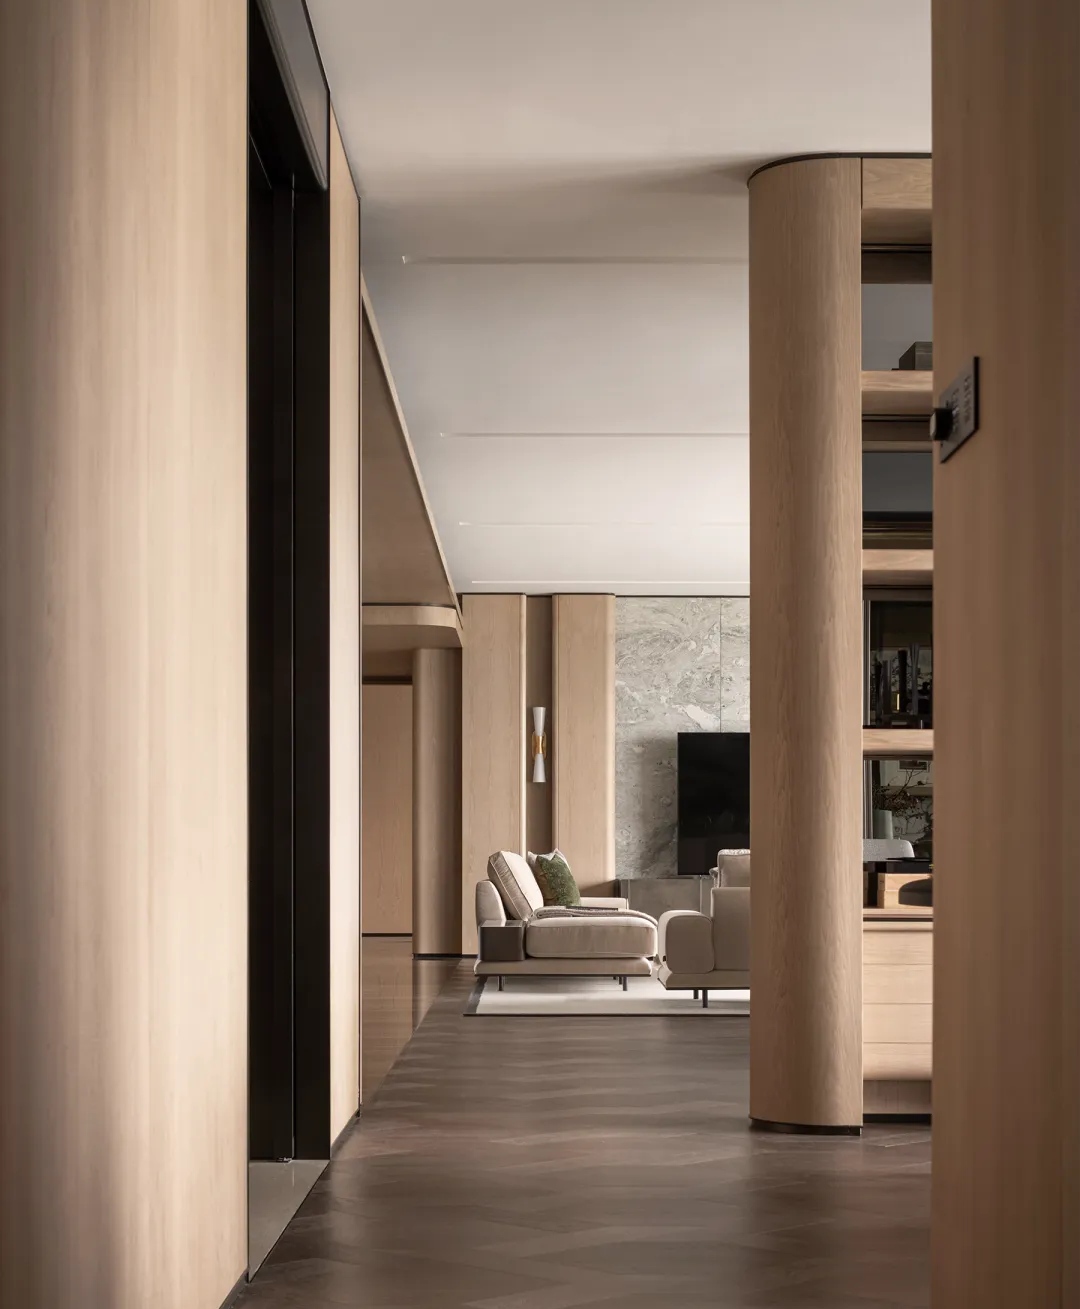
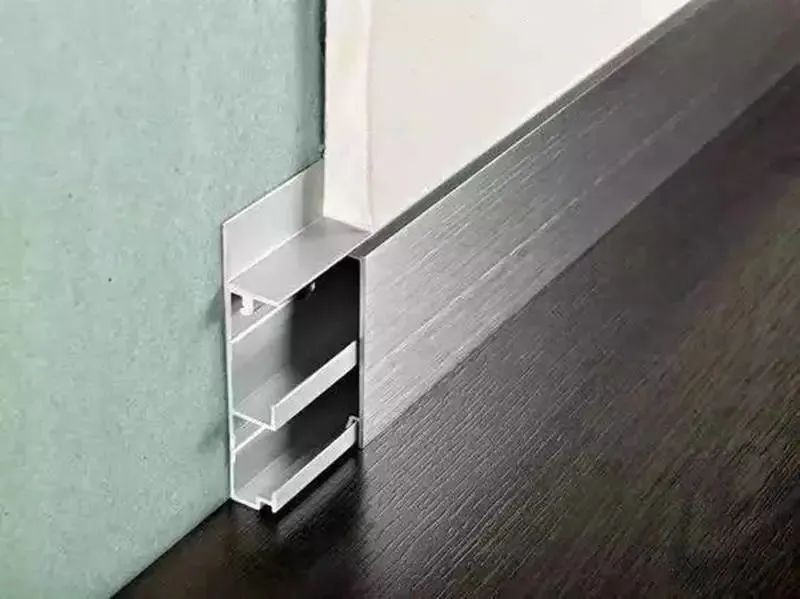
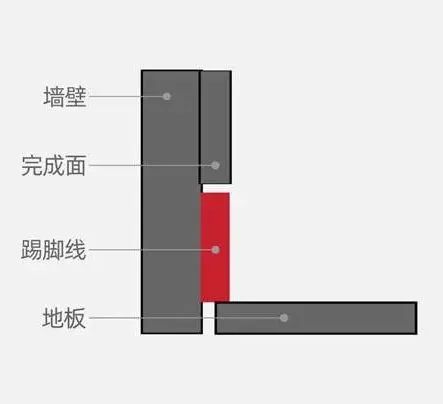
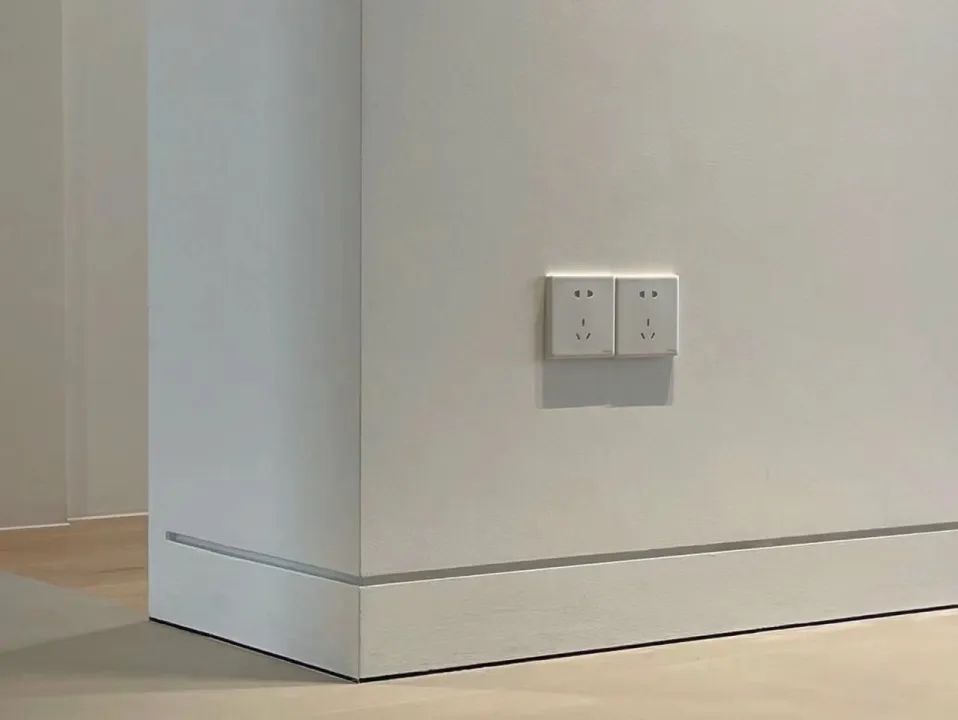
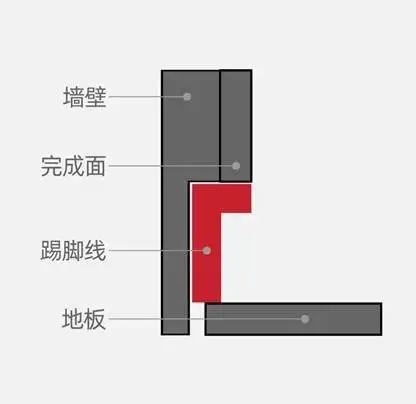
Invisible embedded skirting board refers to creating small grooves in the wall or using the thickness of the finish to form a natural groove, then embedding the skirting board into the groove, so that after construction, the surface of the skirting board is recessed into the wall finish or flush with the wall, achieving the effect of seeming to be embedded in the wall.
Source: google.cn
△ Recessed into the wall style (partial) example
Source: google.cn
△ Recessed into the wall effect example
Source: google.cn
△ Flush with the wall style (partial) example
Source: google.cn
△ Flush with the wall effect example
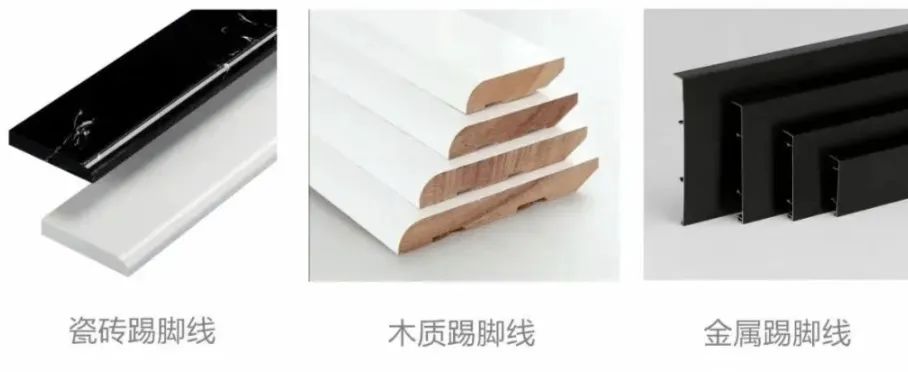
The common materials for skirting boards include stone, wood, tiles, metal, PVC, etc. The invisible embedded skirting board is often more applied in metal materials, mainly stainless steel and aluminum alloy materials.
Source: google.cn
2.Features
Source: google.cn
a.Better protection for walls.
b.Allows for a more natural transition and connection between upper and lower spaces, harmonizing with the wall for a better decorative effect.
c.Usually made of metal skirting boards, which are more durable and have a longer lifespan.
d.Conceals gaps and hides wires.
e.Easier maintenance, furniture can be placed against the wall.
3.How to achieve a better “invisible” effect?
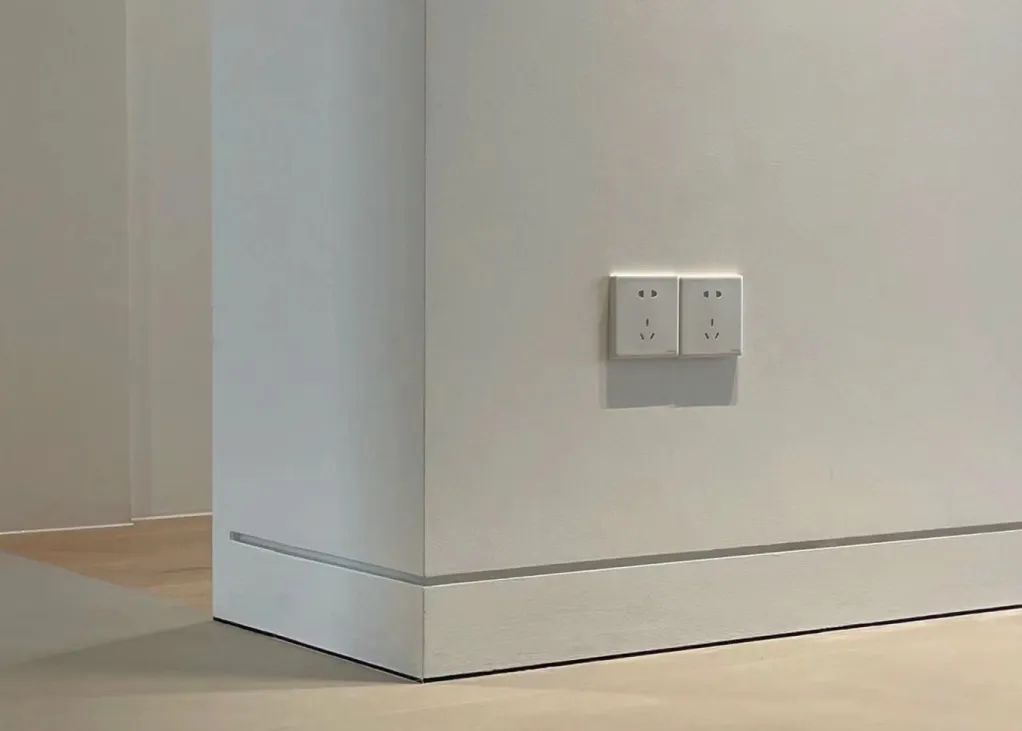
Generally, to make the skirting board less noticeable, it is best to choose the same color, material, texture, etc., as the floor, wall, and door frame, making it look coordinated and unified.
a.Same color as the wall
The simplest way to achieve the “invisible” effect for the skirting board is to choose an embedded skirting board that is the same color as the wall, which is also a cost-effective choice for visual coordination.
Source: google.cn
Source: google.cn
b.Same color as the floor
In spaces with higher ceilings, skirting boards can be chosen in colors similar to the flooring or tiles. If the color and material can match, it can achieve a seamless look.
Source: google.cn
Source: google.cn
c.Same color as the door frame
Choosing the color of the door frame not only creates visual harmony but also presents a sense of unity with the door frame’s lines.
Source: google.cn
Source: google.cn
02. Crafting methods for invisible skirting boards
www.shejidedao.com丨Contact VX:dop024 Reply “Public Account” to join the group
Source: google.cn
The common installation methods for skirting boards are wall-mounted (exposed), flush wall, and embedded in wall. Among them, flush wall and embedded wall can be used for invisible embedded skirting boards.
1.Flush wall
Source: google.cn
Flush wall is essentially embedded, just the effect produced is a flush wall.
Source: google.cn
Features:
Maintains unity with the wall
Not easily collects dirt
High aesthetic value
Easy to clean
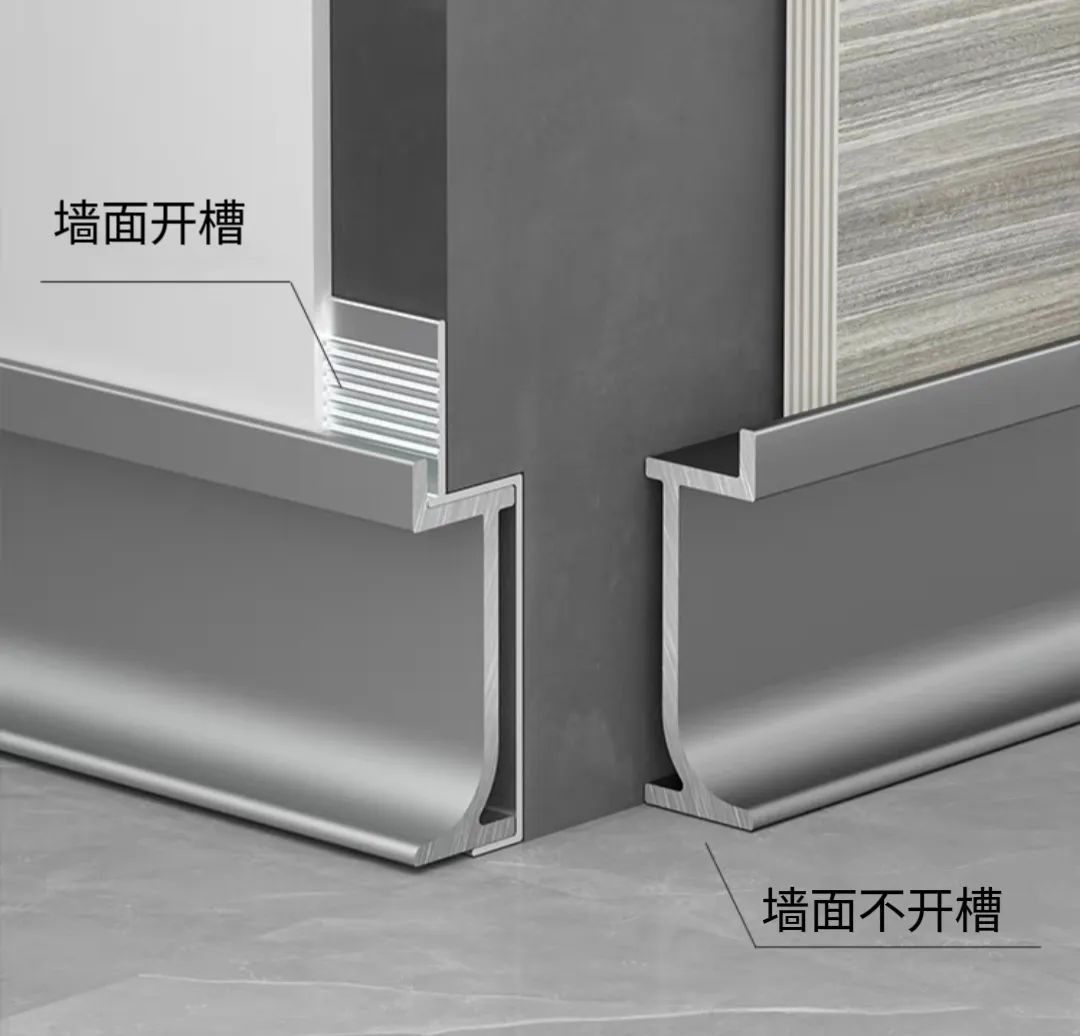
Typically, flush wall can also be divided into grooved and non-grooved according to the different crafting methods.
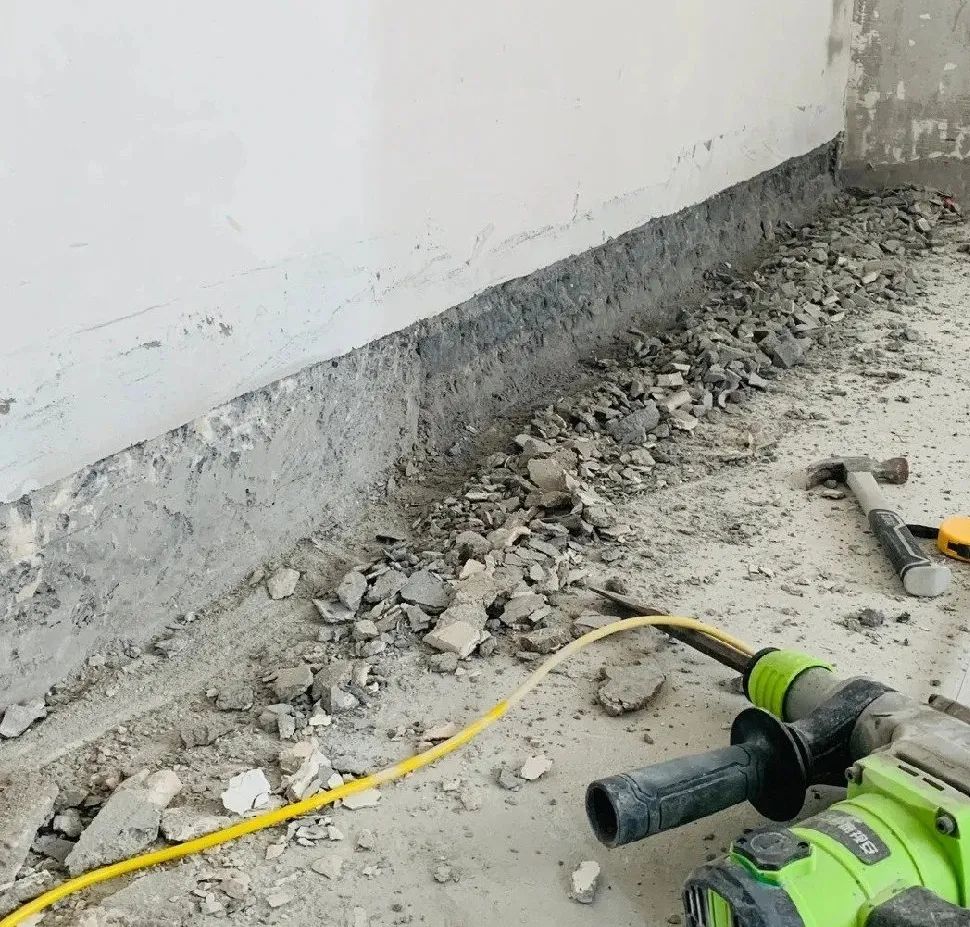
a.Grooved
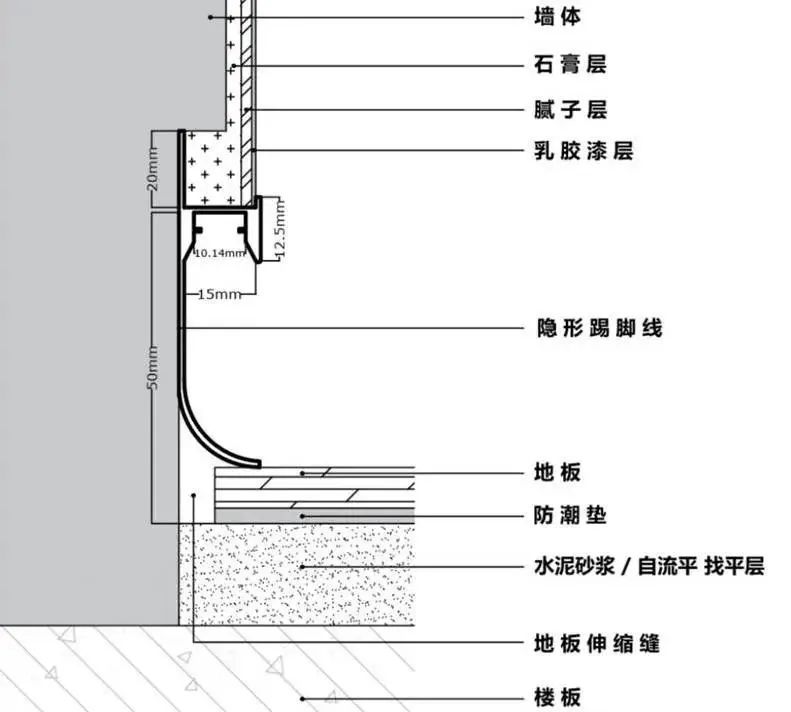
Grooved typically involves opening a groove at the bottom of the wall based on the height, thickness of the skirting board, and thickness of the finish layer, then inserting the skirting board and leveling it with putty to keep it flush with the wall.
Grooved is usually suitable for walls with painted finishes.
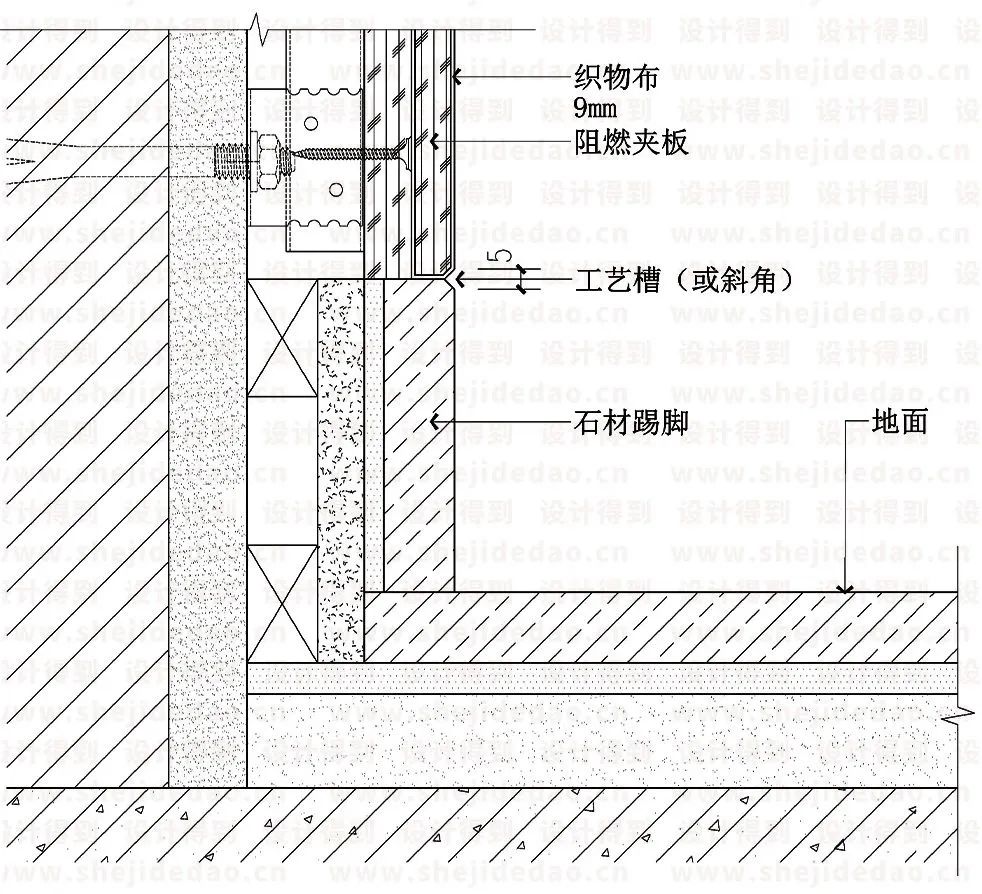
Source: google.cn
△ Method illustration
Specific construction process:
① Construction preparation
② Wall grooving
③ Wall decoration
④ Floor material installation
⑤ Skirting board installation
⑥ Wall finishing
(The order of wall and floor construction can be adjusted according to the project)
Source: google.cn
Source: google.cn
△ Related node construction
b.Non-grooved
Non-grooved typically involves selecting the thickness of the skirting board according to the thickness of the wall finish layer, allowing the skirting board to stay flush with the wall finish layer.
Usually suitable for gypsum board walls, wooden finish walls, etc.
Source: google.cn
Source: google.cn
△ Method illustration
Specific construction process:
① Construction preparation
② Floor material installation
③ Installing wall finish panels (if there are boards that need painting, this step is completed here)
④ Skirting board installation
⑤ Wall finishing
(The order of wall and floor construction can be adjusted according to the project)
Source: google.cn
Source: google.cn

Source: google.cn

Source: google.cn
△ Node construction
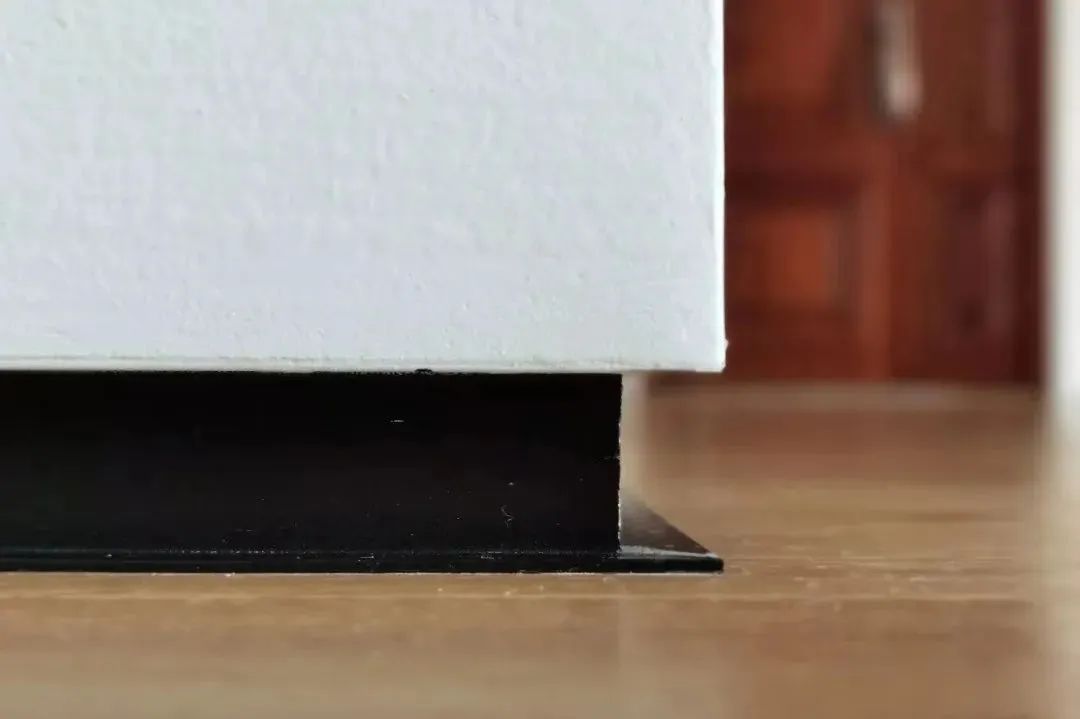
2.Embedded in wall
Source: google.cn
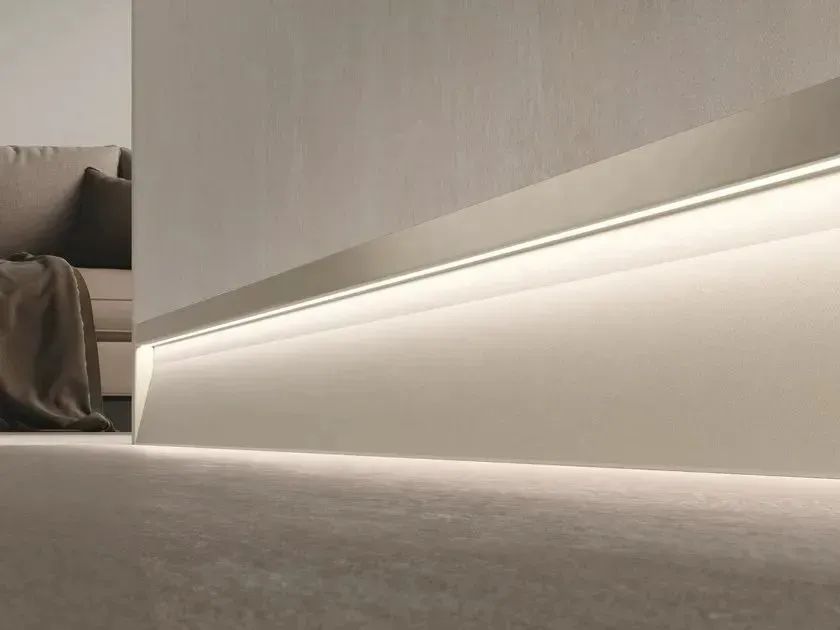
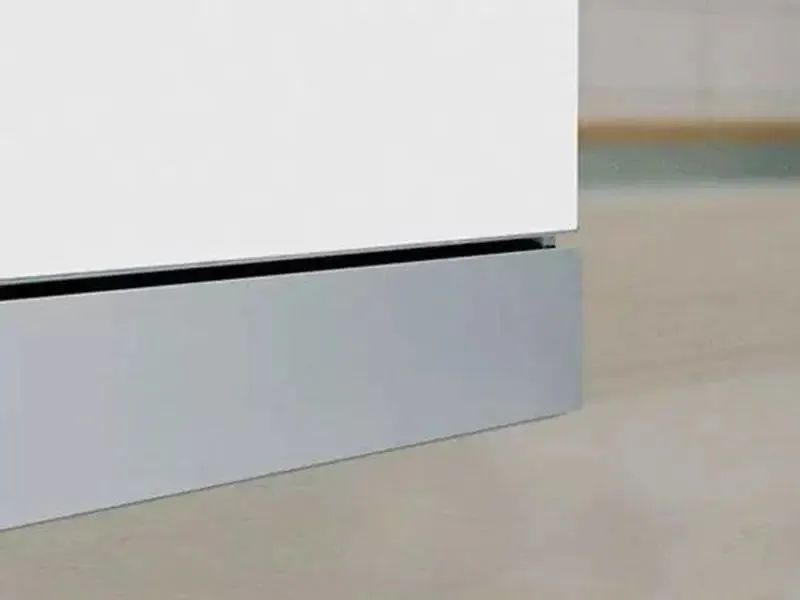
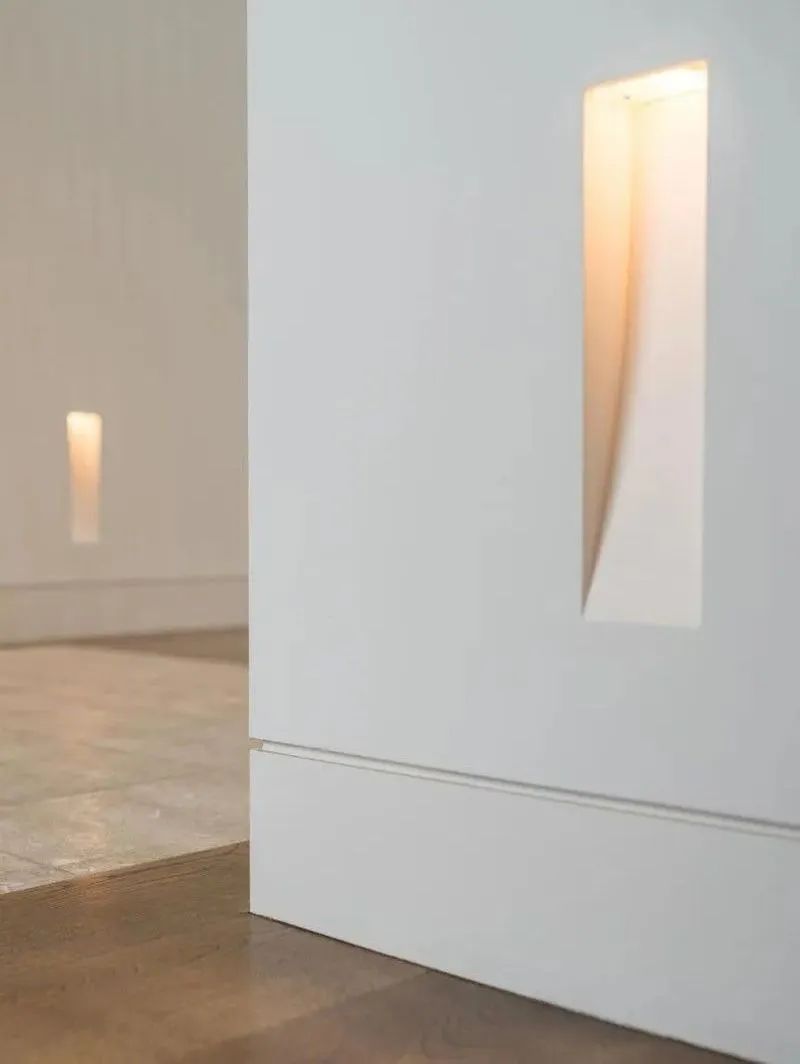
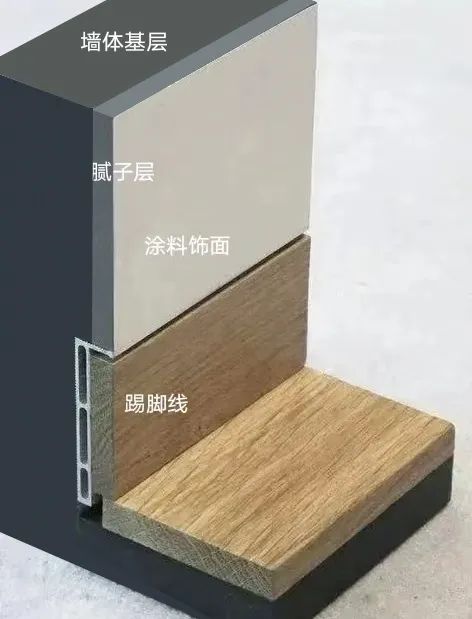
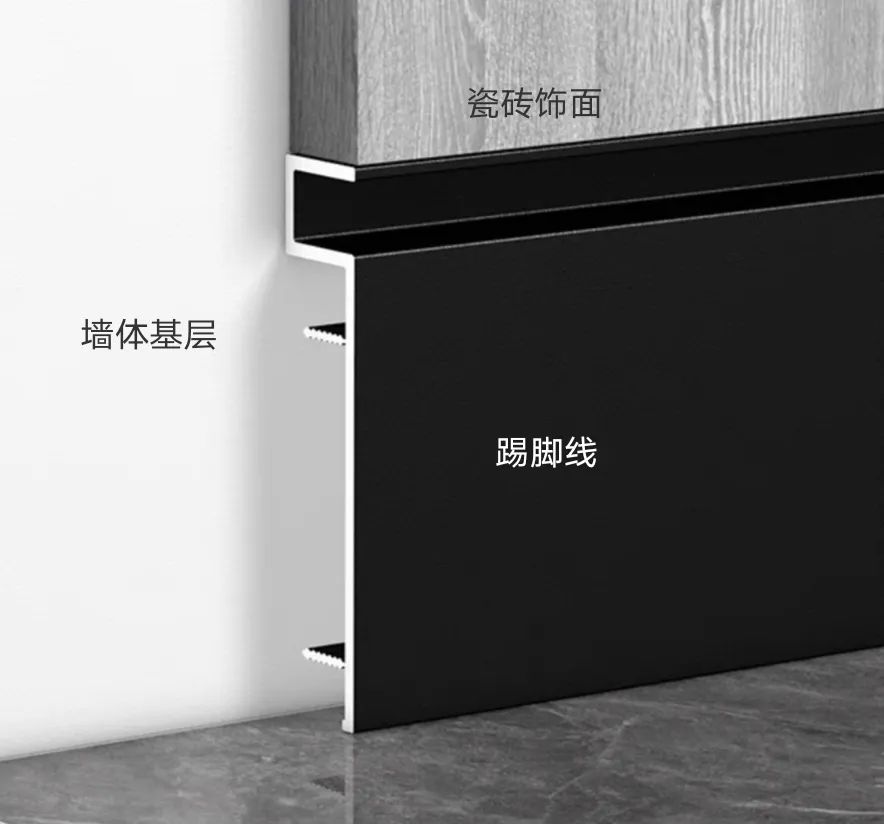
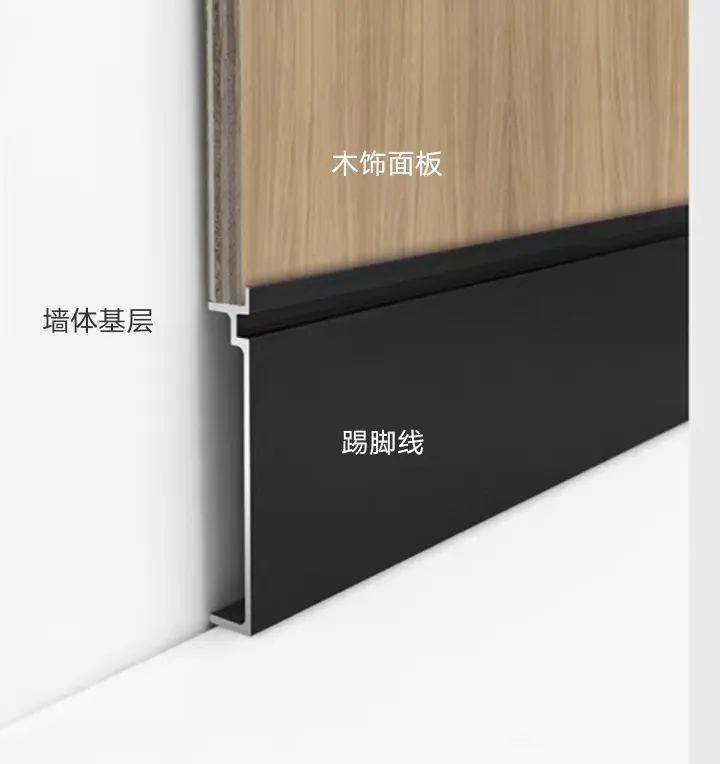
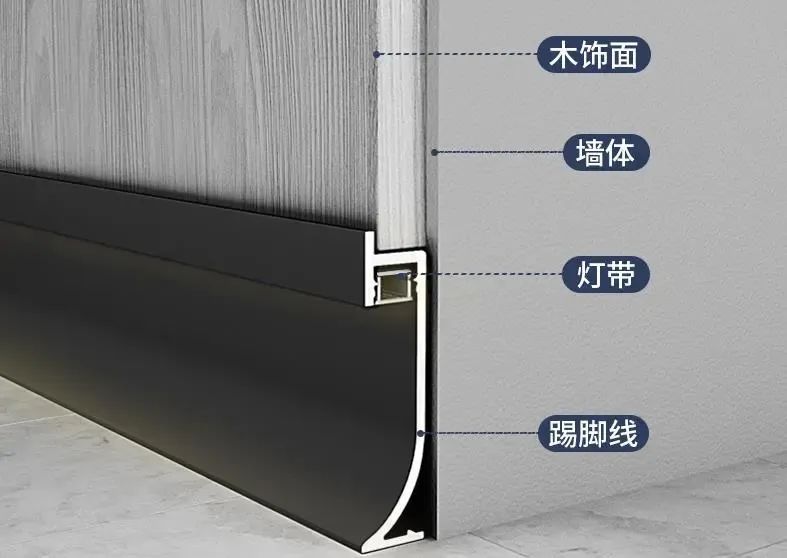
Embedded skirting board is recessed into the wall finish, creating an illusion of suspension at the bottom of the wall.

Source: google.cn
Features:
Dust-free and easy to maintain
Enhances the visual effect of the space
Strong sense of layering
Provides enough space to hide lighting strips
Embedded skirting boards can also be divided into grooved and non-grooved based on different crafting methods.
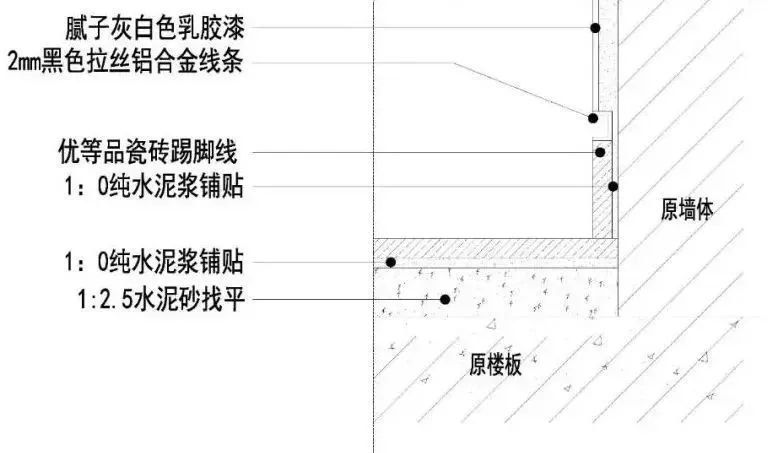
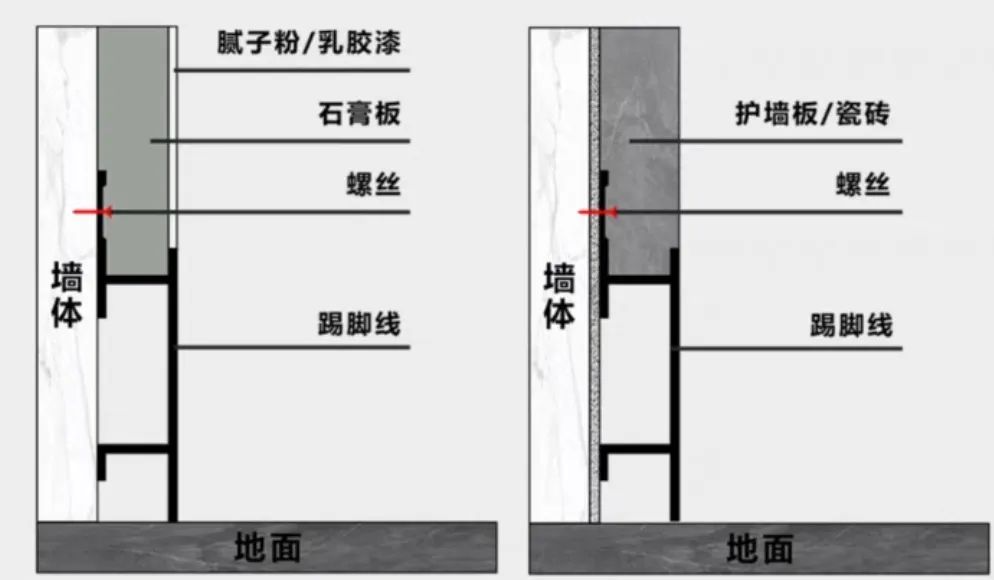
a.Grooved
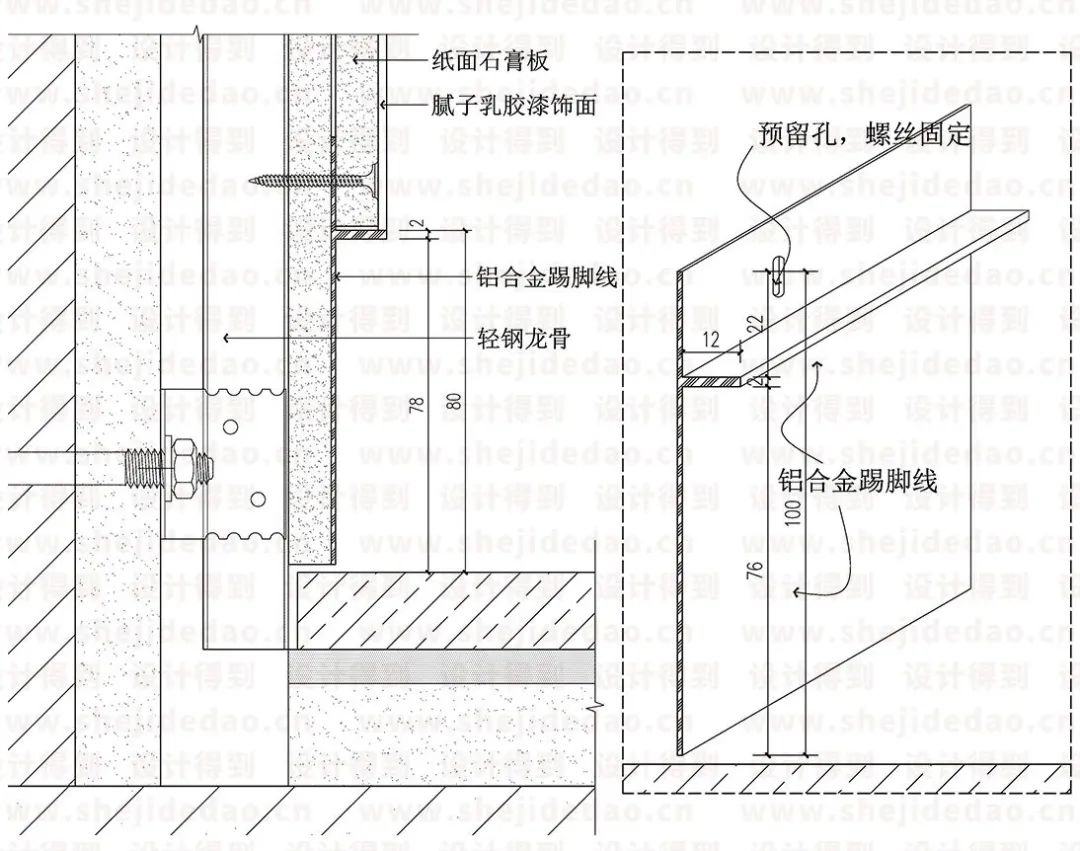
Grooved typically involves opening a groove at the bottom of the wall based on the height and thickness of the skirting board, then inserting the skirting board and leveling it with putty to keep it embedded in the wall.
Grooved is usually suitable for walls with painted finishes.

Source: google.cn
△ Method illustration
Specific construction process:
① Construction preparation
② Wall grooving
③ Wall decoration
④ Floor material installation
⑤ Skirting board installation
⑥ Wall finishing
(The order of wall and floor construction can be adjusted according to the project)

Source: google.cn

Source: google.cn
Source: google.cn

Source: google.cn
△ Node construction
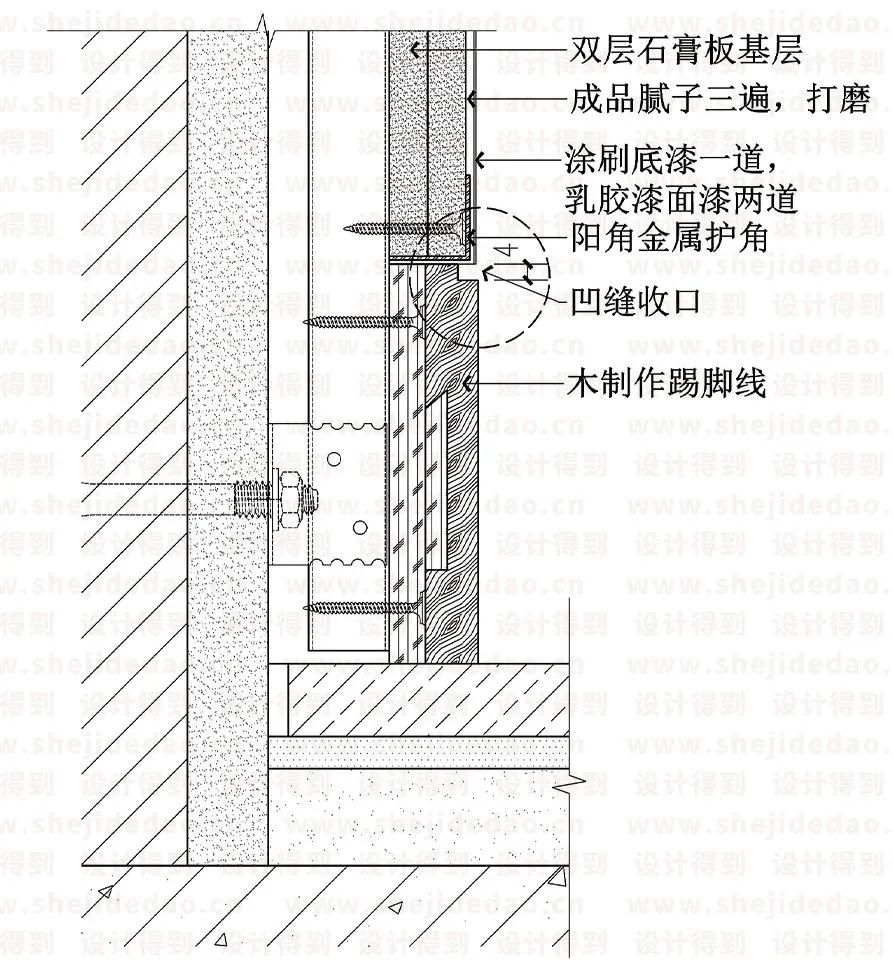
2.Non-grooved
Non-grooved typically involves selecting the thickness of the skirting board according to the thickness of the wall finish layer, allowing the skirting board to stay flush with the wall finish layer.
Usually suitable for gypsum board walls, wooden finish walls, etc.
Source: google.cn
△ Method illustration
Specific construction process:
① Construction preparation
② Floor material installation
③ Installing wall finish panels (if there are boards that need painting, this step is completed here)
④ Skirting board installation
⑤ Wall finishing
(The order of wall and floor construction can be adjusted according to the project)
Source: google.cn

Source: google.cn

Source: google.cn
Source: google.cn
△ Node construction
3.Precautions
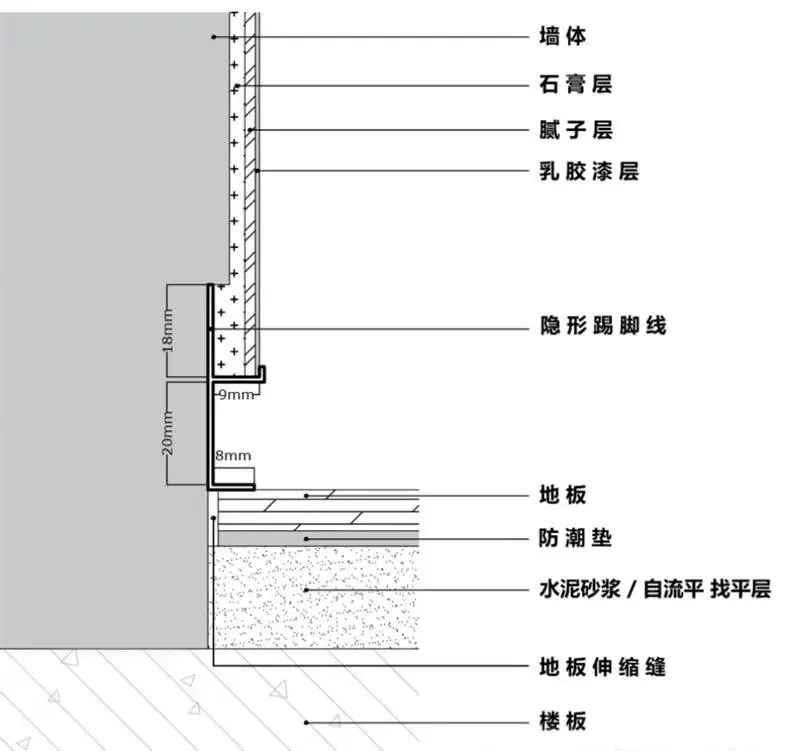
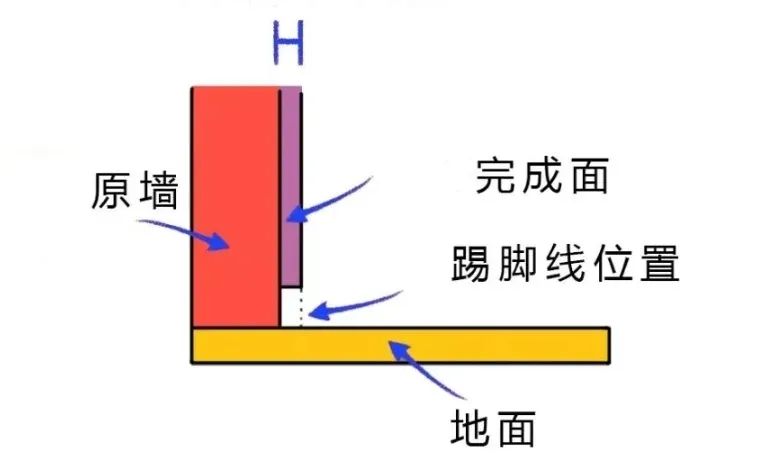
a.Usually during the water and electricity phase, the wall bottom grooving process is carried out. The groove size should be determined based on the selected skirting board size and the thickness of the wall finish layer. The groove depth is typically around 2cm, and it is best not to damage the wall structure.
Source: google.cn
b.No matter which crafting method, floor method, and skirting board style are chosen, it should be ensured that the skirting board can completely cover the gap between the wall and floor after installation.
Source: google.cn
c.If the skirting board is installed first and then the wall is painted, the depth of the putty layer must be reserved, then install the skirting board and level it to ensure it is horizontal and vertical.
Source: google.cn
d.When installing flush wall grooved skirting boards, it’s relatively difficult to ensure that the finished surface and the wall’s finished surface are on the same vertical plane, so it often requires higher construction skills.
(The images in this article are sourced from the internet, copyright belongs to the original author)

Today’s Free Good Book
“Residential Layout Anatomy Book”
Suzuki Nobuhiro
Introduction: A pictorial guide to residential design and planning anatomy
Professional architects tell you how to create a warm, comfortable, and livable home. Layout, lighting, flow, view, storage… all covered! 25 design tips, each one is valuable. Achieve the pleasure of life, the functionality of residence, and the creativity of design. Whether you are a home buyer or a renter, you can benefit from it.


△ Join the design community to share good books, receive a free e-book every day △
Summary.
www.shejidedao.com丨Contact VX:dop024 Reply “Public Account” to join the group
Alright, that’s it for this DOP article. If it helps, please comment “Daily Progress” to support DOP~
Leave a message over 10 comments, next time, we will systematically discuss “5 tips to solve 99% of the problems with edge finishing“, stay tuned~
Last image, summary of the article, see you tomorrow at noon:
△ Click to save, welcome to share
△ Some images in the text are from the internet. If there is any infringement, please contact the editor~
Extended Reading
How to design special ceilings? (DOP Design Experience)
How to understand the design intent of a space? This is the best explanation I’ve ever seen!
Should gypsum board ceilings have expansion joints?
On-site poured terrazzo vs. prefabricated panels, how to choose? (Deepening Circle Q&A)
– End –
If it helps, please like, view, and share to support
Some images in the text are from the internet. If there is any infringement, please contact the editor~
Add dop024, receive “DOP Design Gift Package”

For more design insights, please visit the Design Community website
www.shejidedao.com or click “Read the Original” to start learning!
👇👇👇