5 Command History Window
The MATLAB command line window provides a very user-friendly interactive feature, allowing users to think and verify in this environment. After completing the design, users can extract verified commands again through MATLAB’s history function. This ability to record commands is accomplished using the corresponding commands in MATLAB’s Command History window.
In versions 2014a and later, the history window no longer appears in MATLAB’s default layout, and the feature to bring up the history window using the up arrow key has been added (as shown in Figure 1-13). The history function has been enhanced to include features such as “marking erroneous commands,” “case-sensitive search,” “filtering,” and “displaying execution time.”
If readers wish to embed the history window in the desktop as in previous versions, they can set this in the Layout options and select the command to embed it into the desktop, as shown in Figure 1-14. Additionally, similar to the command window, clicking the button on the history window and selecting can float this window, allowing it to be brought up in the command line using the up arrow key.
The embedded history window is shown in Figure 1-15. In the history window, if a command line encounters an error during execution, there will be a red mark on its far left, which easily informs users which commands have errors, making it very useful for analyzing error causes or debugging programs. Furthermore, if several lines of commands are run as a group, there will be square brackets enclosing this group on the far left, as shown in the figure for loops and so on.
By clicking the button on the history window, users can select to find, display execution time, etc., as shown in Figure 1-16. By checking the 【Show Execution Time】 option, the execution time of that command line will be displayed in the history window, as shown in Figure 1-15. In this menu, clicking the 【Find…】 option will bring up the find toolbar. For example, if we search for commands that start with the letter ‘a’ in the toolbar, the found commands will be highlighted in yellow. If we click the icon, all matching search results can be filtered out, as shown in Figure 1-17.
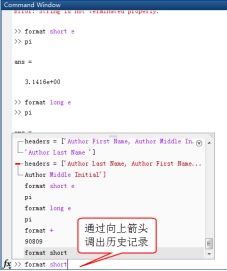
Figure 1-13 Bringing up the history
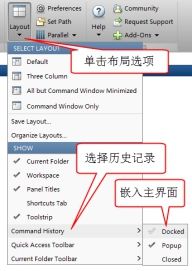
Figure 1-14 Embedding the history window

Figure 1-15 Marking in the history window
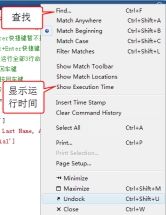
Figure 1-16 History window menu
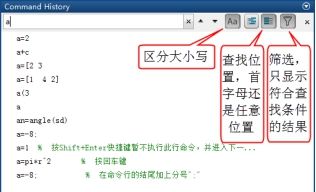
Figure 1-17 Find function in the history window
In the history window, all commands typed in the MATLAB command window are recorded, including the time of each MATLAB startup and all MATLAB commands typed in the command line after startup. These commands can not only be recorded in the history window but can also be executed again. There are several methods to execute historical commands from the history window:
(1) Double-clicking a command will send it to the command window for immediate execution.
(2) Selecting the command to be executed again and copying it to the command window.
(3) Selecting the command to be executed, right-clicking, and choosing the 【EvaluateSelection】 option (or pressing the shortcut key F9) will execute the corresponding command. This method is more convenient when multiple lines of commands need to be executed at once.
Additionally, commands recorded in the history window can also be used to create M files directly.
To facilitate future use, users may want to save commands used in the command window as a file. MATLAB has made user-friendly considerations for this, providing the diary command to achieve this functionality. The diary command is used to create a “log” file, which records all content in the current command window (including commands and results) truthfully as an ASCII file.
If users want to record all content in the command window as a “log” file, they can follow these steps:
(1) Set the directory for the log file (e.g., D:\workdir) as the current directory. This can be done using the command “cd d:\workdir” in the command window (it can also be done using the mouse in the current directory window or working directory path).
(2) Run the command diary xxx in MATLAB (the name can be anything). Thereafter, all content displayed in the command window (including commands, results, prompt information, etc.) will be recorded.
(3) After running the close command diary off, all operations stored in memory will be recorded in the directory under D:\workdir with the name xxx.
It should be noted that the log file created in the diary is in plain text document format and cannot be run directly in MATLAB, but can be read and edited using MATLAB’s M file editor or other text reading and writing software. Additionally, the diary function’s command recording capability is only effective in MATLAB sessions after the diary command has been executed. If MATLAB is closed and restarted, the diary command needs to be re-entered.
6 Current Folder Window
MATLAB loads any file and executes any command starting from the current directory, so MATLAB provides the Current Folder window. By default, this window is located in the upper left corner of the MATLAB interface. Similar to the previous windows, the Current Folder window can also be floated or docked by clicking the button in the upper right corner of the window using the Dock and Undock options. The floating current folder window is shown in Figure 1-18.
The current path in MATLAB refers to the default path for saving and reading all files. This working path can be modified in the working path bar located below the desktop toolbar. In versions after MATLAB R2008b, modifying the path is similar to the modification method in the Windows 7 operating system, allowing direct modification of any level of path names, making it more convenient.
Right-clicking on the MATLAB startup icon on the desktop and clicking on the “Properties” option will bring up the properties dialog box as shown in Figure 1-19. There is a text input box for “Start in” where the default working path for MATLAB startup can be set.
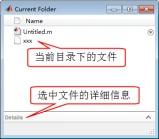
Figure 1-18 Current folder window
By setting the working directory, users can change the search path MATLAB uses during function calls. Selecting the 【Set Path】 menu item from the desktop toolbar (as shown in Figure 1-19) will bring up the path setting dialog box (as shown in Figure 1-20), from which the corresponding search path can be set. The search path determines how MATLAB selects functions when running a command and the order in which the functions are run. This book will provide detailed introductions to this in subsequent chapters.
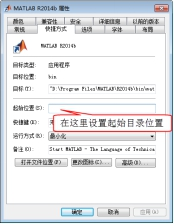
Figure 1-19 MATLAB startup properties dialog box

Figure 1-19 “Set Path” settings
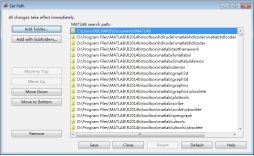
Figure 1-20 “Set Path” dialog box
7 Workspace Browser and Variable Editor Window
7.1 Workspace Browser Window
MATLAB needs to handle a variety of data, which requires a dedicated memory space to store them, and this place is the MATLAB Workspace. Data stored in the workspace can be called at any time. The Workspace window is an important part of MATLAB. The workspace window displays all the variable names, data structures, byte sizes, types, as well as maximum, minimum, average, variance, and other statistical information of all MATLAB variables currently in memory. Different variable types correspond to different variable name icons. When the workspace window is closed, it can be opened by clicking the 【Layout】 | 【Workspace】 menu command in the toolbar. By default, the MATLAB workspace window is located in the lower left corner of the desktop. Additionally, the MATLAB workspace window can not only be embedded in the MATLAB user interface but also, similar to the command window, can be floated by clicking the button on the history window and selecting 【Undock】 option as shown in Figure 1-21. If you wish to re-embed the workspace window into the MATLAB interface, you can click the button and select the 【Dock】 option.
7.2 Variable Editor Window
By double-clicking a variable name in the Workspace, such as W in Figure 1-21, the Variable Editor window will pop up. The Variable Editor window allows users to view the contents of the variable and perform various editing operations. The Variable Editor window is shown in Figure 1-22, where users can double-click on the data cell they wish to modify to change the corresponding data. In the Variable Editor window, users can select the required elements and use the plotting tools in the 【PLOT】 tab for quick plotting. In the 【VARIABLE】 tab, users can perform operations such as inserting, deleting, transposing, and sorting variables, as shown in Figure 1-23.
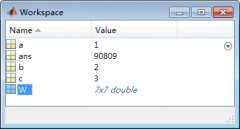
Figure 1-21 Workspace window
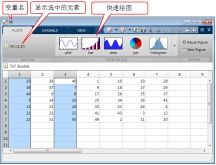
Figure 1-22 Variable Editor window PLOT tab
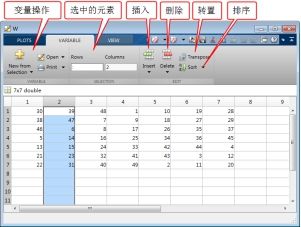
Figure 1-23 Variable Editor window VARIABLE tab
8 Command Line Assistive Features and Function Browser
In MATLAB, the assistive features of the command line are gradually being strengthened. The most notable feature is the addition of the Function Browser in versions after R2008b, which makes querying and inputting functions more user-friendly in MATLAB. This is one of the strong recommendations of this book for using the new version of MATLAB, especially for beginners, as it provides more convenience in the learning process.
8.1 Delimiter Matching
When entering commands in the MATLAB command line and editor, MATLAB will remind users which delimiters correspond to each other. For example, when entering quotes, parentheses, or loop bodies, MATLAB will highlight the matching delimiters.
8.2 Using the Tab Key
MATLAB can help users complete known command inputs, reducing spelling errors and saving time on consulting help and other books. MATLAB can assist users in completing the following inputs:
(1) Variables in the Workspace, including structure arrays;
(2) Functions or models in the current directory or search path;
(3) MATLAB objects;
(4) Filenames and directories, including object-oriented programming groups and class directories;
(5) Graphics handle properties.
Users only need to input the first few letters of the function or object and then press the Tab key. The Tab key can also be used in the MATLAB editor to complete input. Below is an example of how to use the Tab key to complete input in the command line.
If there is a variable named costs_may in the Workspace, then in the command line, you only need to enter:
>>costs
Then press the Tab key, and MATLAB will automatically complete the variable name input, displaying as:
>> costs_may
After this, users can add other operators, variables, functions, etc., and press the enter key to run the corresponding command after completing the expression.
If there is also a variable named costs_april in the variable space, then after entering costs and pressing the Tab key, two candidate prompts will appear, and users can complete the input by moving the cursor with the up and down keys or clicking with the mouse, as shown in Figure 1-24.
8.3 Function Syntax Prompt
The function syntax prompt is a feature that shows a pop-up window with prompts for input variables when entering an expression. When users know how to spell the function but are unsure of which variables to input, the function syntax prompt feature is very useful, saving a lot of time checking help documentation.
Typically, function syntax prompts only indicate the basic function syntax structure. If users need more detailed usage instructions, they can use the Function Browser or Help instead.
Function syntax prompts can only be applied once the exact spelling of the function is known. If users do not know the exact spelling of the function, they can use the Tab key completion feature or help documents like Function Browser.
As shown in Figure 1-25, after entering the function name and parentheses and waiting two seconds, the function syntax prompt window will pop up, allowing users to input the corresponding variables according to the prompts.
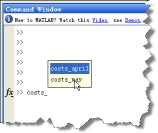
Figure 1-24 Example of using the Tab key
Figure 1-25 Function syntax prompt
8.4 Function Browser
In versions after MATLAB R2008b, the Function Browser has been added, which makes it very convenient to find functions.
The Function Browser is particularly useful in the command line. Through the Function Browser, users can search for functions just like in the Help browser, but it makes the user’s work smoother.
Users can open the Function Browser using the Shift+F1 shortcut or the icon in front of the command prompt, as shown in Figure 1-26.
In the Function Browser, input the function to search for and press enter, and a list of all functions related to the input keyword will be obtained. Clicking the function name with the left mouse button will pop up a function usage instruction window, as shown in Figure 1-27. The convenience of the Function Browser is that once the desired function is found, it can be directly double-clicked to insert it at the cursor position in the command line, which is something the Help does not offer, making it very convenient in practical use.
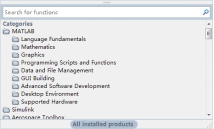
Figure 1-26 Function Browser

Figure 1-27 Using Function Browser to find functions