This article discusses Linux device drivers. In Linux, I/O devices can be divided into two categories: block devices and character devices. These two types of devices do not have any hardware differences; they are mainly classified based on different functionalities, and their main difference lies in whether they can randomly access and manipulate data on hardware.
CharacterDevice: Provides a continuous stream of data that applications can read sequentially and typically does not support random access. In contrast, such devices support reading and writing data by bytes/characters. For example, a modem is a typical character device.
BlockDevice: Applications can randomly access device data, and the program can determine where to read data. Hard disks are typical block devices; applications can address any location on the disk to read data. Additionally, data read and write can only be performed in multiples of blocks (usually 512 bytes). Unlike character devices, block devices do not support character-based addressing.
There is no strict distinction between the two types of devices; the main difference lies in the access interfaces provided by character device and block device drivers (file I/O API). This article mainly compares the data interface, access interface, and device registration methods for the two types of devices.
First, let’s understand the framework of character device drivers.
For upper-level application developers, there is no need to understand how specific hardware is organized and works. For example, in Linux, all devices are files. Therefore, if an application developer needs to print a string of text on the screen, it may seem that this is achieved simply by using the printf function. However, in reality, it is using the int fprintf(FILE *fp, const char* format[, argument,…]) encapsulated result, and in fact, the fprintf function operates on a FILE, which corresponds to the standard output file, that is, our screen.
So, what does the simplest character device driver framework look like?
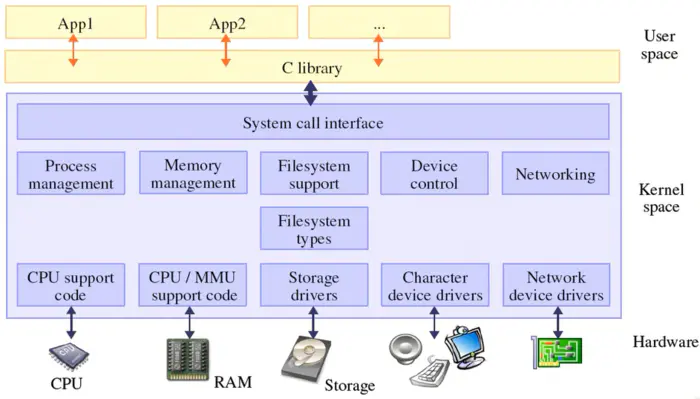
▲ Structure of application program and underlying calls
From the above figure, we can see that the driver program is also part of the kernel. Of course, the code can be compiled directly into the kernel. However, for many development boards, the kernel has already been compiled and is running on the board. Is it necessary to recompile and flash the entire kernel?
Switching to a PC, this is clearly not the case. If we buy a keyboard, we shouldn’t have to reinstall the corresponding operating system for the keyboard, as that would be too inconvenient, and our usage experience is not like that.
In the kernel compilation process mentioned earlier, some modules can be compiled as modules and loaded at runtime without needing to recompile the entire kernel each time.
Therefore, this aspect is very important for driver program development and is one of the most commonly used methods in our daily work.
Now let’s review how we usually operate a device file at the application layer. We typically use functions like read, open, write, etc. (Refer to my previous article: Linux File Programming). When using these functions, some header files are included, such as: sys/types.h, sys/stat.h, and fcntl.h, which are part of the C library. The user program only needs to care about how to use the C library, while the C library actually completes the calls to some system calls, similar to sys_open, sys_read, etc., to invoke kernel space.
This article is not intended to analyze the specific implementation principles of the framework; we will gradually elaborate on that in the future. Here, the main goal is to discuss how to quickly use these frameworks to write character device driver programs.
In fact, writing a character driver is not complicated. We first establish the framework, which I think can be roughly divided into the following two steps (details will be elaborated later):
Write the entry and exit functions of the driver, which will be called when the driver module is loaded and unloaded. Write specific read, write, open, etc. functions, which can be called when the user program uses the corresponding functions (not mandatory).
Let’s first look at a simple driver program framework:
#include <linux/init.h>   // Defines module_init
#include <linux/module.h> // The most basic header file, which defines macros like MODULE_LICENSE
#include <linux/fs.h>    // The file_operations structure is defined in this header file

static const char* dev_name = "first_driver";  // Define device name
static unsigned int major = 55;               // Define device number

// Define open function
static int first_drv_open (struct inode *inode, struct file *file)
{
    printk("open\n");
    return 0;
}

// Define write function
static ssize_t first_drv_write (struct file *file, const char __user *buf, size_t size, loff_t * ppos)
{
    printk("write\n");
    return 0;
}

// Register open and write functions in file_operations
static struct file_operations first_drv_fo =
{
    .owner = THIS_MODULE,

    // Associate the corresponding functions in the file_operations structure
    .open = first_drv_open,
    .write = first_drv_write,
};

// Init driver entry function
static int first_drv_init(void)
{
    // Register device, actually putting the file_operations structure into a specific array in the kernel for management
    // Specify major as the main device number in register_chrdev
    register_chrdev(major, dev_name , &first_drv_fo);
    printk("init\n");
    if(dev_id < 0)
        printk("error\n");
    return 0;
}

// Driver exit function
static void first_drv_exit(void)
{
    printk("exit\n");
    unregister_chrdev(major, dev_name);  // Unload device, actually removing the file_operations structure from the kernel-maintained array using the main device number as index
}

// The kernel will use this macro to know the entry and exit functions of this driver
module_init(first_drv_init);
module_exit(first_drv_exit);

MODULE_AUTHOR("Ethan Lee xxxxxxxxx");
MODULE_LICENSE("GPL");  // Specify protocol
The above code basically outlines the framework structure of a character device driver. It can be seen that the above code is simply a simple driver program framework. In fact, if there are no first_drv_open and first_dev_write functions, it is still possible to correctly install the driver on the hardware. When installing the driver, the function registered in module_init will be called, and when unloading the program, the function registered in module_exit will be called. However, the file_operations structure still needs to be defined. But actual driver programs that need to manipulate actual hardware generally have functions like open, read, write. This is just to illustrate the minimum framework of the driver.
Now that the driver program is written, let’s use a test program to call it. Here is the test program:
#include <sys/types.h>
#include <sys/stat.h>
#include <fcntl.h>
#include <stdio.h>

int main(int argc, char **argv)
{
    int fd;      // Declare device descriptor
    int val = 1; // Arbitrary variable to pass in
    fd = open("/dev/xxx", O_RDWR); // Open device according to device descriptor
    if(fd < 0)   // Open failed
            printf("can't open\n");
    write(fd, &val, 4); // Call write according to file descriptor

    return 0;
}# The driver program is actually part of the kernel, so when compiling, you need to use the already compiled kernel to compile the driver program, which is very important.
KERN_DIR=/code/LinuxDev/Lab/KernelOfLinux/linux-2.6.22.6 # Kernel directory
all:
make -C $(KERN_DIR) M=`pwd` modules # M=`pwd` means the generated target is placed in the directory of the pwd command # -C means use the Makefile in the directory for compilation
clean:
make -C $(KERN_DIR) M=`pwd` modules clean
rm -f modules.order
obj-m += first.o # Load into the module compilation chain, the kernel will compile and generate the ko file as a module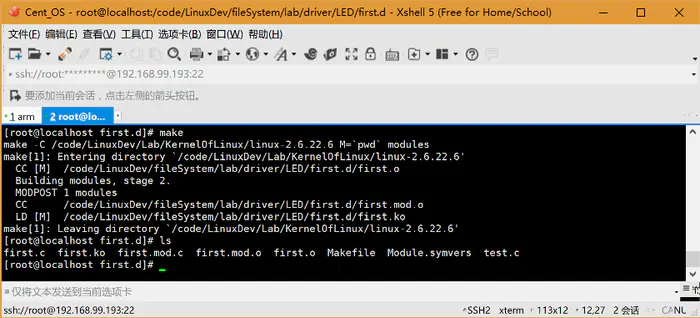
▲ Compile driver program using Makefile

▲ Compile test program
After compiling the test program and driver program, the next step is to install the driver program on the development board and use the lsmod command on the board to check the installed modules.
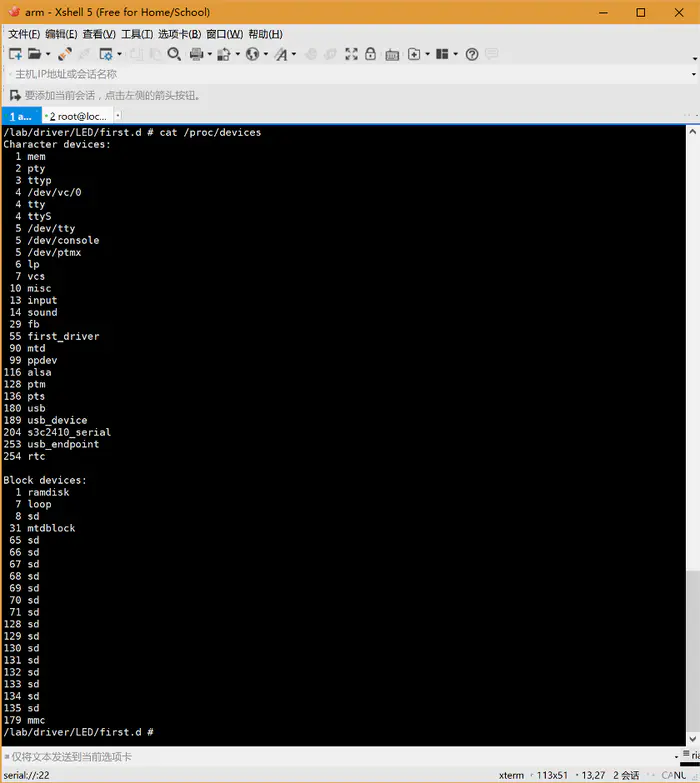
▲ Use lsmod to check the installed modules in the system
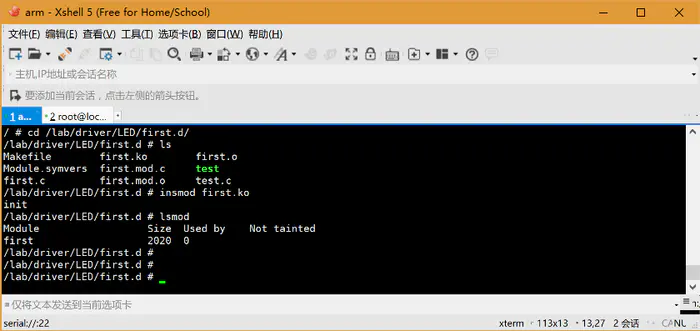
▲ Load the first.ko module into the system
Therefore, we know that when loading the driver program, the corresponding entry function of the driver program will be called.

▲ Test situation
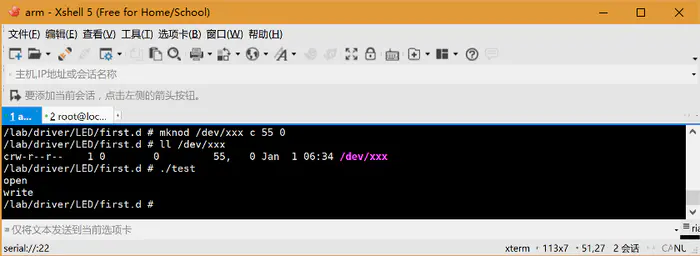
At this point, if we check the /dev/ directory, we will find that the device we wrote has not been added there. So we need to add a device file for the development board.

▲ Add a device file and then execute the test program
mknod command, the first parameter is the name of the device file, which must match the name opened in the test program.
The second parameter c indicates a character device. 55 represents the major device number. 0 represents the minor device number.

▲ Writing in the driver program
This is a simple framework of a character device driver program. The driver program calls the entry function when insmod is executed and calls the exit function when rmmod is executed. When we call write or open, the corresponding write and open functions registered in the file_operations structure of the driver program will be invoked.
If we observe the execution process just now, we will find several issues:
After loading the driver program, the device is allocated a device number in /proc/devices, but the device number is hardcoded in the driver program. If the device number is occupied, the loading will definitely fail; After loading the driver program, it cannot directly open the corresponding device file with the test program because the device file has not been automatically created. We need to manually create the device node before we can use the test program to operate the hardware corresponding to the driver program.
These issues can certainly be resolved; otherwise, it would be too inconvenient to have to perform these operations every time. So let’s improve our code to achieve automatic allocation of device numbers and creation of device files.
First, the solution to the first issue is simple. When registering the driver program, if the major number passed is 0, the system will automatically assign a major device number to this driver program, and this program will also return the assigned major device number.
The second issue is also not too difficult to solve. Linux provides a mechanism called udev, which can be used to automatically create devices. In embedded Linux file systems, such as busybox, there is also a simplified mechanism called mdev. When configuring the file system, corresponding configurations will be made. After writing the article about the file system, I will post the link.
If we use mdev to create this device file when calling the entry function of the driver program, that would suffice. When using mdev, two structures are needed: one is class and the other is class_device. Both structures are defined in %kernel%/include/linux/device.h header file.
For the sake of brevity in this driver program, we will not define the related open, write, etc. functions, so there is no need to define related test functions either.
#include <linux/module.h>
#include <linux/fs.h>
#include <linux/init.h>
#include <linux/device.h>    // Location of class and class_device structure definitions

static const char* dev_name = "third_driver";
static struct class *third_class;   // Define class structure
static struct class_device *third_class_dev;   // Define class_device structure

static struct file_operations third_fos=
{
    .owner = THIS_MODULE,   // Only specify owner in file_operations structure
};

static int dev_id = 0;   // Initialize device number to 0
static int __init third_init(void)
{
    dev_id = register_chrdev(dev_id, dev_name, &third_fos);  // Specify the major device number as 0 and use the device number to receive the return value of the function, which will automatically create the major device number

    third_class = class_create(THIS_MODULE, "third_drv");  // Initialize class structure, specify device file name

    third_class_dev = class_device_create(third_class, NULL, MKDEV(dev_id, 0), NULL, "third_drv"); // Initialize class_device based on class, will create the corresponding device file

    printk("init\n");

    return 0;
}

static void __exit third_exit(void)
{
    unregister_chrdev(dev_id, dev_name);
    class_device_unregister(third_class_dev); // Unload the last created first
    class_destroy(third_class);
    printk("exit\n");
}

module_init(third_init);
module_exit(third_exit);
MODULE_LICENSE("GPL");
MODULE_AUTHOR("Ethan Lee xxxxxxxx");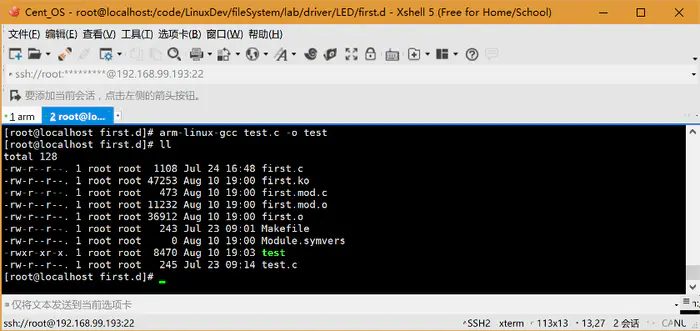
▲ Execution result

▲ Unload driver program
–End-
From Information Technology Person Information Technology Person WeChat Official Account