Click on the “Mushroom Cloud Creation” above to follow us!
Smart Access Control System
Interesting Life Events
In December 2019, Baidu, JD.com, and Alipay successively launched offline “face payment” applications, which made people speculate that the long-awaited “face payment” has entered commercial use. For us, face payment is changing our way of life.
Face Payment
Face payment means we can go out without a phone and still complete various payments. This is a boon for some forgetful friends, at least they won’t encounter the awkwardness of forgetting to “bring their face” when going out. At the same time, facial recognition can also achieve security monitoring, such as in smart security systems like smart access control systems.
In this lesson, we will use the Husky’s facial recognition function to create a smart access control system.
Function Introduction
In this project, we will learn about the facial recognition function of HUSKYLENS, utilizing its built-in machine learning capabilities to distinguish learned faces from others. When our smart access control system recognizes a learned face, the servo can rotate a certain angle to open the door while playing cheerful music, bringing some joy to the owner after a tiring day. When a stranger’s face is recognized, a buzzer will sound an alarm to scare away the stranger. Of course, our access control system must also have a normal visitor function, so we will add a button to implement the doorbell function. This way, we can achieve the creation of a smart access control system.
Materials List
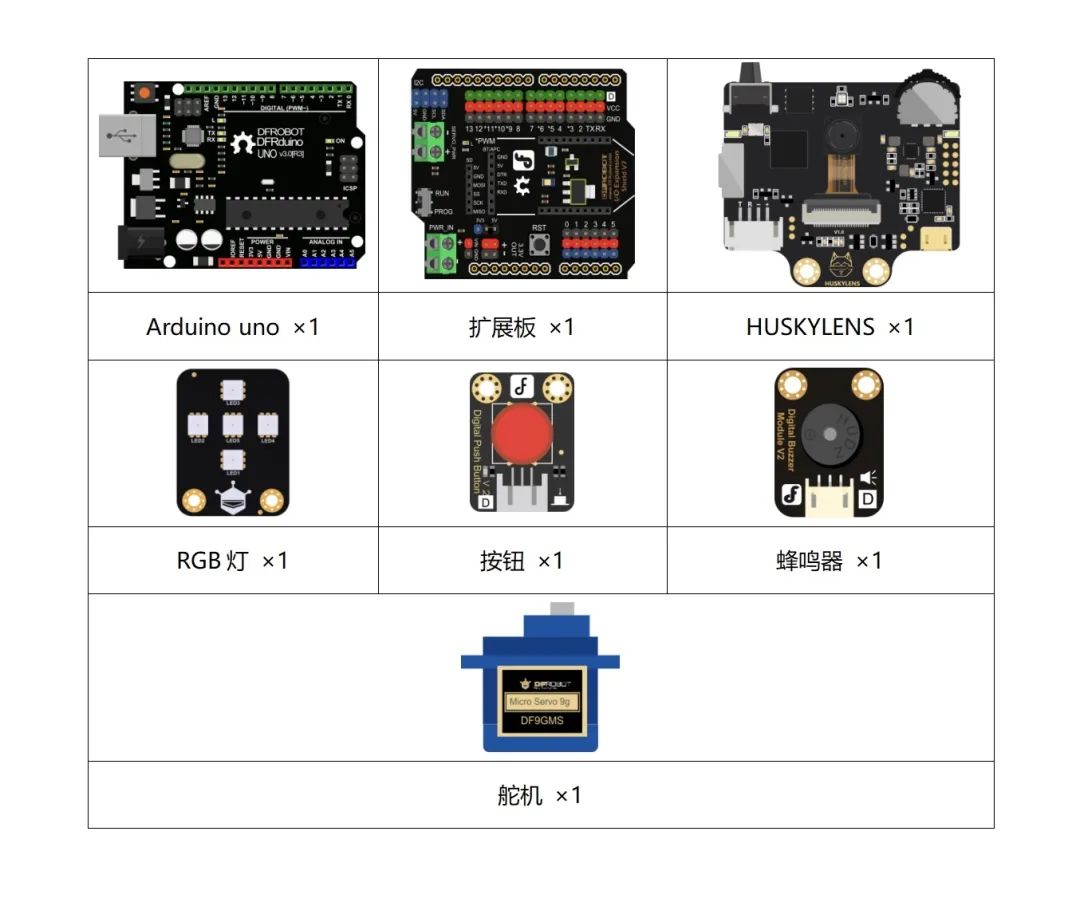
Knowledge Area
The human face, like other biological characteristics (fingerprints, irises, etc.), is unique and not easily replicated. Facial images are among the earliest types of images studied and are also the most widely used in the field of computer vision. This project utilizes the facial recognition function of HUSKYLENS.
1. What is Facial Recognition?
Facial recognition is a biometric technology that identifies individuals based on facial features. It uses cameras to capture images or videos containing faces, automatically detects image information, tracks faces, and conducts a series of related analysis techniques on the detected faces.

Facial Recognition Working Principle:
There are 4 key steps in the facial recognition process: let me briefly explain these 4 steps.

Face Detection: Locating the position of faces in the image, generally marked with a box.
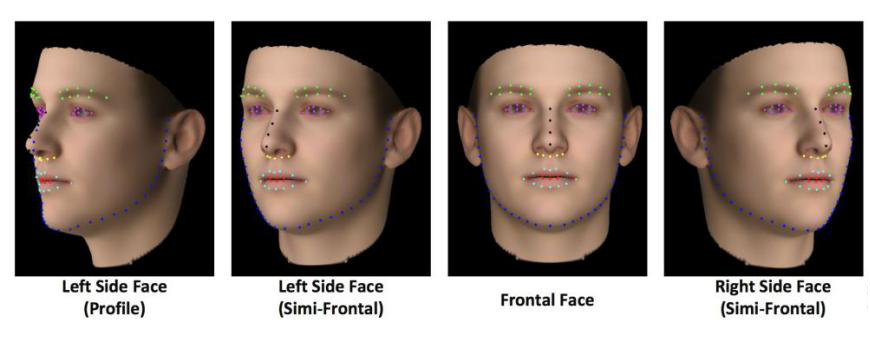
Face Alignment: Locating feature points on the face to recognize faces from different angles.
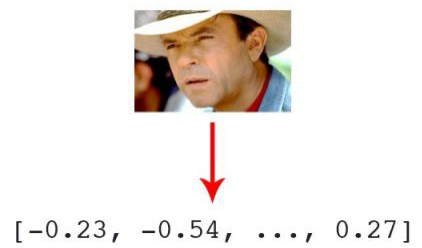
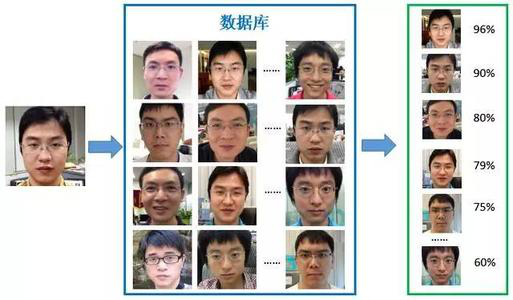
Face Encoding: This can be simply understood as extracting facial information and converting it into a form that computers can understand.
Face Matching: Matching facial information with an existing database to obtain a similarity score and provide matching results. Facial recognition is considered one of the most difficult research topics in the field of biometric recognition and even artificial intelligence. The difficulty of facial recognition mainly stems from the characteristics of faces as biometric features.
Similarity: The differences between different individuals are minimal; the structure of all faces is similar, and even the structure and shape of facial features are very similar. This characteristic is beneficial for locating faces but disadvantageous for distinguishing between individuals.
Variability: The shape of the face is very unstable; people can produce many expressions through changes in their facial features, and the visual image of the face can vary greatly from different observation angles. Additionally, facial recognition is affected by lighting conditions (e.g., daytime and nighttime, indoors and outdoors), various facial coverings (e.g., masks, sunglasses, hair, beards, etc.), age, and other factors.
Application Scenarios for Facial Recognition:
Access Control Systems: Areas under security protection can identify the identity of those attempting to enter through facial recognition, such as prisons, detention centers, residential communities, schools, and even homes.
Surveillance Systems: In public places such as banks, airports, stadiums, shopping malls, and supermarkets, crowds can be monitored for identity recognition purposes. For example, installing surveillance systems at airports to prevent terrorists from boarding, and social security payments to prevent fraud. Facial recognition is currently widely used in various industries, such as student attendance systems, cameras, unlocking mobile phones, and identity verification machines.

2. HUSKYLENS Facial Recognition Function Demonstration
Returning to our smart access control system project, HUSKYLENS can distinguish faces due to its built-in machine learning function. It acts like a database collector that can manually input specified facial information and label that information. How do we operate this? Take out your HUSKYLENS, and let’s operate together.
* First-time users of the camera, please refer to the WIKI website for firmware burning and language settings:
http://wiki2.dfrobot.com.cn/HUSKYLENS_V1.0_SKU_SEN0305_SEN0336
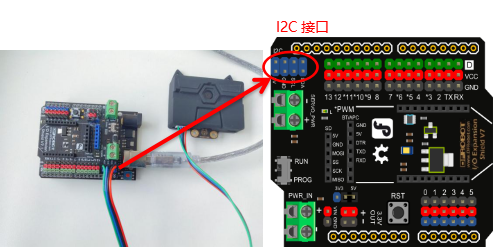
STEP 1 Power On
HUSKYLENS connects to the IIC interface on the Arduino UNO board, and the board is powered via USB cable to the computer.
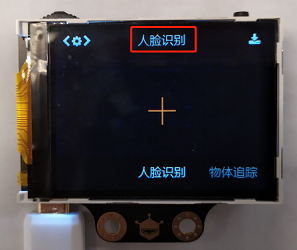
STEP 2 Select the “Facial Recognition” Function
Slide the “Function Key” to the left until the top of the screen displays “Facial Recognition”.
STEP 3 Learn a Face
Point HUSKYLENS at an area with a face; the screen will automatically outline all detected faces with a white box and display the word “Face” respectively.
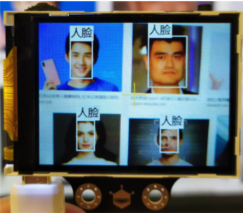
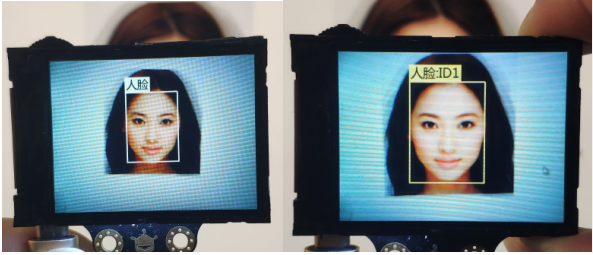
Align the ” + ” in the center of the HUSKYLENS screen with the face you want to learn, and press the “Learn Key” briefly to complete the learning. If the same face is recognized, a blue box will appear on the screen displaying “Face: ID1”. This indicates that facial recognition is now possible.
* Long press the “Learn Key” to record the face at multiple angles.
* If there is no ” + ” in the center of the screen, it means that HUSKYLENS has already learned in this function (learned state). At this point, press the “Learn Key” briefly, and the screen will prompt “Press again to forget!”. Before the countdown ends, press the “Learn Key” again to delete the last learned information.
Project Practice
After learning the basic operations of the HUSKYLENS camera, let’s work together to implement the smart access control system project. The first function to achieve is for the camera to distinguish between learned and unlearned faces when recognizing them. Next, add servos and RGB lights to implement identity verification and door opening functions, and add buzzers for alerting and welcoming functions, finally implementing the doorbell function.
Task 1: Identity Verification and Door Opening Function
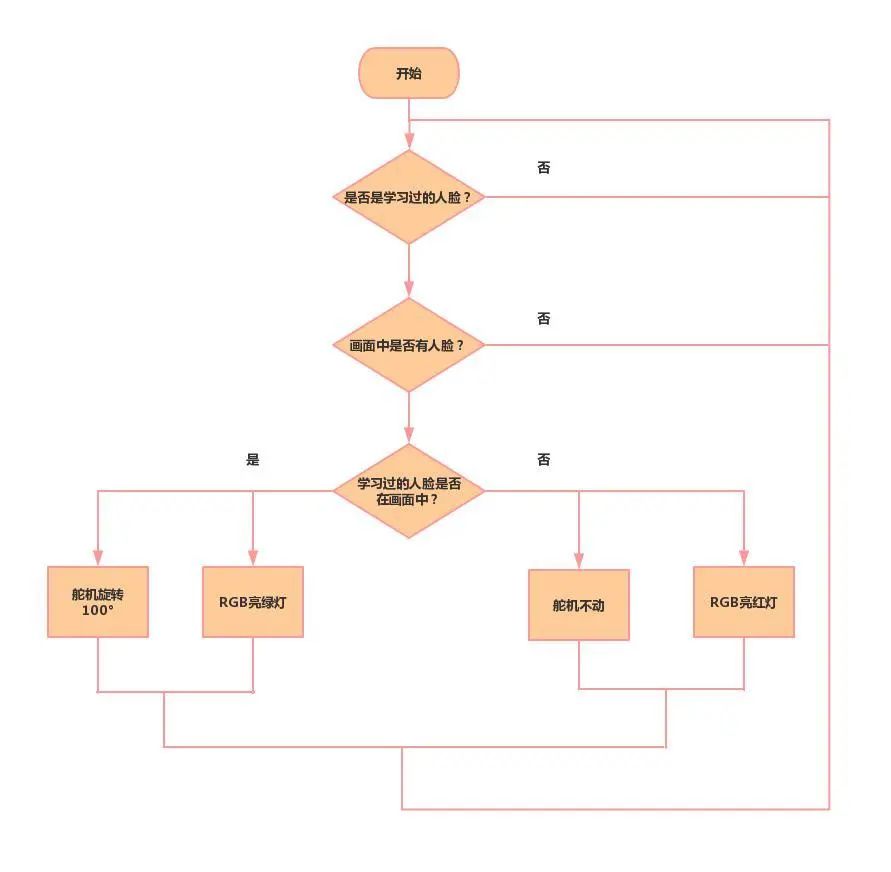
In this step, we first learn how to use the HUSKYLENS camera to recognize and distinguish faces and determine whether they have been learned. If it is a learned face, the servo will rotate a certain angle to open the door, and the RGB light will turn green. Otherwise, the RGB light will flash red.
Task 2: Sound Alert and Welcome Function
After learning how to distinguish faces and execute feedback functions, we can add more functions based on this, such as playing different music when recognizing different faces, thus achieving sound alert or welcome functions.
Task 3: Doorbell Function
In different scenarios of our lives, the required functions vary. Here we add a doorbell function, which needs to be implemented using an interrupt function.
Task 1: Identity Verification and Door Opening Function
1. Hardware Connection
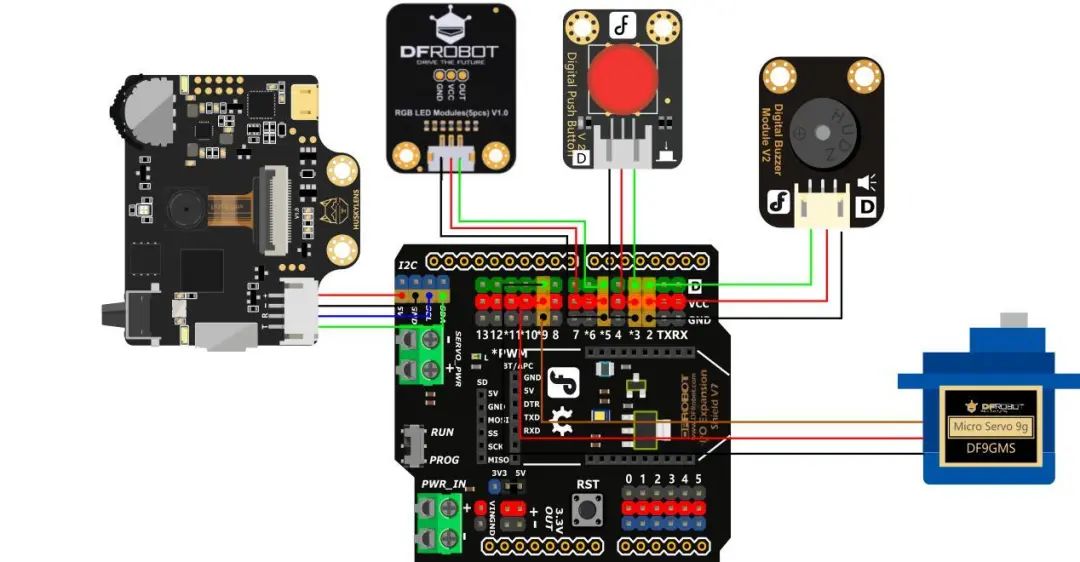
2. Program Design
In this step, the distinguishing face assumes that the camera has already learned the specified facial information. When the camera sees a face again, it only needs to determine whether it has been learned. To make the display process clearer, the RGB light connected to pin 5 of the main control board will light up green to indicate that the recognized face is the specified face. At this point, the access control system should automatically open the door, waiting for the person to enter before automatically closing. If it is not a previously learned face, it indicates a stranger, and the servo will not rotate, while the RGB light will flash red to scare the stranger away.
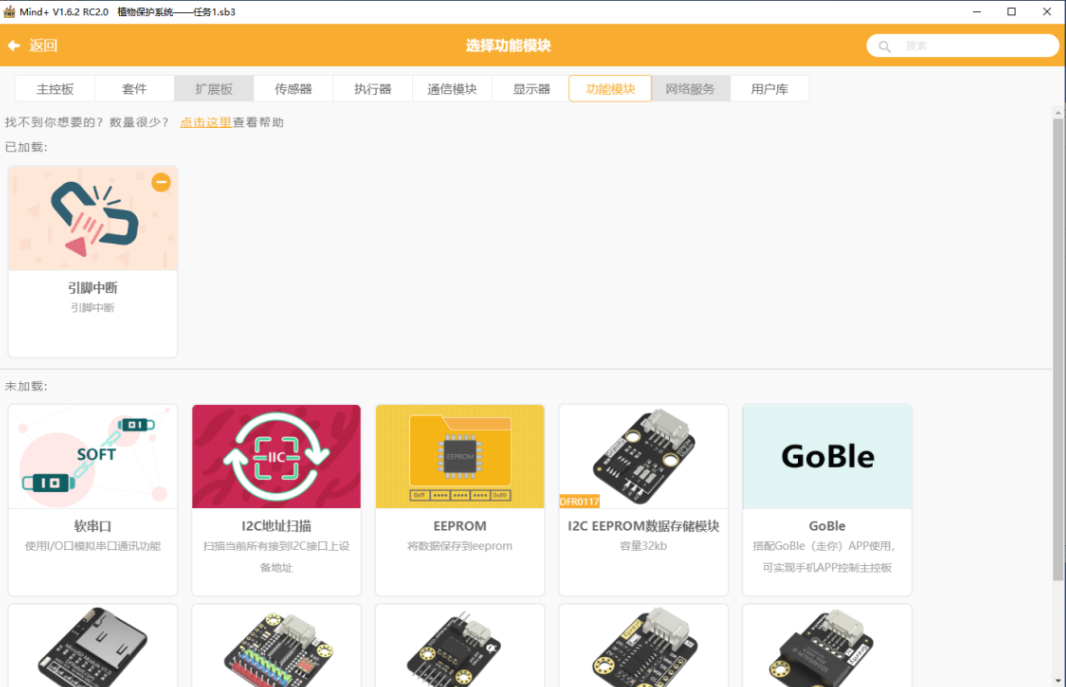
STEP 1 Mind+ Software Setup
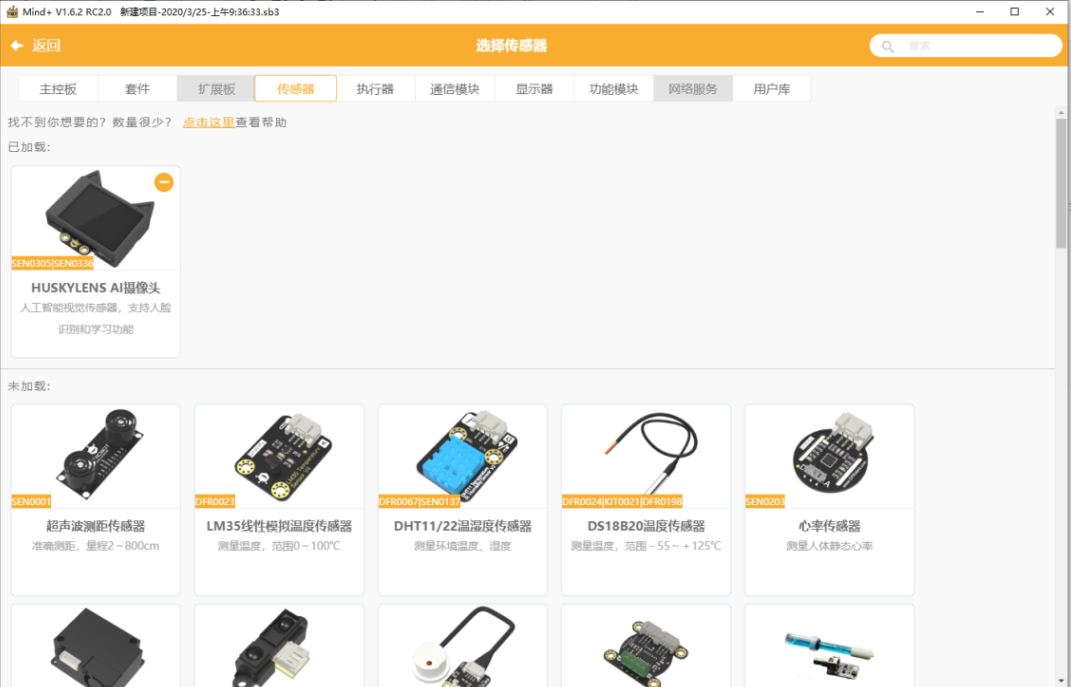
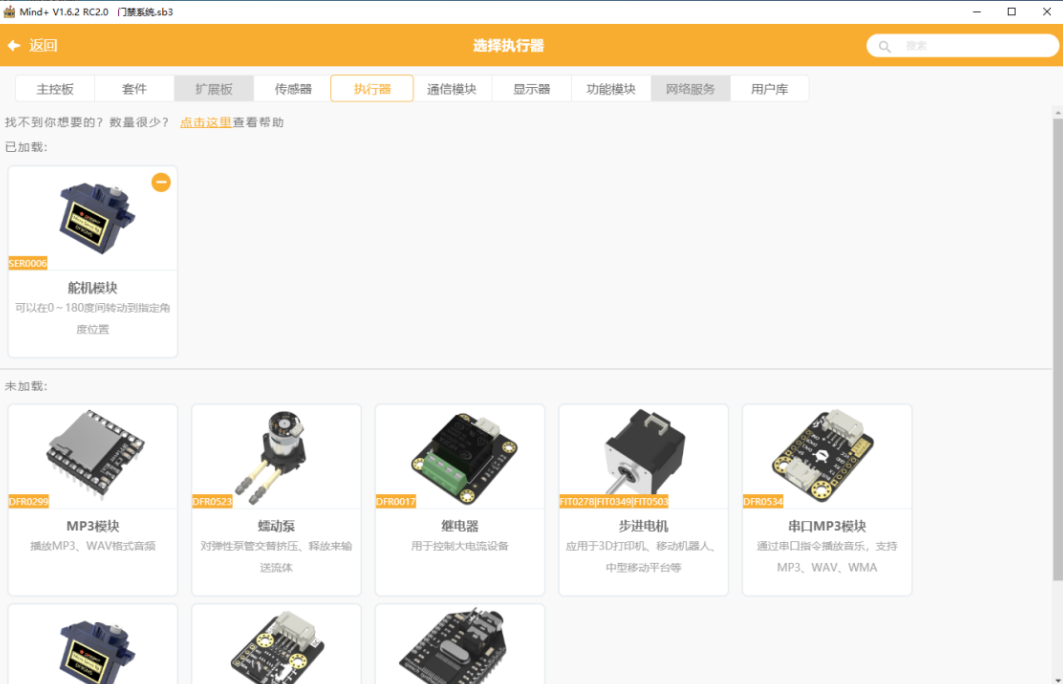
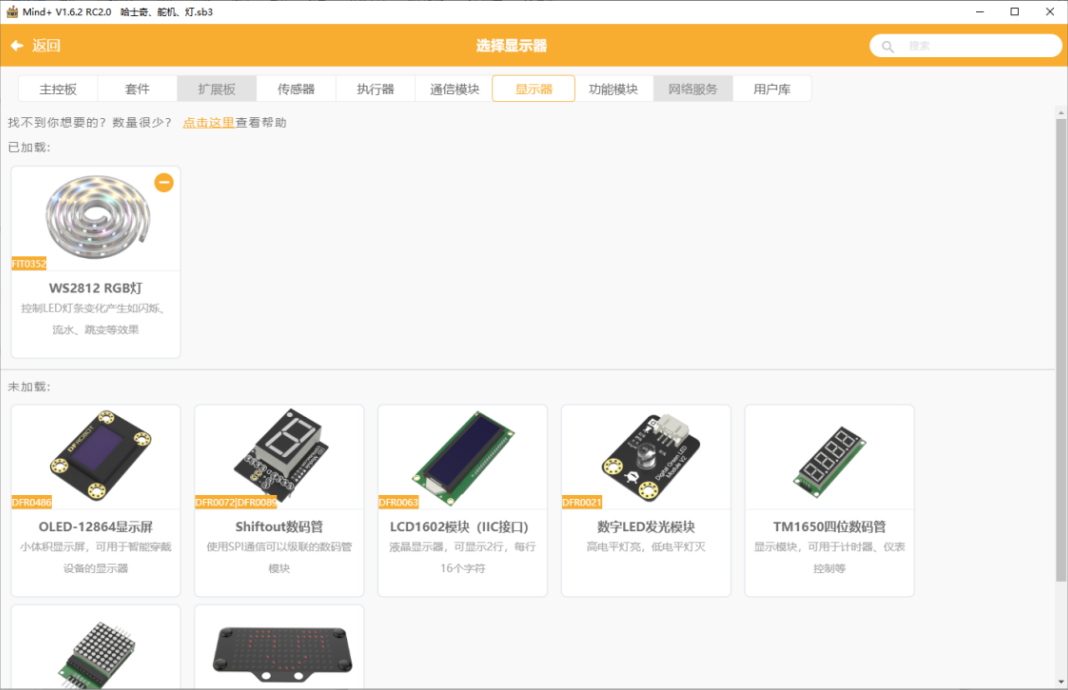
Open the Mind+ software (version 1.62 or higher), switch to “Upload Mode”, click “Extension”, load “Arduino UNO” under “Main Control Board”, load “HUSKYLENS AI Camera” under “Sensors”, load “Servo Module” under “Actuators”, and load “WS2812 RGB Light” under “Displays”. Add “Interrupt” under “Function Modules”.

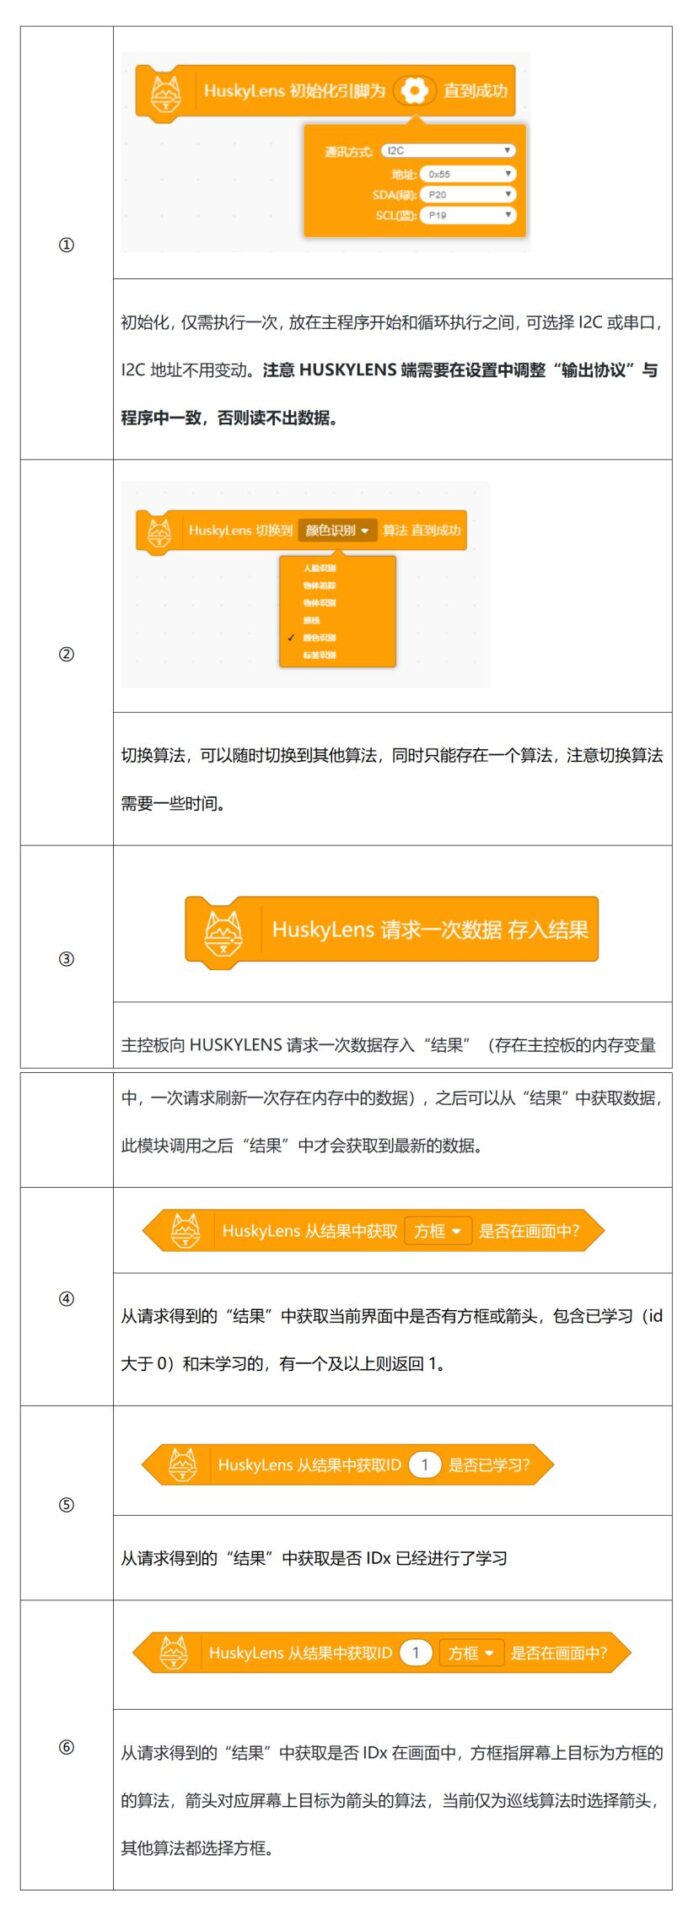
STEP 2 Command Learning
Let’s get to know some of the main commands used.
STEP 3 Flowchart Analysis

3. Program Example
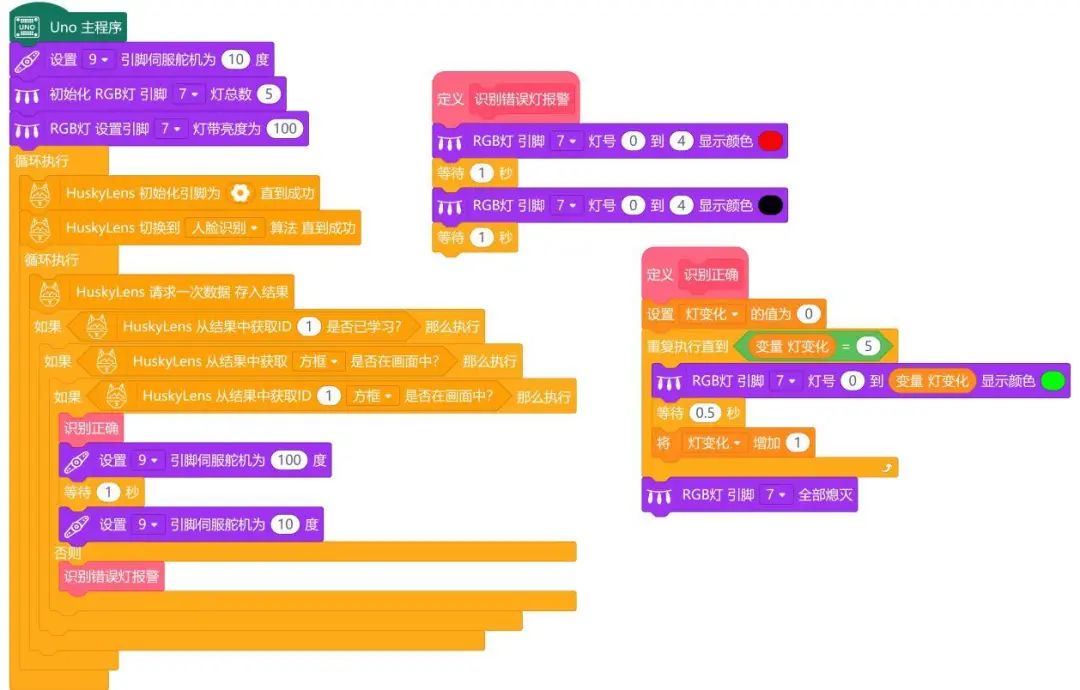
4. Running Effect
After the camera has learned a face, upload the program to the main control board. When the camera sees the specified face, the RGB light will show a green effect and light up in sequence. The servo will rotate from the set 10° to 100°, achieving the door opening effect (the servo rotation angle can be adjusted according to the actual situation). After the person passes, the door will automatically close. When seeing other faces, the servo will not rotate, and the RGB will light up red to warn.
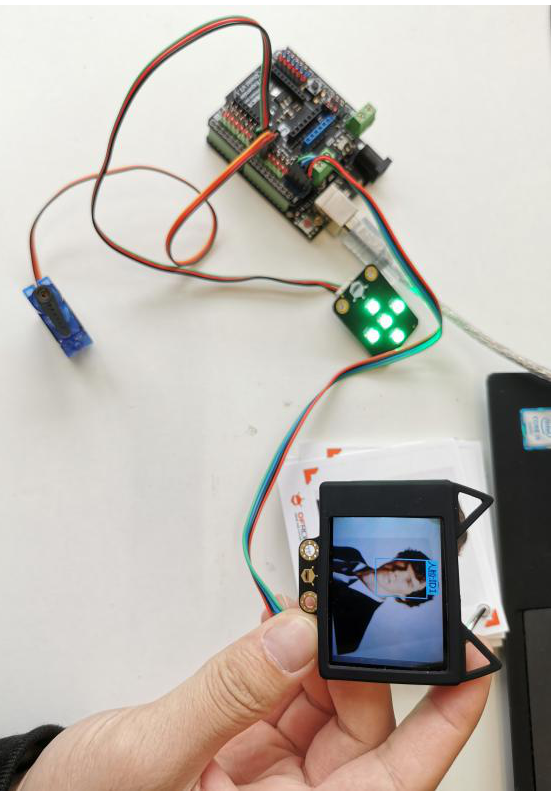
Correct Recognition
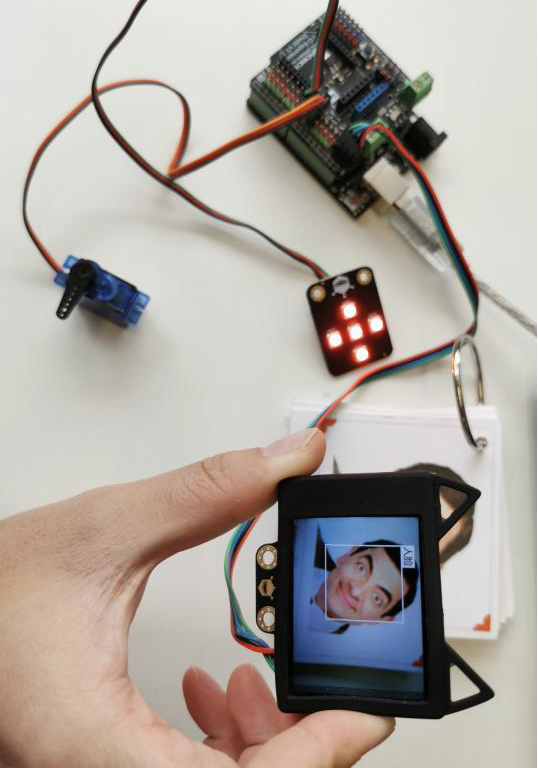
Incorrect Recognition
Task 2: Sound Alert and Welcome Function
1. Program Design:
Here, we refine the previous code. When no one passes by our access control system or when someone who is not the owner passes by, we can add a piece of music to the RGB and servo reactions, such as a praise song or a quirky one. For example, the theme song of Ultraman Diga’s “Miracles Reappear” and “Ugly Monster”.
How to add music? Here we use the buzzer in the kit.
How to find sheet music? Search for the simple sheet music of “Miracles Reappear” and “Ugly Monster” online, and capture the required segments.


How to write the program? In Mind+, there are built-in instructions for playing notes, divided into low, medium, and high pitches, with various rhythms.
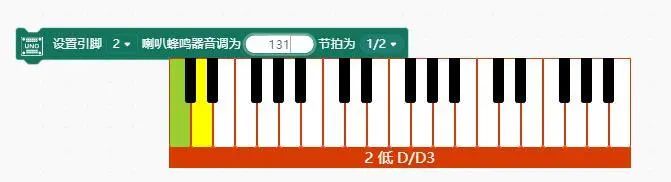
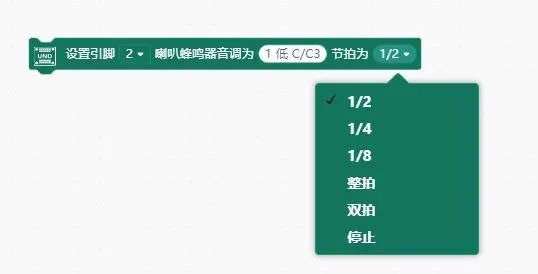
How to correspond the sheet music with instructions? Here is a simple recognition method, taking note 2 as an example, as shown in the table below.

2. Program Example:
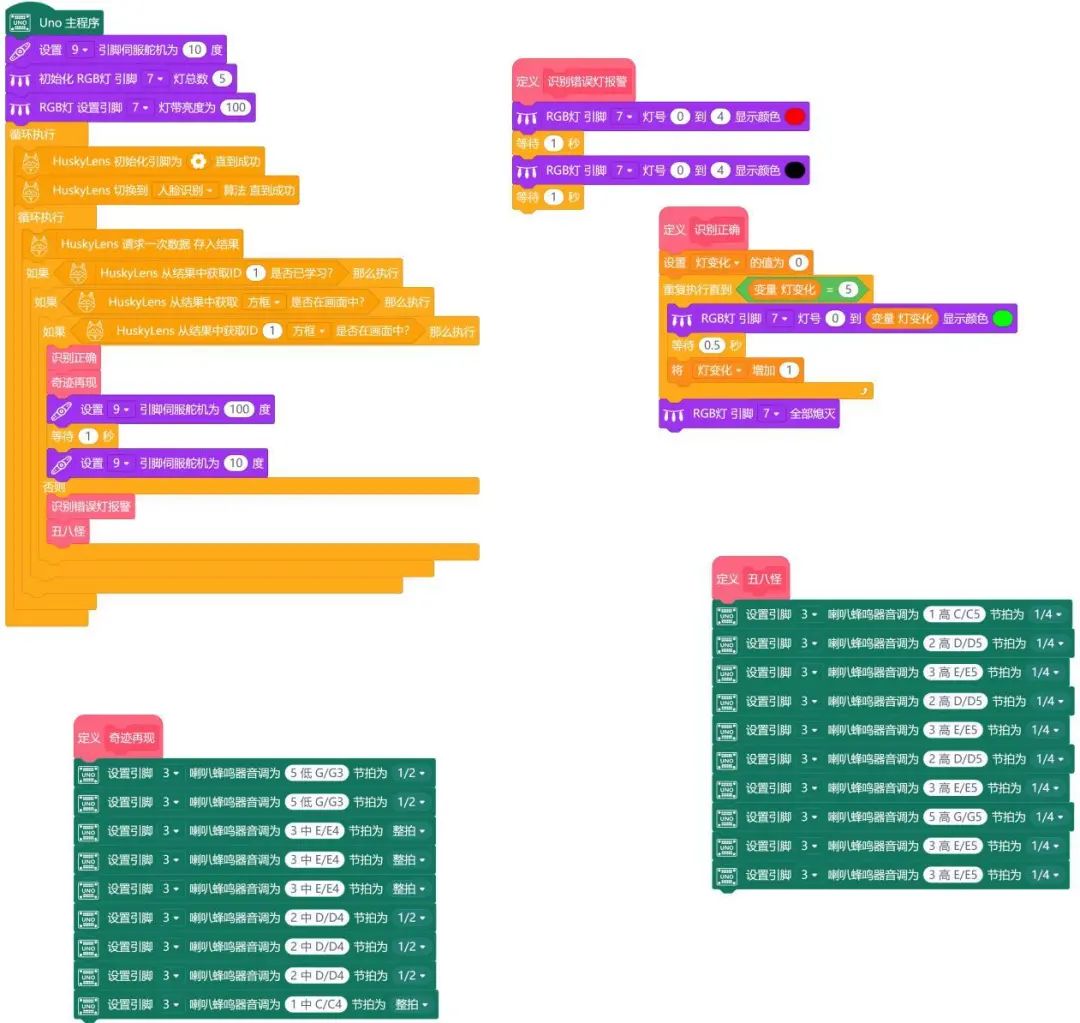
3. Running Effect:
Pre-learn your own face on the camera, upload the program to the main control board, and when the program runs, as long as the camera sees you, the RGB will light up in sequence, and the buzzer will play a melody of “Your dreams come true will not be far away”, while the servo will also rotate slightly to open the door. After the person passes, it will automatically close. If the camera sees other people, the RGB light will flash red to warn the stranger, and the buzzer will play “Ugly Monster”. If there is no face, the light will be off, and the buzzer will not play music.
Thinking: What if someone visits? How to solve it?
Task 3: Implement Doorbell Function
1. Program Design:
Based on the previous code, add the button control for the buzzer. Where should we add it? Imagine the scenario: When someone visits (not a previously learned face), first trigger the previous program to play “Ugly Monster”. At the end of this or at any time someone presses the button, our system should respond. Our interrupt happens to have this function, allowing the current task to be interrupted and trigger the interrupt program. Therefore, we use interrupts to solve this issue.
2. Program Example:
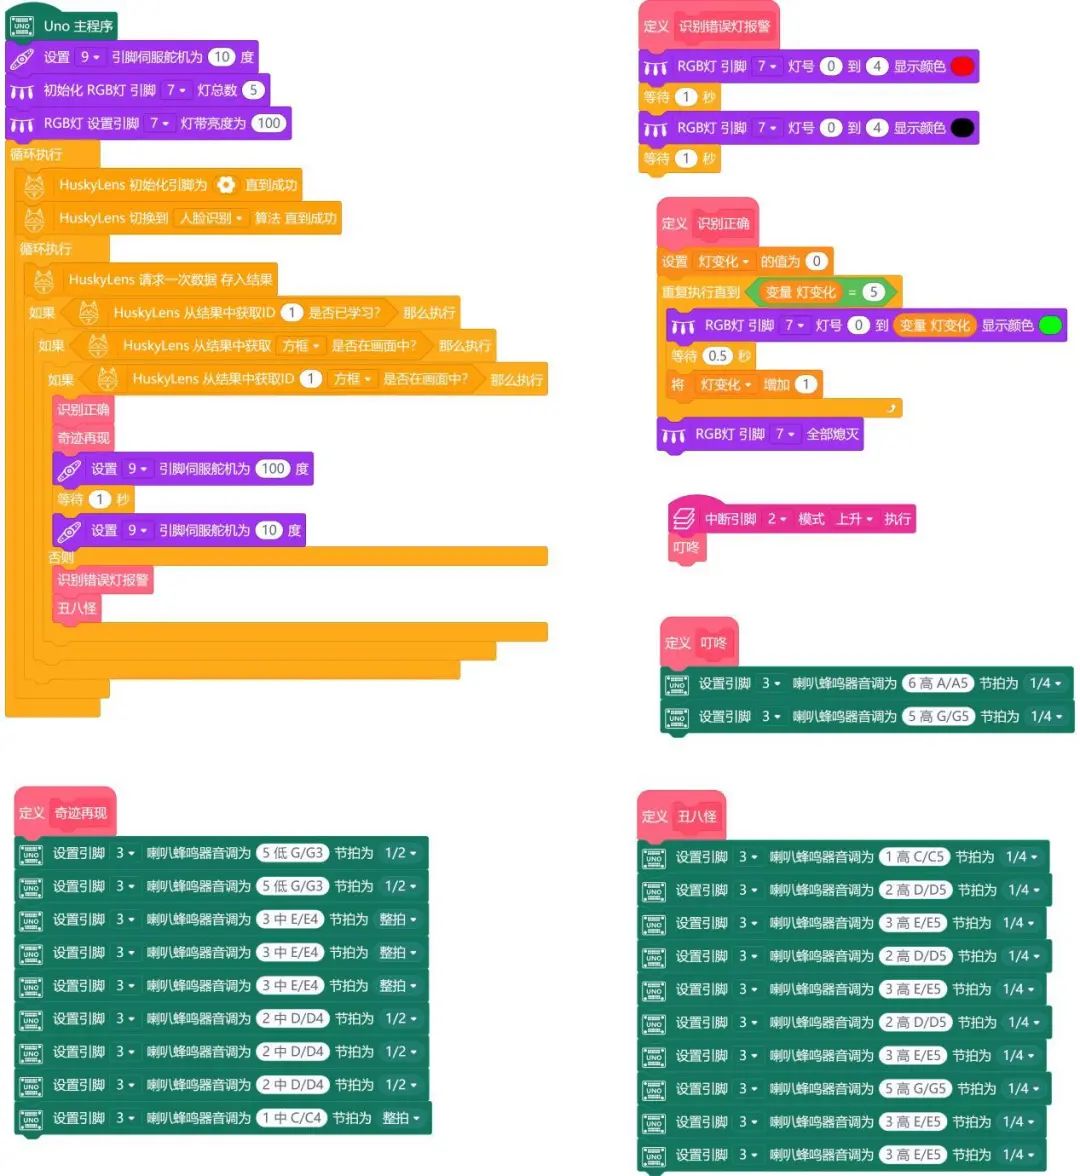
3. Running Effect:
Pre-learn your own face on the camera, upload the program to the main control board, and when the program runs, as long as the camera sees you, the RGB will light up in sequence, and the buzzer will play a melody of “Your dreams come true will not be far away”, while the servo will also rotate slightly to open the door. After the person passes, it will automatically close. If the camera sees other people, the RGB light will flash red to scare away the stranger, and the buzzer will play “Ugly Monster”. If there is no face, the light will be off, and the buzzer will not play music. During the above process, at any time, pressing the button will switch the music to “Ding Dong”, thus implementing the visitor access function. If there is no face, the light will be off, and the buzzer will not play music.
Project Summary
Through the access control system project, we learned about the working principle of facial recognition and studied the application of facial recognition algorithms on HUSKYLENS. In the field of artificial intelligence visual recognition, facial recognition is an indispensable part and has a rich range of application scenarios. Let’s brainstorm together and think about what other facial recognition applications we can create.
Knowledge Points Review:
1. Understand the working principle of facial recognition
2. Learn the relevant instructions for HUSKYLENS facial recognition
Project Expansion
In this project, we combined facial recognition with music and some sensors to design an access alarm system. However, if applied in real scenarios, the buzzer alarm sound is indeed too low. So can we combine it with the Internet of Things? We could try to create a home alarm system, using the camera to detect if there are strangers at the door. If a stranger lingers too long without pressing the doorbell, we can use the Internet of Things to send a message to the owner’s computer or mobile phone, and even achieve remote door opening functionality.
———————End of Text———————
The purpose of education is to cultivate students’ collaboration, communication, critical thinking, and creativity skills, with creativity being the core. Mushroom Cloud Maker Education, as one of the few one-stop maker education service providers in China, aims to cultivate children’s creativity.
In order to better connect the knowledge learned by students in the classroom with the real world, Mushroom Cloud will guide schools in planning, establishing, and operating their own maker spaces. And according to the different ages of students, distinctions have been made in design and layout.
Elementary school maker spaces focus on fun,
emphasizing interactive scenarios;
Middle school maker spaces focus on practicality,
emphasizing learning scenarios;
High school maker spaces focus on technology,
emphasizing application scenarios;
In terms of content, Mushroom Cloud collaborates with leading maker teachers in China to compile a series of textbooks suitable for domestic maker education. It also has a complete maker education curriculum system, including course content and teaching aids, course training, and technical Q&A. Similarly, distinctions are made in course classification and design according to different student age groups.
Elementary school courses are conducted through gamification and experiential methods, focusing on “learning through play”.
Middle school guides students to engage in inquiry-based learning through hands-on processes, promoting “learning through doing”.
High school learning is based on problems and designs, requiring teachers to create relevant real-life scenarios for students to “learn through thinking”.