Click on “Mushroom Cloud Creation” to follow us!
Book Borrowing and Returning System
Life Anecdotes
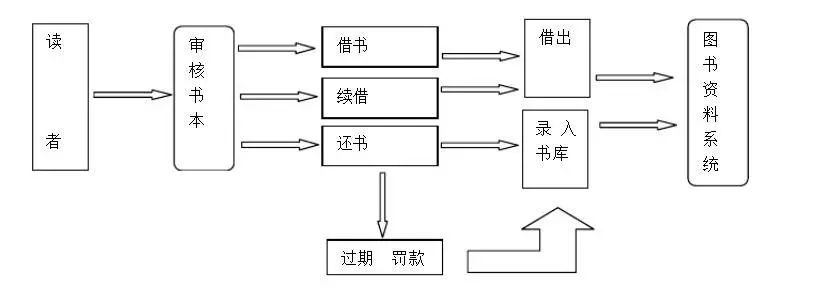
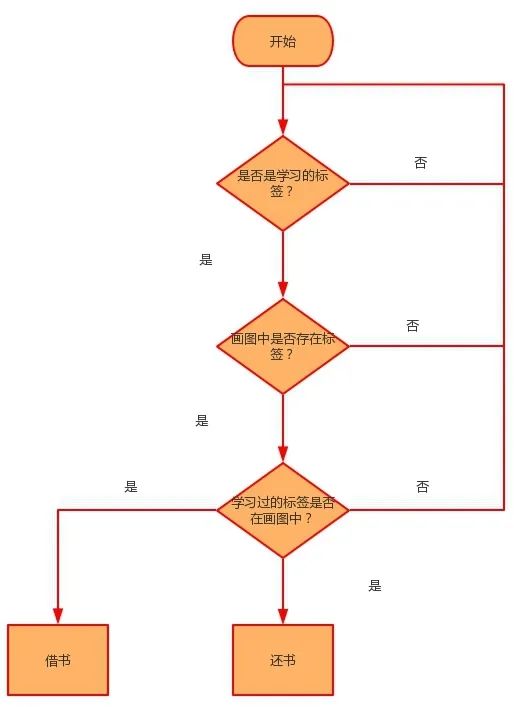
We are no strangers to libraries since childhood. When I went to borrow books from the school library, I needed a library card, which contained some of my information. With this card, I could borrow books. Now borrowing books is even easier; it can be done with a QR code or a student ID (even a meal card). Let’s recall our book borrowing process, as shown in the figure below.
Normal library borrowing operation flowchart:
Today, we will use the Husky’s tag recognition function to create a borrowing and returning system that can borrow and return books using a QR code.
Function Introduction
In this project, we will learn the tag recognition function of HUSKYLENS, using its built-in machine learning capabilities to recognize learned tags. We will not set up the information on the tags here; we assume this tag contains our information, and once entered into the system, we can perform borrowing and returning operations. We can also use the SIoT function to record the borrowing and returning times and send relevant messages to the administrator for remote monitoring.
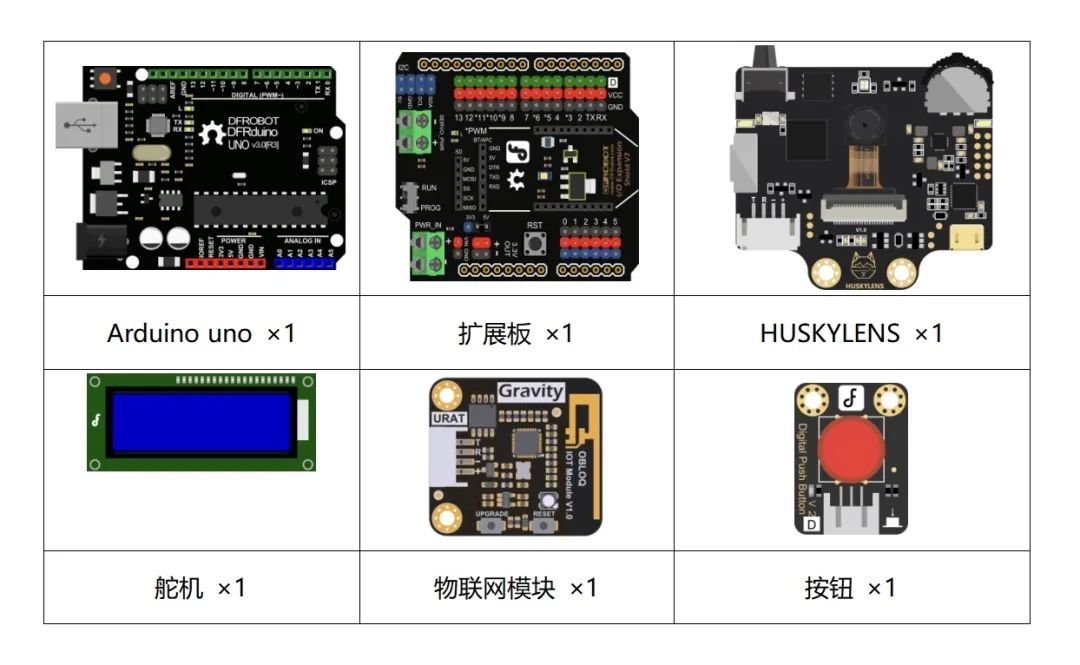
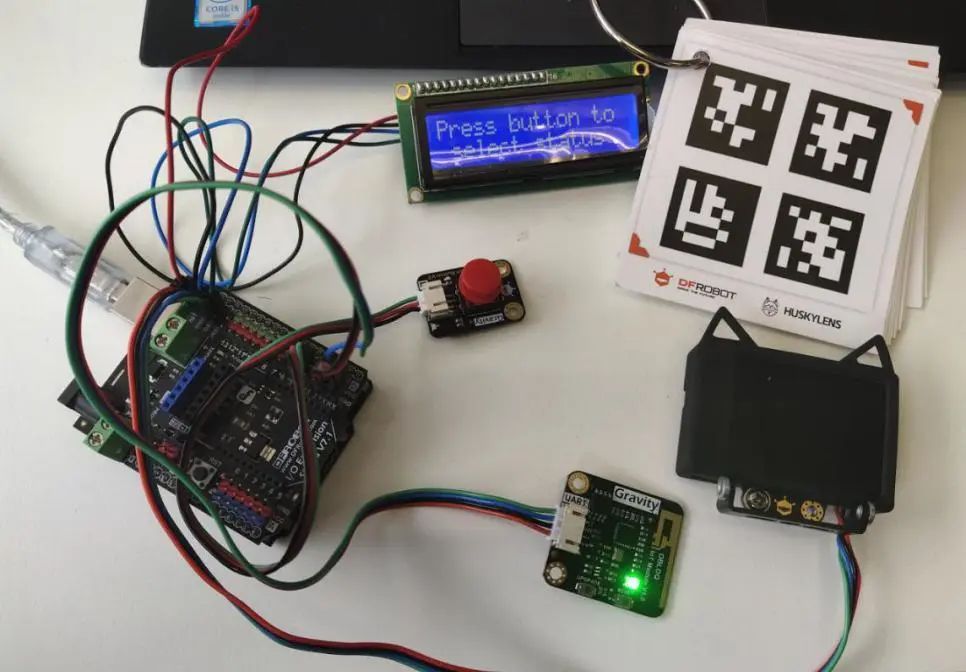
Material List
Knowledge Garden
Upon careful observation of the current book borrowing process, we find that whether it is manual or self-service borrowing and returning, it is done through a scanning device that scans the barcode on the library card (or the built-in chip). Each borrower has a unique barcode, so we only need to find a replacement for the scanning device and barcode to achieve our project.

Scanning device ——> HUSKYLENS tag recognition function
Barcode ——> AprilTag
1. What is Tag Recognition?
Tag recognition technology (abbreviated as identification technology) refers to the effective, standardized coding and identification of items. It is the foundational work of informatization. As people’s awareness of health and safety increases, the food industry has higher and higher requirements for product quality and safety (from raw materials, transportation, production, storage, and related tracking and management). Identification plays a significant role in meeting enterprises’ needs for product tracking and tracing.
Identification technology mainly includes barcode technology, IC card technology, radio frequency identification technology, optical symbol recognition technology, voice recognition technology, biometric recognition technology, remote sensing and telemetry, and robot intelligent perception technology.
2. What is AprilTag?
AprilTags are a visual landmark system developed by a project team at the University of Michigan, primarily used in AR, robotics, and camera calibration. The function of the tags is similar to barcodes, storing a small amount of information (tag ID) while allowing for simple and accurate 6D (x, y, z, roll, pitch, yaw) pose estimation.
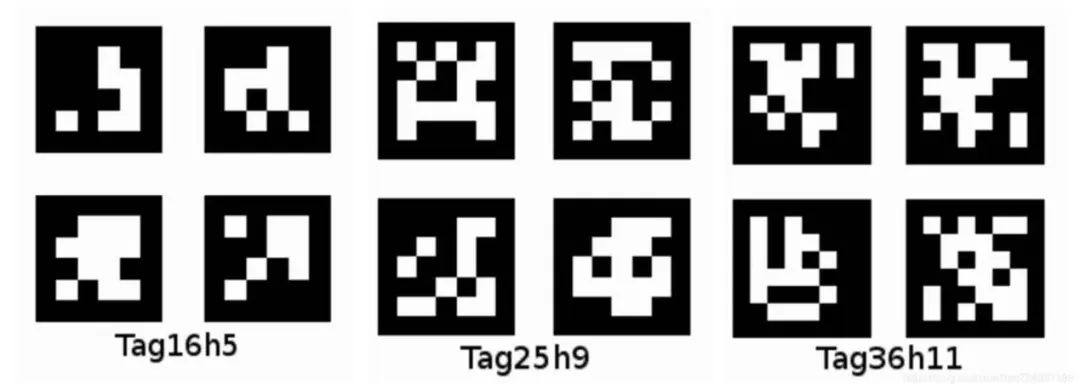
3. Principle of HUSKYLENS Recognizing AprilTag
The AprilTag recognition process mainly includes the following steps:
1. Edge detection, finding the edge contours in the image.
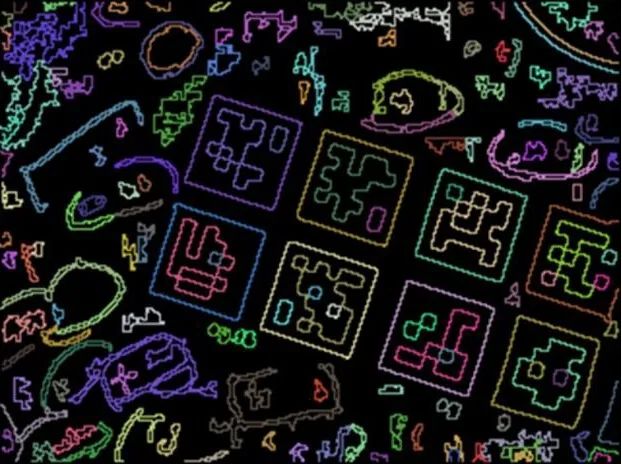
2. Quadrilateral detection, finding quadrilaterals in the contours.

3. Decoding, matching and checking the identified quadrilaterals.
Through these steps, the tag recognition function of HUSKYLENS can recognize different AprilTags. Therefore, we only need to stick different AprilTags on different products to achieve recognition of corresponding products.
4. HUSKYLENS Sensor – Tag Recognition Function Demonstration
1. Detecting Tags
When HuskyLens detects a QR code tag, it automatically frames all detected QR code tags with a white box on the screen.
2. Learning Tags
Align the “+” sign in the center of the HuskyLens screen with the tag that needs to be learned, and short press or long press the “learn button” to complete the learning of the first tag. After releasing the “learn button,” the screen will prompt: “Press again to continue! Press other buttons to end.” If you want to continue learning the next tag, press the “learn button” before the countdown ends. If you no longer need to learn other tags, press the “function button” before the countdown ends or do not operate any buttons and wait for the countdown to end.
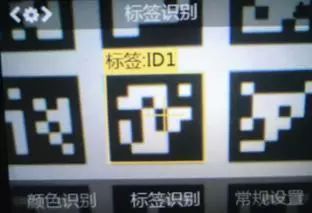
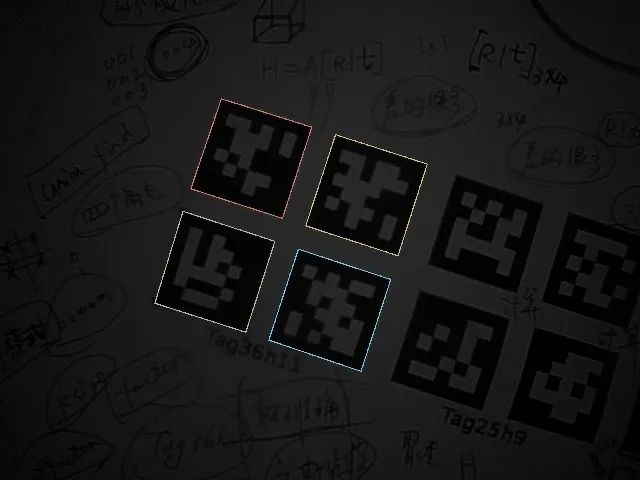
The tag IDs will be consistent with the order of the learned tags, that is, learned tags will be sequentially labeled as “Tag: ID1”, “Tag: ID2”, “Tag: ID3”, and so on. The border colors corresponding to different tags will also be different.
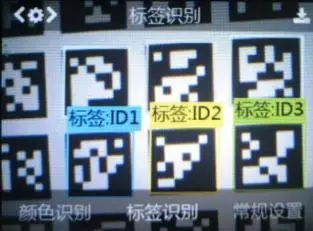
3. Recognizing Tags
When HuskyLens encounters learned tags again, it will highlight these tags with colored borders on the screen and display their IDs. The size of the border will change with the size of the QR code tags, and the border will automatically track these QR code tags.
Project Practice
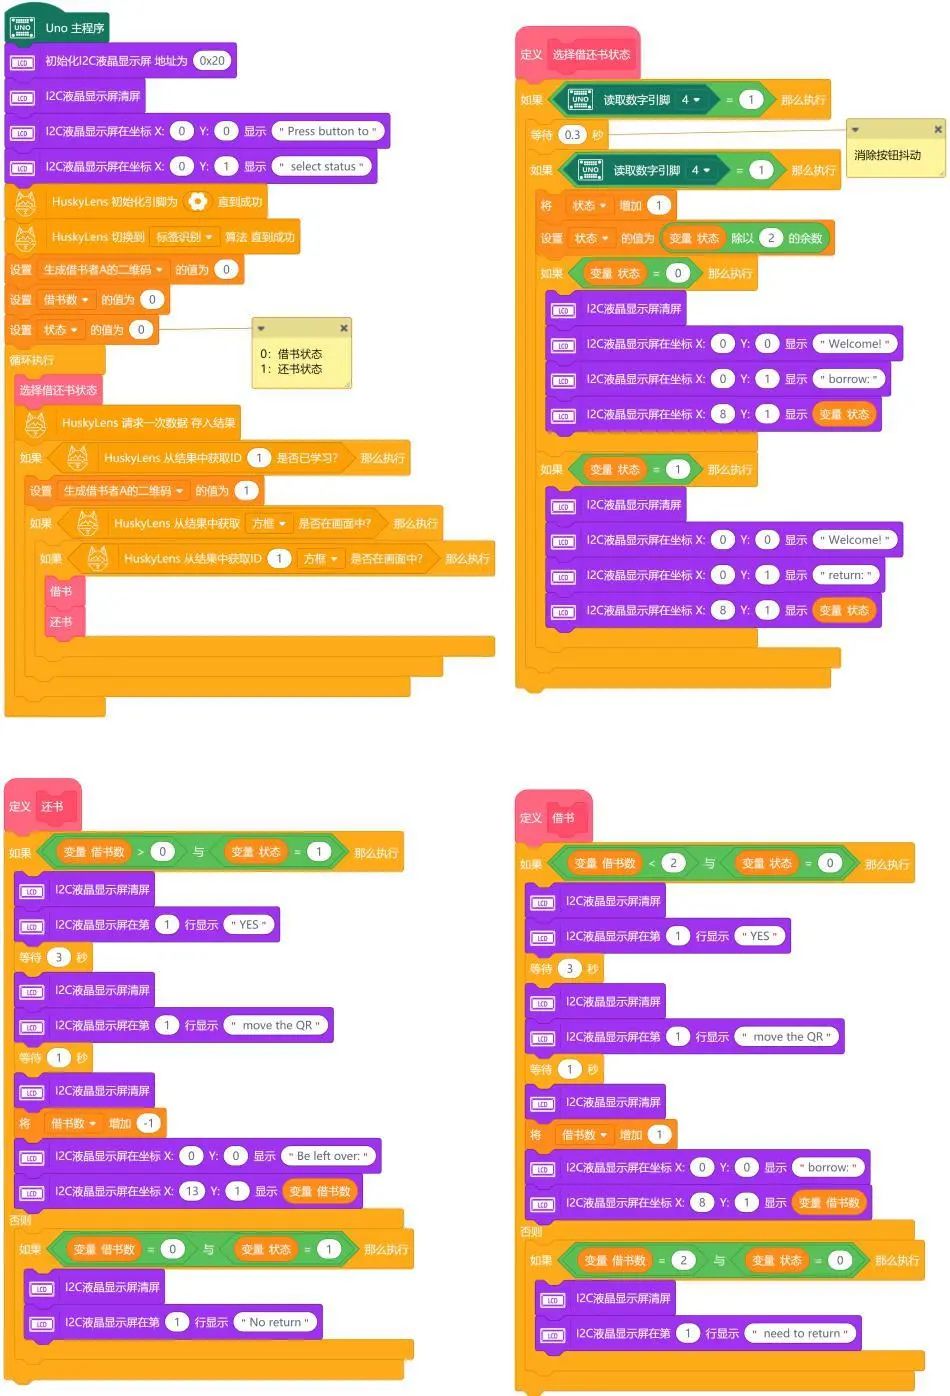
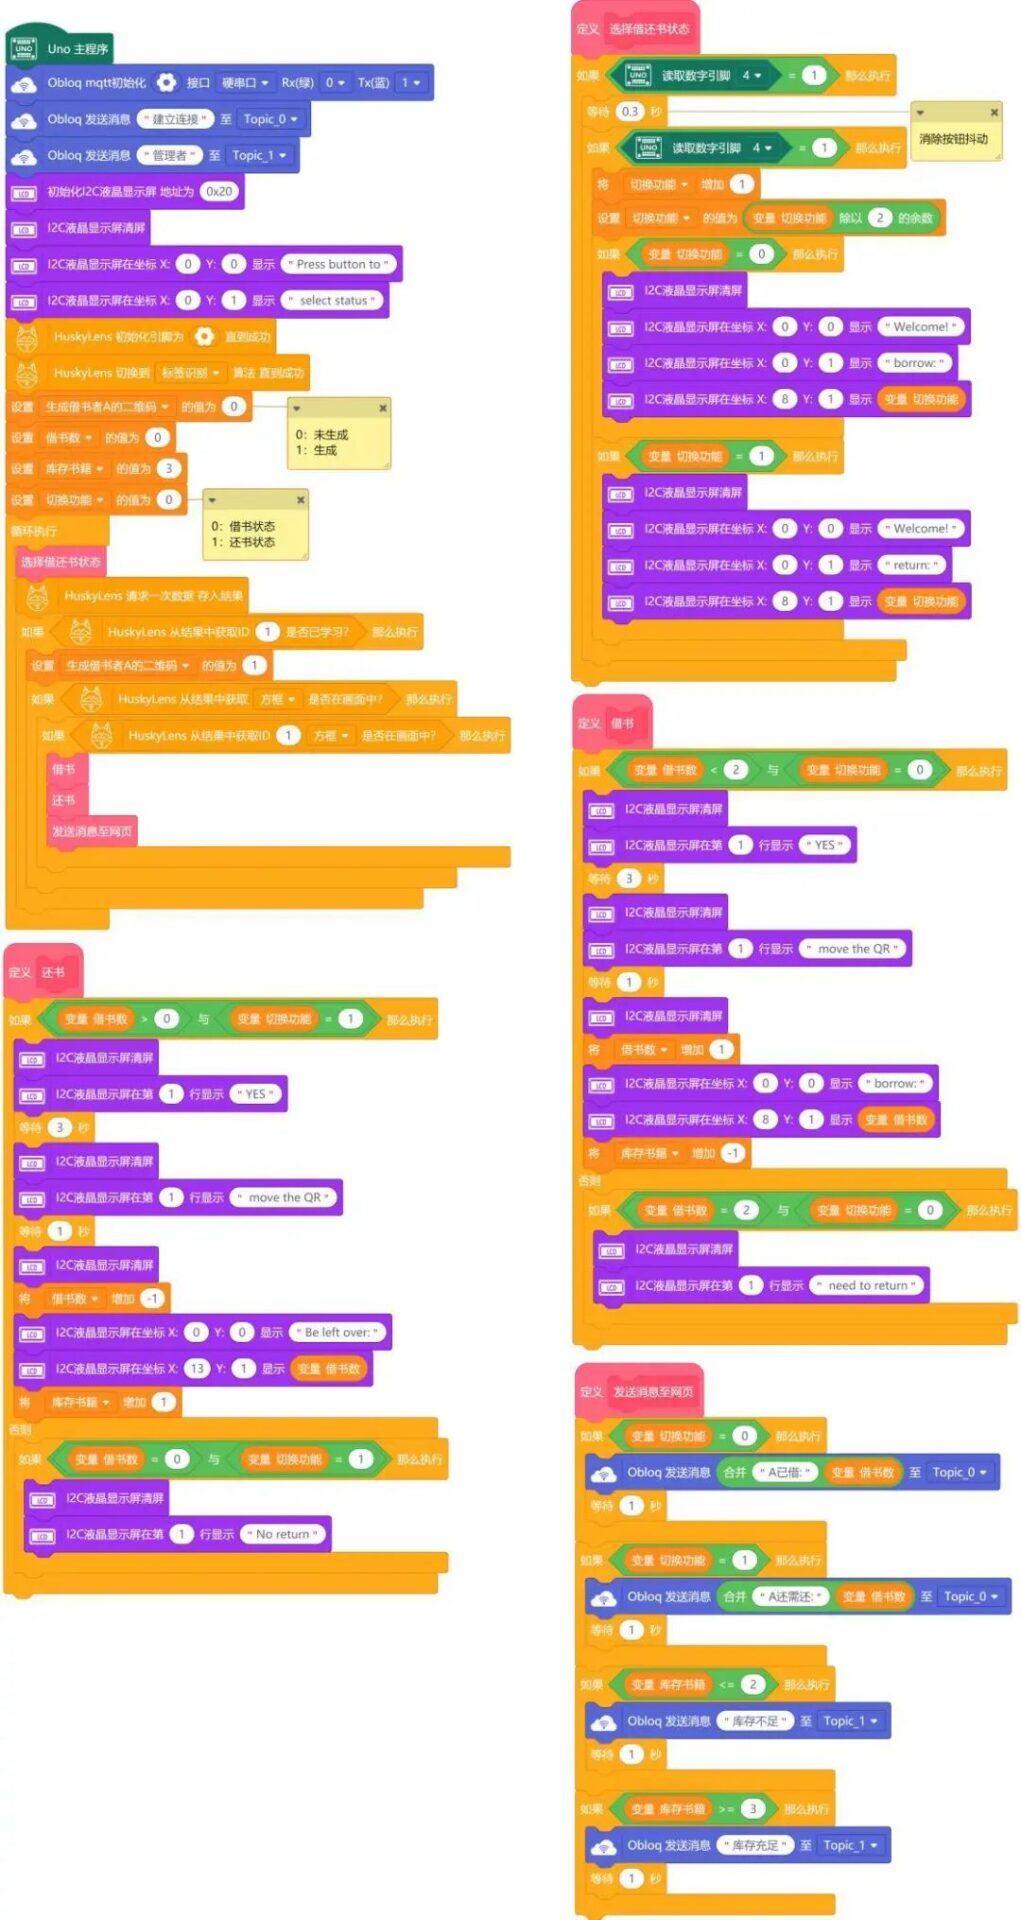
After learning the tag recognition function of Husky, let’s work together to implement the borrowing system’s functions. The first function to implement is the camera’s ability to recognize different tags, where each tag represents a different borrower. Here we define a variable for Borrower A to represent a borrower. The LCD screen will display our operations in real-time. However, our borrowing and returning system has both borrowing and returning, so we need a button to switch the state. Finally, we will achieve remote monitoring through the IoT module.
Task 1: Implement Borrowing and Returning Functions
In this step, we first learn how to use the HUSKYLENS camera to learn tags. If it is a learned tag, borrowing and returning can be done. Here we set a variable to determine borrowing and returning (0 and 1, with 0 representing borrowing and 1 representing returning). First, for borrowing, initially, each person can borrow up to two books. When reaching the limit, they need to return books before borrowing again. Secondly, for returning, the foundation for returning is that we first have borrowed books (so the initial borrowing count should be set to 1 or 2). The changes in the borrowing and returning counts can be displayed in real-time on the screen.
Task 2: Implement Function Switching
After completing the borrowing and returning functions, we need to combine them, so we need a button to switch between borrowing and returning states.
Task 3: Implement Remote Monitoring Function
After completing the above functions, we want to record the time of each borrowing and returning (the date of borrowing and returning) and notify the administrator of potential inventory shortages. To achieve these functions, we can implement remote monitoring through the IoT module.
Task 1: Implement Borrowing and Returning Functions
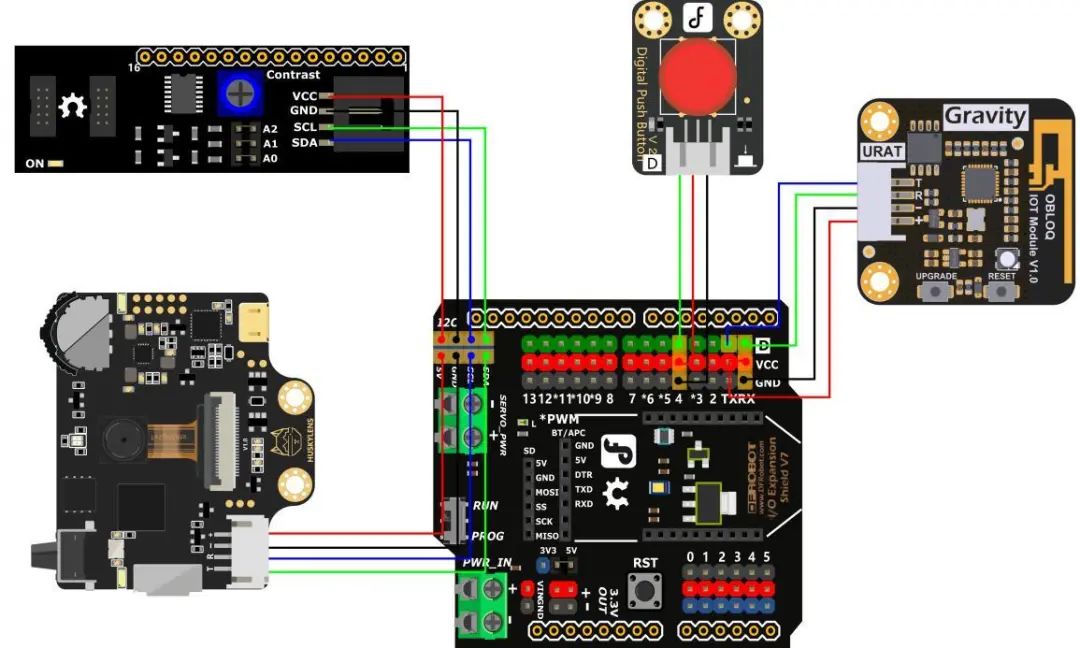
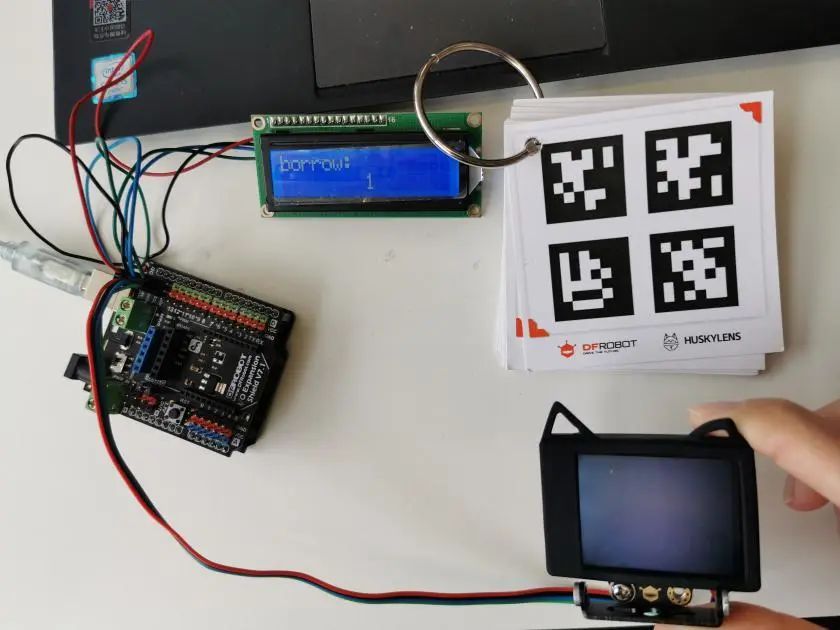
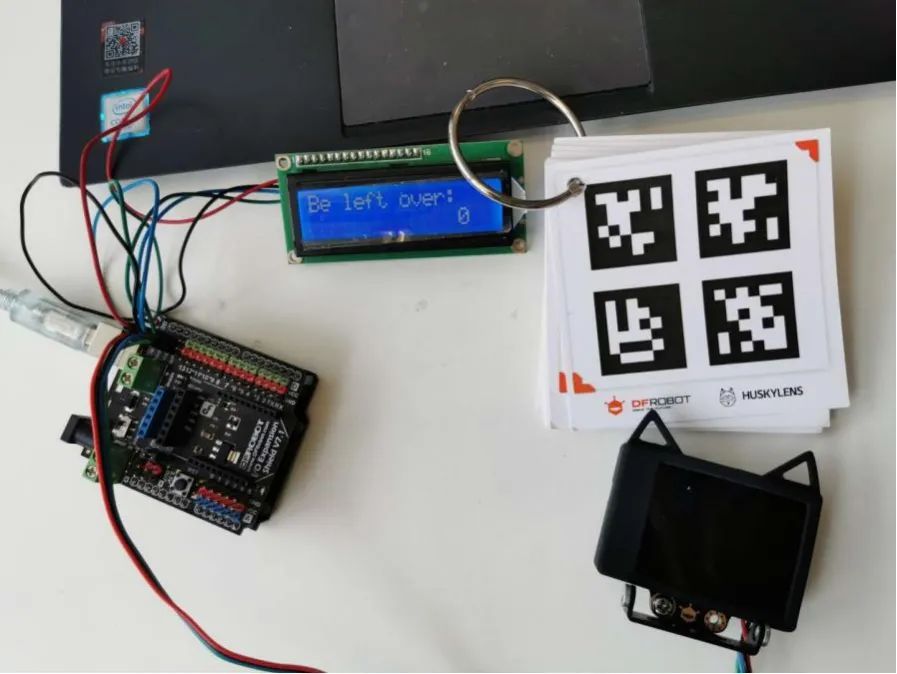
1. Hardware Connections
HUSKYLENS: I2C pins (T—SDA, R—SCL, +—5V, – —GND)
Button: Digital pin 4
IoT Module: UART port (T—RX (green wire), R—TX (green wire), +—VCC, – —GND). When uploading the program, remove RX, and reconnect it after the upload is successful.
LCD Display: I2C pins (SDA—SDA, SCL—SCL, VCC—5V, GND—GND)
2. Program Design
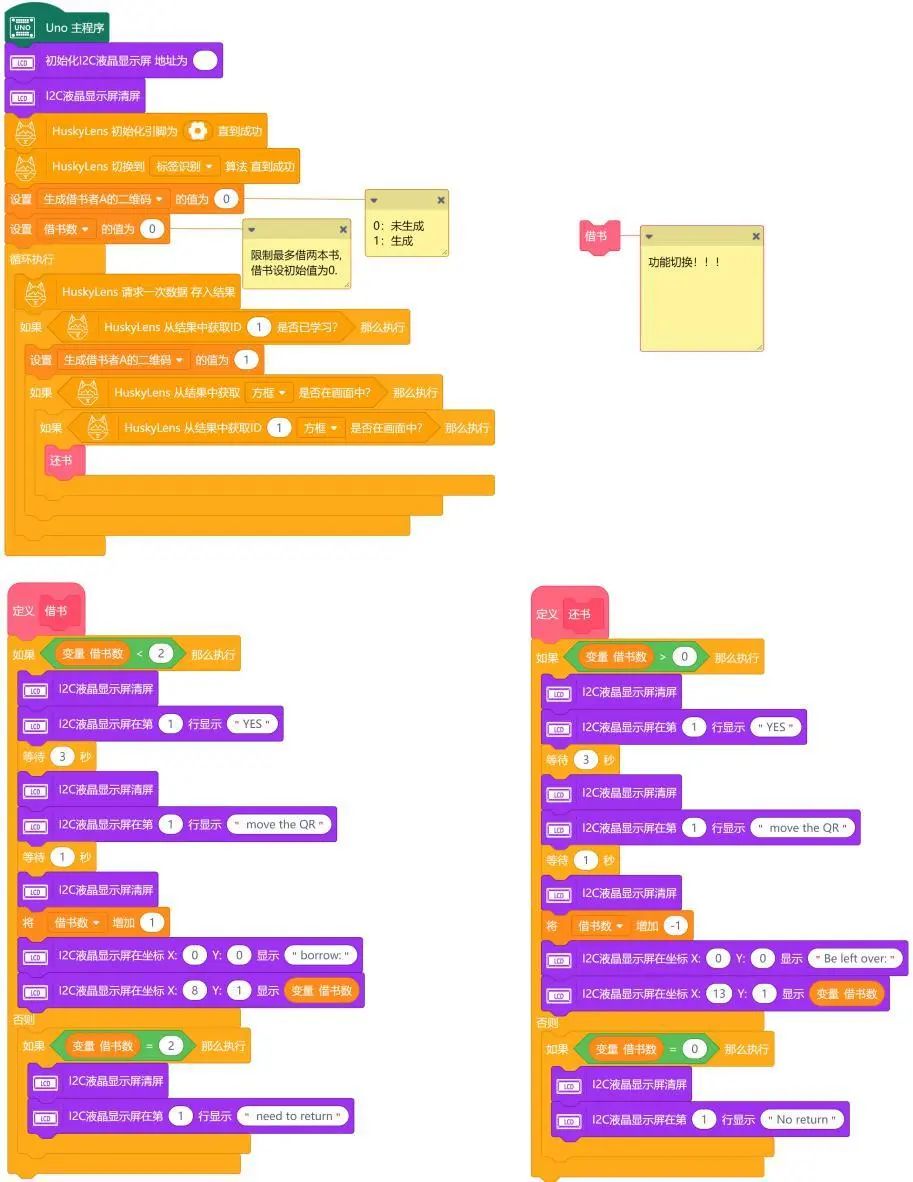
We need to use the HUSKYLENS scanner to implement the borrowing and returning functions for Borrower A. Therefore, we set the variable “borrowing count” with an initial value of 0 (indicating no borrowing or returning operations). The maximum borrowing count can be set to 2, indicating that each person can borrow up to two books at the same time. When using HUSKYLENS to scan the AprilTag code, the LCD screen will display the value of “borrowing count” in real-time. Each scan will increase the borrowing count by 1. When the borrowing count reaches 2, the screen will prompt “need to return.” When performing a return operation, each scan will decrease the “borrowing count” by one. When there are no books to return, it will prompt “No return.”
STEP 1 Mind+ Software Setup
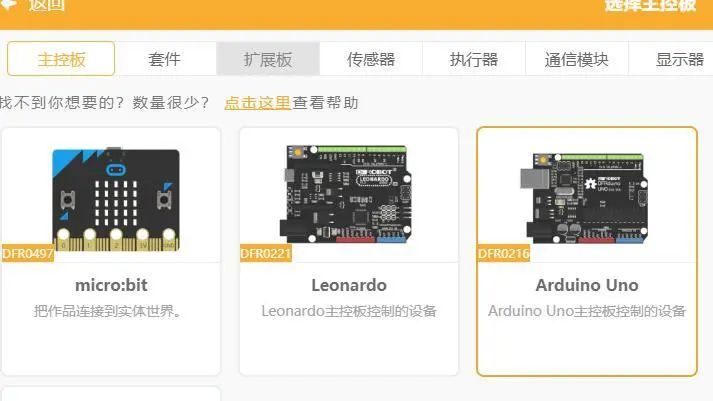
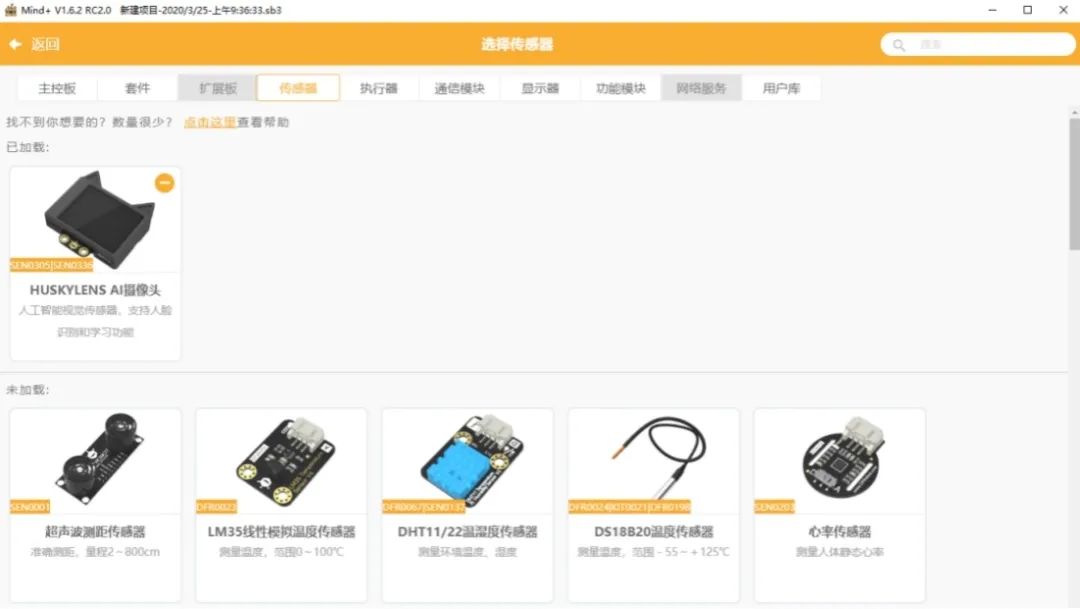
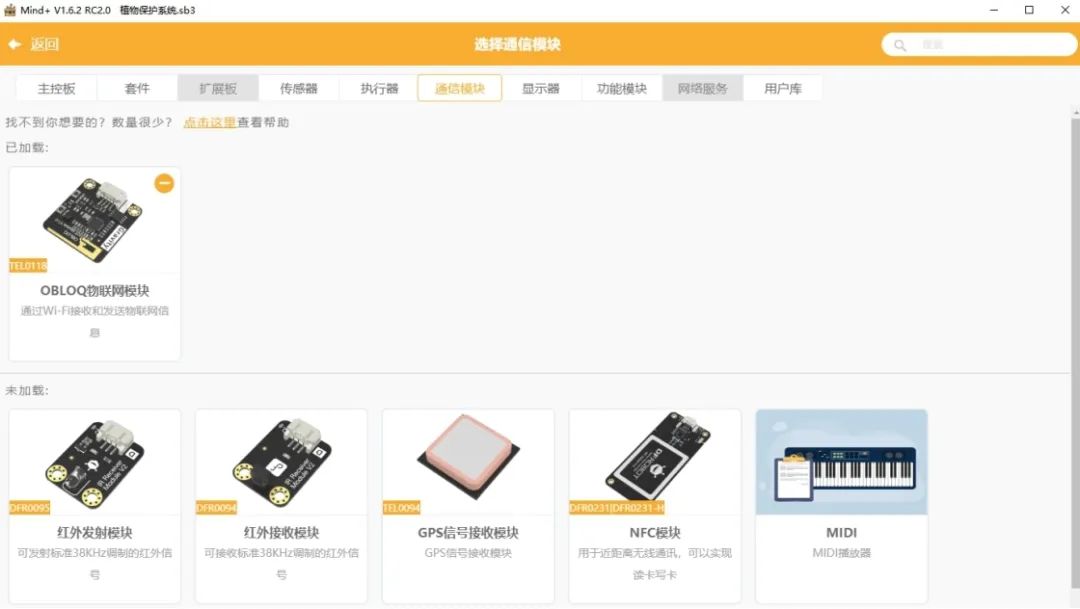
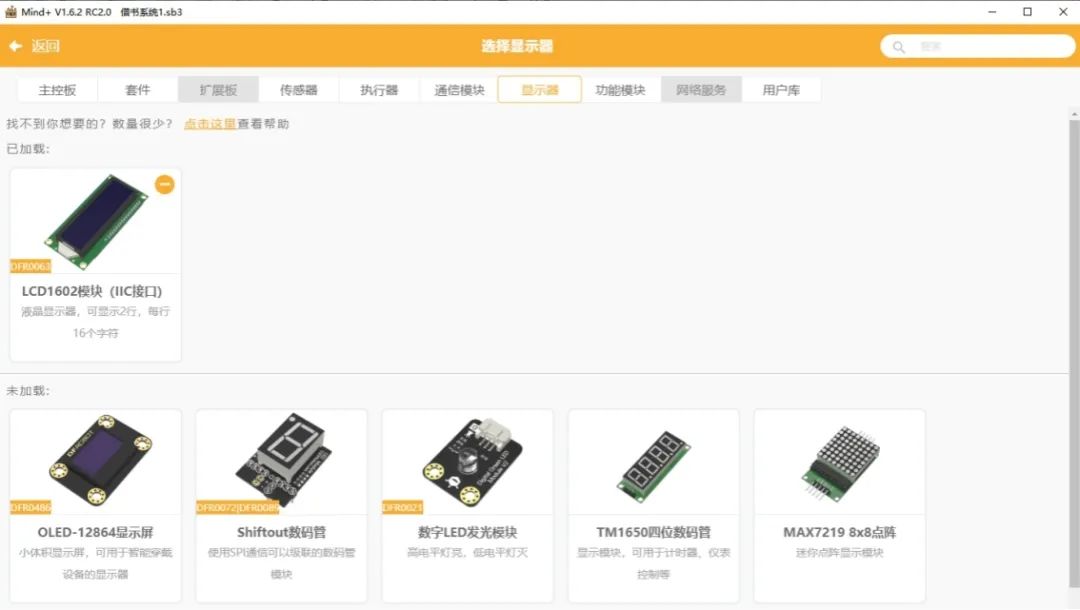
Open the Mind+ software (version 1.6.2 and above), switch to “Upload Mode,” click “Extension,” load “Arduino Uno” under “Main Control Board,” load “HUSKYLENS AI Camera” under “Sensors,” load “OBLOQ IoT Module” under “Communication Modules,” and load “LCD1602 Module” under “Display.”
STEP 2 Command Learning
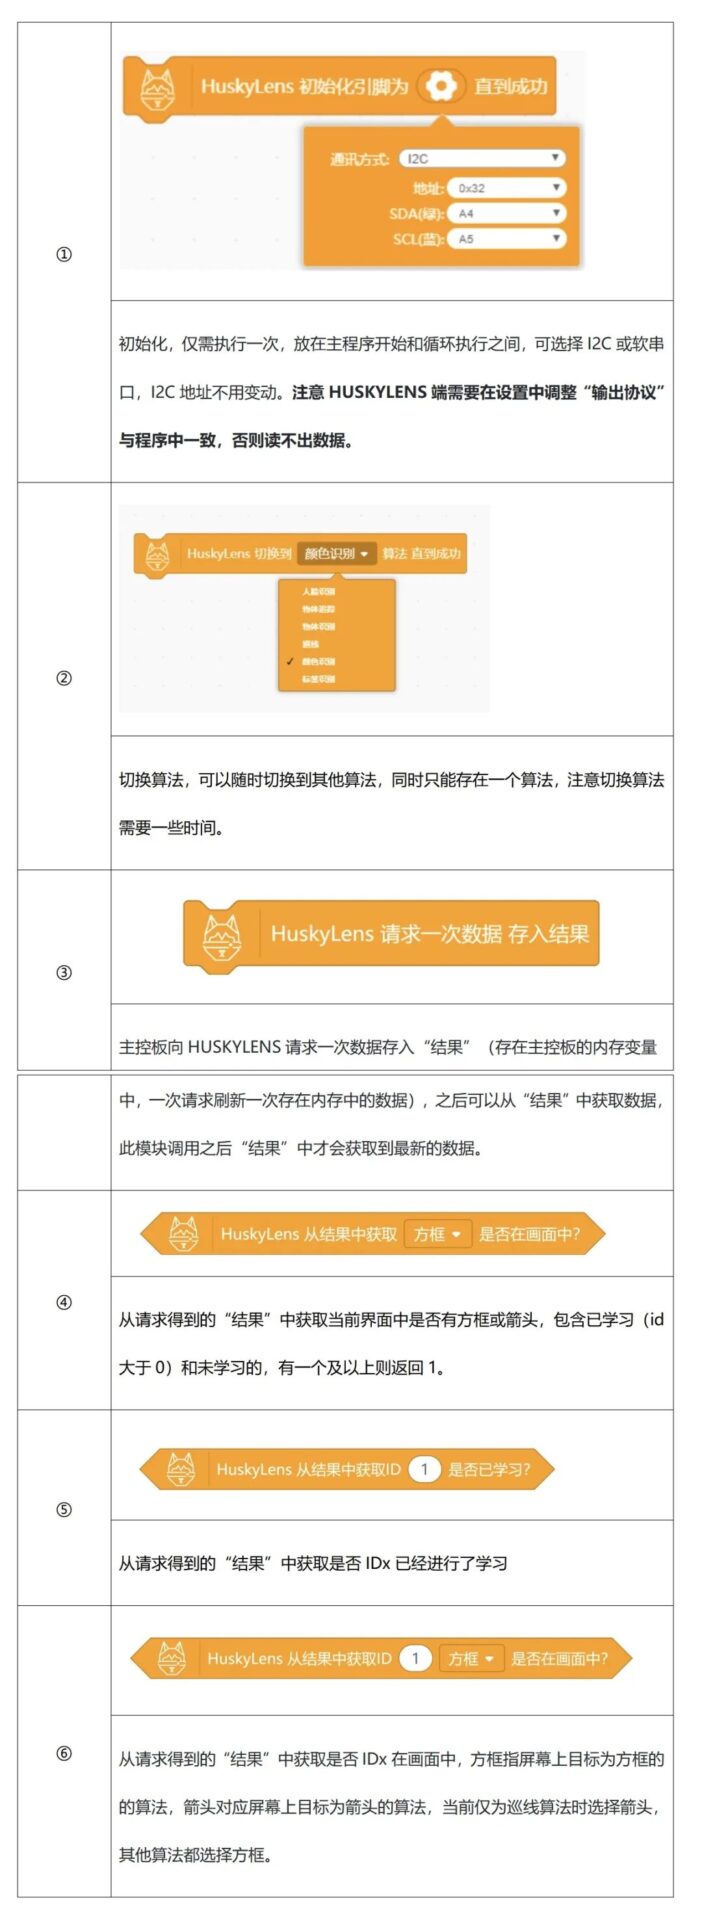
Let’s get to know some of the main commands used.
STEP 3 Flowchart Analysis
3. Program Example
(1) Borrowing Example Program, set the initial value of “borrowing count” to 0.
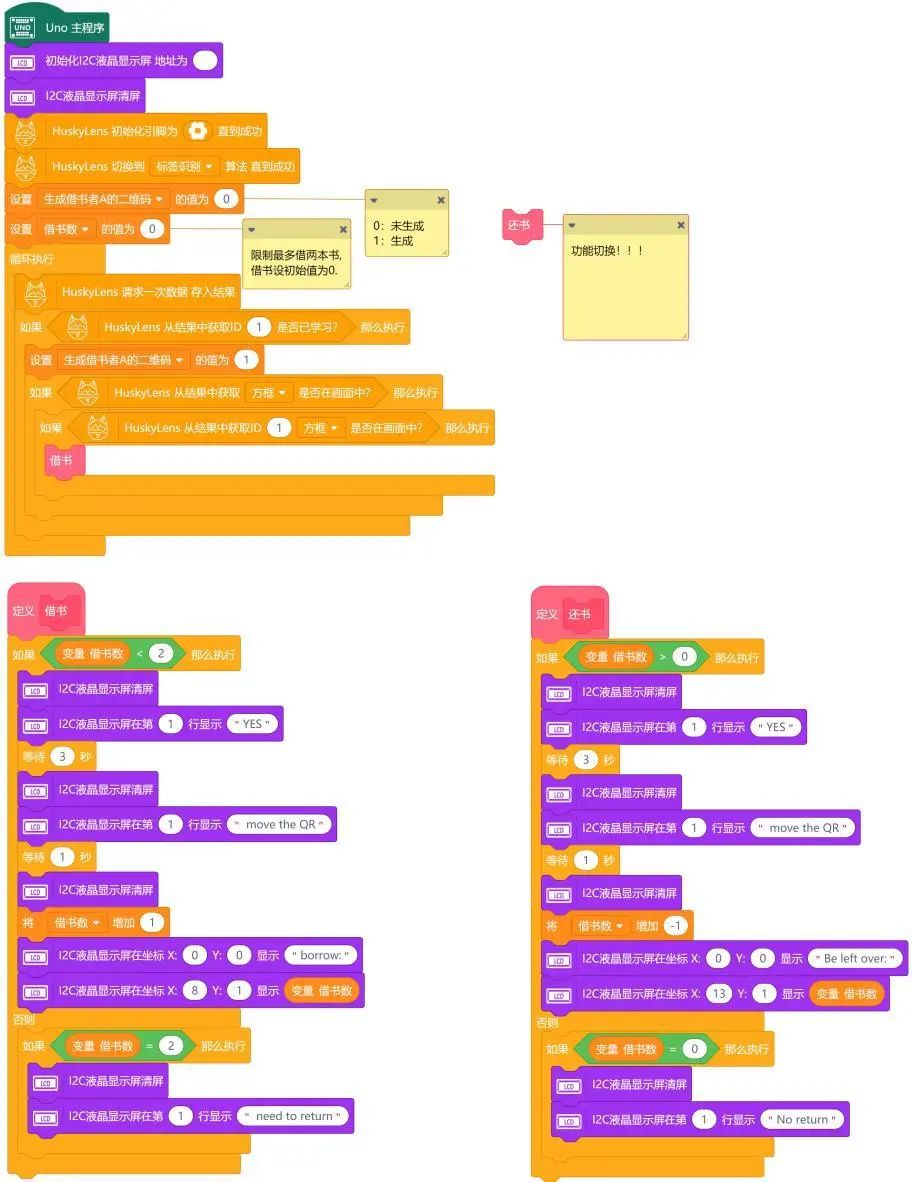
(2) Returning Example Program, set the initial value of “borrowing count” to 1 or 2, so that the return operation can be performed.
4. Running Effect
When selecting the example program (1), the HUSKYLENS camera recognizes the AprilTags recognition code, allowing borrowing operations. When scanning a previously learned tag, the display will show “YES” (the display can only show English; specific content can be set by yourself), indicating that borrowing operations can be performed. After 3 seconds, the screen displays “move the QR,” prompting that the tag needs to be moved away from the camera, after which it shows the number of books borrowed.
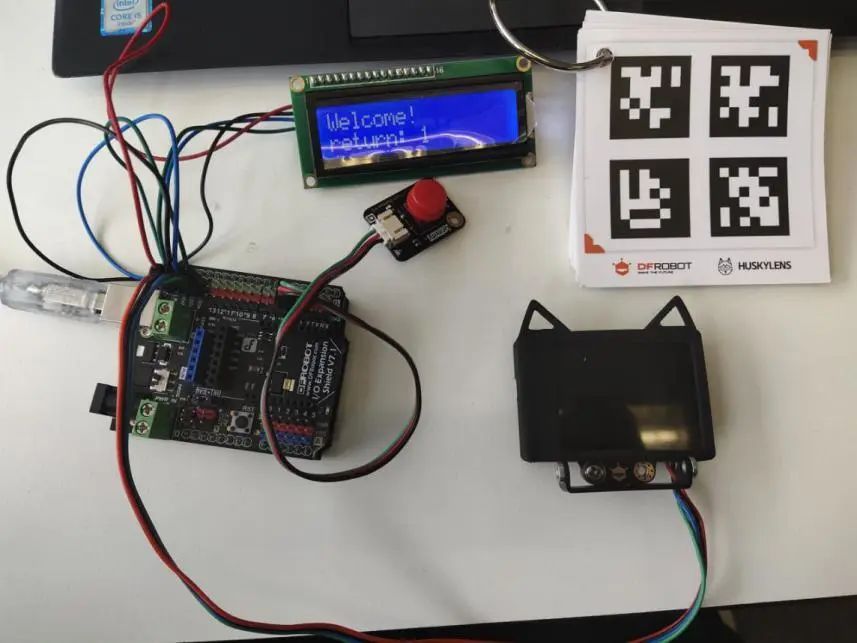
When selecting the example program (2), the HUSKYLENS camera recognizes the AprilTags recognition code, allowing returning operations. When scanning a previously learned tag, the display will show “YES,” indicating that returning operations can be performed. After 3 seconds, the screen displays “move the QR,” prompting that the tag needs to be moved away from the camera, after which it shows the number of books still to be returned.
Task 2: Implement Function Switching
1. Program Design:
Integrating the above codes into one project, we need a switching function, and here we choose a button to switch. The program logic requires a variable to control the switching of the program under different states. Therefore, we set a variable named “switch function” and initialize it to 0. When the value is 0, it is set to the borrowing state. When the value is 1, it is the returning state. At the same time, we can improve the content displayed on our screen to achieve better prompts for borrowers.
2. Program Example:
3. Running Effect:
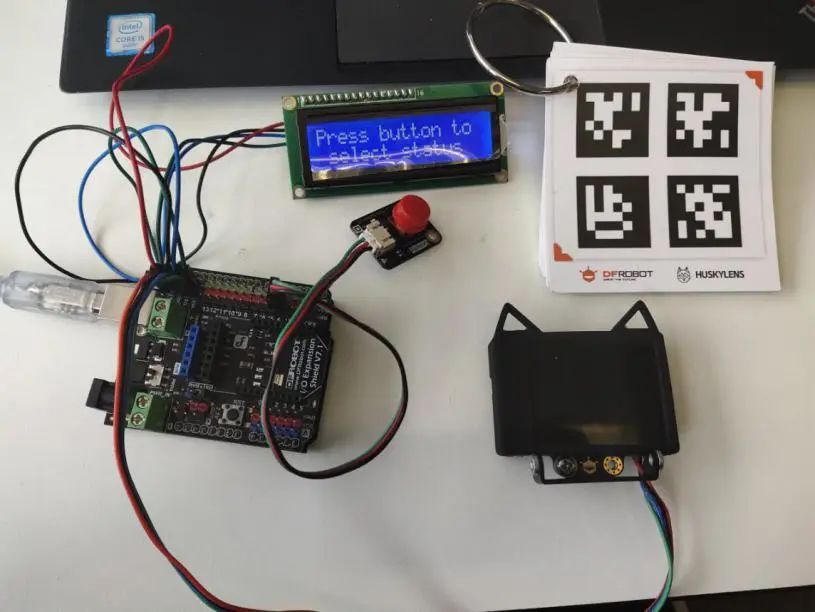
Based on the previous program, we added the button switching state function. When the program runs, the screen displays “Press button to select status,” prompting to press the button to select the function state, defaulting to the borrowing state. At this time, directly using the HUSKYLENS camera to scan the tag allows immediate borrowing. After borrowing books, pressing the button allows switching to the returning state.
(1) Status Selection
(2) Borrowing State

(3) Returning State
Task 3: Implement Remote Monitoring Function
1. Program Design:
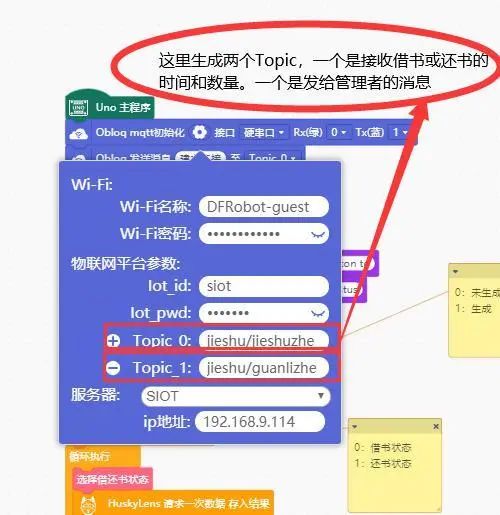
After completing the above design, we try to add the IoT module. It can record the time of borrowing and returning books. Of course, when the inventory of books is less than two, it can notify the administrator, etc. How can we implement these functions? First, for the borrowing and returning time, it is very simple because our SIoT can automatically record the time of received messages. Therefore, we just need to use the IoT module to send messages whenever borrowing or returning occurs on the web end. As for notifying the administrator, to facilitate implementation, we can set the inventory to 3 (the inventory can be set arbitrarily, but here it is set to 3 for convenience), and when it is less than 3, notify the administrator of insufficient inventory.
For the details of SIoT’s corresponding settings, please refer to the link:
https://mc.dfrobot.com.cn/thread-281129-1-1.html
2. Program Example:
3. Running Effect:
When the program runs, it needs to wait for the SIoT to connect successfully (the IoT module lights up green) before being able to switch functions using the button. When we select the borrowing state, the camera scans the tag, completing the borrowing process. The display screen shows “borrow: 1,” and the message on the web end for “jieshuzhe” shows “1 borrowed,” while the message for “guanlizhe” shows “inventory insufficient,” perfectly meeting our functional design.
When the SIoT connects successfully, a “jieshu” project is generated under the SIoT project.
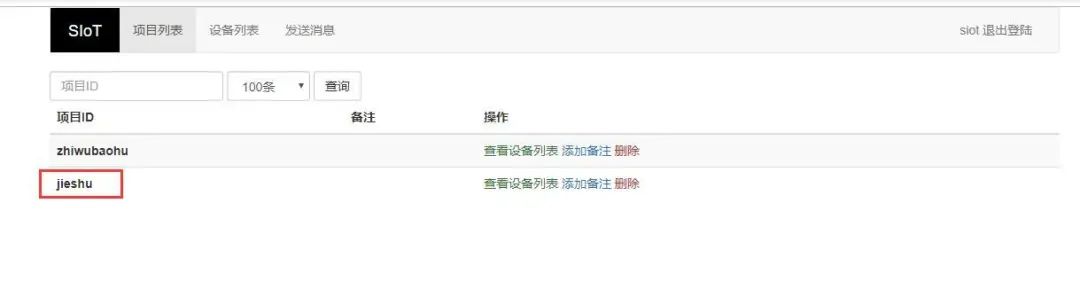
Click on the “jieshu” project and view the device list to see the two messages we sent.
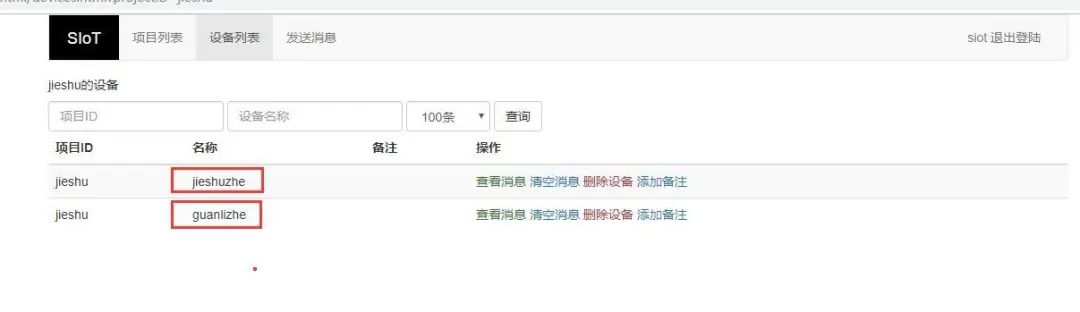
Click on “jieshuzhe” to view messages.

Click on “guanlizhe” to view messages.

Project Summary:
Through the book borrowing and returning system project, we learned about the new tag recognition function of “HUSKYLENS.” Through tag recognition, we basically achieved the two functions of borrowing and returning books (as well as displaying the dates of borrowing and returning) and can send messages to the administrator for reminders.
Knowledge Points Review:
1. Understand the working principle of tag recognition;
2. Learn the learning process of HuskyLens tag recognition;
3. Learn the relevant instructions for HuskyLens tag recognition;
4. Flexible use of variables to achieve different effects.
Project Expansion:
In this project, we only created a borrowing and returning system for one borrower. Can you add two new borrowers? After adding new borrowers, think about what other functions might be missing if this were a library management system? If you think of something, give it a try!
———————End of Text———————
The purpose of education is to cultivate students’ collaboration, communication, critical thinking, and creativity skills, with creativity being the core. Mushroom Cloud Maker Education, as one of the few one-stop maker education service providers in China, aims to cultivate children’s creativity.
To better connect the knowledge learned by students in class with the real world, Mushroom Cloud will guide schools in planning, establishing, and operating their maker spaces. Furthermore, it has differentiated the design and layout based on students’ age groups.
Elementary school maker spaces focus on fun,
emphasizing interactive scenarios;
Middle school maker spaces focus on practicality,
emphasizing learning scenarios;
High school maker spaces focus on technology,
emphasizing application scenarios;
In terms of content, Mushroom Cloud collaborates with top maker teachers in China to compile a series of textbooks suitable for domestic maker education. It also has a complete maker education curriculum system, including course content and teaching aids, course training, and technical Q&A. Similarly, the curriculum classification and design will differ based on students’ age groups.
Elementary education is conducted through gamification and experiential methods, focusing on “learning through play.”
Middle school guides students to engage in inquiry-based learning through hands-on experiences, promoting “learning by doing.”
High school learning is based on problem-solving and design, requiring teachers to create relevant real-life scenarios for students to learn through “thinking.”
Click “Read the Original Text” to learn more!