
Guest Post / Dominic Pajak and Sandeep Mistry from the Arduino Team
Arduino is on a mission to make machine learning easy for everyone. Last year, we announced that TensorFlow Lite Micro could be used in the Arduino Library Manager. This allows you to use some cool pre-made ML examples, such as voice recognition, simple machine vision, and even end-to-end gesture recognition training tutorials. For a comprehensive background, we recommend reading this article.
In this article, we will take you through a simpler end-to-end tutorial: using the TensorFlow Lite Micro library, along with the Arduino Nano 33 BLE Sense color sensor and proximity sensor to classify objects. For this, we will run a small neural network on the development board.
Running TensorFlow Lite Micro on Arduino BLE 33 Nano Sense
The idea of Tiny ML is to do more work on device with fewer resources (smaller form factor, less power consumption, and lower-cost chips). Running inference on the same development board as the sensor is beneficial for both privacy and battery life, and means that inference can be done without an internet connection.
We installed a proximity sensor on the board, which means we can read the depth of objects in front of the development board in real-time without using a camera or machine vision to determine if an object is a target.
In this tutorial, when an object is close enough, we can sample the color, with the onboard RGB sensor acting as a 1-pixel color camera. While this method has limitations, it allows us to quickly classify objects using minimal resources. Note that you can actually run a full CNN-based vision model on the device. This special Arduino development board is equipped with an onboard color sensor, so we think starting the demo this way is not only fun but also very instructive.
-
CNN-based vision modelhttp://cs231n.github.io/convolutional-networks/
We will demonstrate a simple yet complete end-to-end TinyML application that can be quickly implemented without deep ML or embedded background. The content involved includes data collection, training, and classifier deployment. What we introduce is a demo application where you can connect an external camera to improve and enhance it. We hope you can see what the tools we provide can achieve; this is just a starting point.
Prerequisites
-
Arduino BLE 33 Nano Sense -
A Micro USB cable -
A desktop device/laptop with a web browser -
Several objects of different colors
Introduction to Arduino Development Board
The Arduino BLE 33 Nano Sense development board we use is equipped with an Arm Cortex-M4 microcontroller that runs mbedOS and has multiple onboard sensors, including a digital microphone, accelerometer, gyroscope, and temperature, humidity, pressure, light, color, and proximity sensors.
While this microcontroller is very small by cloud or mobile standards, it is powerful enough to run TensorFlow Lite Micro models and classify sensor data from onboard sensors.

Setting Up the Arduino Create Web Editor
In this tutorial, we will use the Arduino Create web editor, a cloud-based Arduino development board programming tool. You will need to register for a free account to use it, then install a plugin that allows the browser to communicate with the Arduino board via USB cable.
-
Download and install the plugin -
Log in or register for a free account
-
Getting Started Guidehttps://create.arduino.cc/getting-started/plugin?page=1
(Note that you can also use the Arduino IDE desktop application; setup instructions can be found in previous tutorials)
Capturing Training Data
Now we will collect the data needed to train the model in TensorFlow. First, select a few objects of different colors. Here, we will use fruits, but you can use any other objects you like.
Setting up Arduino to collect data
Next, we will program the Arduino board using Arduino Create to run the object_color_capture.ino application, which can collect color data samples from nearby objects. The development board will send the color data in CSV log format to your desktop device via USB cable.
object_color_capture.ino application onto the Arduino board, do the following:-
Connect the development board to your laptop or PC via USB cable -
The Arduino board should connect to a Micro USB port -
Click this link to open
object_color_capture.inoin Arduino Create.
-
Linkhttps://create.arduino.cc/editor/TensorFlowExamples/ca761558-13ed-4190-baee-89ced06147c3/preview
Your browser will open the Arduino Create web application (see the GIF above) and click “OPEN IN WEB EDITOR”

-
For existing users, this button will be marked as “ADD TO MY SKETCHBOOK”
-
This operation will take a while to complete -
You will see the yellow light on the board blinking, indicating it is “accepting programming”
-
This operation will open the Monitor panel on the left side of the web application -
Now, when an object is near the top of the board, you will see CSV formatted color data here
Collect data for each object into a CSV file
We will collect some color data for each object to be classified. We will quickly collect one sample for each class; this obviously won’t train a general model, but we can still quickly validate the concept with the objects at hand!
-
Use the small white button on top to reset the development board. -
Unless you want to sample your finger, keep it away from the sensor! -
The Monitor in Arduino Create will prompt “Serial Port Unavailable” for a minute -
Then, you should see the words Red,Green,Blueappear at the top of the serial monitor -
Point the front of the development board towards the apple. -
The board will only sample when it detects an object close to the sensor and in good lighting (light on or near a window) -
Move the board back and forth over the object’s surface to capture color variations -
You will see the RGB color values displayed in comma-separated data format in the serial monitor. -
Capture samples of the object (for a few seconds) -
Copy this log data from Monitor and paste it into a text editor -
Tip: Uncheck the AUTOSCROLL checkbox at the bottom to stop the text from moving -
Save the file as apple.csv -
Use the small white button on top to reset the development board.
Repeat the above steps to collect logs for other objects and save the log information (e.g., banana.csv, orange.csv). Note: The first line of each .csv file should display as: Red,Green,Blue
If you do not see this at the top, just copy and paste it above the code line.
Training the Model
-
First, open Jupyter Notebook in Colab -
Follow the instructions in Colab -
Upload your *.csv files -
Parse and prepare the data -
Train the model using Keras -
Output the TensorFlowLite Micro model -
Download this model to run the classifier on Arduino
-
Colabhttps://colab.research.google.com/github/arduino/ArduinoTensorFlowLiteTutorials/blob/master/FruitToEmoji/FruitToEmoji.ipynb
After completing the above steps, you should have downloaded the model.h file that can run object classification on the Arduino board!
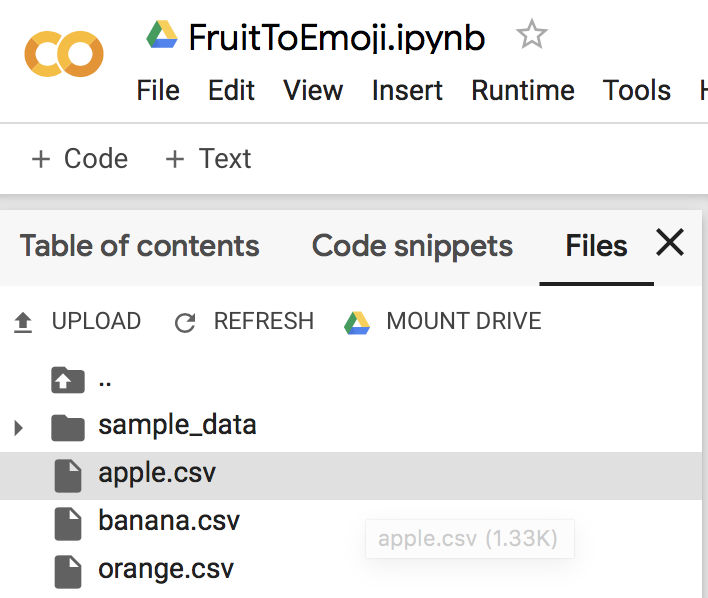
Colab will guide you to drag and drop the .csv files into the file window, as shown in the above image
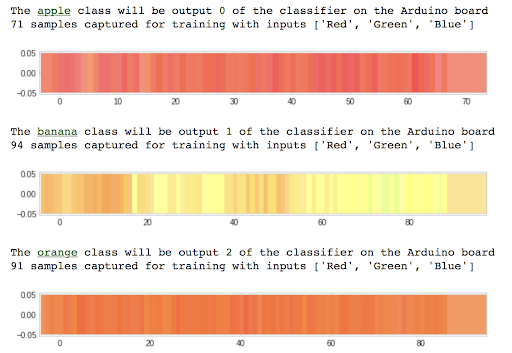
Colab will plot the standardized color samples collected from the Arduino board
Writing the TFLM Model to the Arduino Board
-
Open Classify_Object_Color.ino
-
Classify_Object_Color.ino https://create.arduino.cc/editor/TensorFlowExamples/8508c70f-5155-4e3b-b982-c5f6bd36ea5c/preview
-
Click the OPEN IN WEB EDITOR button -
Use Import File to Sketch to import the
model.hfile downloaded from Colab:
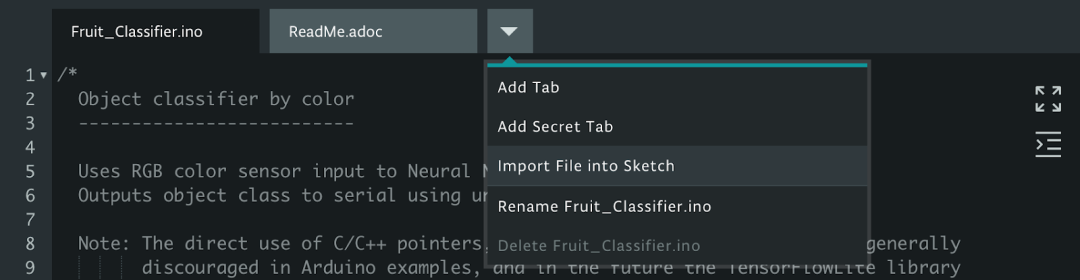
Import the model.h file downloaded from Colab

The model.h tab should look like the above
-
Compile and upload the application to the Arduino board -
This operation will take a while to complete -
Once completed, you will see the following message in the Monitor:

-
Place the Arduino RGB sensor next to the object you trained on -
You will see the classification results output in the Monitor:

Classifier output in Arduino Create Monitor
You can also edit the object_color_classifier.ino sketch to output emoji instead of names (we kept the unicode in the code comments!), you can close the web browser tab where Arduino Create is located, reset the board, and enter cat /cu/usb.modem[n] in the Mac OS X or Linux terminal to see these emojis.
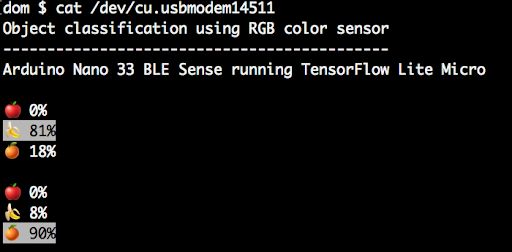
Output from Arduino serial to Linux terminal with ANSI highlighted results and unicode emojis
Conclusion
We have learned a quick end-to-end demo of machine learning running on Arduino. This framework can also be used to sample different sensors and train more complex models. For the task of classifying objects by color, we can also collect more example samples under more conditions to generalize the model.
In future research, we will explore how to run device-side CNN. Meanwhile, we hope this will be an interesting and exciting project for you. Enjoy the fun that TinyML brings!

Tap ‘Like’ to let me see your AI ❤️~