Author | Josh Mo Translator | Hezi Cola Planner | Ding Xiaoyun
Recently, Shuttle released a new Node.js CLI package that allows users to quickly bootstrap applications developed with a Next.js frontend and an Axum backend (a popular Rust web framework known for its ease of use and simple syntax).
The example we intend to build is a note-taking application with a login portal, providing features such as user registration, user login, and password reset. After logging in, users can view, create, update, and delete note content. This article will mainly focus on the Rust backend, with less emphasis on the React.js/Next.js frontend.
For the complete code repository, please refer to this link (https://github.com/joshua-mo-143/nodeshuttle-example).
Get Started Now
Run the following command to quickly start this example:
npx create-shuttle-app --ts After pressing Enter, the system will prompt us to enter a name—you can name it whatever you like, and then the system will automatically install Rust and bootstrap an application using Next.js (since we added the ts flag, TypeScript is used); the backend part uses Rust, and with the corresponding npm commands, we can quickly start the development work for both the backend and frontend. The backend framework we are using is Axum, which is a flexible, high-performance framework with simple syntax and high compatibility with tower_http (a powerful library for creating middleware).
Shuttle is a cloud development platform that simplifies the application deployment process. Its most prominent advantage is “Infrastructure as Code,” allowing everyone to define infrastructure directly through code without the need for complex consoles or external yaml.config files. This approach not only improves code clarity but also better ensures the quality of compile-time output. Need a Postgres instance? Just add the corresponding comment. Shuttle also supports secrets (as environment variables), static folders, and state persistence.
Next, we need to install sqlx-cli, a command-line tool that helps us manage database migrations. Just run the following simple command to complete the installation:
cargo install sqlx-cliNow, as long as we go to the backend directory within the project folder, we can use sqlx migrate add schema to create a database migration. This command will add a migration folder (if it does not already exist) and a new SQL file named
This SQL file contains the following content:
-- backend/migrations/<timestamp>_schema.sqlDROP TABLE IF EXISTS sessions;
CREATE TABLE IF NOT EXISTS users (    id SERIAL PRIMARY KEY,    username VARCHAR UNIQUE NOT NULL,    email VARCHAR UNIQUE NOT NULL,    password VARCHAR NOT NULL,    createdAt TIMESTAMP WITH TIME ZONE DEFAULT CURRENT_TIMESTAMP );
CREATE TABLE IF NOT EXISTS notes (    id SERIAL PRIMARY KEY,    message VARCHAR NOT NULL,    owner VARCHAR NOT NULL,    createdAt TIMESTAMP WITH TIME ZONE DEFAULT CURRENT_TIMESTAMP );
INSERT INTO notes (message, owner) VALUES ('Hello world!', 'user');
CREATE TABLE IF NOT EXISTS sessions (    id SERIAL PRIMARY KEY,    session_id VARCHAR NOT NULL UNIQUE,    user_id INT NOT NULL UNIQUE);
Migrations will run automatically. However, if you want to operate manually, you can also use sqlx migrate run –database-url
Now that the setup is complete, let’s get into the actual development!
Frontend
In this application, we need the following pages:
-
Login and registration page;
-
Page for users to reset their password when they forget it;
-
Dashboard page displaying records;
-
Page for editing and creating new records.
You can clone the frontend example from this article using the following command:
git clone https://github.com/joshua-mo-143/nodeshuttle-example-frontendThe cloned code repository contains a pre-configured src directory, as shown in the image below:
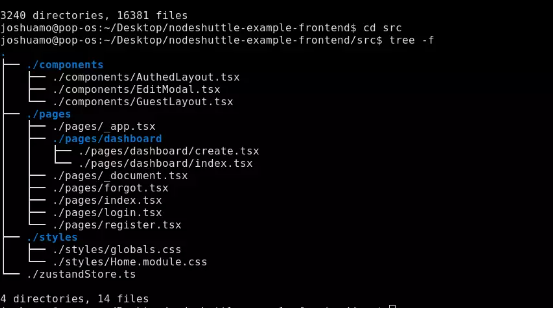
The components folder contains two layout components, and we need to nest the page components within them; there is also a modal for editing records on the dashboard index page. The Pages folder contains the relevant page components we will use in the application (the file names represent the corresponding paths).
The CSS here uses TailwindCSS, and Zustand is chosen to ensure simple basic state management without involving too many templates.
Once users log in, existing messages will be displayed as follows:
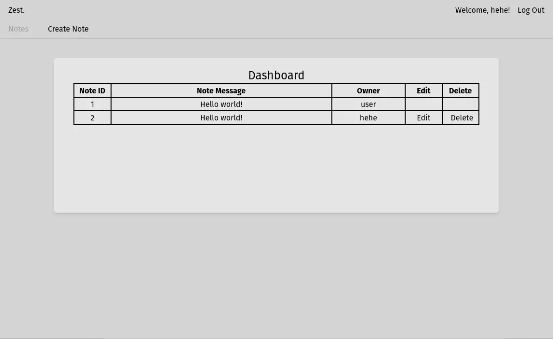
After the backend is built, users can register and log in through the frontend (using a cookie-based session authentication mechanism) and view, create, edit, and delete their messages. If users forget their password, they can reset it by entering their email.
If you are not satisfied with the frontend in the example, you can also refer to the GitHub code repository (https://github.com/joshua-mo-143/nodeshuttle-example) to understand how API calls and state management are set up.
Now that the frontend part is complete, let’s move on to the backend!
Backend
Go to the backend folder, and you will see a file named main.rs. This file contains a function that creates a basic router and returns “Hello, world!” We will use this file as the entry point for the application and then create other files that we call in the main function.
Make sure your Cargo.toml file contains the following:
# Cargo.toml[package]
name = "static-next-server"
version = "0.1.0"
edition = "2021"
publish = false
[dependencies]
# the rust framework we will be using - https://github.com/tokio-rs/axum/
axum = "0.6.1"
# extra functionality for Axum https://github.com/tokio-rs/axum/
axum-extra = { version = "0.4.2", features = ["spa", "cookie-private"] }
# encryption hashing for passwords - https://github.com/Keats/rust-bcrypt
bcrypt = "0.13.0"
# used for writing the CORS layer - https://github.com/hyperium/http
http = "0.2.9"
# send emails over SMTP - https://github.com/lettre/lettre
lettre = "0.10.3"
# random number generator (for creating a session id) - https://github.com/rust-random/rand
rand = "0.8.5"
# used to be able to deserialize structs from JSON - https://github.com/serde-rs/serde
serde = { version = "1.0.152", features = ["derive"] }
# environment variables on shuttle
shuttle-secrets = "0.12.0"
# the service wrapper for shuttle
shuttle-runtime = "0.12.0"
# allow us to use axum with shuttle
shuttle-axum = "0.12.0"
# this is what we use to get a shuttle-provisioned database
shuttle-shared-db = { version = "0.12.0", features = ["postgres"] }
# shuttle static folder support
shuttle-static-folder = "0.12.0"
# we use this to query and connect to a database - https://github.com/launchbadge/sqlx
sqlx = { version = "0.6.2", features = ["runtime-tokio-native-tls", "postgres"] }
# middleware for axum router - https://github.com/tower-rs/tower-http
tower-http = { version = "0.4.0", features = ["cors"] }
# pre-req for using shuttle runtime   tokio = "1.26.0"
# get a time variable for setting cookie max age
time = "0.3.20"
Once completed, the next step is to set up the main function so that we can use shuttle_shared_db and shuttle_secrets to obtain the shuttle-provisioned database and use secrets, as shown below (including cookie-based session storage functionality, kept simple for brevity):
// main.rs #[derive(Clone)]pub struct AppState {    postgres: PgPool,    key: Key}
impl FromRef<AppState> for Key {    fn from_ref(state: &AppState) -> Self {        state.key.clone()    }}
#[shuttle_runtime::main]async fn axum(    #[shuttle_static_folder::StaticFolder] static_folder: PathBuf,    #[shuttle_shared_db::Postgres] postgres: PgPool,    #[shuttle_secrets::Secrets] secrets: SecretStore,) -> shuttle_axum::ShuttleAxum {    sqlx::migrate!().run(&postgres).await;
    let state = AppState {        postgres,
        key: Key::generate()    };
    let router = create_router(static_folder, state);
    Ok(router.into())}
Now we can create the router! First, we need to create a router.rs file in the src folder of the backend directory. Most of our router code will be stored here, and once ready, we will import the final version of the router function into the main file.
Now open the router.rs file and create a function that will return a router capable of routing to registration and login:
// router.rs
// typed request body for logging in - Deserialize is enabled via serde so it can be extracted from JSON responses in axum#[derive(Deserialize)]pub struct LoginDetails {    username: String,    password: String,}
pub fn create_router(state: AppState, folder: PathBuf) -> Router {// create a router that will host both of our new routes once we create them    let api_router = Router::new()           .route("/register", post(register))           .route("/login", post(login))           .with_state(state);
// return a router that nests our API router in an "/api" route and merges it with our static files   Router::new()       .nest("/api", api_router)       .merge(SpaRouter::new("/", static_folder).index_file("index.html"))
}
Next, we will write the functions used in the router. Additionally, we can easily chain multiple methods together to use multiple request methods within the same route (which will be explained in detail later).
// backend/src/router.rspub async fn register(// this is the struct we implement and use in our router - we will need to import this from our main file by adding "use crate::AppState;" at the top of our app    State(state): State<AppState>,// this is the typed request body that we receive from a request - this comes from the axum::Json type    Json(newuser): Json<LoginDetails>,) -> impl IntoResponse {
// avoid storing plaintext passwords - when a user logs in, we will simply verify the hashed password against the request. This is safe to unwrap as this will basically never fail     let hashed_password = bcrypt::hash(newuser.password, 10).unwrap();
    let query = sqlx::query("INSERT INTO users (username, email, password) values ($1, $2, $3)")// the $1/$2 denotes dynamic variables in a query which will be compiled at runtime - we can bind our own variables to them like so:        .bind(newuser.username)        .bind(newuser.email)        .bind(hashed_password)        .execute(&state.postgres);
// if the request completes successfully, return CREATED status code - if not, return BAD_REQUEST    match query.await {        Ok(_) => (StatusCode::CREATED, "Account created!".to_string()).into_response(),        Err(e) => (            StatusCode::BAD_REQUEST,            format!("Something went wrong: {e}"),        )            .into_response(),    }}
Here we hash the password and set up a query using SQLx to create a new user. If successful, it returns a 201 Created status code; if not, it returns a 400 Bad Request status code to indicate an error.
Pattern matching is a very powerful error handling mechanism in Rust, providing various usage methods: we can use if let else and let else, both of which involve pattern matching, which will be explained in detail later.
// backend/src/router.rspub async fn login(    State(mut state): State<AppState>,    jar: PrivateCookieJar,    Json(login): Json<LoginDetails>,) -> Result<(PrivateCookieJar, StatusCode), StatusCode> {    let query = sqlx::query("SELECT * FROM users WHERE username = $1")        .bind(&login.username)        .fetch_optional(&state.postgres);
    match query.await {        Ok(res) => {// if bcrypt cannot verify the hash, return early with a BAD_REQUEST error            if bcrypt::verify(login.password, res.unwrap().get("password")).is_err() {                return Err(StatusCode::BAD_REQUEST);            }// generate a random session ID and add the entry to the hashmap                 let session_id = rand::random::<u64>().to_string();
                sqlx::query("INSERT INTO sessions (session_id, user_id) VALUES ($1, $2) ON CONFLICT (user_id) DO UPDATE SET session_id = EXCLUDED.session_id")                .bind(&session_id)                .bind(res.get::<i32, _>("id"))                .execute(&state.postgres)                .await                .expect("Couldn't insert session :(");

            let cookie = Cookie::build("foo", session_id)                .secure(true)                .same_site(SameSite::Strict)                .http_only(true)                .path("/")                .finish();
// propagate cookies by sending the cookie as a return type along with a status code 200            Ok((jar.add(cookie), StatusCode::OK))
        }// if the query fails, return status code 400        Err(_) => Err(StatusCode::BAD_REQUEST),    }}
As you can see, the request only accepts various JSON request bodies (since we set the request body to be of type axum::Json, it will only accept requests with a JSON request body containing “username” and “password”). This struct must implement serde::Deserialize, as we need to extract data from JSON, and the JSON request parameters will be passed as the last parameter to our routing function.
In the login request, we use a struct called PrivateCookieJar. This way, we can automatically handle HTTP cookies without explicitly setting header fields for them (to propagate changes within them, we need to set them as return types and return the changes). When users want to access protected routes, they need to retrieve values from the cookie jar and validate them against the session ID stored in the database. Since we are using a private cookie jar, any cookies stored on the client will be encrypted using the key created in our initial struct, and a new key will be generated each time the application starts.
Now that we have added the route for login, let’s see how to add the route for logout and the middleware for validating sessions:
// backend/src/router.rspub async fn logout(State(state): State<AppState>, jar: PrivateCookieJar) -> Result<PrivateCookieJar, StatusCode> {    let Some(cookie) = jar.get("foo").map(|cookie| cookie.value().to_owned()) else {        return Ok(jar)    };
    let query = sqlx::query("DELETE FROM sessions WHERE session_id = $1")        .bind(cookie)        .execute(&state.postgres);

        match query.await {        Ok(_) => Ok(jar.remove(Cookie::named("foo"))),        Err(_) => Err(StatusCode::INTERNAL_SERVER_ERROR)           }}


pub async fn validate_session<B>(    jar: PrivateCookieJar,    State(state): State<AppState>,// Request<B> and Next<B> are required types for middleware from a function in axum    request: Request<B>,    next: Next<B>,) -> (PrivateCookieJar, Response) {// attempt to get the cookie - if it can't find a cookie, return 403    let Some(cookie) = jar.get("foo").map(|cookie| cookie.value().to_owned()) else {
        println!("Couldn't find a cookie in the jar");        return (jar,(StatusCode::FORBIDDEN, "Forbidden!".to_string()).into_response())    };
// attempt to find the created session    let find_session = sqlx::query("SELECT * FROM sessions WHERE session_id = $1")                .bind(cookie)                .execute(&state.postgres)                .await;
// if the created session is OK, carry on as normal and run the route - else, return 403    match find_session {        Ok(res) => (jar, next.run(request).await),        Err(_) => (jar, (StatusCode::FORBIDDEN, "Forbidden!".to_string()).into_response())    }}
As you can see, in the logout route, we attempt to destroy the session and return the cookie deletion; as for the validation route, we attempt to retrieve the session cookie and ensure that the cookie session is valid in the database.
Next, let’s see how to create the most basic CRUD functionality for the records in the database. Here we create a struct using sqlx::FromRow, which allows us to easily extract records from the database, as shown in the following code:
// src/backend/router.rs#[derive(sqlx::FromRow, Deserialize, Serialize)]pub struct Note { id: i32, message: String, owner: String,}After that, we can directly use sqlx::query_as and classify the variable as a vector of structs to achieve the desired functionality, as shown below:
// src/backend/router.rspub async fn view_records(State(state): State<AppState>) -> Json<Vec<Note>> {    let notes: Vec<Note> = sqlx::query_as("SELECT * FROM notes ")        .fetch_all(&state.postgres)        .await.unwrap();
    Json(notes)}
Clearly, what we need to do is connect to the database through a query and ensure that the returned struct has the sqlx::FromRow derive macro. In the same way, we can easily write other routes:
// backend/src/router.rs#[derive(Deserialize)]pub struct RecordRequest {    message: String,    owner: String}
pub async fn create_record(    State(state): State<AppState>,    Json(request): Json<RecordRequest>,) -> Response {    let query = sqlx::query("INSERT INTO notes (message, owner) VALUES ($1, $2)")        .bind(request.message)        .bind(request.owner)        .execute(&state.postgres);
    match query.await {        Ok(_) => (StatusCode::CREATED, "Record created!".to_string()).into_response(),        Err(err) => (            StatusCode::BAD_REQUEST,            format!("Unable to create record: {err}"),        )            .into_response(),    }}
// note here: the "path" is simply the id URL slug, which we will define laterpub async fn edit_record(    State(state): State<AppState>,    Path(id): Path<i32>,    Json(request): Json<RecordRequest>,) -> Response {
    let query = sqlx::query("UPDATE notes SET message = $1 WHERE id = $2 AND owner = $3")        .bind(request.message)        .bind(id)        .bind(request.owner)        .execute(&state.postgres);
    match query.await {        Ok(_) => (StatusCode::OK, format!("Record {id} edited ")).into_response(),        Err(err) => (            StatusCode::BAD_REQUEST,            format!("Unable to edit message: {err}"),        )            .into_response(),    }}
pub async fn destroy_record(State(state): State<AppState>, Path(id): Path<i32>) -> Response {    let query = sqlx::query("DELETE FROM notes WHERE id = $1")        .bind(id)        .execute(&state.postgres);
    match query.await {        Ok(_) => (StatusCode::OK, "Record deleted".to_string()).into_response(),        Err(err) => (            StatusCode::BAD_REQUEST,            format!("Unable to edit message: {err}"),        )            .into_response(),    }}
Now we have created all the basic functionalities for this web application! But before merging all the routes, we have one last task. How should users reset their password? We should certainly provide a self-service password reset route, so let’s get started.
// backend/src/router.rs
pub async fn forgot_password(    State(state): State<AppState>,    Json(email_recipient): Json<String>,) -> Response {    let new_password = Alphanumeric.sample_string(&mut rand::thread_rng(), 16);
let hashed_password = bcrypt::hash(&new_password, 10).unwrap();
    sqlx::query("UPDATE users SET password = $1 WHERE email = $2")            .bind(hashed_password)            .bind(email_recipient)            .execute(&state.postgres)            .await;
    let credentials = Credentials::new(state.smtp_email, state.smtp_password);
    let message = format!("Hello!\n\n Your new password is: {new_password} \n\n Don't share this with anyone else. \n\n Kind regards, \nZest");
    let email = Message::builder()        .from("noreply <your-gmail-address-here>".parse().unwrap())        .to(format!("<{email_recipient}>").parse().unwrap())        .subject("Forgot Password")        .header(ContentType::TEXT_PLAIN)        .body(message)        .unwrap();
// build the SMTP relay with our credentials - in this case we'll be using gmail's SMTP because it's free    let mailer = SmtpTransport::relay("smtp.gmail.com")        .unwrap()        .credentials(credentials)        .build();
// this part doesn't really matter since we don't want the user to explicitly know if they've actually received an email or not for security purposes, but if we do then we can create an output based on what we return to the client    match mailer.send(&email) {        Ok(_) => (StatusCode::OK, "Sent".to_string()).into_response(),        Err(e) => (StatusCode::BAD_REQUEST, format!("Error: {e}")).into_response(),    }}
We also need to use Secrets.toml and Secrets.dev.toml files at the Cargo.toml level to add the necessary secrets. For this, we need to use the following format:
# Secrets.tomlSMTP_EMAIL="your-email-goes-here"
SMTP_PASSWORD="your-email-password-goes-here"
DOMAIN="<your-project-name-from-shuttle-toml>.shuttleapp.rs"
# You can create a Secrets.dev.toml to use secrets in a development environment - in this case, you can set domain to "127.0.0.1" and copy the other two variables as required.
Now that the application has been developed, the next step is to establish the export router for the entire application. We can simply nest the routes and attach middleware to the protected routes as follows:
// backend/src/router.rspub fn api_router(state: AppState) -> Router {// CORS is required for our app to work    let cors = CorsLayer::new()        .allow_credentials(true)        .allow_methods(vec![Method::GET, Method::POST, Method::PUT, Method::DELETE])        .allow_headers(vec![ORIGIN, AUTHORIZATION, ACCEPT])        .allow_origin(state.domain.parse::<HeaderValue>().unwrap());
// declare the records router    let notes_router = Router::new()        .route("/", get(view_records))        .route("/create", post(create_record))        .route(// you can add multiple request methods to a route like this            "/:id",       get(view_one_record).put(edit_record).delete(destroy_record),        )        .route_layer(middleware::from_fn_with_state(            state.clone(),            validate_session,        ));
// the routes in this router should be public, so no middleware is required    let auth_router = Router::new()        .route("/register", post(register))        .route("/login", post(login))        .route("/forgot", post(forgot_password))        .route("/logout", get(logout));
// return router that uses all routes from both individual routers, but add the CORS layer as well as AppState which is defined in our entrypoint function    Router::new()        .route("/health", get(health_check))        .nest("/notes", notes_router)        .nest("/auth", auth_router)        .with_state(state)        .layer(cors)}
We can simply define two routers to create an API router, each corresponding to its own route path (the router is protected and will only run the corresponding route when the session is validated), and then directly return a route with a health check, nesting our previous two routers, and finally adding CORS and application state to the router.
Our final routing function is roughly as follows:
// backend/src/router.rspub fn create_router(static_folder: PathBuf, state: AppState) -> Router {    let api_router = api_router(state);
// merge our static file assets    Router::new()        .nest("/api", api_router)        .merge(SpaRouter::new("/", static_folder).index_file("index.html"))}
Next, we will use this function to generate the router in the entry point function of the main function (main.rs) as follows:
#[derive(Clone)]pub struct AppState {    postgres: PgPool,    key: Key,    smtp_email: String,    smtp_password: String,    domain: String,}
impl FromRef<AppState> for Key {    fn from_ref(state: &AppState) -> Self {        state.key.clone()    }}
#[shuttle_runtime::main]async fn axum(    #[shuttle_static_folder::StaticFolder] static_folder: PathBuf,    #[shuttle_shared_db::Postgres] postgres: PgPool,    #[shuttle_secrets::Secrets] secrets: SecretStore,) -> shuttle_axum::ShuttleAxum {    sqlx::migrate!()        .run(&postgres)        .await        .expect("Something went wrong with migrating :(");
    let smtp_email = secrets        .get("SMTP_EMAIL")        .expect("You need to set your SMTP_EMAIL secret!");
    let smtp_password = secrets        .get("SMTP_PASSWORD")        .expect("You need to set your SMTP_PASSWORD secret!");
// we need to set this so we can put it in our CorsLayer    let domain = secrets        .get("DOMAIN")        .expect("You need to set your DOMAIN secret!");
    let state = AppState {        postgres,
        key: Key::generate(),
        smtp_email,
        smtp_password,
        domain,
    };
    let router = create_router(static_folder, state);
    Ok(router.into())   }
Note that for functions imported from files, if they are located in the same directory as mentioned earlier (use router), they need to be defined in lib.rs; if you need to import functions from one file to another non-main entry point file, the same operation must be performed.
Now the programming part is all done, and you can try the actual deployment effect!
Deployment
Thanks to Shuttle, the entire deployment process is very simple; just run npm run deploy in the root directory of the project. If there are no errors, Shuttle will start our application and return a list of deployment information and the database connection string configured by Shuttle. If you need to find this database string again, you can run the cargo shuttle status command in the backend directory of the project.
Before actual deployment, you may also need to run cargo fmt and cargo clippy in advance, as warnings or errors may occur during the build process of the web service. If you do not have these components, you can also replace them with rustup component add rustfmt and rustup component add clippy—here I strongly recommend these two tools to all Rust developers; they are definitely must-haves in your toolbox.
Conclusion
Thank you for reading this article! I hope this article can help you gain a deeper understanding of how to easily build Rust web services. Over the past few years, Rust has made significant progress and lowered the entry barrier for beginners. If you are still stuck in the old notion that Rust is “not for the faint of heart,” there is no need to worry; now is a great time to get started. I believe that Rust’s powerful features and increasingly user-friendly experience will leave a deep impression on you.
Original link:
https://joshmo.hashnode.dev/nextjs-and-rust-an-innovative-approach-to-full-stack-development
Disclaimer: This article is a translation by InfoQ and may not be reproduced without permission.
Today’s Recommended Articles
52 companies, 48 want to cut costs: Can FinOps save the “cloud exodus”?
Is frontend easy to mythologize? From high school dropout to a $1 billion startup
Will this be a disaster? PostgreSQL database with 37 years of history will undergo major architectural changes
GitHub Copilot: Creating a groundbreaking product with just 6 people